How to set up your Windows machine for easy Idle/AFK mining - Coach's EZ Guides
Estimated time to complete - 5 min.
Here's an introduction to making Windows work for you - whether this is your main mining computer or not.
Video version:
!
I. Intro
Let's say you're like me, and you get up from your personal computer a lot, or you want one of your passive mining machines to start mining without your input, or you're just plain lazy (read: efficient).
Enter Windows Task Scheduler - the easy to use, and incredibly underutilized Windows automation platform! With this, we're going to be setting up an Idle/AFK script that automatically launches our favorite miner, with all the flags we normally want. At the end of this five minute tutorial, you should have a Windows machine that automatically launches your miner every time you get up to make a meal, every time your computer resets after an update, or really just whenever you're not around.
II. The guide. The meat. The crème de la crème.
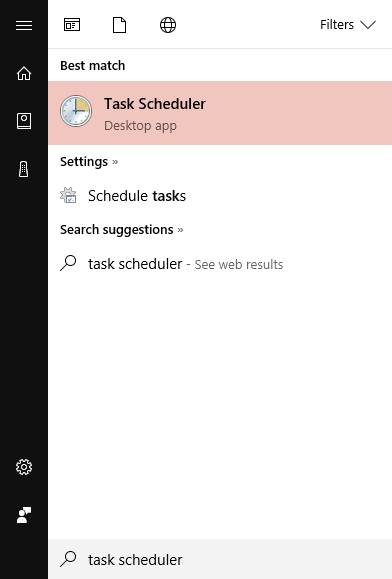
Step 1 . Open up Task Scheduler by hitting the Windows key on your keyboard, typing "task scheduler," and clicking on the program that pops up:
Step 2. In the window that opens, click on "Create Task" on the right-hand side:

Step 3. Next, you'll want to enter a name for your script, click "Run whether user is logged on or not", enter your password in the prompt that comes up and click "ok", then select Windows 10 in the "Configure for:" dropdown:

Step 4. Now, click the Triggers tab at the top of the window that's open, and click the "New" button at the bottom. In the window that opens, select "On Idle" from the dropdown, make sure that "enabled" is checked, and click "Ok":

Step 5. Click the Actions tab, click "New," select "Start a program" in the New Action window, click "Browse," find your mining program in the file selection window, and click "Open." Here, I used Claymore's Ethereum Miner program:

Step 6. Enter your mining program command line arguments into the "Arguments" box (without quotation marks, and with spaces between each argument). This replaces .bat script if your program requires one. Here's what I entered for my Claymore's Ethereum Miner argument:
-mode 1 -allpools 1 -allcoins exp -epool ubiq.hodlpool.com:8009 -ewal 0x46381765EdA4A435b45cA12fE022569402C8D90B -eworker rig1 -nofee 1
The parameters added above include my chosen Ubiq mining pool address, the wallet I want coins sent to, and some other flags to optimize for Ubiq mining on a low-end machine

Click "Ok" at the bottom of the Edit Action window when you're done.
Step 7. Move on to the Navigation tab, check the box for "Start the task only if the computer is idle for," select whatever time period you want the computer to wait to start the script (I chose 10 minutes), then choose to not wait in the "Wait for idle for" dropdown. You may also check the other boxes, depending on whether or not you want the computer to wake up to start the script, wait for an internet connection to be available, etc. My mining program successfully runs whenever I leave the computer alone with only the first box checked.

Step 7b. You may make additional tweaks in the Settings tab, if you want to do things like stop the task if it runs longer than x days, force stop the task, etc.
Step 8. Finally, click "Ok" at the bottom of the window, enter your Windows username/pass in the popup that comes up, and click "Ok" once again:

Step 9. Test, test, test! Walk away from your computer and see if your miner starts, connects, and mines! If it doesn't, go back through the above steps and make sure you filled in everything correctly, or post a comment below!

As always, feel free to upvote, follow, and leave any comments or questions you have below! <3 you folks!
