Guide: Reboot Your Mining Rig From Anywhere in The World For 5$ or Less!
Have you ever come across a situation when you're away from home and go on ethermine or similar to see your hash rates are down to 0?
Then you try to check your simple mining account or if you're a windows user remote log into your PC and find that you are unable to connect?
Well to save you mining time and effort of buying expensive hardware for the small scale miner I have created a guide on how set up a very simple ESP8266 module that allows you to remotely power on/off your pc using a cloud service called thinger.io.
ESP8266 is available in many forms but I would recommend using a nodeMCU 1.0 module which is the module I will be using in this guide.
Parts list and links will be available at the end of this guide.
First you will need to program the device.
- Download latest version of Arduino
https://www.arduino.cc/en/Main/Software
- Open the IDE after installing it
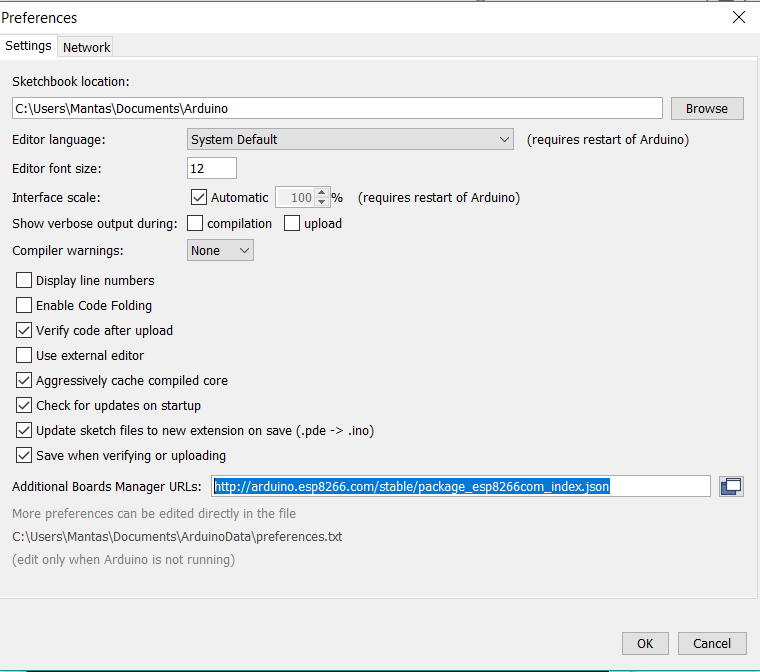
- Click File-> Preferences and paste this line in the text box for additional boards
http://arduino.esp8266.com/stable/package_esp8266com_index.json
- Now go to back to the IDE and click tools -> Board - > Boards Manager and search ESP

Install the board support package, this might take a few minutes, once the download is finished close and reopen the IDE.
Now you can connect your NodeMCU using a USB cable, if you have windows 10 navigate to the device manager in your state menu and click on the drop down menu for com ports. Note the name of your port. In my picture it is 5.

Start Arduino IDE again and select Tools-> Port -> and select your port, then again in Tools->Board->Select NodeMCU 1.0
Now you are fully setup and ready to connect your device to the cloud.
Go to https://thinger.io/ and setup a free account
Log in and now click devices

- Give your device a unique name and credentials and remember them, you will need them to link your device to the cloud
- Now Go back to the Arduino IDE and paste the following code:
#include <ESP8266WiFi.h>
#include <ThingerESP8266.h>
#define USERNAME "YourUserName"
#define DEVICE_ID "YourDeviceID"
#define DEVICE_CREDENTIAL "YourCredentials"
#define SSID "YourSSID(WIFINAME)"
#define SSID_PASSWORD "WIFIPASSWORD"
#define POWER_SWITCH D7
ThingerWifi thing(USERNAME, DEVICE_ID, DEVICE_CREDENTIAL);
int nPowerOn;
int nPowerOff;
int nReboot;
void setup() {
pinMode(BUILTIN_LED, OUTPUT);
thing["led"] << digitalPin(BUILTIN_LED);
pinMode(POWER_SWITCH, OUTPUT);
digitalWrite(POWER_SWITCH, HIGH);
Serial.begin(9600);
thing.add_wifi(SSID, SSID_PASSWORD);
// resource output example (i.e. reading a sensor value)
thing["Hours"] >> outputValue(millis() / (1000 * 60 * 60));
thing["RigCommandReboot"] << inputValue(nReboot, {
digitalWrite(POWER_SWITCH, LOW);
delay(5000);
digitalWrite(POWER_SWITCH, HIGH);
delay(10000);
digitalWrite(POWER_SWITCH, LOW);
delay(2000);
digitalWrite(POWER_SWITCH, HIGH);
});
thing["RigCommandOn"] << inputValue(nPowerOn, {
digitalWrite(POWER_SWITCH, LOW);
delay(2000);
digitalWrite(POWER_SWITCH, HIGH);
});
thing["RigCommandOff"] << inputValue(nPowerOff, {
digitalWrite(POWER_SWITCH, LOW);
delay(5000);
digitalWrite(POWER_SWITCH, HIGH);
});
// more details at http://docs.thinger.io/arduino/
}
void loop() {
thing.handle();
}
Now simply replace the information in the first few lines with the user name of your thinger account the device id and credentials followed by your wifi SSID and password.
Once you have done that just click upload icon which is indicated by a little arrow at the top left of the IDE.
Allow the code to upload and then check your thinger account again you should be able to see your device status change to online in the devices tab.

Now to create the buttons, navigate to the dashboard tab on thinger.io and then create a new dashboard, call it whatever you like.
Click on your new dashboard to enter and then select the slider on the top right corner to enter "editor" mode
Select "Add Widget" and then select "On/off state" from the drop down menu
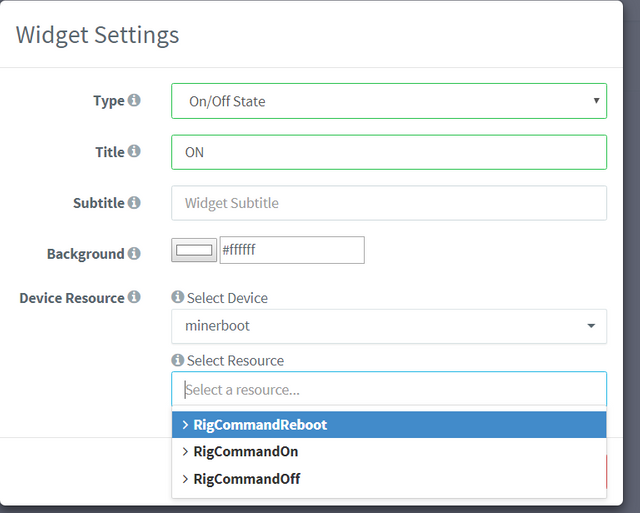
Now give the widget a name either ON/OFF/REBOOT/LED and then select your device in the drop down menu, then the next drop down menu will present you with 4 available variables. Select the variable that matches the name you gave it.

Now follow the same steps to create a button for each of the variables.
You should now have 4 buttons available on the dashboard, if you now try to toggle the LED button you should see the red light on your NodeMCU switch on and off.

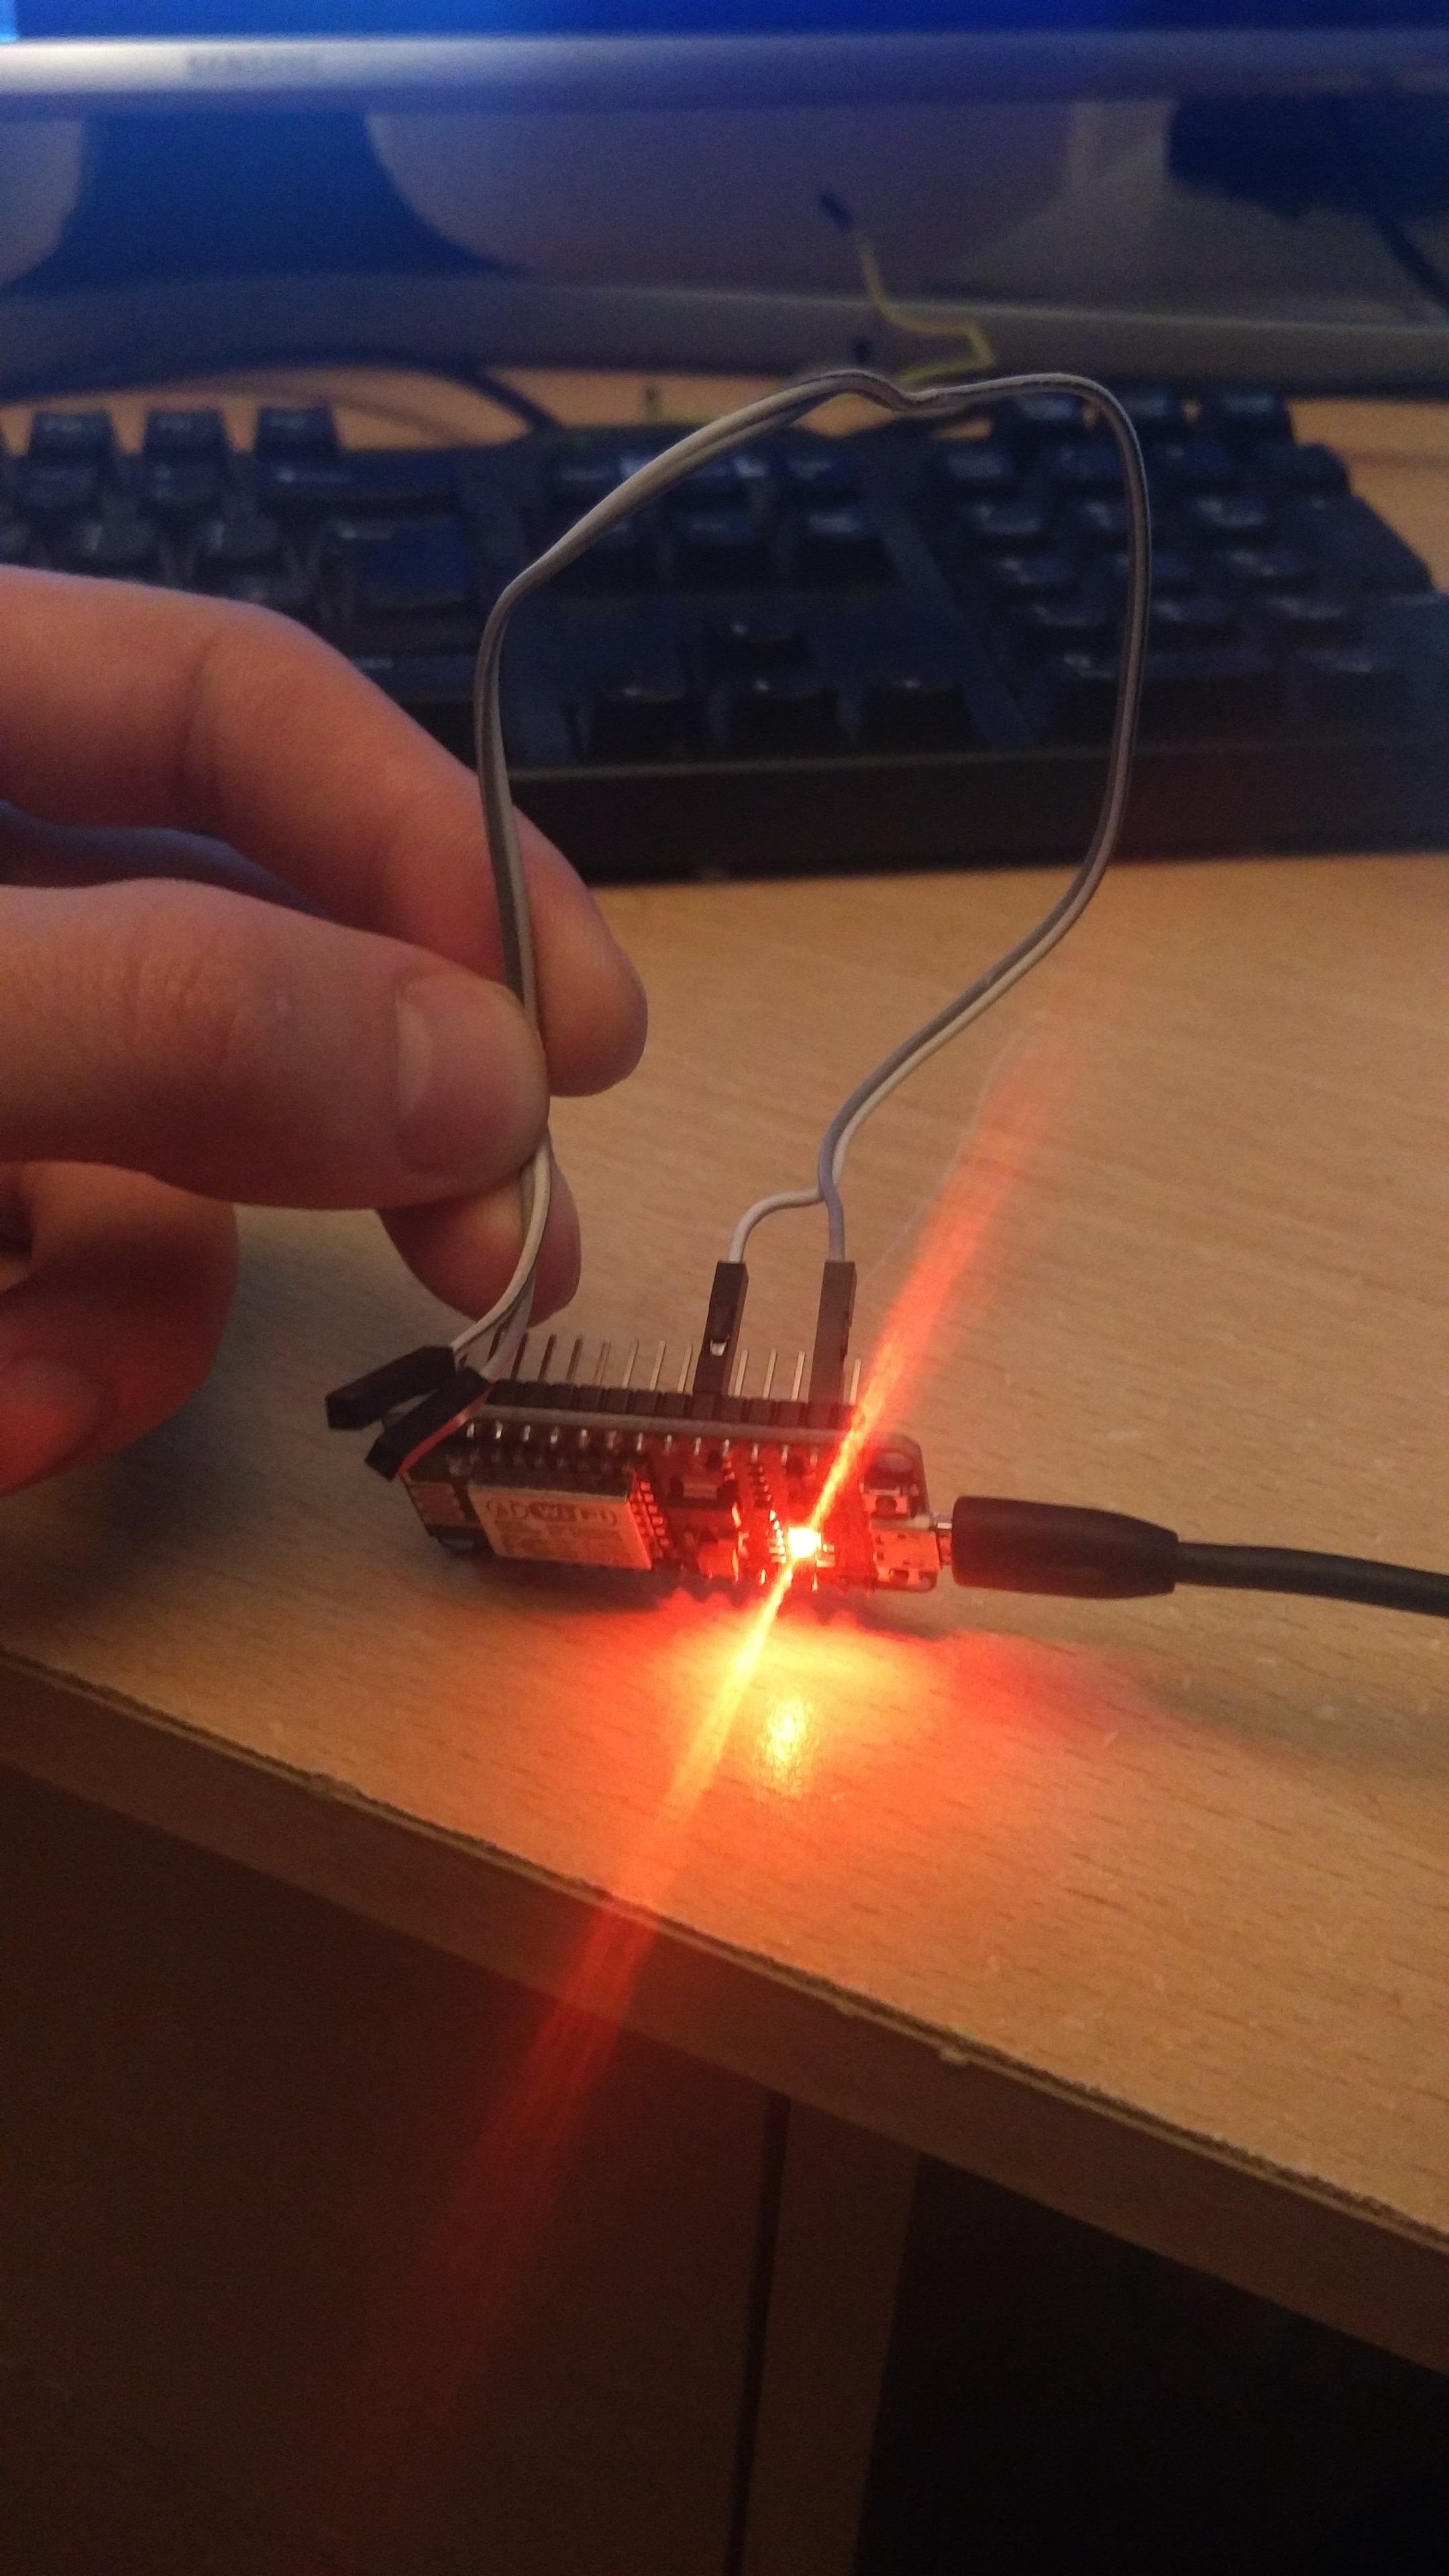
- Now to connect your NodeMCU to the PC, for this you will need 2 wires, I am using 2 female jumper wires but any wire or old switch header will work just fine. Locate the pins D3 and GND on the nodeMCU board and connect the 2 wires to the 2 pins.
- Now power down your PC and locate the power switch header on your motherboard, the header should indicate which pin is positive (+) mine said +pwrbnt below the pin. Most motherboards will have the same header and the positive pin is pin 6.

Connect the wire from pin D3 on NodeMCU to the positive pin of the power switch, and then connect the GND wire to the pin next to it (pin 8).
Now you are ready to test your power switch all you need to do is power the NodeMCU from an external power supply like a USB charger or if you have power share and your computer supports USB charging while powered down you can leave it connected to the PC.
Now to test the device power it on and go to your devices dashboard on thinger, wait for it to come online and try clicking the On button, your PC should now power on, if you allow it to boot and then press the off button, the PC should power down.
The reboot option is experimental and it executes a 5 second press followed by a 10 second delay and then another 2 second press. This should be enough to power down the machine and then power it back up again.
You can now download the thinger app on android or iOS and connect to your device and also have the ability to remotely reboot your PC using a smartphone.
This is just one example sing nodeMCU, there are other options, you can use Arduino with Ethernet shield or a Raspberry pi.
Please feel free to ask questions I will try help anyone trying this out.
PARTS LIST:
NodeMCU:
Wire:
If you found this useful please support me, I will be posting more useful material in the future.
BTC: 1FpugSbkycbhPAcsEB5ZKc3rn2bF98GDM1
ETH: 0x3a632de2669b1f5ba3f447d2a0d1fe8f0fb7eddb
DSH: Xxrgi4VFkbrJSyJW78XEMpHV2pnCujcbmH
ETC: 0x279ca5b98aa9051538ce379a540b660b45388255
LTC: LiMhUCrLVJCs5ZQrT7GWGUTtuMjVfhbCyM
ZEC: t1SLmtzHRLmUSEDxMP96weDeqq75sBQqxAr
DGE: D5YfBGJ3aZSraNMFA7Ntv8t9bHqYRkS2EW
GNT: 0x3a632de2669b1f5ba3f447d2a0d1fe8f0fb7eddb
hello i just voted you
follow me
lets help each other :)
Bienvenido a Steemit! Este Post puede tener muchos upvotes con la ayuda del King: @dineroconopcion, El cual es un Grupo de Soporte mantenido por @wilbertphysique, @yoenelmundo y 5 personas mas que quieren ayudarte a llegar hacer un Top Autor En Steemit sin tener que invertir en Steem Power.Te Gustaria Ser Parte De Este Projecto?
Welcome to Steemit! This Post can have many upvote's with the help of the King's Account: @dineroconopcion, It's a Support Group run by @wilbertphysique, @yoenelmundo, and 5 other people that want to help you be a Top Steemit Author without having to invest into Steem Power. Would You Like To Be Part of this Project?