Arduino Project #1
Arduino & PIR Lighting System

PIR Motion Sensor သံုးၿပီး လူဝင္လာရင္ မီးလင္းၿပီး၊ လႈပ္ရွားမႈမရွိတာ 20 s ၾကာရင္ မီးျပန္ပိတ္ေပးတဲ့ project ေလးပါ။
အသံုးျပဳထားတဲ့ ပစၥည္းေတြက —
(၁) Arduino Pro Mini
(၂) PIR Motion Sensor
(၃) 3 Digit 7 Segment LED
(၄) IR Receiver
(၅) 1 Channel Relay Module
(၆) Pilot LED
(၇) Push Button × 4
(၈) 220Ω Resistor × 4
(၉) 10KΩ Resistor × 4
ျဖစ္ပါတယ္။
လုပ္ေဆာင္ေပးႏိုင္တဲ့ feature ေတြကေတာ့ —
(၁) Default အေနနဲ႔ လႈပ္ရွားမႈမရွိတာ 20 s ၾကာရင္ မီးျပန္ပတ္ေပးပါတယ္။
(၂) Up Button သို႔မဟုတ္ Remote Control မွ Plus (+) ကို ႏွိပ္ၿပီး မီးဖြင့္ၾကာခ်ိန္ကို တိုးလို႔ ရပါတယ္။
(၃) Down Button သို႔မဟုတ္ Remote Control မွ Minus (-) ကို ႏွိပ္ၿပီး မီးဖြင့္ၾကာခ်ိန္ကို ေလ်ာ့လို႔ ရပါတယ္။
(၄) On/Off Button သို႔မဟုတ္ Remote Control မွ Play ကို ႏွိပ္ၿပီး PIR Motion Sensor ကို မသံုးဘဲ မီးအဖြင့္/အပိတ္ လုပ္လို႔ ရပါတယ္။ ညဦးပိုင္း မိမိတို႔ မအိပ္ခင္မွာ ဒီ feature ကို အသံုးျပဳၿပီး မီးဖြင့္ထားလို႔ ရပါတယ္။ အိပ္ေတာ့မယ္ဆိုမွ Push Button သို႔မဟုတ္ Remote Control ကို အသံုးျပဳၿပီး Motion Sensor System ကို ဖြင့္ခဲ့လို႔ ရပါတယ္။
(၅) မီးဖြင့္ၾကာခ်ိန္ အေျပာင္းအလဲကို 3 Digit 7 Segment LED နဲ႔ ျပေပးမွာ ျဖစ္ပါတယ္။
(၆) LED display ကို မလိုအပ္ဘဲ အျမဲတမ္း ပြင့္မေနေအာင္ Push Button ကို မႏွိပ္ေတာ့ဘဲ (သို႔မဟုတ္) Remote Control ကို မႏွိပ္ဘဲထားရင္ 5 s အၾကာမွာ LED display ျပန္ပိတ္သြားမွာ ျဖစ္ပါတယ္။
(၇) Push Button တစ္ခုခု (သို႔မဟုတ္) Remote Control ကို ပထမတစ္ခ်က္ ႏွိပ္လိုက္ရင္ LED display ျပန္လင္းလာပါလိမ့္မယ္။ ေနာက္တစ္ခ်က္ ႏွိပ္မွ သက္ဆိုင္ရာ command ကို လုပ္ေဆာင္မွာ ျဖစ္ပါတယ္။
(၈) လႈပ္ရွားမႈတစ္ခုခုကို Sensor မွ အာ႐ံုခံ ေတြ႕ရွိရင္ Pilot LED ခဏတာ လင္လာပါလိမ့္မယ္။ 200ms အၾကာမွာ Pilot LED ျပန္လည္ပိတ္သြားမွာ ျဖစ္ပါတယ္။
(၉) Save Button ကို ႏွိပ္ၿပီး မိမိတို႔ သတ္မွတ္ထားတဲ့ မီးဖြင့္ၾကာခ်ိန္ကို ATmega328 microprocessor ၏ EEPROM တြင္ မွတ္သားႏိုင္ပါတယ္။ ဒီလို မွတ္သားထားရင္ မီးပိတ္ၿပီး ျပန္ဖြင့္လ်င္ မိမိတို႔ မွတ္သားထားတဲ့ မီးဖြင့္ၾကာခ်ိန္အတိုင္း လုပ္ေဆာင္ေပးမွာ ျဖစ္ပါတယ္။
Arduino ကို စတင္ေလ့လာသူမ်ားအေနျဖင့္ ဒီ project မွာ —
(၁) Button debouncing
(၂) 7 Segment LED control (Library မသံုးဘဲ manual ေရးျပထားပါတယ္။)
(၃) IR decoding
(၄) Delaying without delay() function
(၅) EEPROM input/output
စတာေတြကို ေလ့လာႏိုင္ပါလိမ့္မယ္။
Arduino Project File ကို ဒီ link မွာ down ႏိုင္ပါတယ္။
https://www.mediafire.com/download/hch5su4ufprdhlm/
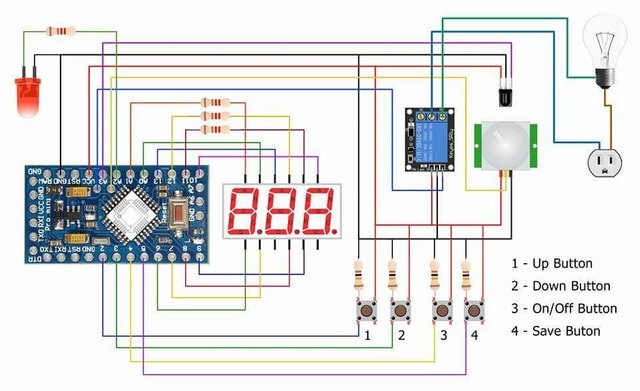

Image credit Google
good
နည္းျပ္ဦး
ဟုကြီး
tesnply bhyh
bncsyjh jg
Congratulations! This post has been upvoted from the communal account, @minnowsupport, by threemm from the Minnow Support Project. It's a witness project run by aggroed, ausbitbank, teamsteem, theprophet0, someguy123, neoxian, followbtcnews, and netuoso. The goal is to help Steemit grow by supporting Minnows. Please find us at the Peace, Abundance, and Liberty Network (PALnet) Discord Channel. It's a completely public and open space to all members of the Steemit community who voluntarily choose to be there.
If you would like to delegate to the Minnow Support Project you can do so by clicking on the following links: 50SP, 100SP, 250SP, 500SP, 1000SP, 5000SP.
Be sure to leave at least 50SP undelegated on your account.