Installing EOS (Dawn 1.1) on an Ubuntu 16.10 VM using VirtualBox
Due to popular demand, I am posting the steps I used to successfully install EOS. It tries to cover every minute step, even non-EOS related dependencies like installing Ubuntu on a VM. Hope it is helpful and any feedback appreciated.
NOTE: These instructions are only applicable for EOS Dawn 1.1. Once EOS Dawn 2.0 comes out on Dec. 4, 2017, these instructions may no longer apply to it. I will try to find time to create a new installation guide for 2.0 around that time.
Pre-Requisites:
Download Ubuntu 16.10 Server (64 bit):
http://old-releases.ubuntu.com/releases/16.10/ubuntu-16.10-server-amd64.iso
Download VirtualBox for your system:
https://www.virtualbox.org/wiki/Downloads
(For Windows) Download PuTTY (64-bit)
https://the.earth.li/~sgtatham/putty/latest/w64/putty.exe
Set up Ubuntu VM (SKIP THIS IF YOU ARE FAMILIAR WITH INSTALLING VMs):
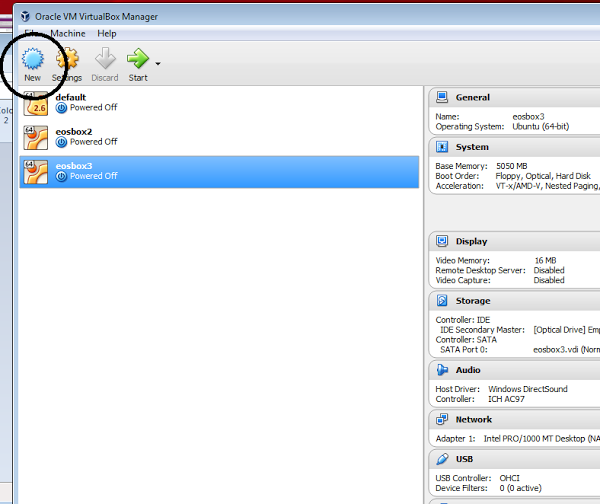
- Open VirutalBox, Click “New” button.

- Set VM details similar to below (adjust memory size as desired). NOTE: The VM can crash if it has trouble allocating memory, so make sure you don't set aside more memory than is realistically available. Also, try not to do other memory intensive tasks during the installation:

- Set VM details similar to below (adjust file size as desired). NOTE: Whatever storage size you choose, as always, make sure you actually have that much space available on your hard drive:

Start VM
When prompted, select Ubuntu ISO file you downloaded earlier:


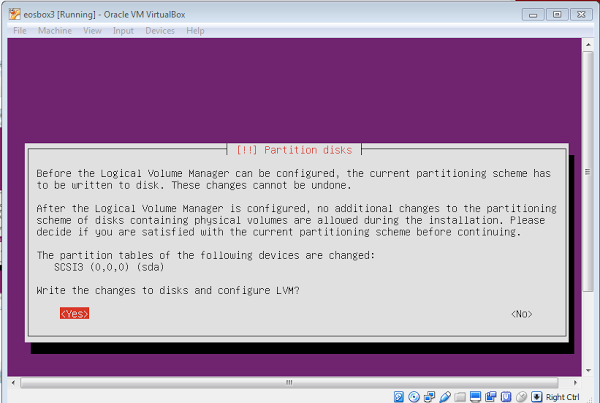
- Follow the rest of the following screens. Below is what I selected for each part as general guidance, but you may adjust as necessary (NOTE: On Windows, hit Right Ctrl key whenever you need the mouse cursor to re-appear in your Windows host system):


NOTE: Put your desired name instead.

NOTE: Set your own desired username.

Set your password for the user


Installation is done at this point. By hitting Continue, the VM will restart into the command line.
- Log into the just-rebooted console:

Setting up VirtualBox for remote SSH connections (to allow copying and pasting commands into VM console via external ssh client)
Start VM in within VirtualBox and log into console
Run the following:
sudo apt-get updateInstall openssh-server (if not already installed):
sudo apt-get install openssh-serverEdit /etc/ssh/sshd_config:
sudo nano /etc/ssh/sshd_configScroll down to the line
#PasswordAuthentication yesand remove the # symbol. Save the file (Ctrl+X, then “Y”, then Enter) and restart the ssh service by typing:
sudo service ssh restartFind the Guest IP by typing ifconfig in the console and finding the guest IP in the output (your IP may be different than the one in the screenshot below):

- Set up port forwarding on VirtualBox. You can use the address of the host, e.g. 127.0.0.1 if you are on that machine. You will need to set up port forwarding in VirtualBox, which can be found in the networking settings, Right click on VM in VirtualBox, click Setting -> Network->Advanced and you should see this. Click “Port Forwarding”:

- Set up the rule using whatever host port you want (as long as it doesn't conflict with another service on the host), and whatever your guest IP and port values are, for example:

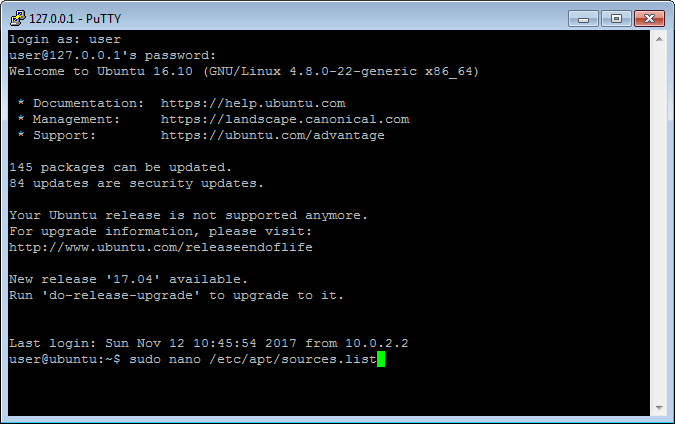
- (For Windows) You should be able to open PuTTy and log into you box from there. PuTTy will allow for copying and pasting the commands into the console. For other operation system, use Terminal or other ssh client tool.

- NOTE: (For Windows) To paste into a PuTTy terminal, highlight the command from this guide you want to copy, and then hit Ctrl+C to copy the command into the clipboard. Finally, right-click the PuTTy terminal window to paste the contents from the clipboard into the terminal.

Commands to Install EOS
- Open the following file:
sudo nano /etc/apt/sources.list
- Add the following lines to the bottom of the file:
deb http://apt.llvm.org/xenial/ llvm-toolchain-xenial-4.0 main
deb-src http://apt.llvm.org/xenial/ llvm-toolchain-xenial-4.0 main
- Run the commands below. Replace git user information with your own.
NOTE: It is recommended to run each command one at a time in order to catch the exact command where an error might show up (at least the first time, then, if it works, feel free to run the commands as a script for future installations).
NOTE 2: Running all these commands will take many hours. Many of these commands take a long time to complete.
NOTE 3: If you don't have at least 4 cores on your system, replace any occurrence of -j4 below with the number that matches your core count (such as -j1, -j2, or -j3).
NOTE 4: If the VM crashes due to low memory during the make -j4/make -j4 install steps, simply log back in, go to the same directory you originally ran the command from, and run the command again. It will continue from where it left off.
NOTE 5: If the make -j4 or make -j4 install command fails with an error, and the process was previously interrupted, delete the previously created build folder, recreate it, and run the make -j4/make -j4 install command again.
NOTE 6: If your host machine loses Internet connectivity, you will have to restart your VM after your host reconnects to the Internet because the VM will not automatically reconnect itself to the Internet.
NOTE 7: Ignore the mongodb and doxygen warnings when you run cmake on the eos build.
sudo apt-get install git
git config --global user.name "John Doe"
git config --global user.email "[email protected]"
git config --list

sudo apt-get update

wget -O - https://apt.llvm.org/llvm-snapshot.gpg.key|sudo apt-key add -

sudo apt-get install clang-4.0 lldb-4.0 cmake make \
                    libbz2-dev libssl-dev libgmp3-dev \
                    autotools-dev build-essential \
                    libbz2-dev libicu-dev python-dev \
                    autoconf libtool git

cd ~

wget -c 'https://sourceforge.net/projects/boost/files/boost/1.64.0/boost_1_64_0.tar.bz2/download' -O boost_1.64.0.tar.bz2

tar xjf boost_1.64.0.tar.bz2
cd boost_1_64_0/
echo "export BOOST_ROOT=$HOME/opt/boost_1_64_0" >> ~/.bash_profile
source ~/.bash_profile
./bootstrap.sh "--prefix=$BOOST_ROOT"
./b2 install
source ~/.bash_profile

cd ~
git clone https://github.com/cryptonomex/secp256k1-zkp.git
cd secp256k1-zkp
./autogen.sh
./configure
make
sudo make install

cd ~
git clone https://github.com/WebAssembly/binaryen.git
cd ~/binaryen
git checkout tags/1.37.14
cmake . && make

echo "export BINARYEN_ROOT=~/binaryen" >> ~/.bash_profile
source ~/.bash_profile

mkdir  ~/wasm-compiler
cd ~/wasm-compiler
git clone --depth 1 --single-branch --branch release_40 https://github.com/llvm-mirror/llvm.git
cd llvm/tools
git clone --depth 1 --single-branch --branch release_40 https://github.com/llvm-mirror/clang.git
cd ..
mkdir build
cd build

cmake -G "Unix Makefiles" -DCMAKE_INSTALL_PREFIX=.. -DLLVM_TARGETS_TO_BUILD= -DLLVM_EXPERIMENTAL_TARGETS_TO_BUILD=WebAssembly -DCMAKE_BUILD_TYPE=Release ../

make -j4 install

cd ~
git clone https://github.com/eosio/eos --recursive
mkdir -p ~/eos/build && cd ~/eos/build

echo "export WASM_LLVM_CONFIG=~/wasm-compiler/llvm/bin/llvm-config" >> ~/.bash_profile
echo "export LLVM_DIR=~/wasm-compiler/llvm/bin" >> ~/.bash_profile
source ~/.bash_profile

export CXX=/usr/bin/clang++-4.0

cmake -DCMAKE_BUILD_TYPE=Debug -DBINARYEN_BIN=~/binaryen/bin -DOPENSSL_ROOT_DIR=/usr/local/opt/openssl -DOPENSSL_LIBRARIES=/usr/local/opt/openssl/lib ..

make -j4
Verifying the EOS install was successful
- Go to eosd direcotry and try to start EOS to create some required files (NOTE: This will fail but that is expected):
cd /home/user/eos/build/programs/eosd
./eosd
- Go to config directory:
cd /home/user/eos/build/programs/eosd/data-dir
- Delete current config file:
rm config.ini
- Create new blank config file:
touch config.ini
- Open the config file for edit:
nano config.ini
- Copy and paste the below into the currently-blank file and then save the file (Ctrl+X, then “Y”, then Enter)
# Track only transactions whose scopes involve the listed accounts. Default is to track all transactions.
# filter_on_accounts =

# Limits the maximum time (in milliseconds) processing a single get_transactions call.
get-transactions-time-limit = 3

# File to read Genesis State from
 genesis-json = /home/user/eos/genesis.json

# override the initial timestamp in the Genesis State file
# genesis-timestamp =

# the location of the block log (absolute path or relative to application data dir)
block-log-dir = "blocks"

# Pairs of [BLOCK_NUM,BLOCK_ID] that should be enforced as checkpoints.
# checkpoint =

# Limits the maximum time (in milliseconds) that is allowed a transaction's code to execute from a received block.
rcvd-block-trans-execution-time = 72

# Limits the maximum time (in milliseconds) that is allowed a pushed transaction's code to execute.
trans-execution-time = 18

# Limits the maximum time (in milliseconds) that is allowed a transaction's code to execute while creating a block.
create-block-trans-execution-time = 18

# The time frame, in seconds, that the per-authorized-account-transaction-msg-rate-limit is imposed over.
per-authorized-account-transaction-msg-rate-limit-time-frame-sec = 18

# Limits the maximum rate of transaction messages that an account is allowed each per-authorized-account-transaction-msg-rate-limit-time-frame-sec.
per-authorized-account-transaction-msg-rate-limit = 1800

# The time frame, in seconds, that the per-code-account-transaction-msg-rate-limit is imposed over.
per-code-account-transaction-msg-rate-limit-time-frame-sec = 18

# Limits the maximum rate of transaction messages that an account's code is allowed each per-code-account-transaction-msg-rate-limit-time-frame-sec.
per-code-account-transaction-msg-rate-limit = 18000

# open the database in read only mode
readonly = 0

# the location of the chain shared memory files (absolute path or relative to application data dir)
shared-file-dir = "blockchain"

# Minimum size MB of database shared memory file
shared-file-size = 8192

# The local IP and port to listen for incoming http connections.
http-server-endpoint = 127.0.0.1:8888

# Specify the Access-Control-Allow-Origin to be returned on each request.
# access-control-allow-origin =

# Specify the Access-Control-Allow-Headers to be returned on each request.
# access-control-allow-headers =

# Specify if Access-Control-Allow-Credentials: true should be returned on each request.
access-control-allow-credentials = false

# The local IP address and port to listen for incoming connections.
listen-endpoint = 0.0.0.0:9876

# The IP address and port of a remote peer to sync with.
# remote-endpoint =

# Overrides the advertised listen endpointlisten ip address.
# public-endpoint =

# The name supplied to identify this node amongst the peers.
agent-name = EOS Test Agent

# True to always send full blocks, false to send block summaries
send-whole-blocks = 1

# Log level: one of 'all', 'debug', 'info', 'warn', 'error', or 'off'
log-level-net-plugin = info

# Enable block production, even if the chain is stale.
enable-stale-production = true

# Percent of producers (0-99) that must be participating in order to produce blocks
required-participation = false

# ID of producer controlled by this node (e.g. inita; may specify multiple times)
# producer-name =

# Tuple of [public_key, WIF private key] (may specify multiple times)
private-key = ["EOS6MRyAjQq8ud7hVNYcfnVPJqcVpscN5So8BhtHuGYqET5GDW5CV","5KQwrPbwdL6PhXujxW37FSSQZ1JiwsST4cqQzDeyXtP79zkvFD3"]

# Plugin(s) to enable, may be specified multiple times
# plugin =

producer-name = inita
producer-name = initb
producer-name = initc
producer-name = initd
producer-name = inite
producer-name = initf
producer-name = initg
producer-name = inith
producer-name = initi
producer-name = initj
producer-name = initk
producer-name = initl
producer-name = initm
producer-name = initn
producer-name = inito
producer-name = initp
producer-name = initq
producer-name = initr
producer-name = inits
producer-name = initt
producer-name = initu

# Load the block producer plugin, so you can produce blocks
plugin = eosio::producer_plugin
# Wallet plugin
plugin = eosio::wallet_api_plugin
# As well as API and HTTP plugins
plugin = eosio::chain_api_plugin
plugin = eosio::http_plugin
Go to the eosd directory:
cd ..
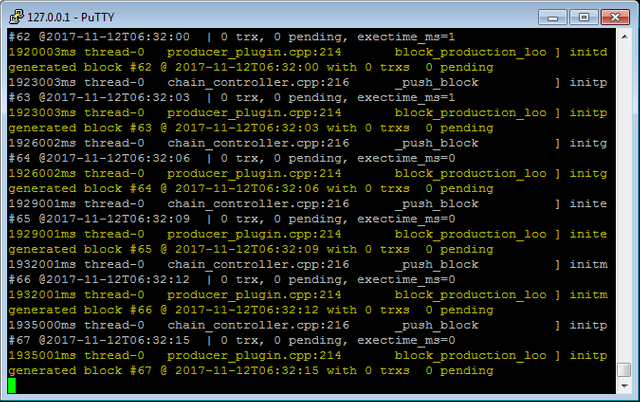
Run EOS:
./eosdEOS should be running now:

Note ALL: If you tried this earlier today and it didn't work, please try again but take note of the newly added step that says: "export CXX=/usr/bin/clang++-4.0". I didn't need to run that before but with the latest code I do. Make sure you export that environment variable, clean up the build folder and try again.
Wow! tons of info in this great post. There's thousands of people that are looking for this info. Hope you set some resteems to get this out there!
Awesome !!! THANK YOU so much !!!!
Good tutorial i will try it
Tutorials for Dawn 2.0 pleaseeeeee =)