手把手教你玩eos:卡牌游戏第六课——战斗部分
文章由EOS节点EOSWing(柚翼)首发于eoswing.io博客,内容将不定期更新,仅供学习交流之用。

0.引言
0.1教程概况
手把手教你玩eos系列教程,从最基础开始,一步一步教你学会用eos。比如发代币,开发DAPP等等。
本文是第十二篇。本篇教程主要学习卡牌游戏的战斗场景部分代码编写。
0.2 学习内容
相关准备
智能合约代码编写和部署
编写前端代码
测试代码
0.3 机器环境
cpu: 1核
内存: 8G
操作系统:CentOS 7.4 64位
服务器所在地:香港
推荐将服务器放在网络较为优质的环境,比如香港。不然会有很多配置依赖下载上的问题。
1 相关准备
1.1 课程目标
现在,我们需要计算战斗结果并扣除玩家或AI的HP。
在本课中,我们将实现解决玩家和AI之间战斗所需的智能合约功能。
战斗将由每轮打出的牌决定,使用这些功能根据牌攻击点和类型计算伤害。
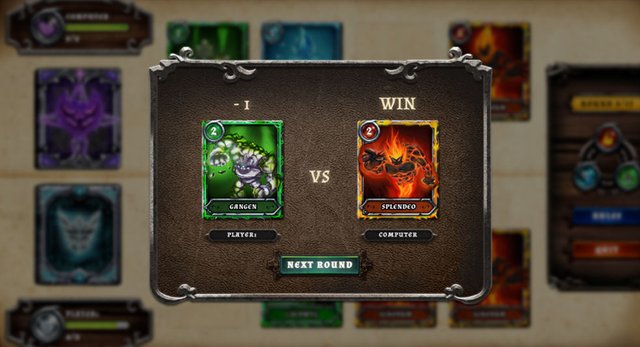
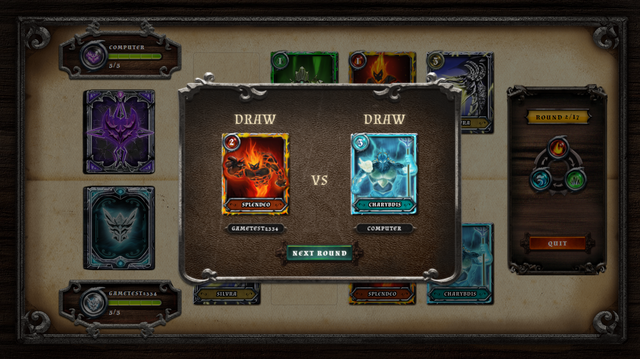
最后,我们将添加UI组件以在屏幕上显示每轮的结果。
1.2 规则讲解
元素战斗中的每张牌都由其攻击力和元素类型定义。
有5种不同的类型,包括火,木,水,中性和虚空。
火(Fire),木(wood)和水(water)是形成元素相互克制的牌。
其中,火克制木,木克制水,水克制火。当一个元素克制另一个元素时,它的攻击力增加1。

中性(Neutral)和虚空(Void)是特殊牌。
中立没有元素兼容性,所以有中立牌的一轮中没有攻击力调整。
而一张虚空牌导致这一轮没有造成伤害。
举个栗子:
玩家1出木(Wood) 攻击力2
玩家2出火(Fire) 攻击力2
因为火克制木,玩家2就获得+1攻击
这导致:
玩家1攻击力为2
玩家2攻击力为3
所以玩家2获得胜利,玩家1则输了1HP。

1.3 准备工作
进入开发环境容器
docker exec -it eosdev /bin/bash
进入后端智能合约文件夹
cd /eos-work/contracts/cardgame
2 智能合约代码编写和部署
2.1 编写合约代码
打开cardgame.hpp文件:
vi cardgame.hpp
编辑代码,添加代码如下:
int ai_choose_card(const game& game_data);
//在上面代码行后添加如下代码
//===下面为添加代码===
void resolve_selected_cards(game& game_data);
//======
打开gameplay.cpp文件:
vi gameplay.cpp
编辑代码,在cardgame::calculate_attack_point函数体中添加代码如下:
int cardgame::calculate_attack_point(const card& card1, const card& card2) {
int result = card1.attack_point;
//在上面代码行后添加如下代码
//===下面为添加代码===
//Add elemental compatibility bonus of 1
if ((card1.type == FIRE && card2.type == WOOD) ||
(card1.type == WOOD && card2.type == WATER) ||
(card1.type == WATER && card2.type == FIRE)) {
result++;
}
//======
同时,在所有代码行的最后面添加代码如下:
//在代码行的最后添加如下代码
// Resolve selected cards and update the damage dealt
void cardgame::resolve_selected_cards(game& game_data) {
const auto player_card = card_dict.at(game_data.selected_card_player);
const auto ai_card = card_dict.at(game_data.selected_card_ai);
// For type VOID, we will skip any damage calculation
if (player_card.type == VOID || ai_card.type == VOID) return;
int player_attack_point = calculate_attack_point(player_card, ai_card);
int ai_attack_point = calculate_attack_point(ai_card, player_card);
// Damage calculation
if (player_attack_point > ai_attack_point) {
// Deal damage to the AI if the AI card's attack point is higher
int diff = player_attack_point - ai_attack_point;
game_data.life_lost_ai = diff;
game_data.life_ai -= diff;
} else if (ai_attack_point > player_attack_point) {
// Deal damage to the player if the player card's attack point is higher
int diff = ai_attack_point - player_attack_point;
game_data.life_lost_player = diff;
game_data.life_player -= diff;
}
}
打开cardgame.cpp文件:
vi cardgame.cpp
编辑代码,添加代码如下:
game_data.hand_ai[ai_card_idx] = 0;
//在上面代码行后添加如下代码
//===下面为添加代码===
resolve_selected_cards(game_data);
//======
2.2 部署智能合约覆盖原合约
编译智能合约
编译wast文件
eosiocpp -o cardgame.wast cardgame.cpp
编译abi文件
eosiocpp -g cardgame.abi cardgame.cpp
解锁钱包
cleos wallet unlock -n gamewallet
部署智能合约
cleos -u https://api-kylin.eosasia.one set contract 123123gogogo /eos-work/contracts/cardgame -p 123123gogogo@active
至此,后端的合约重新部署完成。
3 编写前端代码
3.1 下载Resolution组件
cd /eos-work/frontend/src/components/Game/components/
svn checkout https://github.com/EOSIO/eosio-card-game-repo/branches/lesson-6/frontend/src/components/Game/components/Resolution
3.2 整合组件
vi index.js
更新代码如下:
import Card from './Card';
import GameInfo from './GameInfo';
import GameMat from './GameMat';
import HandCards from './HandCards';
import PlayerInfo from './PlayerInfo';
import PlayerProfile from './PlayerProfile';
import Resolution from './Resolution';
export {
Card,
GameInfo,
GameMat,
HandCards,
PlayerInfo,
PlayerProfile,
Resolution,
}
返回上一级,编辑Game.jsx
cd ..
vi Game.jsx
更新代码如下:
// React core
import React, { Component } from 'react';
import { connect } from 'react-redux';
// Game subcomponents
//此次引用Resolution组件
import { GameInfo, GameMat, PlayerProfile, Resolution } from './components';
// Services and redux action
import { UserAction } from 'actions';
import { ApiService } from 'services';
class Game extends Component {
constructor(props) {
// Inherit constructor
super(props);
// Bind functions
this.loadUser = this.loadUser.bind(this);
this.handleStartGame = this.handleStartGame.bind(this);
this.handlePlayCard = this.handlePlayCard.bind(this);
// Call loadUser before mounting the app
this.loadUser();
}
// Get latest user object from blockchain
loadUser() {
// Extract setUser of UserAction and user.name of UserReducer from redux
const { setUser, user: { name } } = this.props;
// Send request the blockchain by calling the ApiService,
// Get the user object and store the win_count, lost_count and game_data object
return ApiService.getUserByName(name).then(user => {
setUser({
win_count: user.win_count,
lost_count: user.lost_count,
game: user.game_data,
});
});
}
handleStartGame() {
// Send a request to API (blockchain) to start game
// And call loadUser again for react to render latest game status to UI
return ApiService.startGame().then(()=>{
return this.loadUser();
});
}
handlePlayCard(cardIdx) {
// Extract user.game of UserReducer from redux
const { user: { game } } = this.props;
// If it is an empty card, not going to do anything
if (game.hand_player[cardIdx] === 0) {
return;
}
// Send a request to API (blockchain) to play card with card index
// And call loadUser again for react to render latest game status to UI
return ApiService.playCard(cardIdx).then(()=>{
return this.loadUser();
});
}
render() {
// Extract data from user data of UserReducer from redux
const { user: { name, win_count, lost_count, game } } = this.props;
// Flag to indicate if the game has started or not
// By checking if the deckCard of AI is still 17 (max card)
const isGameStarted = game && game.deck_ai.length !== 17;
// If game hasn't started, display PlayerProfile
// If game has started, display GameMat, Resolution, Info screen
//此次添加调用Resolution组件
return (
<section className="Game">
{ !isGameStarted ?
<PlayerProfile
name={ name }
winCount={ win_count }
lostCount={ lost_count }
onStartGame={ this.handleStartGame }
/>
:
4 测试代码
cd /eos-work/frontend
npm start
在浏览器中输入网址测试。
此次,我没有清空上节课程的账号缓存,所以输入网址后直接跳转到对战界面。

5 后记
延伸阅读
在本文的学习中如果遇到问题,欢迎留言或者在如下链接寻找解决方案:
EOS官方游戏开发第五课: https://battles.eos.io/tutorial/lesson5/chapter1
如果觉得这一系列教程有点意思,请投票给柚翼节点(eoswingdotio)。您的投票是本教程持续更新的动力源泉,谢谢。