Ultimate Guide: Buying EOS From EOS.IO & Registering Your Wallet With Metamask
I recommend you read and reread the steps before performing them as listed. It is your money and being familiar with the process entirely prior to doing any of these steps will give you peace of mind and prevent mistakes. This guide should be used at your discretion and I am not responsible for any errors or issues that may arise. If you like the write-up and are feeling charitable you can send me some of your goods but please, I enjoyed this and want EOS to succeed so a like or good vibe works too :)
ETH, OMG, EOS, and really any ERC20 token address: 0x5c7fC392b343CE2886BC6E3ffaaf5E6C7cF79c09
Before I begin here is a brief outline of what I intend to cover:
⦁ Accessing the Distribution
⦁ Getting Metamask
⦁ Sending Ether to Metamask
⦁ Opening the EOS Token Distribution
⦁ How the distribution period works and Sending Ether to the distribution
⦁ Claiming Your Tokens
⦁ Registering Metamask
⦁ Sending Your Tokens to a Supported Wallet
⦁ Registering Exodus
Accessing the Distribution
Simply, type eos.io into your search browser. This will direct you to their page like so:

Next you want to scroll down to find the “Get EOS” button which is what will direct you to the instructions and distribution. It looks like this:

You are going to want to click that which will bring up a simple menu about the terms of service and such. Select all the boxes, click “Continue” and it will bring you here:

Now we scroll down a little to find this section which I will cover in the next section/s:

DO NOT UNDERESTIMATE THE INSTRUCTIONS! This page can answer many of the questions some of you may have who are not following my method. There is also a telegram chat I will post at the end of the write-up where you can get involved with the community and ask questions.
Getting Metamask
To reiterate from the website, the instructions recommend using Chrome with Metamask to buy from their distribution interface which is what I will be covering in this write up. Metamask is supported on Opera, Firefox, and Brave. I have not used them, but I would like to assume they work the same (someone correct me in the comments if this is not true.)
Conveniently, the button under Metamask directs you to their website to download the plugin (I would open it in a new tab so you can go back to the instructions, we will need it later). The page looks like so:

I am using Chrome so I would click “Get Chrome Extension” and this is just like any other plugin. For other browsers, if it does not replace the main heading with your browser, simply select the tabs beneath for Firefox or Opera.
Once downloaded, you are going to need to make an actual account like any conventional crypto wallet. Select the icon that should now appear on your toolbar:

And it should open a page similar to this (I already have an account so it will prompt you to make one):

Once you have an account, the rest is also pretty easy to do. Like any wallet, you have an address for ether to send both ether and ERC20 tokens to. This is the basic interface you should see:

Sending Ether to Metamask
As you can see, you have some buttons to buy/send. Buy directs you to Coinbase or Shapeshift so you can get some ether.
IMPORTANT: to buy from the ICO you need ether to send. Think of it like a trade, you must trade ether for EOS. If you want to trade fiat currency or other cryptocurrency, you must use an exchange that supports it like Binance.
Now, after you have some ether, either in a wallet you currently have or in an exchange, the process is the same: you are going to send it to Metamask by clicking those 3 little dots in the top right:
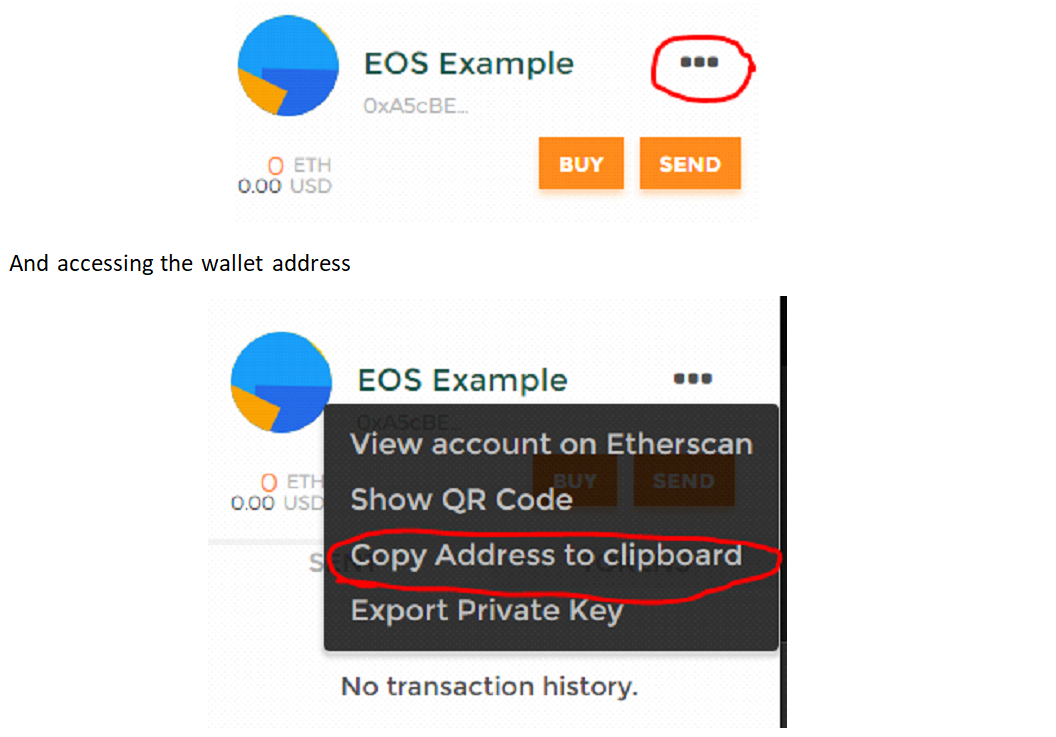
You won’t see anything when you click this, maybe a small notification that you have copied something, but rest assured, ctrl + v or left click + paste will deposit this address into your interface for sending your ether.
After you have sent your ether, you can check Metamask and see if it deposited:

You can see I am poor and only have 3.7 dollars in my account, but aside from that you now have your wallet set up with ether and can buy EOS on the token distribution!
Opening the EOS Token Distribution
Let’s revisit the part where we got directed to Metamask:

Make sure you are logged into Metamask and click “EOS TOKEN DISTRIBUTION”. It will take you to this page:

As I am sure you guys have guessed, we want to select “Get EOS Tokens” in the top left of that 4 button area. Once we hit that we should get this:

So, let me explain a few things before we continue to actually sending our ether. This exchange works based on contribution percentages. To elaborate, every day, for one year since the ICO launched, 2 million EOS are released. People from all over send their ether to the distribution during a period of their choice (minus the ones that have expired, of course) and will get tokens returned to them based on what percentage they contributed.
For example, if today only two people contributed to the exchange, person A sends 1 ether and person B sends 1 ether, they both collect 1 million EOS each. The Next day, a new person joins, person A sends one ether, person B sends one, and person C sends two. Person C will collect 50%, so 1 million EOS but persons A and B, despite contributing the same amount as yesterday, will only receive 500,000 EOS each or 25% as per the total amount of ether contributed. If you are confused, I apologize, but fortunately the page with the instructions I emphasized earlier has a simple example above with worked out math to help.
How the Distribution Period Works and Sending Ether to the Distribution
Now the part we are all waiting for. Simply type in how much ether you want to contribute in the box as shown:

Click Send ETH, and the following Metamask window will pop up (be patient as it can take time):

So, if it tells you to buy ether like I did, do not panic. You simply either need to adjust the gas price to lower it or send less ether. YOU ALWAYS NEED SOME ETHER TO MAKE A TRANSACTION. Note: Changing gas prices or limits lower the priority of your transaction so it may take longer or simply fail. You should not lose anything so don’t be afraid to cancel transactions and try again with higher gas prices or limits.
Once its all set up how you want, click submit (it is typically where it says “buy ether” on my image) and, assuming the transaction goes through, you will be able to claim your ether at the end of the period.
Claiming Your Tokens
So after the period has ended, you can claim your tokens. Right below the button to “Get EOS” simply hit “Claim” and this menu should show up:

It tells you how much ether you contributed, how much total was contributed, and how many tokens you own. Hitting that final claim button brings up another Metamask window. Follow the instructions in the gray box to the left, make sure you have enough ether to pay for gas, and you are good to go. (You can lower gas prices comfortably now since these transactions are low priority anyways just don’t lower too much or it could fail)
Once the tokens have been claimed, you can add the token to Metamask so you can see it in your wallet. Go to the “Tokens” tab and click “add token”

It should show this window:

This is the address you want:
EOS (EOS): 0x86fa049857e0209aa7d9e616f7eb3b3b78ecfdb0
You can also click that question mark and it will redirect you to a page with common token addresses (We want the address for EOS).
It will bring you to this page and all you do is copy that address I pointed to:

Just paste that boy in here, don’t change anything else, and click add. It will show up like so:

Note: If you have claimed EOS, don’t freak out if you don’t see anything yet, like I said the network can be slow at times and some transactions can fail. Just be patient or try again later with a higher gas price/limit.
Now that you have it you can do a couple things here: Either send it to a supported wallet (list is on the ICO website) or you can keep it in Metamask and register Metamask. If you are sending it somewhere, skip to the next section, I will briefly describe the process for registering Metamask here.
Registering MetaMask
Metamask Users ONLY: On the distribution page we have been using, click the “Register” button and another Metamask window will pop up:

KEEP THESE KEYS
They are important. Anyone with the private key has your funds so keep it on lock. Once you have it saved and paste it into that confirmation and clicked that you have backed it up, a new Metamask window will pop up with the same interface you have seen. Make sure you have that gas money and click “Submit” once it goes through, you are done and can chill until June 1st when the network transitions. You only need to register any wallet you use once so feel free to buy more tokens.
Sending Your Tokens to a Supported Wallet
So this part is a bit tricky but not really. Go to https://www.myetherwallet.com/ , agree to all the popups and read them for your benefit, and then select the following:
“Send Ether and Tokens” >> Metamask/Mist

Click “Connect to Metamask”
It will bring you to this menu:

Before we dabble with the scrabble, we need to add EOS to the token list so we can send it. In the right under “Account address”, you should see a separate window for tokens, select “show all tokens” and load EOS.

When you click it, it will tell you it is loading and then should show you how many EOS tokens are in your Metamask. Then select the dropdown and choose EOS:

Paste in the address of the wallet you are going to send it to and, for convenience, send entire balance:

Click “Generate Transaction” then “Send Transaction”. It will open up a confirmation window, double check everything: the receiving address, amount, gas limit, your retirement portfolio, the kitchen oven, etc.. Once comfortable the house isn’t going up in smoke, confirm the transaction and a classic Metamask window will popup to truly finalize the transaction. Click submit and wait for those bad boys to deposit. A little green bar on MyEtherWallet will show up at the bottom of the page detailing the transaction confirmation a bit and letting you know how you can track it (every transaction done in Metamask can be clicked on and looked at in etherscan) and you just wait now. You're done!
Registering Exodus
Here is a good write-up from exodus themselves on registration that I followed and recommend you do as well: http://support.exodus.io/article/65-i-ve-received-eos-tokens-in-exodus-how-do-i-register-them
Telegram chat:
https://t.me/EOSproject
really excellent sharing..
This just blew my mind eos makes way more sense now thanks sooo much!
Great write up! However residents of the US and China won't be allowed to participate using the eos.io website, unless you're using a VPN, wink, wink. You can of course contribute to the crowdsale, claim, and register your tokens using MEW and interacting with the smart contract's functions directly.