Solar/Joule Theif Setup
This is my version of the joule theif idea I originally found on laserhacker.com Really, its all over the internet though. Pretty simple to recreate.
Here, I have a deep cycle battery, tied to a solar panel by a 30 Amp charge controller.
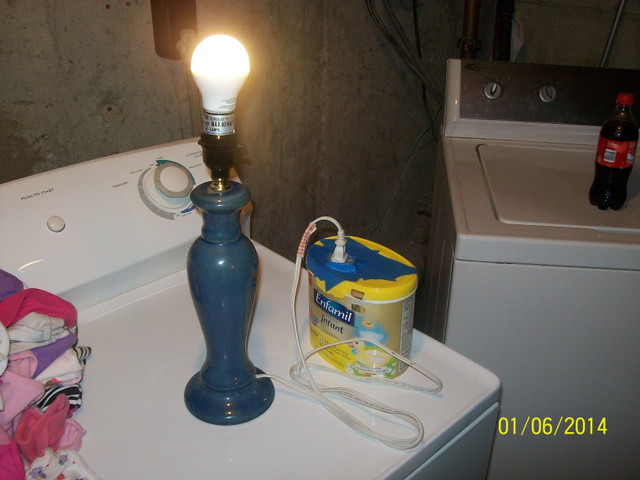
Now, I've built the joule theif into the lid of the box, complete with its own outlet and voltage meter. The joule theif will only work with LED bulbs. But, I also do have a small inverter hooked directly to the charge controller, so that it can shut off the inverter should the voltage get too low. I plan on building a separate low voltage shut off circuit, and incorporating the inverter into the box with its own outlet.
This thing is able to run up to ten LED bulbs on one unit! There is a phenomena where the more bulbs you add, the more efficiently they run. You do lose some light output, but not much. These units are perfect for sheds, or off grid outfits.
I really hope you like it, and will consider making one of your own! Any questions, feel free to contact me in the comments. I will gladly help out anyone trying to recreate this. Good luck, my first one was quite difficult!
I don't understand the objectif of the joule thief and how it works.
The way I understand this, is that it works by pulling every last joule of energy out of a battery. But beyond that, it runs more efficiently, depending on the amount of of turns in your coils, as you can adjust for efficiency or brightness. Another factor is how many bulbs you have hooked up, as it seems the more, the better. If you are interested, I would not worry about trying to understand how it works. We can both figure that out later :)
Here's a link to a great video
This is a slightly different version.
If you need help with the schematic, just let me know. All it is, is a blocking diode, transistor, 11 to one coil ratio I believe, think I did 11/111 turns of magnet wire (2 separate coils) and you just want to be sure to add a ferrite, to block radio signals from being emitted. I guess some have had government agents show up about it! Only because that individual lived close to an airport. But the signals can interfere with your other electronics, so it's important. Also runs much more efficiently with the ferrite. To make the coils, I simply wrapped magnet wire around a 2 liter bottle, the desired amount of times. I cut into the bottle first, to ease the removal of the complete coil. 2n3055 is the transistor I used.
Do you have any figures to show how much more efficient it makes things? Im interested in trying to make one from your design.
I don't have figures, sorry. But I can hook a 9volt battery up to this setup, with 5 or so LED light bulbs, and it always seemed to last about 8 to 10 hours, if that helps. To me, that is pretty good. You will not find this kind of efficiency with power inverters, and I have yet to see it in even bulbs made for 12volts. Laserhacker.com and his YouTube can explain it much better than I. I need to rewrite the diagram, when I was making this, I didn't have others being able to understand it in mind. I will hopefully do this today at some point, and add to the article and reply here. Thank you for your interest!
Thanks. Ill look further. If you do redo your diagram. Pleasepost it. Ike that youve done it with repurposed materisls.
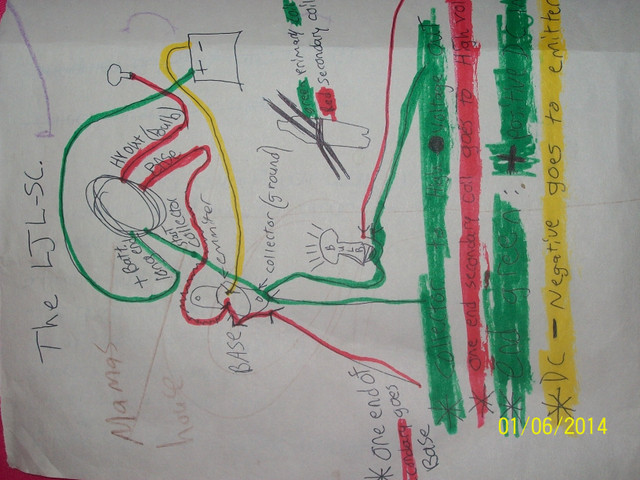
Its still a bit confusing, this is another one I found that I had already made. Between the two, and laserhacker.com or youtube, you should be able to figure it out. Any questions, just ask! :)
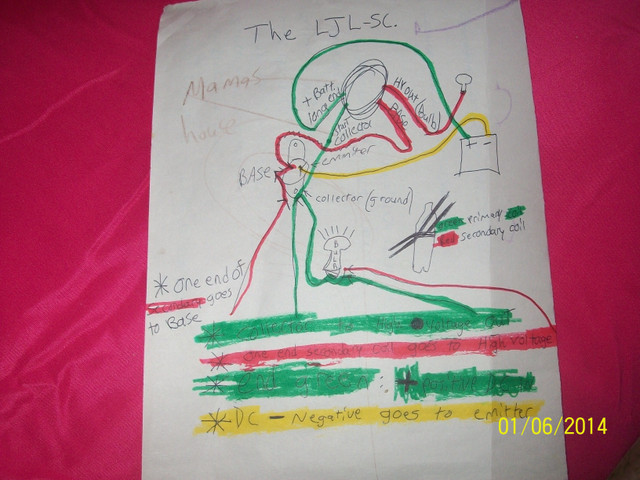
It seems I forgot the blocking diode on the transistor, between base and emitter in the diagram. Don't make the same mistake, in real life!
О! I'll show this to my son. He likes it
Man that is so cool! i love how you repurposed all that stuff! Keep up the good work. Great Post. I am going to resteem it for you. Everybody needs to see that there is more than one way to light up a light bulb.
Thank you, I can be pretty crafty. I only had to buy the transistor, and magnet wire, which even that could be salvaged from junk electronics. I took the ferrite from a old keyboard cord. Had diodes from building solar panels. This project absolutely is a winner. It took me a while to get it, but once I did, I was cranking them out for friends in under a hour.
Your Post Has Been Featured on @Resteemable!
Feature any Steemit post using resteemit.com!
How It Works:
1. Take Any Steemit URL
2. Erase
https://3. Type
reGet Featured Instantly – Featured Posts are voted every 2.4hrs
Join the Curation Team Here
@originalworks