Blind 16Bit C-Development with FreeDos, OpenWatcom and qemu (Step 2)
Graphic-Modes / Grafikmodi
The following chart shows roughly the different graphic-modes which can be set up with INT 0x10. Also their features and required hardware. The standard-mode while/after booting the system is 80x25 textmode with 16 colors. The interesting modes (for me) are marked green. At first i want to have a look at mode 0x04. A good reference for INT 0x10 is this website.
In der folgenden Tabelle sind grob die verschiedenen Grafikmodi die mit INT 0x10 zu erreichen sind, deren Features und benötigte Hardware aufgelistet. Standardmäßig bootet das System in den 80x25 Textmodus mit 16 Farben. Interessant für mich sind die grün markierten. Erstmal will ich mir den Modus 0x04 anschauen. Eine gute Referenz für INT 0x10 ist diese Website.

To make the following reusable fot the future, i create the files myvideo.h and myvideo.c. There i can create some functions for general graphicstuff. For example the change of the graphic-mode.
Damit das ganze für die Zukunft wiederverwendbar ist, erstelle ich mir die Dateien myvideo.h und myvideo.c. Darin kann ich mir Funktionen zusammenbasteln die für Grafik allgemein verwendbar sind. Z.B. in dem Fall den Wechsel des Modus.
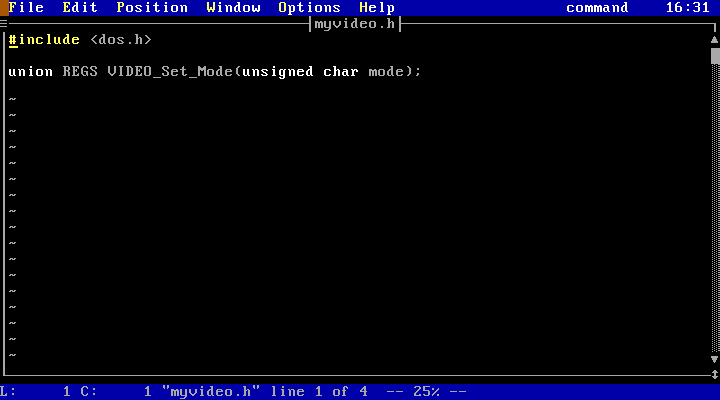
To make a mode-change we have to set the register AH = 0x00 and AL is the wanted mode. For integrity i return the registers. I don‘t know yet if i need this later.
Einen Moduswechsel kündigen wir mit dem Register AH = 0x00 an, und in AL steht dann der gewünschte Modus. Zur Vollständigkeit gebe ich die Register zurück, ob das jemals gebraucht wird weiß ich noch nicht.

To test my function i try to set 40x25 (16 colors) textmode. The text should then be twice as wide as before. OpenWatcom have to compile and link myvideo.c/h too: wcl hellocga.c my*.c
(The Wildcard makes, that all files which start witch my and end with .c are added. There will be more files later.)
Um das ganze zu testen versuche ich einfach mal in den 40x25 (16 Farben) Modus zu schalten. Als Ergebnis sollte der Text dann doppelt so breit sein. Damit OpenWatcom auch die myvideo.c/h mit kompiliert und linkt: wcl hellocga.c my*.c
(Durch die Wildcard sucht er sich alle datei die mit my beginnen und mit .c enden. Das werden später noch mehr.)

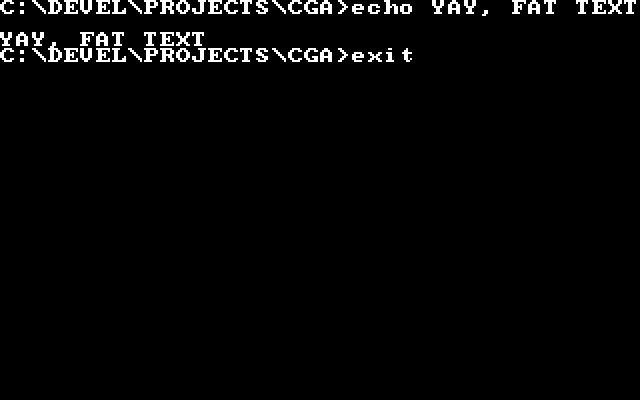
… this works very good! Let‘s hope the editor will switch back or can handle this!
… was auch wunderbart funktioniert. Hoffentlich schaltet der Editor wieder zurück, oder kommt damit zurecht!

Sh*t. Crtl+Alt+Del :/
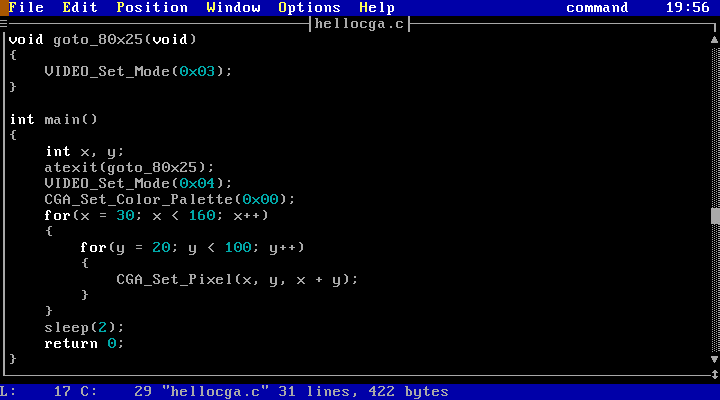
Okay, the program must switch back to the „normal“-textmode at the end. A good solution is the atexit-function (stdlib.h). To make some progress the program should this time directly into the 320x200x4-mode and put some random pixels. The graphics-memory is at the address 0xB800 in the segment 0x0000. We need a Far-Pointer to get there. Then the program should just write 1024 bytes into memory. This are 4096 pixels (1 Byte = 4 Pixel. More about that later.) This step really annoyed me. I didn‘t know, that in C89 all variables MUST be declared at the beginning of a block. I declared x after VIDEO_Set_Mode and got some very cryptic error-messages.
Mist. Strg+Alt+Entf :/
Okay, das Programm muss beim beenden also unbedingt wieder in den „normalen“ Textmodus zurückschalten. Dazu bietet sich die atexit-funktion (stdlib.h) an. Um etwas voranzukommen soll das Programm diesmal direkt in den 320x200x4-Modus schalten, und ein paar Pixel mit irgendwelchen Werten füllen. Der Grafikspeicher in diesem CGA-Modus liegt an der Adresse 0xB800 im Segment 0x0000. Dahin kommen wir mit einem Far-Zeiger. Danach einfach 1024 Bytes in den Speicher packen, das sind also 4096 Pixel. (1 Byte = 4 Pixel. Dazu später mehr.) Dieser Schritt hat mir einiges an Kopfzerbrechen bereitet. Ich wusste nicht, das in der C89-Variente alle Variablen am Anfang eines Blocks stehen MÜSSEN. Ich hatte x aber erst nach VIDEO_Set_Mode deklariert und furchtbar kryptische Fehlermeldungen beim kompilieren bekommen.

CGA-Palettes / CGA-Paletten

Hurray, we got some pixels! Ugly but i works. But why are the colors so badly choosen? Unfortunatly the CGA-Palettes are predefined. Only the background-color (black) can be set. At least there are 2 palettes. They can be set bright or dark.
Hurra, wir haben Pixel! Hässlich aber immerhin. Nur was sollen die unglücklich gewählten Farben? Leider ist die Palette von CGA vordefiniert und nur die Hintergrundfarbe kann gewählt werden (Schwarz). Immerhin gibt es 2 Paletten, und von diesen jeweils eine helle und eine dunkle Version:

There is a third hidden palette. But the third isn‘t compatible with some hardware, so i don‘t want to use it. Looks like palette 1 is the default. Lets see if this can be changed without problems. For CGA-functions i create the files mycga.h and mycga.c.
Es gibt auch noch eine dritte etwas versteckte Palette. Diese ist aber nicht mit jeder Hardware kompatibel, also gehe ich auf diese jetzt nicht ein. Es sieht so aus, als ob er standardmäßig Palette 1 wählt. Mal sehen ob sich das einfach wechseln lässt. Für CGA-Funktionen erstelle ich mir gleich noch eine mycga.h und mycga.c.


With the registers AH = 0x0B and BH = 0x01 we tell the CGA-hardware to change the palette. The last bit from BL defines the palette. I don‘t know if the other bits are doing something, so i set them with & 0x01 to 0 by default.
Mit dem Register AH = 0x0B und BH = 0x01 sagen wir der CGA-Hardware, dass wir die Palette ändern wollen. Im letzten Bit von BL wir dann die Palette definiert. Ich weiß nicht ob die anderen Bits noch irgendwas machen, also setze ich die einfach mit einem & 0x01 einfach grundsätzlich auf 0.

Looks a bit better, but why is every second line still black? The CGA-hardware wants all even lines at 0xB800 and the odd lines at 0xBA000.
Das sieht jetzt immerhin schon etwas angenehmer aus, aber warum ist nur jede zweite Zeile mit pixeln versehen? Hardwarebedingt liegen alle geraden Zeilen an 0xB800 und alle ungeraden an 0xBA00.
Setting Single Pixels / Einzelne Pixel setzen
At first we have to check in which line the pixel is. Then the exact entry (byte) has to be calculated and then set the required bits.
A pixel has 2 bits:
00Background (Black)01Green / Cyan10Red / Magenta11Yellow / White
I someone is interested in the calculation, i can create an extra Post with an explanation. (Please comment)
Es muss also überprüft werden in welcher Zeile ein Pixel ist, der gesetzt werden soll. Dann muss noch der Eintrag (Byte) berechnet werden und die nötigen Bits gesetzt werden.
Ein Pixel hat 2 Bit:
00Hintergrund (Schwarz)01Grün / Cyan10Rot / Magenta11Gelb / Weiss
Sollte hier Interesse bestehen kann ich die Berechnung gern nochmal in einem extra Beitrag erklären. (Bitte ein Kommentar)

After adding the function to the header-file, i‘m really curious if this works! (this took me some time...)
Nachdem ich die Funktion natürlich noch in der Header-Datei eingetragen habe bin ich gespannt ob meine Funktion auch funktioniert! (Ich habe etliche Anläufe gebraucht...)
This should show a colorful block.
Das sollte einen bunten Block anzeigen.

This looks good! If i could manage to write a „Hello World“ to the screen, i would be happy for now.
Das sieht doch schon gut aus! Wenn ich jetzt noch ein „Hello World“ auf den Bildschirm bekomme bin ich erstmal zufrieden.
Showing an Image / Ein Bild anzeigen
I don‘t want to set every single pixel by it‘s own and i don‘t have a function to write text (yet). So i created a simple file with a hex-editor which looks like the graphics-memory. So 1 byte = 4 pixels. My little image is 64x8 pixels. This are only 128 byte! (64 * 8 / 4) I wrote 2 additional functions for this. They should be pretty self-explanatory.
Daher ich nicht jeden Pixel einzeln definieren will und noch keine Funktion habe, die Text auf dem Bildschirm ausspuckt habe ich mit einem Hex-Editor eine sehr simple Datei erstellt, die genauso aussieht wie der Grafikspeicher. Also 1 Byte = 4 Pixel. Mein Bildchen ist 64x8 Pixel. Das sind gerade mal 128 Byte! (64 * 8 / 4) Dazu habe ich mir noch 2 Funktionen geschrieben. Diese sollten eigentlich relativ selbsterklärend sein.

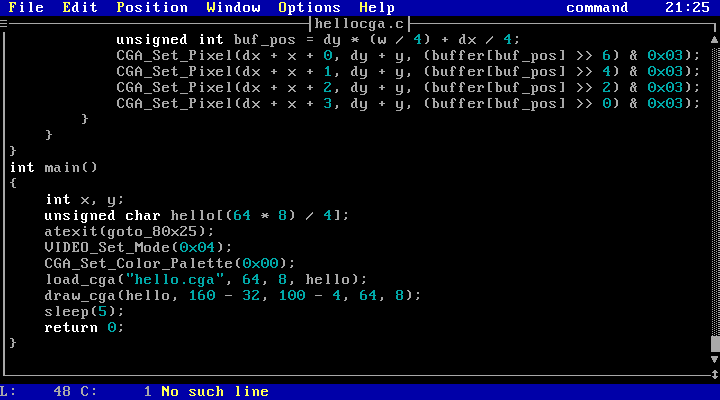
After a lot of trial&error i finally got the desired result!
Nach etlichem probieren hab ich dann endlich das gewünschte Ergebnis bekommen!

Sourcecode:
Software:
Questions? Suggestions? Found Mistakes? Criticism? Please let me know in the comments!
Fragen? Vorschläge? Fehler gefunden? Kritik? Bitte alles in die Kommentare!
Congratulations @whiteshampoo! You have completed some achievement on Steemit and have been rewarded with new badge(s) :
Click on any badge to view your own Board of Honor on SteemitBoard.
For more information about SteemitBoard, click here
If you no longer want to receive notifications, reply to this comment with the word
STOPCongratulations @whiteshampoo! You received a personal award!
Click here to view your Board
Congratulations @whiteshampoo! You received a personal award!
You can view your badges on your Steem Board and compare to others on the Steem Ranking
Vote for @Steemitboard as a witness to get one more award and increased upvotes!