Review: The Stability and Autofocus Performance of DJI Ronin 4D
In our last review, we introduced Functions and imaging performance of DJI Ronin 4D Movie Camera. Considering its obvious advantages in stability and autofocus, we will focus on them to give you a more intuitive understanding of Ronin 4D.
The newly added Z-axis ensures stabilization in movements. We did not adopt the walking method of using the traditional 3-axis stabilizer when shooting, but naturally walked around fast. In this process, the Z-axis is good to reduce vertical shaking.

Throughout the shooting process, we turned on autofocus and ActiveTrack on. While shooting, the focus frame always appeared on the face or body in the screen to indicate the subject in focus. Although our composition and shooting distance kept changing constantly, the focus was always on the person. This is attributed to DJI's LiDAR focusing system, as well as its human body recognition function.
.gif)
When we were moving back and forth largely on the left/right side of the dancer, there is no need to always pay attention to the direction of the lens to ensure the composition like using a traditional handheld camera, but only need to move to the corresponding position. This is attributed to the ActiveTrack feature.
We also found in the test, the ActiveTrack feature in most cases are able to identify and follow the subject well, but in some extreme angle will also lose the focus.
Generally, when shooting skateboarding and other fast-moving sports, the stabilizer is indispensable. However, the traditional three-axis stabilizer requires exact and complicated pace, or otherwise you will get shaking images.
.gif)
The Ronin 4D has wonderful stabilization when shooting fast-moving sports such as skateboarding.
.gif)
Especially when shooting in the horizontal direction, it can produce the same result as shooting along the professional track. As a result, a photographer and a Ronin 4D are enough to complete the shooting.
In the shooting, we use autofocus combined with the ActiveTrack feature, which can capture the high-speed moving skater and keep him within the exact range of the composition; when the foreground in the middle of the image (pillar) appeared to affect focus, the Ronin 4D will immediately refocus on the subject quickly.
.gif)
In order to give you a better understanding of the autofocus of the Ronin 4D, we chose a top-notch mirrorless camera which is well-known for its autofocus performance to compare with DJI Ronin 4D both of which are of 35mm lens and an aperture of F2.8.
While the dancer was moving back and forth, we observed the focus performance of the two cameras. On the whole, both of the two cameras performed well.
.gif)
.gif)
If you have to choose one, then it must be the Ronin 4D for which is absolutely free from defocus and bellows in the footage.

We use DJI RS2 equipped with a mirrorless camera of 35mm lens to shoot the model's walking, running, upstairs and jumping movement to test stability respectively.
Obviously, the Z-axis gives DJI Ronin 4D an excellent advantage over the mirrorless camera paired with DJI RS2 in upstairs and jumping test.
Theory test
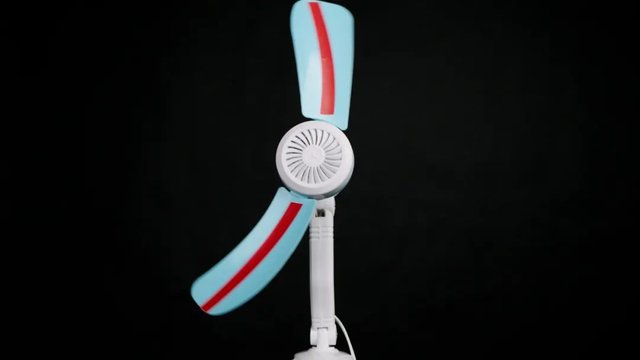
001 Rolling Shutter
As an all-new full-frame Zenmuse X9 gimbal camera on DJI Ronin 4D adopts an electronic rolling shutter, it’s inevitable to lead to more obvious rolling shutter effect. As can be seen below, the red tape on the fan blade becomes curved on its tail, resulting in obvious tailing phenomenon.
In actual shooting, you will find more obvious rolling shutter effect. For example, when you shoot fast movements, you may find that pillars and railings in the foreground appear tailing phenomenon.
002 Latitude
DJI Ronin 4D (6K and 8K versions) officially stated that the latitude is of 14 stops. In our test, 10 common stops of exposure latitude (5 over to 5 under) are available all of which can be pushed back to base exposure easily.
.jpg)
At 6 stops over, most of details are lost; but images are on a similar level with 6 and 7 stops under in standard exposure scene. However, at 8 stops under and pushed back to base, noise becomes atrocious. It is recommended to control the exposure within the range of 5 stops over and under, so that even if you need to adjust exposure later, images can keep pure.