Review of the Functions and imaging performance of DJI Ronin 4D Movie Camera
Review of the Functions and imaging performance of DJI Ronin 4D Movie Camera
In our last tweet, we introduced DJI Ronin 4D (6K version), from which you can learn its four core highlights including cinematic imaging, LiDAR focusing, 4-axis stabilization and Wireless transmission and its design.
Today, we will further explain its functions and imaging performance and share our practical experience with you.
Considering its obvious advantages in stability and autofocus, we will focus on them to give you a more intuitive understanding of Ronin 4D in the next review.
Just subscribe and follow us.
※ CineCore 3.0 Processor
DJI Ronin 4D features DJI’s latest image processing system, CineCore 3.0. The system uses DJI’s proprietary chip to provide advanced processor architecture, and some of its advantages are as follows:
First, the system can capture internal 8K Raw video which supports up to 8k/50fps. Secondly, it supports precise color reproduction, advanced assistive functions with a high-performance AI engine, which will make your work more efficient. It also supports multi-link monitoring and control with low-latency image processing.
In general, CineCore 3.0 makes two major contributions to the image processing system. One is to upgrade specifications and computing power, and the other is to provide a wealth of encoding formats.
※ Encoding Formats and Recording Specifications
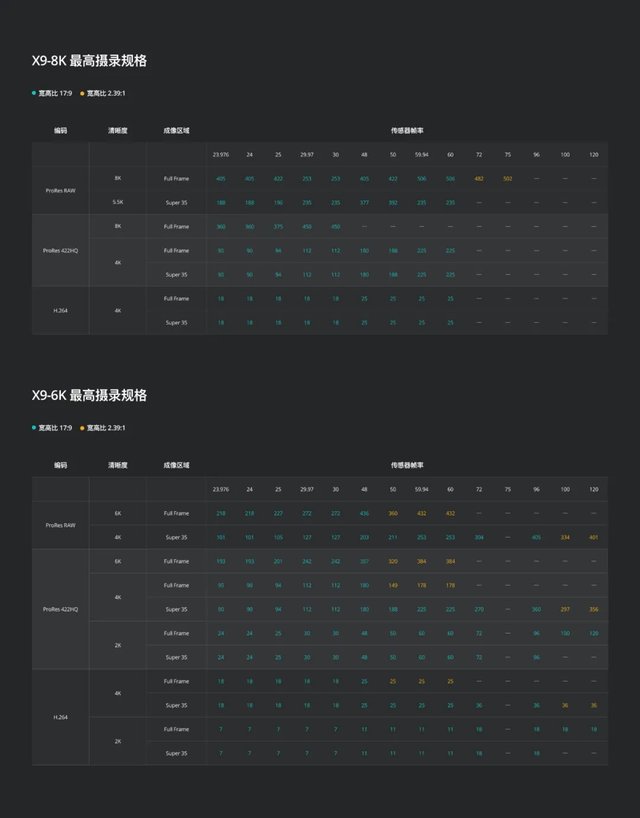
DJI Ronin 4D will be able to record Apple ProRes 422 HQ and ProRes RAW, as well as your standard H.264 codec. A choice of frame rates for different imaging areas are available in 8K, 6K, 5.5K, 4K and 2K resolutions respectively. The chart below presents the full maximum recording specifications for each of 8K and 6K versions.
As mentioned in the last review, H.264 is very versatile that can support most videoplayers and post-processing software, while ProRes 422 and ProRes RAW put higher requirements on both computer and software.
Three pieces of editing software including Final Cut, Adobe Premiere and AVID, support the direct import, preview and editing of ProRes RAW; in terms of color grading, Scratch, Misitka and Baselight support ProRes RAW files. However, the DaVinci system does not yet support the direct editing of ProRes RAW files before transcoding.
The 6K version tops out at 6K/60fps and 4K/120fps, while the 8K version tops out at 75fps. The 8K version is mainly designed to facilitate cropping and secondary composition, as well as deliver better results for keying and other processes needed by special effects users.
When it comes to ProRes 422 HQ and H.264, Ronin 4D at 2K and 4K supports oversampling, which can provide fine image quality and uncropped composition. At the same time, it also provides the in-body S35 mode, which allows shooting for the crop.
.png)
In addition, it is worth noting that all of the above resolutions and frame rates, including 120p support autofocus, as Ronin 4D adopts a LiDAR focusing system.
※ Shooting Settings
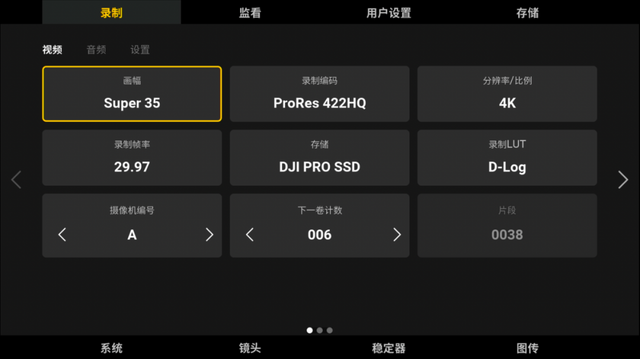
Commonly used recording formats, exposure parameters, color factors, and focus tools are all presented on the monitor of the camera. At the top of the screen are EI, aperture, shutter speed, and frame rate; at the bottom are ND, white balance, time code, and resolution. The left side displays the battery, storage, an audio histogram, Lock switches and a Z-axis switch, and the right side is a focus oscilloscope to assist focusing. Except for the focus oscilloscope, other settings will not cover the imaging.
In addition, there is the file number of the shooting video.
.png)
Click the screen to select other alternative options, such as changing EI, aperture, and shutter speed. Aperture, shutter speed, and white balance can all be set to automatic to cope with scenes with rapid changes in exposure and color temperature.
You can add or delete commonly used shutter speeds and shutter units by long pressing SHUTTER. You can also long press WB to add or delete the commonly used K value which is displayed as a numerical value, accurate to 10 digits with magenta and green shifting settings.
In addition to touch screen operation, you can also press the Mode button of the right-hand handle to activate the aperture, EI, and ND, and then directly change them through the wheel of the right-hand handle. These three parameters are frequently changed, which can be quickly completed by an operator.
※ Lens Calibration
When installing a non-DL mount autofocus lens, the lens needs to be calibrated. By selecting the focal length of the lens and calibrating each focal plane of the lens in the focusing panel, the focus range of the entire lens is available, so that autofocus can be achieved through the feedback of the LiDAR system; of course, the lens without autofocus can also be calibrated by installing a focus-follower.
.gif)
It should be noted that the installed zoom lens must be a parfocal lens. Otherwise, when the focal length is changed, the focus will change, and the calibrated focus range cannot fit the changed focal length, which will cause focus shift.
After the focus is calibrated, autofocus can be used normally once you turn on the AF button and the focusing performance is excellent but it depends.
.jpg)
Therefore, manual lenses can also be used to autofocus, which gives users more choices.
※ Focus
The focus modes include manual focus, autofocus and manual-auto focus.
001 Manual focus
For manual focus, you can use the focus wheel on the right-hand grip and on the left side of the camera. We mostly use the right-hand grip wheel during test. The wheel on the right-hand grip actually has many functions, and the rotation feels different when responding to different functions. When used for manual focus, the rotation feels accurate, which is easier to control.
.gif)
002 Autofocus
The autofocus function is a selling point of Ronin 4D. It’s safe to say that its focusing speed and focus-following ability are top-notch. The LiDAR Ranger Finder can cast up to 43,200 ranging points within a 10-meter dection range.. Compared with phase detection autofocus, Ronin 4D’s LiDAR Focusing System can focus faster without relying on the surface texture of the subject. In low-light environments, it can also run well.
DJI Ronin 4D has three focus modes: single-point focusing, wide-area focusing and smart focusing, which can be switched in the menu. The principle of single-point focusing is the same as that of other commonly-used focusing mode. After testing, we have found that the changing of focus between objects is very fast and accurate.
.gif)
Wide-area focusing takes the center of the frame as a priority (in the yellow box) and the subject within the area can be focused well. We tested the focus mode with two people in the frame. We could see that the focus position was still prone to the center, and even if the person in front appeared in the yellow frame but yet reached the center, the focus would still be on the person behind.
This is because in wide-area autofocus mode, the system will focus on people first. So once there are people in the yellow frame, the system will also exclude interference from edge objects or people.
.gif)
The smart focusing mode is best for shooting people, as it will automatically recognize faces, bodies and autofocus on the recognized people in a fast and persistent way. Combined with a smart following function, it places the recognized person in the center of the frame, ensuring the composition of the frame while moving the camera quickly.
The focusing mode ensures that people are always in focus, and the smart following function ensures that people are always within the range of the frame. The combination of the two is ideal for shooting high-speed sports, street dance and people-tracking activities. And we will share with you the skateboarding and street dance shooting experience in the next article.
.gif)
The laser focusing system, although good, has some problems. Owing to its focusing principle, it will fail to focus on transparent objects or on other objects through the glass. For example, if we shoot a glass, it will not be able to focus on the glass, while switching to another non-transparent objects, it will be able to focus very well.
.gif)
Its autofocus speed is so fast that you can't even feel the focus change. But sometimes we’d like it slower. This requires DJI to further adjust focus sensitivity and speed.
003 Manual&Auto focus
The LiDAR focusing is undoubtedly very fast and accurate, but sometimes, we also want some imaging that changes from focused to defocused range. To achieve it, we can turn on manual-auto focusing mode.
004 LiDAR Oscilloscope
The LiDAR focusing oscilloscope is wonderful. Its working principle and process are as follows:
After the LiDAR rangefinder works, the distance data will be transmitted to the camera itself. Then we turn on the LiDAR focusing waveform. And as you can see that the subject is displayed in the form of a white waveform in a top-down view and the distance (in UK or metric) between the subject and the camera is also illustrated. The focal point of the camera is displayed in the waveform as a horizontal line. When we move the horizontal line to the white waveform, the focus is on the subject.
.gif)
The LiDAR Waveform is a pioneer in the industry equipped with the visualized focus assistance technology. This provides groundbreaking and intuitive focusing assistance which is available for all focus modes. Even operators with little or no experience can become adept at focus following quickly. With autofocus and ActiveTrack on, the position of the subject will also be displayed.
※ ActiveTrack
Almost all of DJI products such as drones, stabilizers, and gimbal cameras feature ActiveTrack. So it’s familiar to DJI customers.
The DJI ActiveTrack mode focuses on people and can recognize the face and body of human beings. Once the mode on, the camera will intelligently tracking the subject while including the whole subject within the box.
.gif)
When creating a footage with a wide range of lens movement and long-distance high-speed following, such as street dancing, skateboarding, running, etc., it is recommended to turn on the ActiveTrack mode. With the mode, the camera will automatically ensure an effective composition. Therefore, you don't even need to observe the composition, just shot. It is fantastic in practical use and for general photography.
But in extreme compositions and angles, the selected subject may be lost.
.gif)
Of course, ActiveTrack is not perfect either. One problem is that it tends to place the selected subject in the center of the picture. Sometimes when shooting people from a different angle, the face is also in the center, which doesn’t conform to the purpose of composition and is less good-looking; Or when you want to take pictures of skating, ActiveTrack only follows the person while keeping out the skateboard in a slightly closer composition. Therefore, ActiveTrack is suitable for most shooting scenes but not for all.
To turn on/off the ActiveTrack mode, you can press the button on the left-hand handle or directly click on the screen icon. When you need a two shot, the ActiveTrack function is very practical.
※ Menu
Ronin 4D's menu can be described as intuitive and convenient. People who are used to Japanese brand cameras may be surprised by this menu, because it is very intuitive, just like a mobile phone, and supports full touch-screen operations. Even operators with little or no experience can become adept at the menu quickly.
The menu is divided into eight major sections, which are located on the upper and lower edges of the screen evenly. The sections are "Recording", "Display", "User Settings", "Storage", "System", "Lens", "Stabilizer" and "OcuSync"; in each section there is a secondary menu.
The interface is comprised of several squares. You can adjust their settings by tapping.
.gif)
All display and menu operations are embodied by the hightlight monitor of the camera. The hightlight monitor has a resolution of 1920*1080, the highest brightness of 1000nit, the highest refresh rate of 60Hz which offers wonderful results. It supports the full-touch adjustment of the menu. If it is inconvenient to touch, you can also use the buttons on the right, left, upper, lower, and back sides to complete all adjustments. The hightlight monitor also supports mirroring. When you need to change the position of the hightlight monitor, you can turn on the mirroring, and the functions of buttons will change accordingly.
During playback, you can directly adjust the progress bar to check, and the resolution and aspect ratio, EI, aperture, shutter speed, frame rate, ND, white balance value and file name will all be displayed.
.gif)
All footages will be presented in small tiles. With a click on one of them, and the data of the footage will be displayed on the right side of the screen, such as frame rate, encoding, resolution and aspect ratio, duration, time code and exposure parameters; click again for full-screen playback.
DJI is really commendable for its intuitive and convenient menu when other manufactures still offer very complicated menus, touch screens that do not support full touch and with low resolution.
※ Team Cooperation
The Ronin 4D is suitable for solo or cooperative shootings. When using it among teams, some other non-standard products of DJI are needed.
The Ronin 4D uses the brand-new DJI O3 Pro Video Transmission technology, which offers better shooting experience that is not included in the standard version.
.gif)
The transmitter of the system is installed in the middle of the body and the battery pendant, (the extend unit behind the body are modular, which can be stacked layer by layer), and four antennas are needed here.
The receiver is a 7-inch wireless video transmission, which has a higher resolution of 1920 * 1200, 1500-nit high bright, up to 1080p/60fps. In short, it’s a wonderful experience! Through it, you can have a good experience of hightlight monitoring and playback.
In addition, it can also be achieved through an external control handle to follow the focus, control the gimbal, start and stop the recording and adjust the camera parameters.
.gif)
Theoretically, it can transmit within a long distance of 20,000 feet or 6 kilometers. In our actual experience, there is no problem with shooting in a distance of 100-200 meters, and there has been no blurred screens or disconnection conditions. And the measured delay is 100 milliseconds under the 4K/24fps recording specification, and 68 milliseconds under the 4K/60fps recording specification. The response of hightlight monitoring, playback and parameter adjustment is very fast.
.gif)
With it, operators, director guiders and other leaders can get good hightlight monitoring experience with higher efficiency at the shooting site.
※ Stability
The newly-added Z-axis can minimize the vertical shaking which traditional stabilizers fail to decrease. In the process of walking, running and a wide range of movement, without the need for an exact pace, you can also decrease the vertical shaking and simulate slider or professional stabilizer, and get a fairly stable result.
.gif)
Some people may ask whether the Z-axis can lift up and down. Actually, it hasn’t this kind of function as it is mainly designed to reduce the vertical shaking of the Z-axis. But it can compensate for the vertical shaking to ensure a persistent composition in a photographer handheld shooting with up and down movement.
.gif)
.gif)
In the process of car-following shooting, the shaking brought by uneven road and the moving car can be well eliminated, with the smart-following function, the shooting task can be completed easily.
.gif)
The Z-axis can be turned on and off. When it is on, there are two states: follow and lock. In the “lock” state, the Z-axis is kept at the same level as possible by default and can minimize the vertical shaking. But if we need some footages with slight shaking, the “follow” state is a better choice.
The M-key motion mode can make faster three-axis following, which feels the same as pure body shooting (without the delay of the stabilizer lens movement), but it is only suitable for small-scale movement.
Of course, such a problem can be solved through more practice, or probably DJI updated firmware ahead.
※ Memory card
The Ronin 4D supports three kinds of disks. One of them is DJI PROSSD 1TB which supports internal recordings of all encoding formats and recording specifications. With it, fast operation, recording and playback can be achieved with no lag (of course, this is also due to the powerful processing system of the Ronin 4D).
.png)
In addition to PROSSD 1TB, CFExpress Type B memory card and USB-C SSD can also be used, but it is recommended to purchase PROSSD 1TB. The other two can only record footages with limited encoding formats and video specifications, as follows:
【CFExpress Type B memory card】
ProRes 422 HQ:
6K:23.976/24/25/29.97/30fps
C4K:23.976/24/25/29.97/30/48/50/59.94/60/72/96/100/120fps
2K:23.976/24/25/29.97/30/48/50/59.94/60/72/96/100/120fps
H.264:
C4K:23.976/24/25/29.97/30/48/50/59.94/60/72/96/100/120fps
2K:23.976/24/25/29.97/30/48/50/59.94/60/72/96/100/120fps
【USB-C SSD】
ProRes 422 HQ:
C4K:23.976/24/25/29.97/30/48/50/59.94/60fps
2K:23.976/24/25/29.97/30/48/50/59.94/60fps
H.264:
C4K:23.976/24/25/29.97/30/48/50/59.94/60fps
2K:23.976/24/25/29.97/30/48/50/59.94/60fps
The Ronin 4D gives a good solution to storage concern. It does not require special high-specification or expensive memory cards and card readers like other movie cameras. Data transmission of PROSSD can be easily completed through Type-C cables. PROSSD boosts its high efficiency and popularity, and there will be no situation where the data cannot be read because the card reader is missed.
By popular demands, we also tested the recording time. Since DJI Ronin 4D is positioned as a movie camera, the recording time should be unlimited. We tested the commonly used full-frame 4K/25fps recording specification under H.264 encoding format, which can record more than 1 hour of video, and there is no abnormal heat phenomenon.
.jpg)
※ Audio
The Ronin 4D is equipped with a 3.5mm TRS audio jack, which is compatible with most wireless microphones or directional microphones; in addition to the 3.5mm Mic in, it also supports the 3.5mm Line in, that is, to input audio signals such as mixers and musical instruments with cables.
.png)
Its highest recording specification is 48KHz 24bit, which can meet professional-level recording needs, but it only supports level adjustment of two audio tracks. If you want to use XLR balanced interfaces, you need additional extension tools.
In fact, the audio is mostly recorded with a tape recorder, which can achieve more functions.
※ Battery and battery life
The TB50 battery Ronin 4D uses is the same as that of Ronin 2 and Inspire 2, whose capacity is 4280w.
During usage, you can press the button to check the remaining battery power at any time.
.gif)
The battery life of the TB50 depends on the video specifications and the gimbal; we use ProRes RAW to produce a 6k/50fps motorcycle footage, with half of the time to turn on the Z-axis, and then we found that about 40 minutes of shooting will use up the electricity, so the battery life is normal.
Fortunately, the charging time of the TB50 battery is very short. It takes about 25 minutes to fully charge once.
※ Real-world experience
001 Charging
Before the formal use, the battery needs to be charged with the standard charging adapter. The battery can be fully charged in just 25 minutes. The four indicator lights on the battery will flash when charging, and the charging is completed when all these lights are on.
.gif)
When not charging, click the button on the battery to check the remaining power.
002 Lens installation
Before installing the lens, you need to install the corresponding lens mount assembly on the DX mount. Different lenses require corresponding mount components.
.gif)
When installing the lens, you need to open the tilt axis and roll axis locks, put the lens on the correct position, rotate the lock paddle to complete the installation.
.gif)
003 Tilt-shift axis and pan axis leveling
After the lens is installed, you need to level the tilt axis and pan axis of the gimbal.
When leveling the tilt axis, you need turn on the tilt axis lock, loosen the locking knobs on the left and right sides of the lens, and adjust the position of the camera and lens until the lens are neither tilting nor tilting. Then lock the tilt axis.
.gif)
When leveling the pan axis, open the axis lock, loosen the knob, and adjust the front and back position of the axis until the camera body is tilted left and right while the camera and lens are stationary to lock the pan axis.
.gif)
004 Install the left and right handles
Left and right handles are installed with the same method. Put handles align with the quick-installation interface of the camera body, and tighten the safety trigger.
.gif)
005 Install the battery
After the battery is full charged, you can slide the battery plate directly from the top. It is simple and clear. If you need to remove it, press and hold the disassembly button on the plate to remove it.
006 Install the memory card
If you use the PROSSD 1TB memory card, you just need to slide it in from the slot; if you need to remove it, press and hold the disassembly button next to the slot and pull it out.
.gif)
If you are using your own CFE Type B memory card, you can also insert it in the same position; while using a USB-C SSD, you need to prepare an additional hard disk rack.
007 Activation and automatic calibration
For the first use, you need to activate the body, download the DJI Assistant 2 for Ronin assistant software, turn on the three-axis of the body (the gimbal cannot be in the OFF state) and the three-axis axis lock, use the official data cable to connect to the computer, and activate as prompted.
.gif)
After the activation is completed, automatic calibration of the camera body is needed. Short press the HOME button of the monitor and select "Stabilizer"-"PTZ Calibration"-"Auto Calibration" on the screen, and automatic calibration starts.
.gif)
009 level the Z-axis
Level the fourth axis in the power-on state. First turn the bottom of the fourth axis to unlock, and then turn on the fourth axis (press the 4D button); follow the prompts of the monitor to gradually adjust the axis lock on the top of the fourth axis, so that the fourth axis is in a horizontal position. When a pan/tilt warning appears on the monitor, that is, the fourth axis is leveled.
.gif)
The above is all about detailed Ronin 4D functions, image quality and practical experience. All in all, we find it has obvious advantages in focus and stability, so just click on here for more detailed informance.