A few secrets for working on cars, that a lot of people don't know!
I've done heavy car work since I was 8 years old (clutch), and I've picked up a few tricks since then. Some people will know some of these, but some may get some value out of others!
First, let me say that this is not a how to, for specific cars; because those are all over the Internet. You can look up those specifics for yourself.
First, I noticed a commercial mechanic drop tools under a car, because he didn't know the first tip. Sockets, extensions, and ratchets are designed to stay together:

Line up the hole on one, with the ball on the other, and they will hang onto each other. I thought everyone knew this, but apparently not.
Now the ratchet is even stronger:

Push this button, and the retaining ball drops inside the ratchet.
On the working end:

Inserting this assembly into the drilled hole on the extension, and releasing the button ; makes a positive connection with the extension. Do this and no tool drops under the car!
The next tip is about water pumps on cars and trucks:

I'll mention 2 tips here, after the NEW pump and gasket are installed (You can look up the YouTube on your specific car); after removal like the old one.
So first tip, most gaskets come with a gasket with stickum on one side. This always goes towards the pump, but you should Never add gasket compound to the other side! Two sided adhesive will require prying to replace later, and can damage the seal surface.
Second tip, how do you Know the water pump is faulty?

This hole is on every water pump I've ever seen, and is called a weep hole. Most are on the bottom of the casting, and all are outside the water pump seals, this one just happens to be on the top. But they work the same, if there's a leaking seal (as the pump fails it will begin to leak on this seal); the antifreeze will come out of the weep hole. Every time this happens, the pump is failing! So if you see antifreeze under your car; coming from this weep hole, it's done.. replace it.
Now I'll move to a drive shaft rust problem:

Most drive shafts are close to a file hardness, so the file will pretty much skate over the shaft's surface. Today, I was handed a drive shaft that was thrown in the back of a truck; which rain filled with water for several inches. It had 'mature' rust about as thick as my fingernail blooming over about half the surface. People often use wire wheels or brushes on this kind of problem, which will damage the sealing surface, causing leaks! I use different tools, beginning with my pocket knife for bulk removal; followed by a Machinist's trick using a file.
By holding a single cut (for a finer finish), purpendicular to the shaft, I was able to draw file off the rust. Never use a stone, or diamond file here! Since a light touch will not cut into the shaft steel, it's possible to remove rust with impunity! Draw filing results in the smoothest surface a file can make, with one warning...the rust will accumulate on the file, and that buildup can mar the surface. So keep it cleaned off!
Like this if you don't have a proper file card:

The surface begins to show, and is smooth enough to not damage the running seal!
Here is a rusty spot close to the end:

Trouble areas are addressed individually, this one was so close to the end; that it was harder to draw file.
After cleanup it looks better:

I'm sure that if I had a profilometer handy, this shaft would be in factory specifications for surface finish!
Now for the last tip, bolt recovery:

When I'm home, working on a car; I run taps in the holes or nuts, and dies on the bolts. This allows easy reassembly, and accurate torque settings. In the field, this option is not available; so I carry an unusual tool.
I carry a disposable blade carpet knife for these occasions:
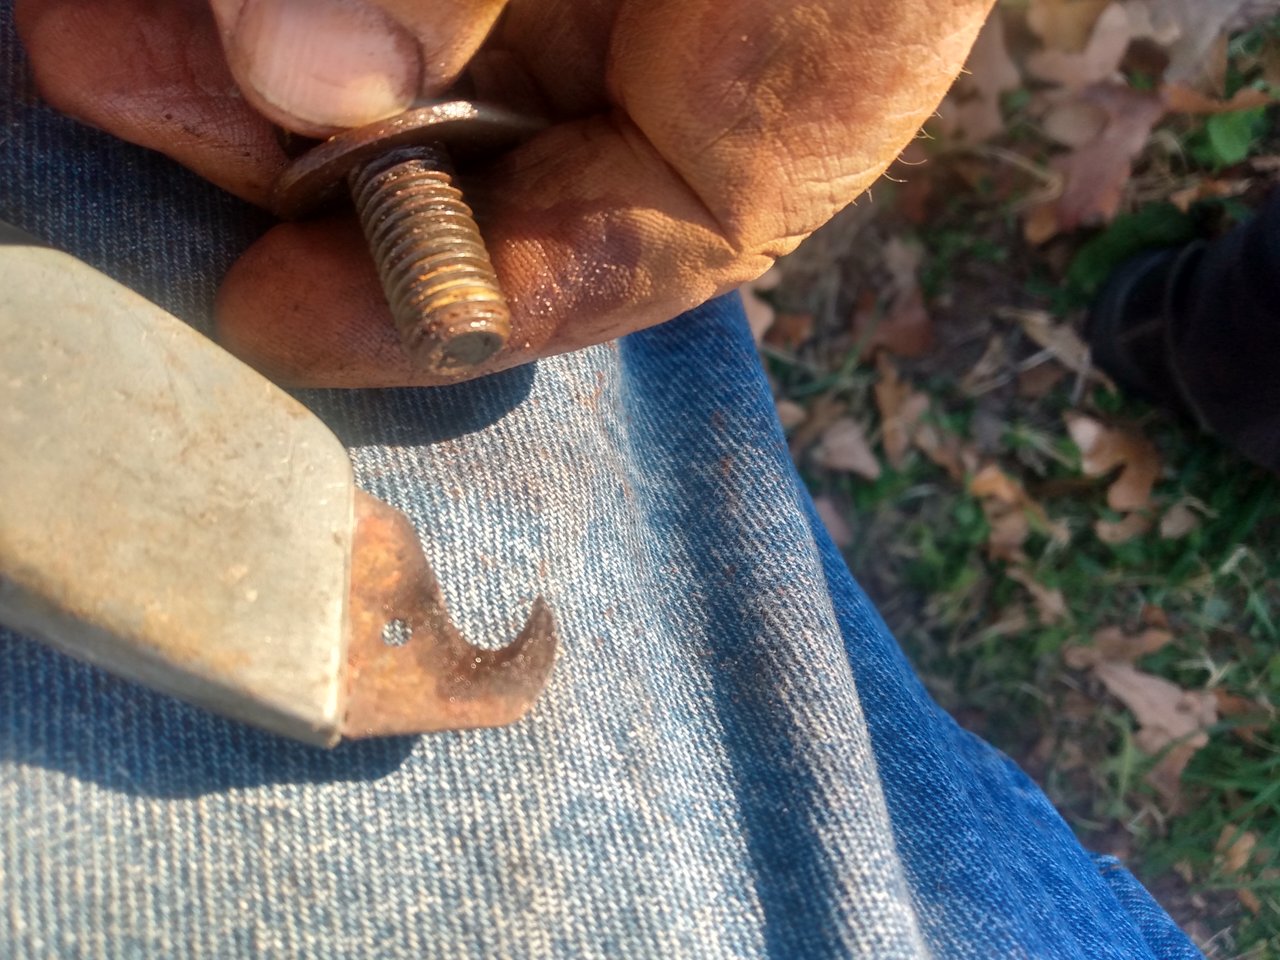
I also use it to cut wires, but it is very effective cleaning out threads!
Like this:

I did spray it with penetrating oil, so what's coming off is rust pudding. But in the field, traveling to get a new bolt can eat half a day; and these are back to finger tighting only in five minutes. The carpet knife blade rides on the back side, to set the blade tip, giving me 95% clean threads. If possible, I choose to screw the screws back into their original holes, so I don't have to look for them later!
I hope some of these tips are useful to you! Keep using a mechanic you can trusted, fix your car yourself....