Getting My Rear End in Gear - Part 2
Turns out there's going to be a Part 3 to this after all. Being a bit overly optimistic about the shims in the differential not needing to be changed, I grossly underestimated how long this job would take me. Because of other things going on in my life I've been delayed several more days so I figured I ought to post a Part 2, then I'll do 3 when it's finished.

Before I could do the install, I needed to clean up the inside of the differential housing and axle tubes because of the metal that made its way in there from the bearing damage. For the diff I just used some solvent out of the parts washer and applied it with a chip brush. This was a little bit of time consumption and fiddling around, but it was pretty straightforward. I had to rack my brain a bit about how to get all the crusted up old gear oil out of the axle tubes. After a snack and a quick break, I ended up coming up with the above. I had some half inch aluminum round stock from another project (I actually last used some of it to make the right size spacers on my lathe for my TV to be mounted lol. Don't judge, it was still cheaper and faster than buying a set of plastic ones off of Amazon) and I repurposed it as a cleaning probe this time. I don't currently have a lathe due to the move but luckily this piece was already center drilled from the last project back in San Diego.

I drilled it with a hand drill and tapped the end for a 1/4-20 bolt to use as a makeshift clamp to attach a rag to. As you can see in the picture, I was a little off on the angle with my hand drill to make the hole, but for this purpose it still works just fine. I then hunted down some fender washers and a 1/4-20 bolt to hold it all together.

To ready a shop rag to accept a bolt through it, I put one of the fender washers on the anvil, folded the rag over several times and used a punch to essentially die cut the rag the same size as the hole in the washer. It worked surprisingly well. Note to self on that one.

At first the idea was to just use this like the rods used for cleaning gun barrels in which a solvent soaked cotton patch is forced through the barrel to clean it, followed up by a repeat with some dry ones to wipe away the solvent. It didn't work for this because the outside hub area of the axle tubes is much narrower than the inner section and so the biggest rag I could fit through the outside was still just flopping around in the larger diameter portion.

Then I came up with the idea to just attach the end of the rod to my drill so that it would spin the rag against the axle tube surface. That metal tube is a spark plug wrench that came with one of my small engines and it worked great as a hand hold for the rod. This worked way better than I could have imagined. With just two solvent soaked rags followed up by two dry ones to clean out the gunk and metal flake that came off I was able to get the axle tubes pretty close to spotless. I followed it all up with brake cleaner (essentially acetone in an aerosol can) to wash away all the solvent and then a compressed air wand to blow all the brake cleaner dry and get all the tiny metal particles out.

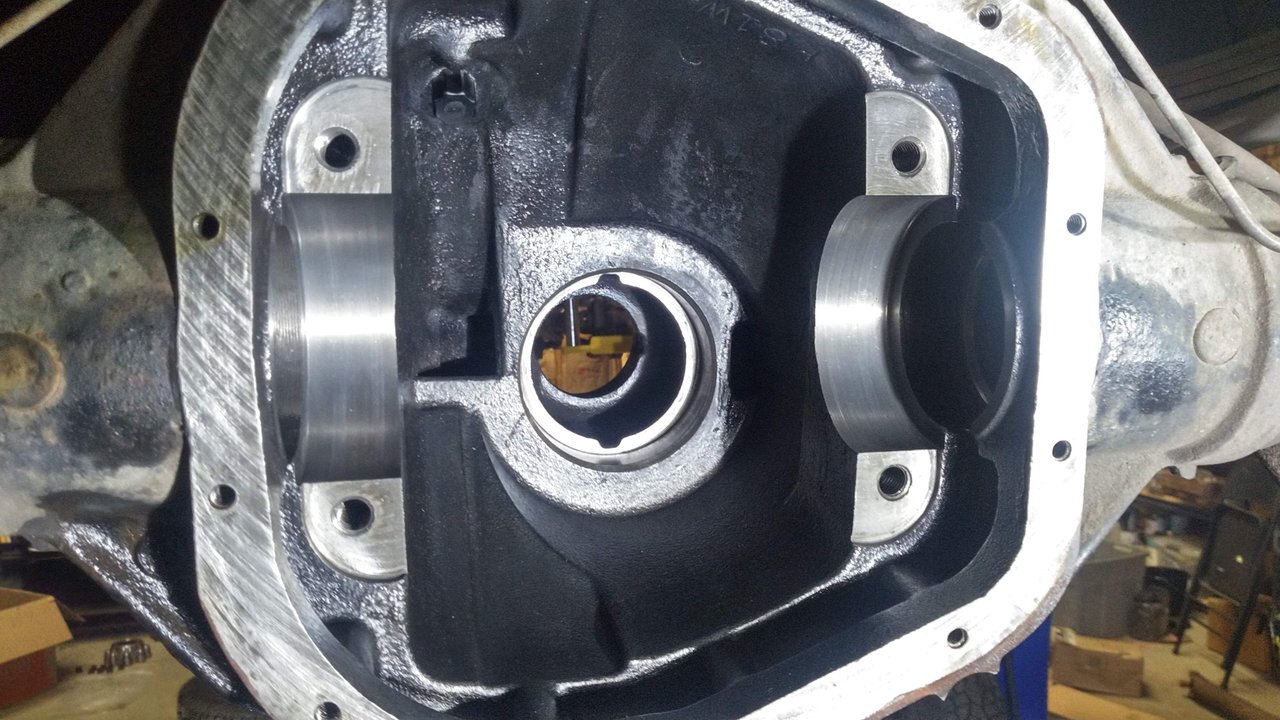
Here's the finished product. Nice and clean. The amount of metal that came out was way more than could've come from the damage I saw on the pinion, which means I believe someone was in here doing repair work some other time and didn't clean out the metal from the previous failure. I wonder why the pinion bearings failed again so soon? Hmm, it makes one wonder lol. I guess one should expect this from an $800 truck off of Craigslist.

Since it was cheaper than buying a new set of spider gears and a posi rebuild kit, I bought this rebuilt carrier off of eBay. The seller did it for a project that never got completed, so he sold it to me super cheap. The spider gears look perfect so it was worth the price just to get those. They would have cost me more than this whole rebuilt carrier did if I bought them new. Unless you're doing stupid stuff with your vehicle, these don't tend to fail very often, so I don't feel the need to put some brand new ones in anyway. So first I pressed on the carrier bearings and then bolted up the ring gear.

This was followed up by freezing the pinion bearing races and then driving them into the differential housing. It still takes quite a bit of pounding to get them in there, but freezing them does shrink the races enough that it ends up being a bit easier to install. Sometimes this technique will let you just slip the race on by hand, but all of this stuff is a super tight fit due to the extreme forces this housing experiences, so no go on that here. It can be so difficult to drive these all the way on at room temp that the install kits and service manuals recommend sliding the smallest feeler gauge in your kit back behind there to see if there's still any gap before you move on. That checked out for me, so on to the next step.

When I was grabbing the carrier shims I had placed next to the old diff carrier I noticed a fun find on one of the bearings. This bearing cage was damaged by someone at one point, maybe during the initial install, I'm not sure. It machined a nice little groove into the shim on that side too. Last time I was in this rear end to attempt a rebuild of the posi (and failed by the way, I think I had the wrong parts sent to me, or at least that's what I like to tell myself), I didn't notice the damage to the bearing cage, but I did notice that groove and wondered how it got there. I guess I know now.

The recommended procedure is to assemble everything with the factory shims to start, so that's what I did here. Here's me checking the preload on the pinion bearings after the nut was cinched down. Turns out the old bearings were so crusty I couldn't really dial this in exactly, so I got it as close as I could and moved on to the next step. Next time I assemble this and check the gear mesh I'm just going to put the new bearings in to be sure everything is perfect and just use my bearing separator to press it back off if the shim needs changing. That won't damage the bearings since I have the right tools to do it, and I'm worried that with the wear on the old rollers that they'll end up not having the same depth on the pinion when they're installed.

This next step is the hardest part of assembly on these. The bearing preload is so extreme that you can't just simply slide the carrier into place. It's a really tight fit. It's a hundred pounds too, so holding it into place while you get it started into the housing is a challenge as well. Once I got the carrier started in, I drove it in with a block of hardwood and a four pound mini sledge. Let me tell you, this is quite the workout. I guess you could call this one the clean without the jerk followed up with a bunch of hammer throws.
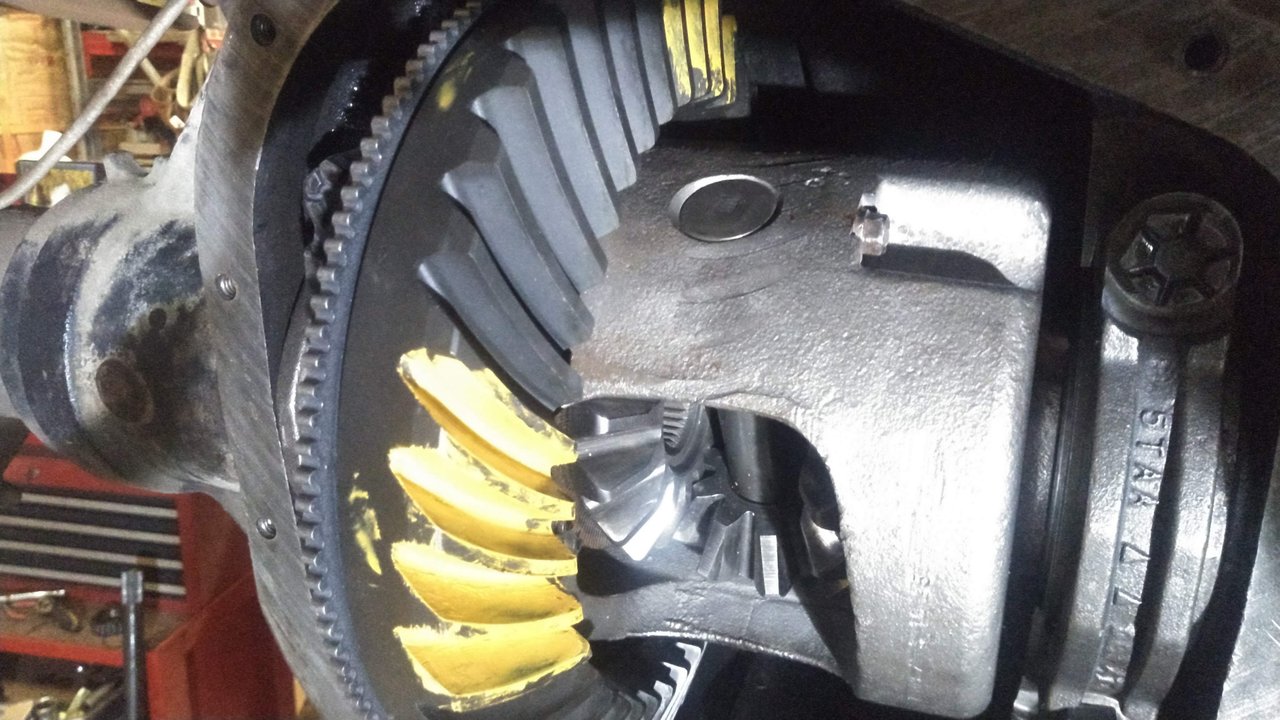

With everything torqued down it was time to get a reading with this gear setup paint. You paint this on the differential ring gear then rotate the pinion back and forth over that section a couple of times. This leaves witness marks in the paint, telling you where the gears are meshing. Last time I did this, it was on an 8.8" rear end from and F150. It was a similar scenario, new gears, new bearings, and even a different carrier (on that one I converted from open diff to posi). Somehow using the factory shims on that one ended up with a perfect gear mesh and so I didn't have to do anything to the setup once it was in. This one, not so much. As you can see from the pattern above, both the coast and drive sides of the gears are fairly centered between the heel and the toe of the gear (fore and aft respectively in these pics) with the pattern, meaning that the pinion depth is good, but the pattern isn't deep enough towards the root to get a good mesh. There needs to be at least some gap between the top lands and the pattern.
What this means is that the carrier has to come back out and the shims need to be changed to shift the whole carrier to the right a little bit. You're supposed to go in very small increments as provided in the shim kit I had waiting, but I tried to get cute and just swap the factory shims into each others' positions because the one on the right was visibly thicker than the left, which would shift it to the right for sure. After swapping them and a repeat of the above exercise routine I began to torque down the bearing cap bolts. I realized as I was doing so that I had overdone it with the shim adjustment and the gears were binding. It was so tight you could barely spin the assembly. Having gotten a late start, it was quite late in the evening already, I was very tired, and I had to call it quits for the night in temporary defeat, so thus part 3 will be born. I pulled it back out that night and it's still sitting on the work bench waiting for the shim adjustment. Maybe tomorrow, we'll see. Until then, Steem On!
Little rest ... after the elevator ...
I definitely had to read part 1.
Woohoo! better than a "Popular Mechanics" magazine.
Sometimes you start the work thinking it will be fast but ... detailed as you are ... you just have to wait until the end.
Hopefully it's only part 3. LOL
Amazing your tube cleaner.
I imagine how the rags turned out ...
Nice job.
Congratulations on a Curie vote.
No rest for the weary Mariita.
Great to see this sort of thing on Steem. Great solution with the cleaning rod.and I look forward to seeing how it all comes together. Congrads on the upvotes. Following you now.
Yeah I'm feeling very fortunate with the votes lately. Thanks for the comment and the follow.
Very useful your publication especially for mechanics. Sometimes very simple things like putting paint and a gear, and then walking so that it leaves its mark is good to know. I hope that many ingenious people like you read to me to read the exchange of opinions about mechanics. Greetings @randr10
Thanks for the kind words Marcy. You ladies from Venezuela are so gracious with the compliments.
You are right! You have a good publication and deserve a comment cool
ehy dear @randr10 I don't understand anything, but your posts are so detailed and well told that I want to know how it turns out !! congratulations on your curie rating and all the best for you
Thanks!
Hello Hello!
Excellent work, I congratulate you for your effort and dedication to create better things :)
Greetings from Venezuela♡
Thanks ;)
Hi randr10,
Visit curiesteem.com or join the Curie Discord community to learn more.
Thank you!
Congratulations @randr10! Your post was featured on our daily build newsletter! We set you as a %15 beneficiary of our newsletter rewards.
Keep sharing your awesome DIY and How-to tutorials together with the recommended tags.