Hen House Using Reused Components.
As this is my first post please forgive any fomatting errors. I am trying to figure out the best way of publishing on here for my tutorials. If you have any issue with my content please let me know so that I may improve.
Thanks
MoTinkerGnome
Intro: Scope of Project
I set out with the following goals, to use as many reclaimed materials as possible, along with making the house easy to move. The resulting coop achieved both goals. I only had to purchase 2 lbs. of screws, a box of staples, 2 lag bolts, and a 25-ft. roll of poultry net. I am sure I could have bartered for these materials locally on craigslist but I was running out of time and the chicks were getting too cramped in my borrowed brooding box.
From the below, you will understand that when I couldn't find a material I bartered or borrowed with buying being the last step. For the base I found a nice 3ftx4ft pallet that a load of paper arrived on. I salvaged door hardware from the dumpster behind work. Sheet wood came from a dumpster of a company that manufactures air filters. 2x lumber from pallets/construction waste. Roofing tin was reclaimed from a section of fence that was storm damaged on my property. All wood is recycled reclaimed or otherwise re-purposed pallets/trash.
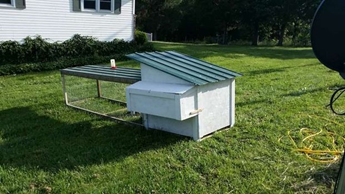
I went with a coop/run model instead of an all in one as I could eventually swap out the 10-ft. run for a longer run, and to facilitate easier moving. The 2 pieces are held in alignment with some brackets that were originally used to hold up cubical sections to the wall, however, U shaped Deck brackets will work as well.
Tools
1x - drill with #2 Phillips driver and a nut driver suitable for roofing screws. Or a screw and nut driver set. 1x - Saw for cutting wood, Manual cross cut/circular with wood blade/jigsaw/reciprocating saw
1x - tin snips or a reciprocating/jig saw with a metal cutting blade. I used tin snips and recommend a reciprocating or jigsaw.
1x - tape measure, 25ft,
1x - straight edge, I used a metal 12-inch ruler
1x - right angle gauge, anything to help you ensure a right angle I used a specific locking protractor with straightedge. But a business card would work in a pinch 2x - pens 3x -pencils I don’t know what happened to them but they kept walking off.
1 - T50/heavy duty staple gun (If it uses T-50 staples it is a HD gun)
Materials List
As-built I scrounged most of my wood before building
1lb box - 1-inch drywall screws
1lb box - 3-inch drywall screws
4- 3ftx8ft pieces of enameled roofing steel. I reused the screws that held the tin up originally, however, drywall screws will work. 2 pieces were cut down into 5-ft. length 2 pieces were overlapped for the 10-ft. run. Adjust for your dimensions.
8 – 3-ft 2x4
2 – 5-ft 2x4
2 – 4-ft 2x4
7 - 28-inch 2x4
2 – 18-inch 2x4
6 - 12-inch 2x4 scrap blocks for the nesting box frame.
4 - 10ft 2x4's
3 - 4x8 sheets of 1/2-inch sheeting (this is an estimate if buying due to the scrounged strand board) 5 - 3-inch door hinges
2 - 1 x 3-inch-deep hinges (for the lid to the nest box)
Various pieces of 1"x4" boards. I used 2 pallets worth of 1x strips for my trim work and 2x scrap for blocking/reinforcement etc.
assorted truss plates, 6-inch nails/screws, or scrap tin to join the run sections together
1 box of T50 1/2 inch or deeper staples.
1 window, I used a piece of scrap Lexan 28" x 24" that was left over from replacing a garage window pane.
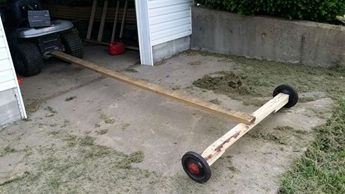
To easily move the coop and enclosure about I made a trailer that easily slides under the house or run if tilted back. I unfortunately don't have any pictures of this setup in action.
2 - 8-inch cart wheels, Available from tractor supply or from a junk lawnmower
1 2"x4"x6'
1 2"x4"x8'
2 2"x4"x6"
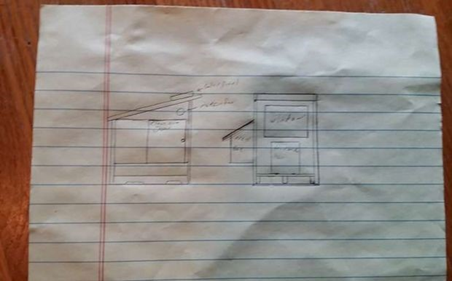
Step 1: On your Mark, Get Set... Plan
I began the process sketching out a small hen house to keep a flock of 3-4 Hens. An adult hen requires about 3-4 ft. of coop/run space (less if free ranged). I figured for ease of moving that building upon a pallet would allow 4 hens, 3 square feet of enclosed indoor space.
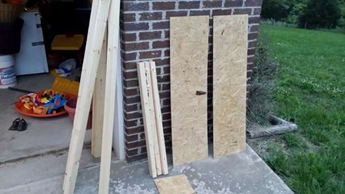
Gather your materials and tools take inventory of what you have and whether it is in a suitable condition to begin assembly. I like to lay everything out so I know what I have and where it is to prevent looking for things elsewhere. In the mean time between sketching and waiting for the paper pallet to free up I started scrounging other refuse wood to use for the frame and sheeting.
Step 2: Build.
Lay out the pallet on a piece of level concrete. such as a garage floor. Retrieve 2 4 ft. 2x4's and 2 3 ft. 2x4s.
Attach them to the exterior corners of your pallet with 3-inch screws ensuring that they are at a 90* angle with the ground. Now you know why I said level concrete. I used the 3-inch screws for framing and 1-inch screws for sheeting.
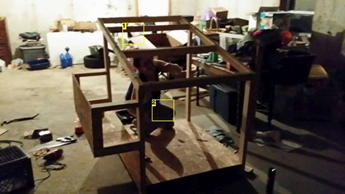
Now that you have your 4 corner posts. retrieve 2 5ft 2x4's and have an assistant hold them up to the posts so that you can mark where to cut notches. See the attached picture. for clarification. I am sure there is a term for that process however I was just don't know it.

Add 4 - 3 ft. 2x4 sections to finish out the roof frame. Capping the ends of the roof line and using 2 as center supports to either attach your roofing tin or underlayment if using shingles.
At this point I installed strips of scrap 1/2-inch strand board for my flooring and began sheeting the exterior. If you don't want to put in a sold floor make sure you attach poultry netting (chicken wire) to the bottom of the pallet before building up your frame. I notched the 2 side strips first then cut down the center strip to ensure that the floor is a solid piece.
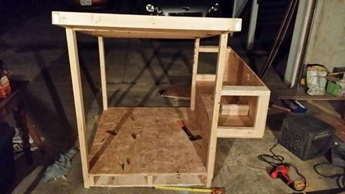
Next, I attached a strip of foot wide board on the outside of one side to give me an idea where to start framing out the nest box. I attached 2 1ft 2x4 sections at a 90* T to the posts of one side. then continued to frame out the U-shaped box. Inside the box will be 4 12" cube dividers. Nesting boxes are best at about 9x9x9 inches square to prevent roosting but plenty of room for laying.
Step 3: Finish sheeting and trim.
Most of my scrap strand board was about 12 inches in width. I put a slight angle on the end pieces for the nest box and the lid for the nest is just attached to the side wall with the 1-inch width hinges.
I seethed up to the roof line then used a circular saw to follow the angle from front to back and everywhere I had a seam between my sections of wood I used a 1x pallet stringer to give a bit of finished trim look and something for the screws to bite into on the inside.
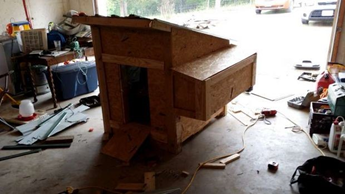
I got lucky and had a 3x3 square sheet of strand board that I used as a hinged wall/door to enable scraping out the interior floor with a shovel. I mounted the hinges to the corner post then held up the door/wall Attached some 1x pallet wood to thicken the hinge mounting point. As I liked the way it looked I used the same method as a trim on the other 4 sides It will give the strand board a bit of corner protection and presents a nicer finish. Unfortunately, I got a little carried away at this point and don’t have more in-depth pictures of assembly it was sort of a puzzle of ok I have this hole here let’s cover it with sheeting.
The Corners are just 2 pieces of 1x pallet stinger overlapped on the edge to cover the strand board seams.
The window Lexan I sandwiched between scrap 1x planking and the strand board. I used a 3-inch door hinge for the drawbridge door, and attached 3 strips to the door so that the birds can easily get up it without sliding back down.
Not pictured, I used a half of a gallon of white paint that we had left over to paint the exterior.
After building the "run" I attached the brackets to the hen house to ensure the 2 pieces stayed in alignment. I do not have them attached together as they are heavy enough that a small predator would not be able to move either piece. If in bear country you will probably want to make a stronger house anyway...

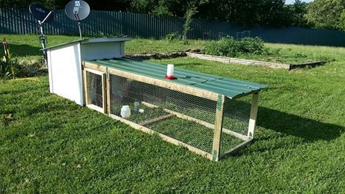
Step 4: The Run, And the trailer...
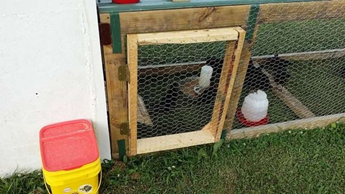
Please refer to the pictures of the finished Project for clarification on how the run goes together. Basically, it is just a chicken wire covered crate with a door on a side.
My roll of poultry netting was 36 inches wide so that limited my height. and my reclaimed 2x4's were 10 ft. long so that limited my length. As the chicken coop was 3 ft. 4 inches wide. I had my final dimension. I started off laying out a rectangle consisting of 2- 2x4x10's and 2- 2"x4"x28"s on the garage floor. Then attached a piece of scrap tin to one side of the butt joints to function as a joiner plate. flipped the rectangle over and added another joiner plate piece of scrap making 2 equal sides. I attached a picture to clarify the corner butt joints and how the house and Run align.
I then grabbed 2 more 28-inch 2x4's and 2 18-inch 2x4's to make the door. Unlike the side walls I screwed the door together on the 2-inch sides so that the door dimensions were 28"tall by 22"wide by 4" deep. The reasoning for the thicker door than the run sidewall was that it would create an overhang both inside and outside of the run to prevent snakes from slipping through a poorly fitting door. That and I could mount the hinge in the center of the 4-inch-thick door to make it open easier. I mounted the door to the hinges and another 28" 2x4 then added the additional 2x4 to the side wall for the 3rd stud on that side.
I added 2 more 3 ft. 2x4's to the center of the top and bottom to give it a bit of rigidity and to give my roofing tin a something to screw to in the middle. Starting on the side with out the door, I started rolling out the chicken wire and stapled it every 3 or 4 inches. with the overhand under where the roofline is going to be screwed down. When I got to the door I trimmed the extra wire then folded back the sharp edges. As shown in the closeup of the corner section.
Screwing the roofing is super easy I just put a screw between the ridges at each edge with a couple screws along the center 2x4. The roof on the hen house is mounted in the same way. it just takes forever to cut 6 linear feet of roof with a pair of tin snip scissors. Hence the suggestion of the metal cutting reciprocating. I did not use any underlayment for my roof as I figured the gaps from the ridges would allow moisture to escape.
The trailer is almost too easy to describe. The cartwheels are some ancient 8-inch diameter wheels (with retro hubcaps) sized for a half inch axle. I took one to the farm and home to get 2 lag bolts to make an axle that would easily slide underneath the coop. After arriving at home, I grabbed the 6 ft. 2x4 and a 10 ft. 2x4 that I had in the shop and screwed them together using an overlap joint in a T shape I then mounted 2 6-inch long 2x4 blocks to each end of the 6 ft. 2x4. I drilled I pilot hole of 3/8th inch slipped a wheel over the lag screw and screwed them to the axle. I left enough slack to allow the wheel to turn. I then added a deck screw I had in my toolbox as the trailer pin.
To use the trailer, I lift up on the front of the house slide the trailer underneath then lower the front onto the 2x4x10' the tongue with about 60% of the weight forward of the axle. The trailer simply rests onto the trailer pinhole on my lawnmower. The weight of the coop and run will keep it from sliding off the trailer to the next part of the yard. After I get the house placed I lift one end of the Run and slide it off then repeat the same process with the other component. Push the pieces together and the coop is ready to release the hens. I kept the trailer simple and unpainted as I can just stand it on its side in my mower shed.
Awesome first effort! Keep posting like this and you'll do well here on Steemit! I following your posts now too.
Thank you for your kind comments. Like most here, I am tired of others profiting off of my work. I have almost 40 more tutorials/how to's that I am going to publish here and strip from the original hosts.
No worries. Yes, ive had similar things happen. We run a blog www.ligaya.online that chronicles and teaches what we've learned. Ive had ideas ripped off too.
Now I tend to publish here first, so that the details are securely recorded on the blockchain and anything that happens to that info is recorded and locatable.
Im looking forwars to seeing your tutorials.
I am following you as well as my gardening is not nearly as good as my building.
Wiyh everyone sharing such a lot of information, we'll all be goid at everything soon
Congratulations @motinkergnome, you have decided to take the next big step with your first post! The Steem Network Team wishes you a great time among this awesome community.
The proven road to boost your personal success in this amazing Steem Network
Do you already know that awesome content will get great profits by following these simple steps, that have been worked out by experts?
welcome to the platform !
hop on over to @steemmakers if you want, we're trying to form a giant
gangfamily of makers toultimately take control ofhelp each other out here on Steemit :)So how does one get boosted with this group?
Well, we've added you to our watchlist.
If you make a good maker-related post with instructions we'll upvote you if our reviewers find you in the 6 days Active Rewards period.
You can also submit your own articles for review (we're still writing up the guidelines, but basically making related posts that explain how the project was made in detail) on the Discord