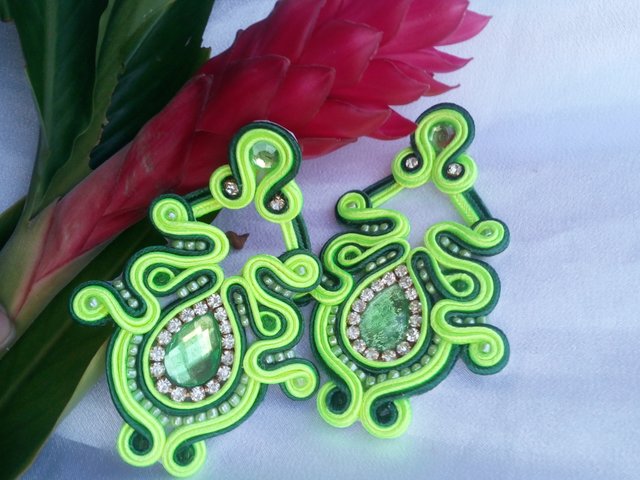
Hello hello, this is a spectacular day to learn a new model, it's a different innovator, to give that special touch to your daily oufit, I thought I would do it with autumn colors even if I ended up with these beautiful ones green tones so that in the tutorial you will notice the difference between each step as these colors stand out more.

First of all I really hope you like it and it will be of great help to all and tried to explain it in detail, I wanted to upload the video but not edit it or what program to use to do it I will be studying about it to do both the written edition step by step and the video

MATERIALS:
Soutache thread or rayon braid. Color of your choice
Piece of thick cloth or leather for the base
Flat tendril base
Strass 3 mm
Apply in the form of Drop 1.2 cm
Apply round plane 0.7 mm
Liquid silicon
scissors.
Ruler.
Lighter.
Encourage base use when working.
Eyebrow tweezers.
Mostacillas

Love, encouragement, and patience for what we do 😊😍🤗

I will explain it little by little according to the sequence of images, all the photos were taken by myself as I made this delicate piece and the collage is made with an excellent page that is called [Befunky] (https: //www.befunky. com /) I recommend it is easy and practical to use, the emoji and the number are placed with fotoefectos
Let's work: 🤗
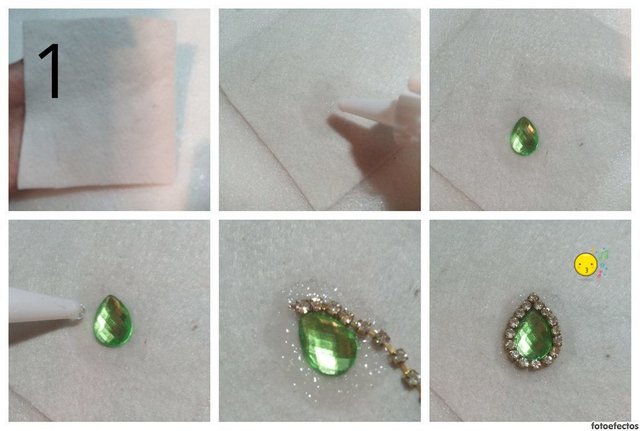
STEP 1: Cut a piece of thick cloth or leather for the base of the tendril can be 15 cm high by 10 cm wide, from one of the tips to 3 cm place a little of liquid silicon and there we will stick the applique in the form of a flat drop of 1.2 cm, after gluing the wall we will place liquid silicon around and we will stick the strass of 3 cm thick little by little all over the edge from end to end, I use 16 stones should be as you see in the last image.

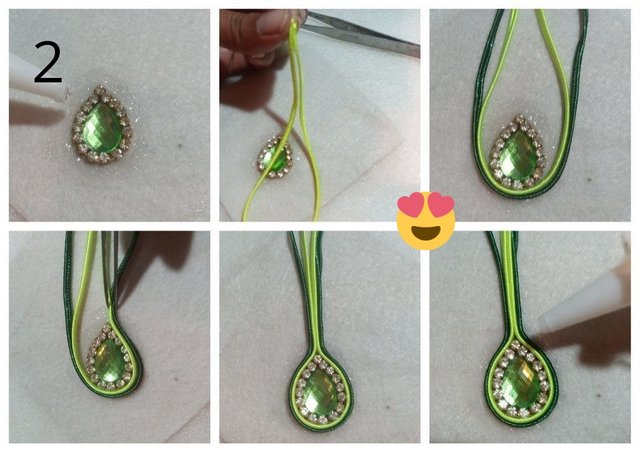
STEP 2: In this part we should see as the first photo, we are going to cut two threads of approximately 20 cm long each, so that you place it right from the center I recommend that some the tips and then the sticks, perform this process with both threads of the color of your choice, with the help of the clip put them well attached.

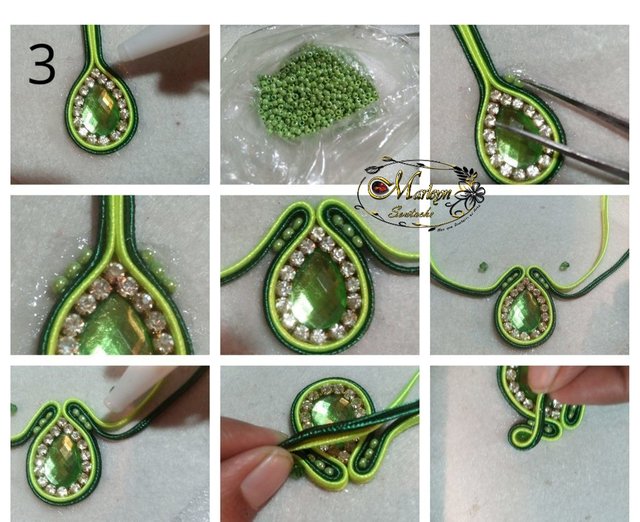
STEP 3: After sticking the strings, liquid silicone will be placed around the pampering and with the help of a tweezer and a lot of patience we will go hitting the 3 beads trying to place them see the gap, we will do this little by little from both sides liquid silicon spreads again and bends the two threads inwards as I show you in the images, fold the thread inwards and in each corner we will stick a bigger stone that is of your Pleases folding the thread back in. Cut the excess and burn the ends.

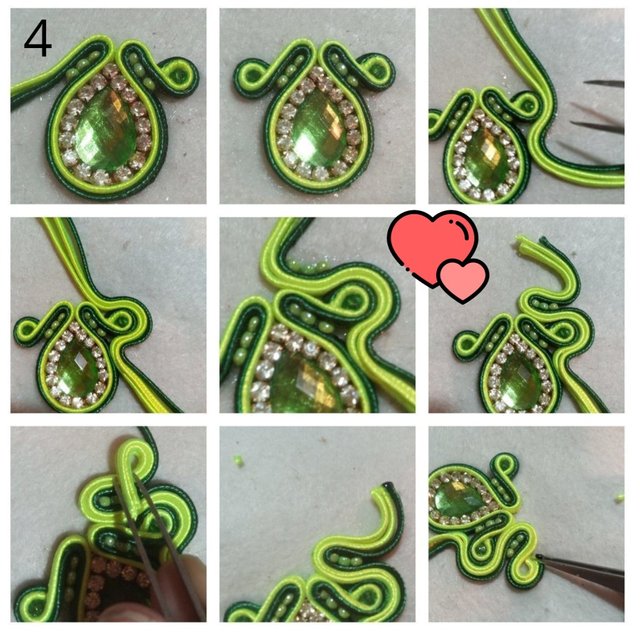
STEP 4: After burning and cutting we are going to introduce the tip into the thread as shown in the image, we will do the same on the other side, at the end it should be as you see in the second image. In one of the tips that we just finished we will stick 2 threads of about 15 cm each one we will stick it around all around it little by little you can help with an eyebrow tweezers so as not to dirty the piece with your fingers, in the upper part we will perform the same process as before, we will stick 3 beads, bend the remaining thread inwards, leaving a small circle, cut and paste it in as you did in the previous step. You must perform this process at both ends.

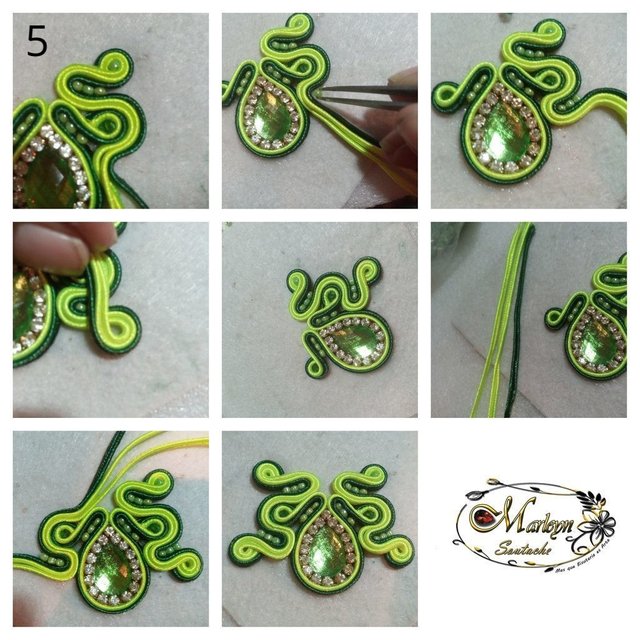
Step 5: in the circle that we left in the previous step you are going to stick a mostacilla or it can be a stone of the strass that is your choice, in this stage we will do previous step in the part of down little by little you will place liquid silicon and stick 3 beads to avoid seeing the gap of the mostacilla, bend the tip cut the excess, burn and insert the tip below the newly attached strands. Perform this process on both sides of the tendril, it will look like the last image of this step.

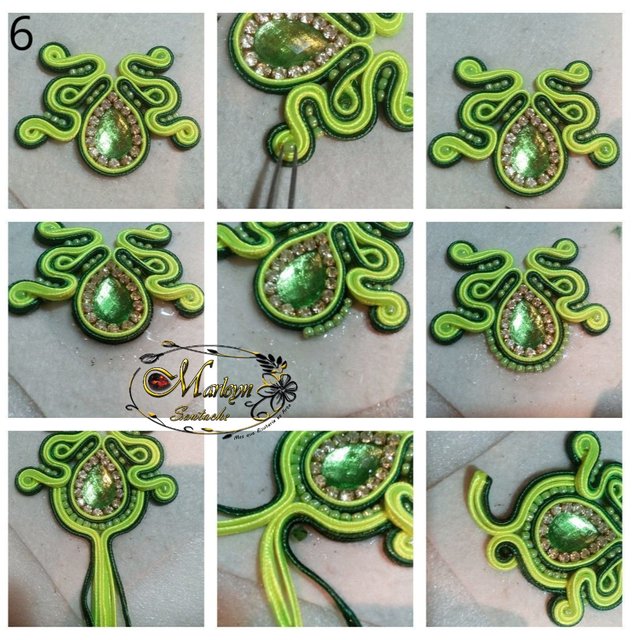
STEP 6: We have almost finished our earrings, in this stage verify the details, in the tips that we have left the small circles we can paste a stone of your liking, now in the part below of the drop we should spread liquid silicon and with the help of the clamp we are going to stick beads all along the edge, then cut 6 threads of about 10 or 12 cm long and we will stick 3 of each side as you see in the image 7 of the collage in step 6, now we bend the threads inwards leaving a small circle, cut to burn and introduce the tips below the threads already stuck, inside the circle stick a stone of your choice.

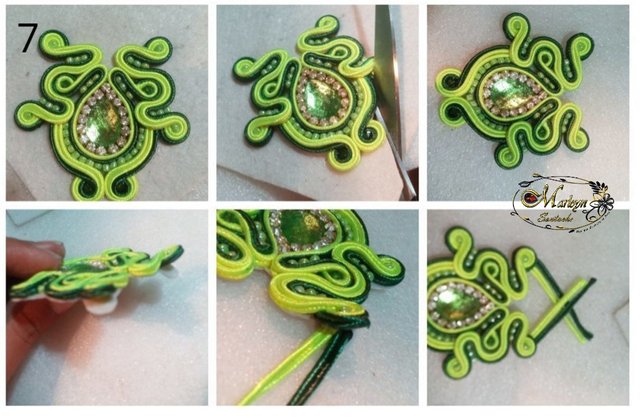
STEP 7: you're almost done with the first part, now we have to cut the leftover leather from our tendrils carefully along the edge, when we finish cutting the leather with a lighter the flame goes through all the quick piece with careful low fire, do not use candle because you stained it, the lighter of the certain brightness to the thread and seals the thread. to finish in the top part of the piece take off a little I show you in the image number 4, cut 4 threads of about 5 cm and place 2 in each tip liquid liquid silicone again and close again you can do a little pressure so that it is well stuck.

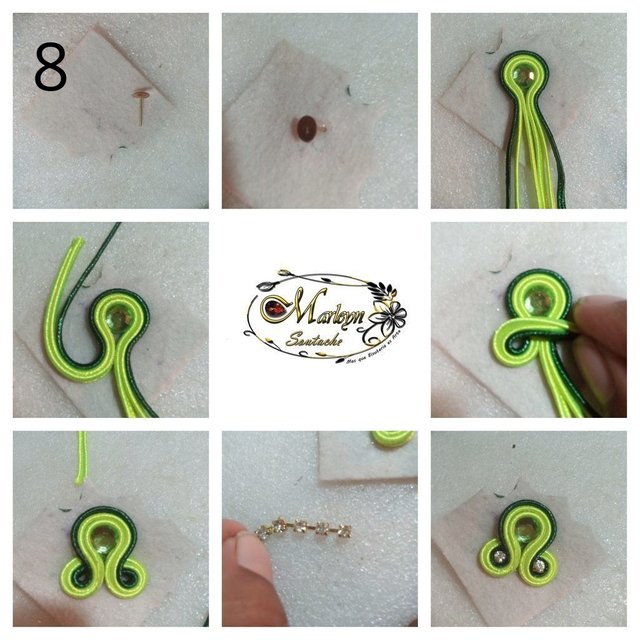
STEP 8: We are going to make the top and the end of the tendril or earring, you can use the leather that is left over from the part you have already trimmed, or a thick leather or cloth of some 4 * 4 cm in the top place a little liquid silicon and introduce the base for flat tendril, now place liquid silicone on top of the base and stick a round wall of approximately 0.7 mm, cut 3 threads of approximately 15 cm each stick them in the middle around the wall as you see in the image each tip to bend leaving a small circle, cut the leftovers burn the tips and enter the tip below, do the same on both sides, in the circles paste a stone of your choice I I decided to use a strass stone.


STEP 9: We have finished, in this step lift the threads already stuck on the topito that goes in the upper part of the tendril, cut the threads and burn the tips, introduce the ends in the top and we are finished, take these 9 steps again to complete the pair of tendrils. I love to take you by the hand in this process I hope you look beautiful your earrings:) ...
If you have a question write me a comment, I will be happy to help you with any detail, I hope that my designs like them as much as I like, learn with pleasure ... Thank you for your support and your incentives and donations with that I can buy more material and follow every day with the tutorials!

Never forget that Power is Wanting and if you want You can ...
You are Light you are Energy, YOU CAN ... That the infinite universe Conspire so that everything always is better ... They are wanted ...


Wonderful tutorial and jewelry @marleyn. Very thorough and easy to follow. Keep up the great work
You were featured in week 60 of @pifc's Pay It Forward Curation Contest by @deanndmathews. @pifc is a Pay It Forward Community which believes in by helping others grow we build a stronger community. We run this contest each week, it is open to everyone. It's a great way to show off people you find that might need some more exposure and meet new people. Plus win some SBI!!
I don't even wear earrings, and this was inspiring to me! Thank you for the time and effort you have put into not only sharing these earrings, but how to make them ourselves!
lot of work.
That's a very detailed process. It looks really nice!
Congratulations on being featured by @deeanndmathews in an entry for the Pay It Forward Contest