Dare to learn with me! Step by step tutorial of handmade earrings.
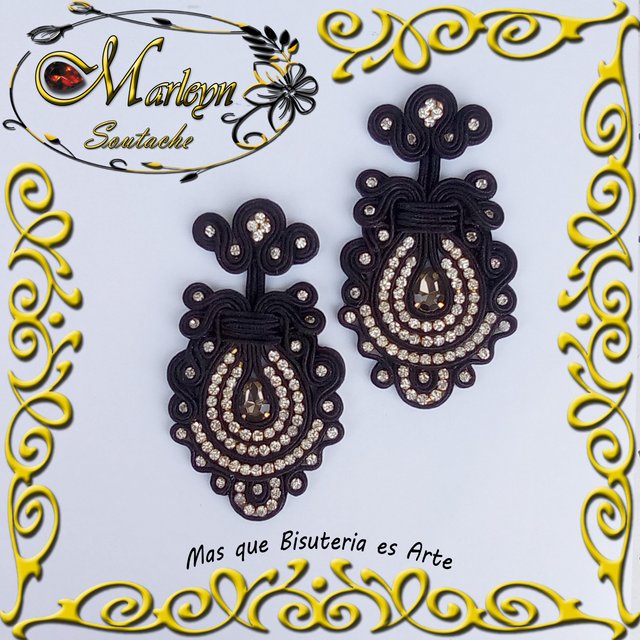
Hello this day new tutorial of maxi tendrils are spectacular and elegant for a super complete outfit on a special night, the measures of these tendrils are 10 cm high by 5.5 cm wide are quite light , if you follow my steps according to the sequence of images it will be easy to create them.
The collage is made with an excellent page called Befunky, I recommend it is easy and practical to use. I wish you like it, as you already know it more than my work, it is my passion, I love what I do, I share it with you with a lot of love ...
I thank the Universe for this new day of work. I really believe that in this life we are all teachers, in some cases we have to be the students, and in others the teachers of someone else, always what we resist persists in our life, in life we will have many obstacles, people that we do not like but they are there to teach us something, as well as sometimes people who will be like a beautiful and warm light that light up our lives and guide us along the path we must go, find what you want, and with what you have learned, fight and follow forward
If you have a question, do not hesitate to write me, I will be happy to help you.

MATERIALS:
Liquid silicone
Anime to use base
Eyebrow tweezers
Soutache thread
Strass 3 mm
Apply drop shaped drop 1.2 cm high
Flat base for tendrils
Lighter
Scissors
Love, encouragement and patience ... Step by step we will learn!

Let's work: 🤗
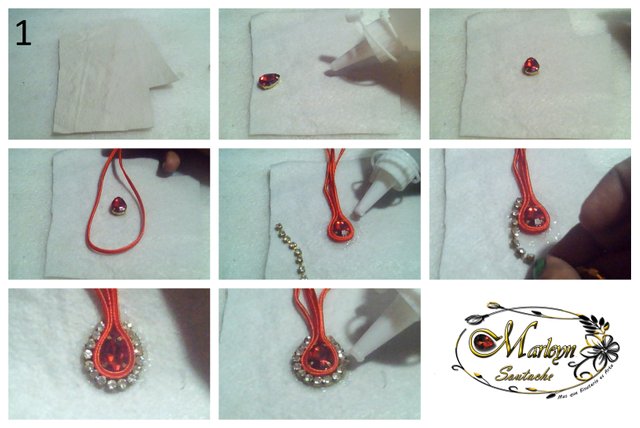
STEP 1: Cut a piece of thick cloth or leather 9 cm wide by 14 cm high, approximately 5 cm we will put some liquid silicone and stick the flat sconce in the shape of drop, when I speak of apply crimped is the stone that comes in a metal base can be silver or gold according to our preferences, when finished gluing it, we will spread liquid silicone around the stone and cut 3 threads of 8 cm long approximately each one with the help of our clamp we must stick it around the appliqué when finishing to stick the threads re-spread liquid silicone and we will stick the 3 mm rhinestones approximately 15 stones that are approximately 9 cm long.

STEP 2: In this stage we put liquid silicone around the previously glued Strass cut a thread of approximately 9 cm and little by little with the help of the clip we will stick it, at the end of paste it back put liquid silicone and stick another line of Strass this time of 23 stones or 13.5 cm long, after finishing the Strass cut a third thread about 10 cm long and stick it around the rhinestones and stuck should be like I show you in the sequence of images.
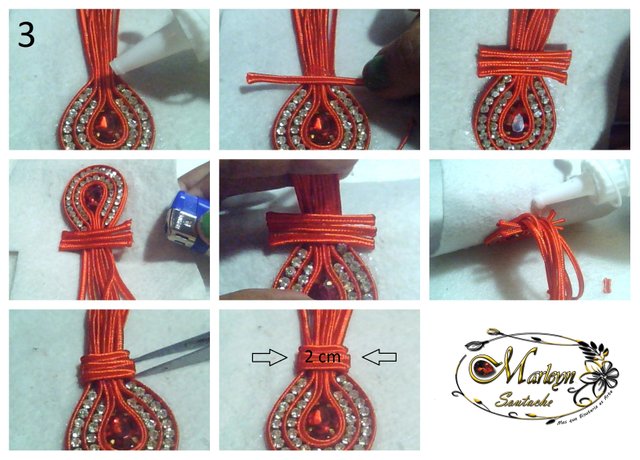
STEP 3: In the upper part where all the strands are joined, place a little liquid silicone and cut 3 threads of approximately 4 cm each to stick them on the previously stuck threads, cut if there is much leftovers and burn the ends, carefully lift the threads and place liquid silicone both the back of the threads and the leather, with the help of the clamp to introduce the threads under the others to hide the tips you should not squeeze them much width will be about 2 cm. You can look at the sequence of images for more detail.
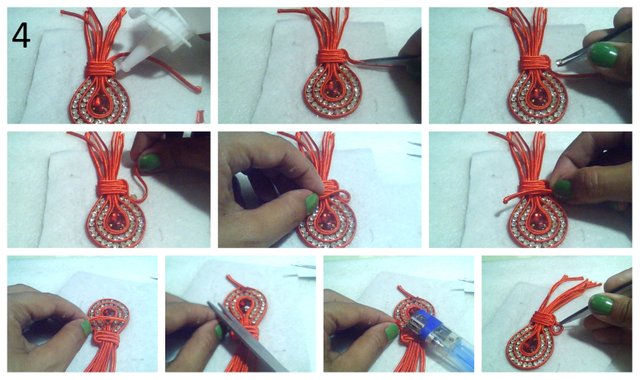
STEP 4: We are going half way 😜 to one side of our piece place liquid silicone and lower the first thread carefully as I show you in the first images, cut a 3mm Strass stone and with the help of the clamp to stick it in front of the thread that we have just lowered, fold the thread to cover the Strass that we paste, mark the excess cut, burn the tip and with the help of the clamp, insert it below for a better finish, follow the sequence of images for a better understanding.
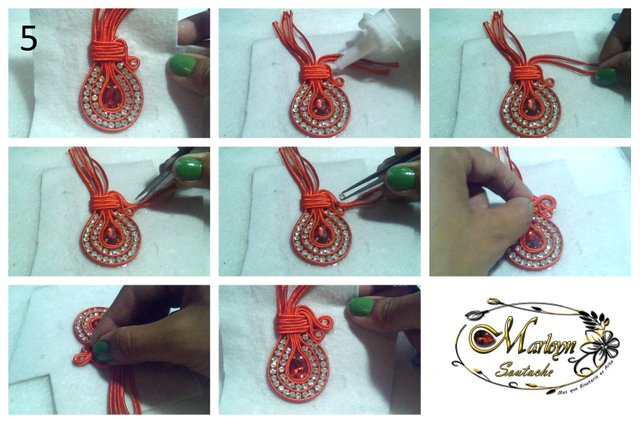
STEP 5: Look at how good we are being it is easy and fast. Now we continue to lower the next two threads with the help of the clamp and paste them cut a stone of 3 mm Strass, paste it in front of the thread with the help of the clamp, bend the remaining thread to cover our stone, mark cut and burn the tips with help of the clamp to insert the same ones below the previously glued for a better finish.
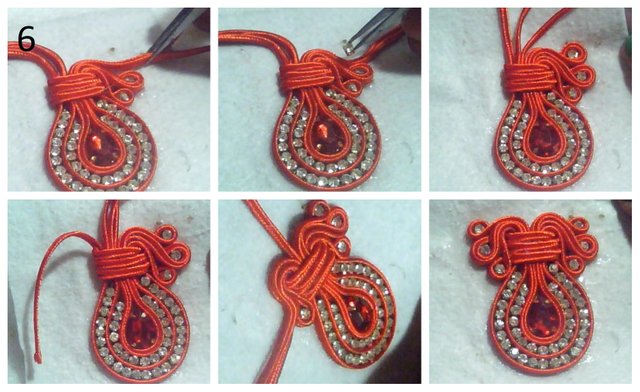
STEP 6: repeat step 4 and 5 in the thread that is missing from the right side and repeat the process on the left side of the tendril.
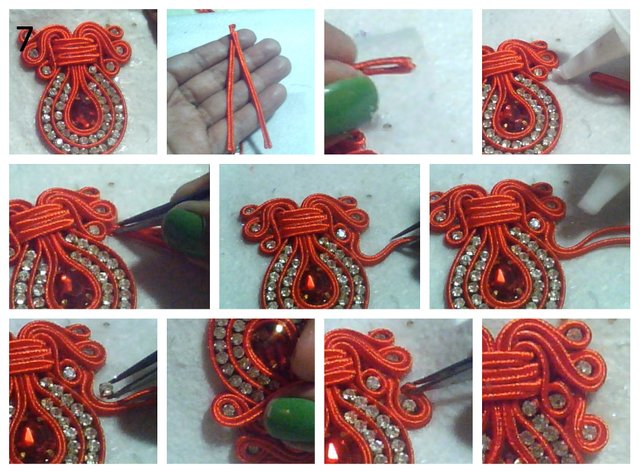
STEP 7: At the end of the top we will cut 2 threads of 6 cm long each, join the ends and burn with a lighter, place a little liquid silicone between the first and second stones stuck as I show you in the sequence of images and with the help of the clamp insert the two tips that you just burned put more liquid silicone to continue sticking the thread down, cut a stone of 3 mm Strass place it in front of the thread already pasted with the help of the clamp with the remaining thread stick it around the stone, mark the thread remaining cut burn the tips and with the help of the clamp introduce the threads below the previously stuck, it should be as I show you in the last image, I recommend patience step by step without hurrying you will be beautiful !!!
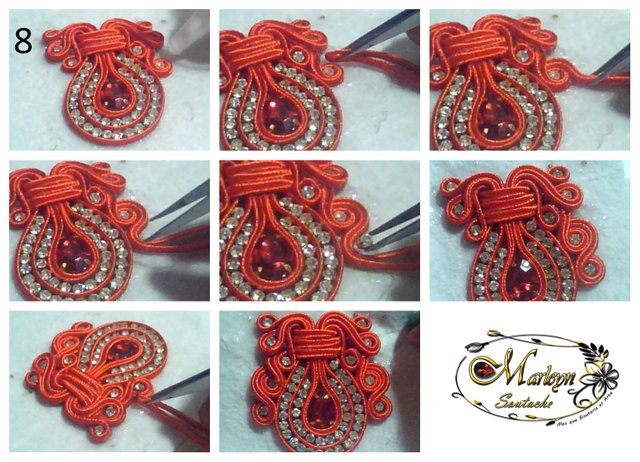
STEP 8: At this stage we must again cut 2 threads of about 6 cm, join the ends and burn them together, place a little liquid silicone on the stone that you hit in the previous step. see in the images and with the help of the clamp insert the tip of the threads from below continue sticking the thread down using the same clamp cut a stone of 3 mm Strass paste with the help of the clamp with the remaining thread cover the stone cut to burn the tips and insert them below the previously stuck. Repeat the process on the other side of the tendril.
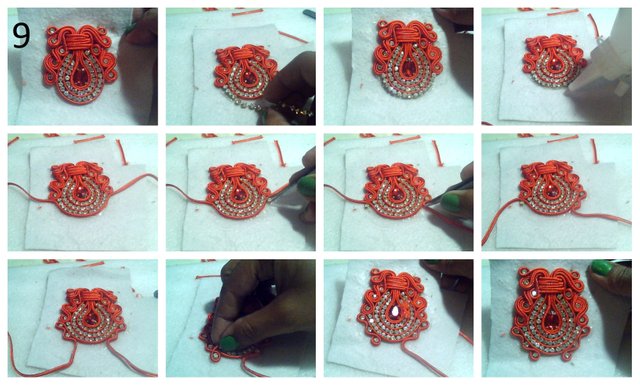
STEP 9: This looks beautiful and shortly, in the bottom of our piece smear a little liquid silicone stick 15 stones Strass 3 mm, we put back liquid silicone and this Once we stick a thread of 20 cm long try to paste it just in half so that the surplus is the same size on both sides, cut a stone of 3 mm Strass paste it on the tip bend the thread, put more liquid silicone and stick the thread in a distance of two stones, cut again a stone of the Strass and paste it you can look at the sequence of images, cut a stone of the Strass place this time outside the thread paste cover it with the remaining thread mark the excess cut burn the tips with the help of the clamp introduce them below the previously stuck, perform this same process on the other side of the tendril. remember to look at the details of the sequence of images to help you.
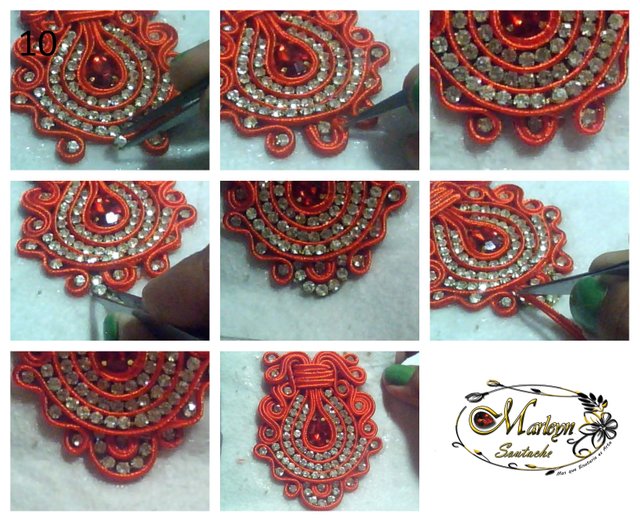
STEP 10: Right in the middle we have to stick a stone of the strass 3 mm, cut 2 threads of about 1.5 cm and I use a patch to recycle and I have almost no thread for the tutorials 😅 burn both tips and stick it around the stone that you hit by inserting both ends below the previously stuck, then we put back liquid silicone and we will stick 7 strass stones with the help of the clip, now we will cut a 3 cm thread and we will stick it around the strass With the help of the clip, you can help with the sequence of images.
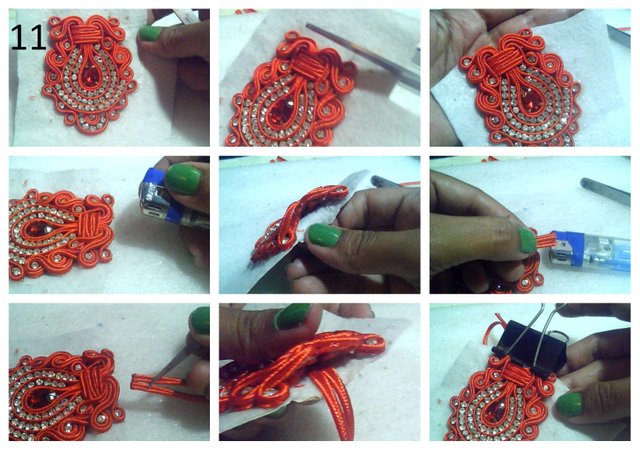
STEP 11: Cut the leftover leather bit by bit so as not to damage our piece when you finish cutting, pass the flame of the lighter on all sides to seal the threads, when you finish at the top, take them off a little, cut 2 threads of about 3 cm burn the tips and with the help of the clamp insert them between the threads and the leather close, making pressure so that they stick well.
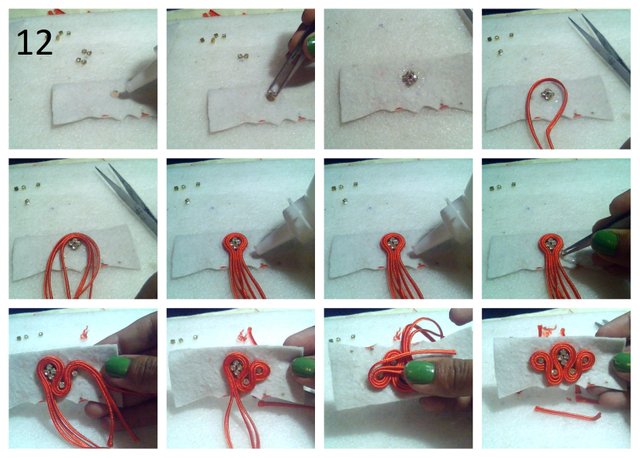
STEP 12: Let's make the top part of our tendril, we can use the remnant of a leather as you will see in the sequence of images insert the tendril base in the leather, place liquid silicone on the same, cut 4 stones of two rhinestones and apart two more to place them as a diamond, cut 3 threads of approximately 15 cm each stick it around the previously glued rhinestones you can help from the clip next to it we will place liquid silicone and stick a stone of Strass up the thread sticking little by little and again put another Strass stone fold the thread to cover it cut the excess, cut the tips burn and paste insert the tips below. perform the same process on the other side. reviewing the sequence of images is easier to understand
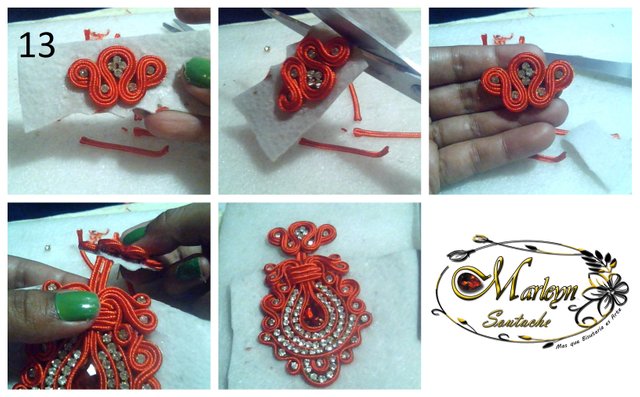
STEP 13: We are finishing at this stage you must cut the leftover leather with care of or damage the piece, at the end of passing the flame of the lighter through the thread to seal it, lift a bit as soon as possible glued and introduce the two threads that were stuck in the previous piece to the distance that you want I placed them at 1 cm away to paste it to make pressure and you will have your piece completely ready. From the heart I hope you like it and do it with love and encouragement


¡Saludos! Tu post ha sido votado y ha tenido resteem por el proyecto @votomasivo.
Apreciación: Muy lindas tus piezas, este trabajo se ve que requiere de mucha paciencia y concentración. Hay que hacer muy meticuloso para obtener buenos resultados.
Curado por @fulani
¡No olvides invitar a tus amigos a unirse a nuestro trail de curación para apoyar post de calidad!
También puedes apoyanos uniéndote a nuestro fan base y delegándonos Steem Power. ↓
Sé parte de nuestra comunidad en Discord
That looks almost "Marine Proof"; meaning, even I could probably do it!
Nice tutorial.
Namaste, JaiChai
Hi, @marleyn!
You just got a 0.12% upvote from SteemPlus!
To get higher upvotes, earn more SteemPlus Points (SPP). On your Steemit wallet, check your SPP balance and click on "How to earn SPP?" to find out all the ways to earn.
If you're not using SteemPlus yet, please check our last posts in here to see the many ways in which SteemPlus can improve your Steem experience on Steemit and Busy.
Congratulations @marleyn! You have completed the following achievement on the Steem blockchain and have been rewarded with new badge(s) :
You can view your badges on your Steem Board and compare to others on the Steem Ranking
If you no longer want to receive notifications, reply to this comment with the word
STOPVote for @Steemitboard as a witness to get one more award and increased upvotes!