Dare to Learn with me! Step by step tutorial, Necklace or Choker handcrafted under soutache technique with my personal touch Part 2
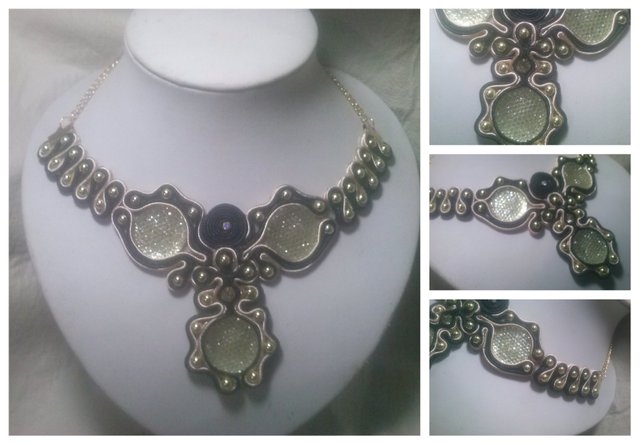
Hi, today I write the second part of this step by step, sorry for the delay I did not have internet, as you see this necklace or Choker is magnificent is very original and elegant, I try as much as possible to explain it easily and in detail to make it I practice the tutorial understand, those who know me know that this is my passion and I do it with love and patience with the desire to inspire them and thus ignite their creative flame to create their own pieces ... It's easy you just need to try ...
In the previous publication I explained step by step how we should make the center of the necklace with detail you can find it Right Here part 1

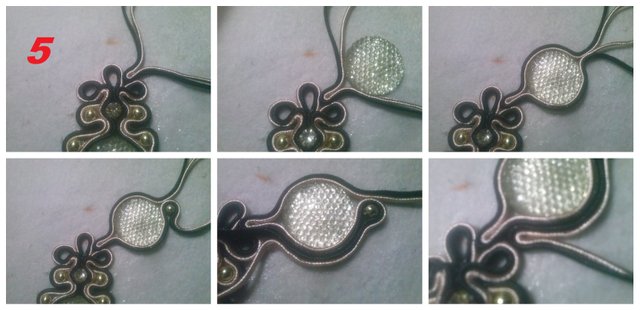
STEP 5: We will start from the right side just above the first thread we stick, we will cut 2 threads of approximately 30 cm each one of the color of your choice we will stick it 1 cm only thread then we will place liquid silicon and it will stick the round sconce, we return to place liquid silicone and stick the thread around it verifying that we do not leave spaces between the threads, we return to place liquid silicone and stick a balin pearl of your choice and with the remaining thread we will surround the balin or pearl chosen the remaining thread we will stick it again around the wall until we get back to where we started as I show you in image number 5 we put liquid silicon again and fold the thread out again, you can help the clip so as not to dirty the threads with the same Stick that gives the piece bad quality.

STEP 6: We will bend and stick the yarn out about 0.5 mm and we will fold it out again forming a circle, you can help with the marking pin and cut the threads will burn the tips and we will introduce it from below carefully. Now we will do the same of step 5 but this time in the upper part of the appliqué, we will fold the thread upwards we will place liquid silicon we will stick the first balin and we will cover it with the thread we will stick approximately 0.5 mm only of thread and we will place the second balin, Then we go back to stick approximately 0.5 mm of thread and stick the third balin or pearl chosen, stick more thread until we get to where we start in the wall we bend up and form a circle we mark cut the remaining thread burns with the lighter the tips and introduces the thread below the threads already stuck the idea is that the tips are not seen so that it has an impeccable finish.
STEP 7: We must repeat step 5 and 6 only this time on the opposite side with love and patience do not worry if you are wrong in something this is trial and error little by little you learn and you will make wonderful pieces this should not be an exact technique as you do it, you are giving shape according to your taste and creativity.
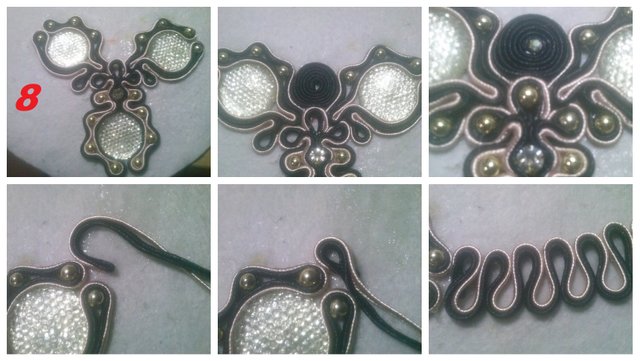
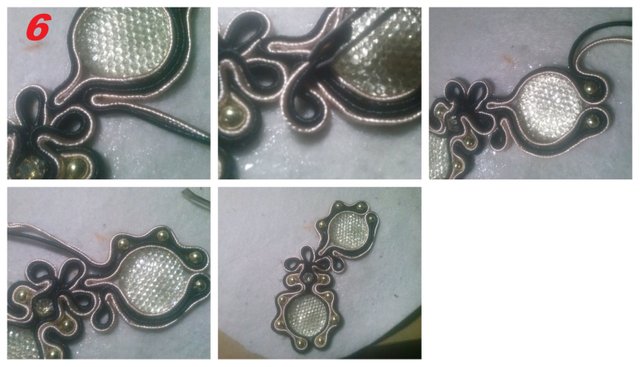
STEP 8: We will make the circle that is right in the middle with a thread of 25 cm long, we will stick it with a little liquid silicon, taking care not to dirty it, we will place a little liquid silicon and stick a stone of strass of 3 mm, you can place some pearl or balin of your taste. Now we are going to cut 2 threads approximately 32 cm long each one burns the tips together and we start to stick it as I show you in picture 4, making circles up and down 5 circles up and 5 circles down that are about the size of the balin or pearl that we are going to place, performs this same process on both sides.
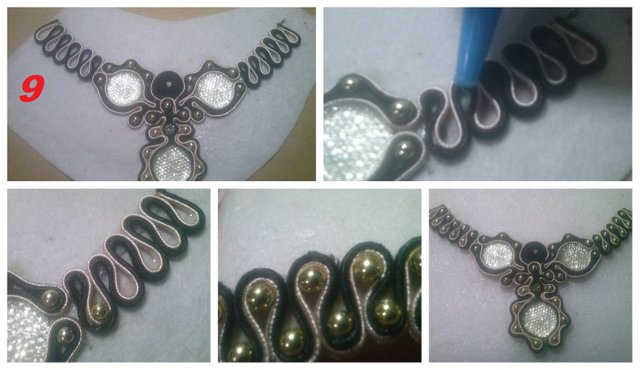
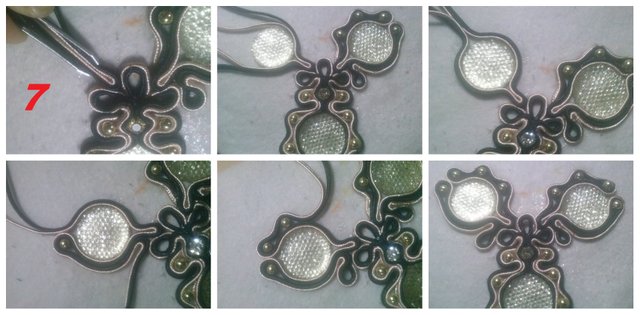
STEP 9: At the end of making the circles on each side of the necklace, we will proceed to smear a little liquid silicon in each of the circles we have made to paste the pellets or pearls of our choice. Wait until it dries just a little and trim all the leftover leather. If the silicon is still fresh it is easier to cut it because the piece is more manageable
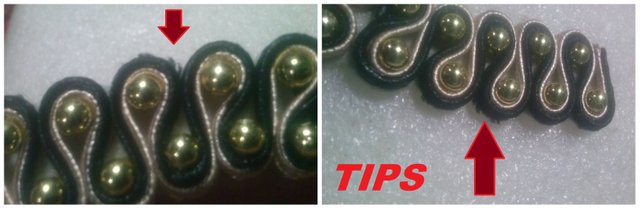
TIPS: There are times when cutting the leftover leather of the piece we break the thread a bit and we are seen in this way, you do not have to worry, it happens to us all more if our scissors do not cut enough, in this case what we should do is to pass the flame of the lighter little by little all over the piece that seals the thread and is left with a smooth and neat shiny finish.

STEP 10: We will cut 2 pieces of chain of 10 cm each part the chain while it has the smallest links it looks better and much more delicate with the help of the costume jewelery clips we will join the handle or suitcase with the chain with the help of a hoop or ring of jewelery this in both pieces of chain, then we will join both pieces of chain with a ring or hoop we put the brooch and again another hoop or ring that will hold the other chain, we take the necklace with the suitcase or handle we tighten carefully with the help of the jewelery clip and you have this spectacular necklace ready.


Really beautiful result and clear tutorial @marleyn, though I don't wear necklace or chokers😊 but I like beautiful handmade things. Thank you for sharing this with us.. keep steeming and wish you continued succeed
Beautiful choker and excellent tutorial.
Namaste, JaiChai