Last Minute DIY Alternate Hurricane Anchors (mobile homes etc) AND My Advanced Hurricane Ice Guide
If you find yourself trying to anchor your building down at the last moment, and anchors are all sold out, well I've got something even better (that may be CHEAPER).
AND
Forget about wasting money on bags of ice, which will be sold out, I've got something better (that's FREE).
So I'm in a all steel mobile building, double wide. Similar in concept nut not quite a mobile home. I couldn't afford the hurricane anchors by the time I got this property ready and got it here. Went last year got edges and hits by multiple tropical storms even a piece of some hurricane. Had wind gusts get up to around 50MPH or so but not felt the thing wiggle. Whatever. But then here's comes Hurricane Irma, the 'most powerful storm in the history of the known universe', and those last couple days they had the final track the thin black line version went straight over top of my roof for all intensive purposes...
DIY ANCHORS
I went to get anchors during the week before Irma but nope already sold out. Expected that, and I already couldn't afford the storm as it was. So it was time to invent something. I grabbed the damaged bags of cement stuffs for the 50% discount, and back home to dig around the shop.
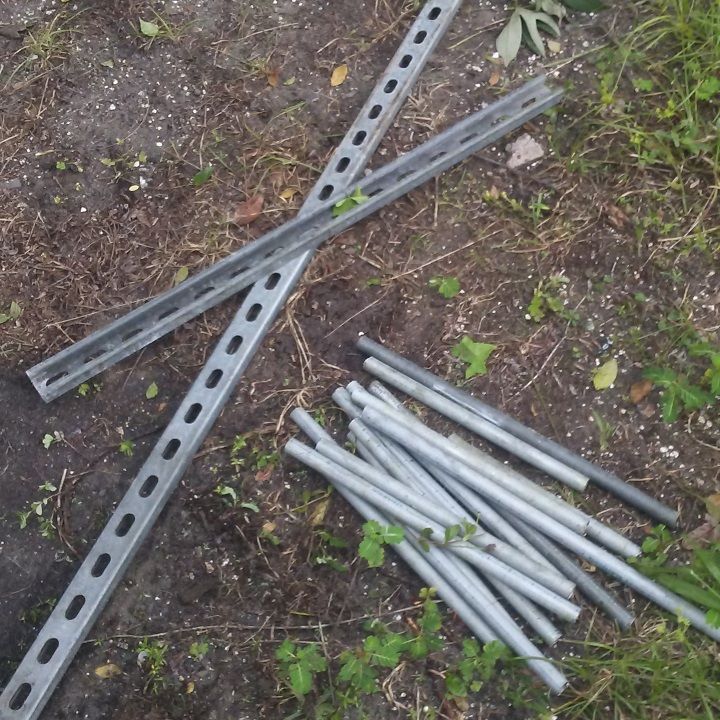
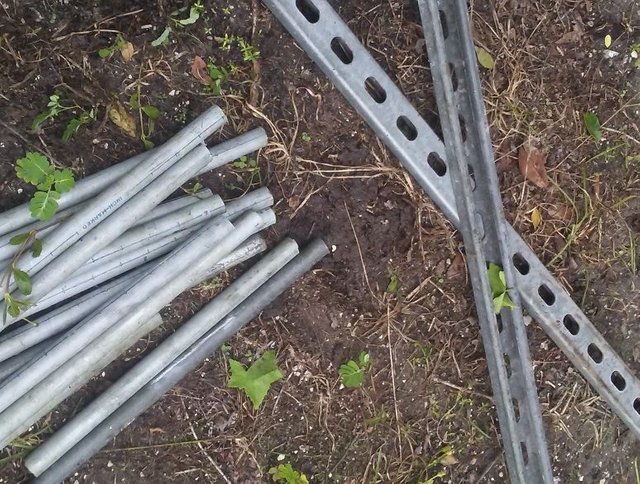
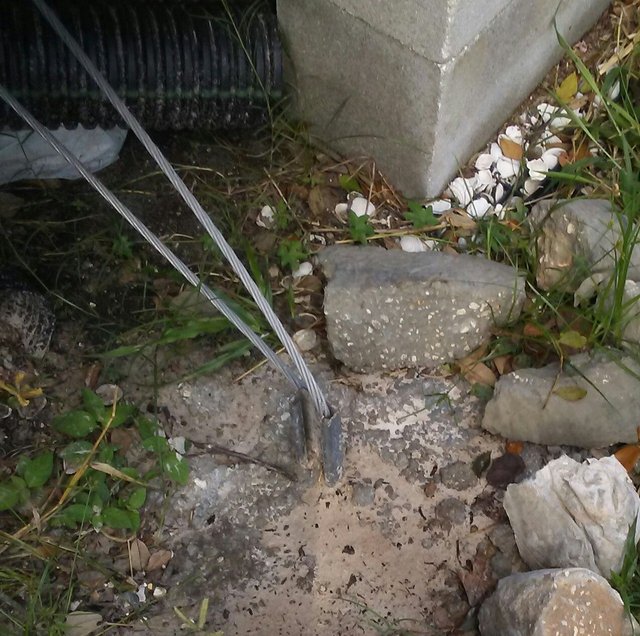
Amongst my metal, of use, I had one and a half beams of "Unistrut" and 1/4" conduit pipe. Unistrut is the metal beam material used in commercial construction. It lays across the proper trusswork, bolts down, and then electricians and 'tin knockers' anchor / strap their electrical / duct work to it. It has nice big holes all down the sides almost perfect to slide a section of conduit pipe into...
As you can see the holes are more oval shape, but a little hammer action to slightly flatten them out and viola:
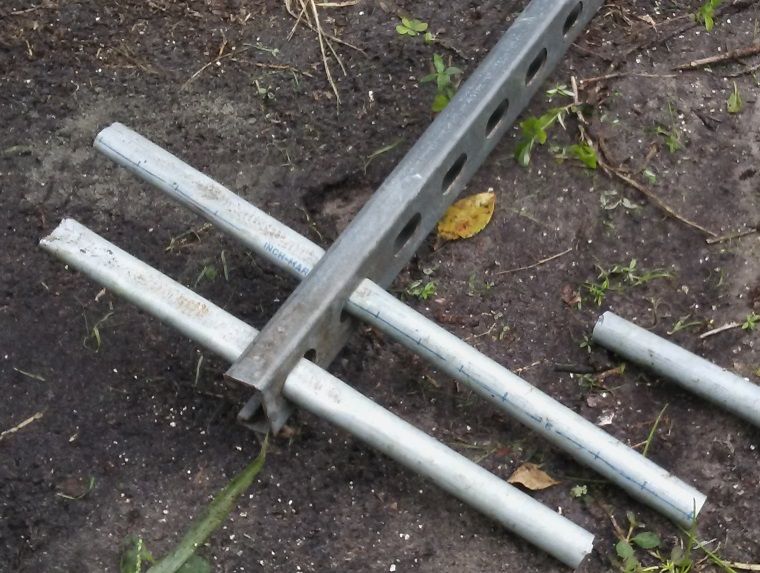
Now you want to cut the conduit longer than the space, and to insert you slant them all down the one direction and then tap them level as you reach the unistrut into the bottom of the hole (which is caverned out down in the bottom). I ended up having 3-4 conduit cross pieces per anchor (the more you can mange the better).
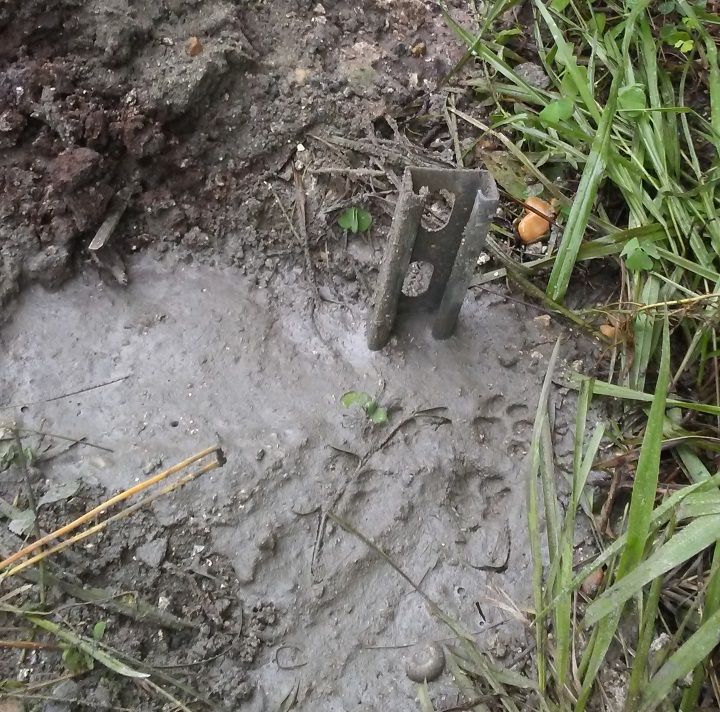
I had several bags of semi-hard cement on hand so I smashed all that up and rammed the chunks down in there while pouring the wet cement, all methodical like.
You just need a sawzall to cut both materials, and get about 3 'anchors' per 10' stick of Unistrut. Unistrut is about $20 per stick, proper anchors are about $20 each.
Now I only had enough for 4 anchors, when normally with the base area of this building it'd have maybe 20 anchors or a little less.

But I wasn't too freaked out because normally anchors are either drilled in via their auger heads and thats it. Since most of the ground down here is sand, and auger bits having or 4" or 5" or whatever auger bit tip, I figure my anchors cemented in real nice would have to be worth every bit of 3 normal anchors.
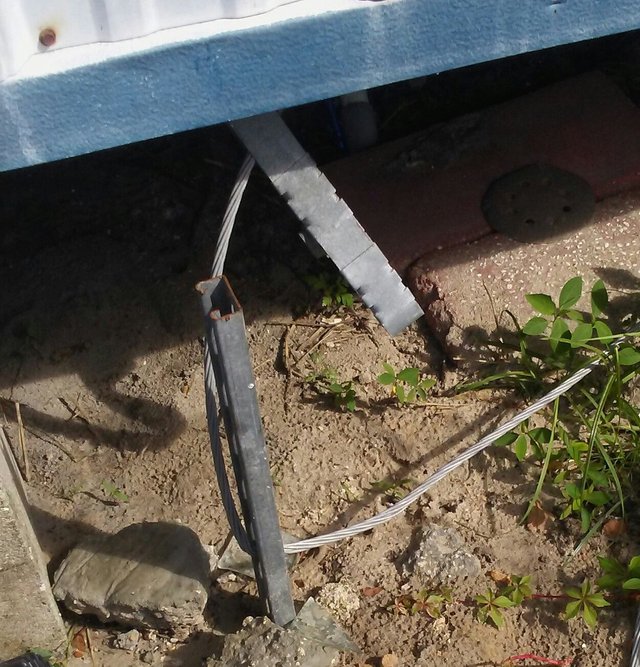
The trick is how to attach the building to the mere four anchors in a way that would match the strength of '20' straps hooked down. Normally the straps are some nice sturdy sheet metal strapping, but I happened to have some 300' of 3/8" aluminium rope on hand, so got the proper clamps and snaked the rope all into the steel truss etc under-carriage through the anchors and clamped them tight.
The hook up part was a blast as I was trying to save that for last amongst preparing a mountain of equipment etc on this property for a direct hit in a big block barn building sure to blow away... so was going to do it at like 4AM before I went to bed, to then be able to evacuate to the big city first thing in the morning. Prolbem is when I was working in the dark in the barn I got stung by something BAD on my finger, where normally bees / wasps stings barely even bother me after and here my whole hand was swelling up and all my body joints started aching within 20 minutes tot eh tune I was pretty sure it must have been a black widow. So at 2AM my whole performance schedule was wrecked.
So when I got up I had like an hour left to finish a bunch of other BS inside and out, aluminum rope the building to the anchors, herd the cats and pack the truck and not forget to do anything. all while the hurricane was already blowing and hard spritzing.
I came to find out that since the rope was in 3 100' strands, used, all coiled as one, to separate them and then wrestle the over-lengthed ropes to each side under there, in the dark on a bunch of beers and 72 hours intense prepping, yeah that wasn't going to work well alone in the dark.
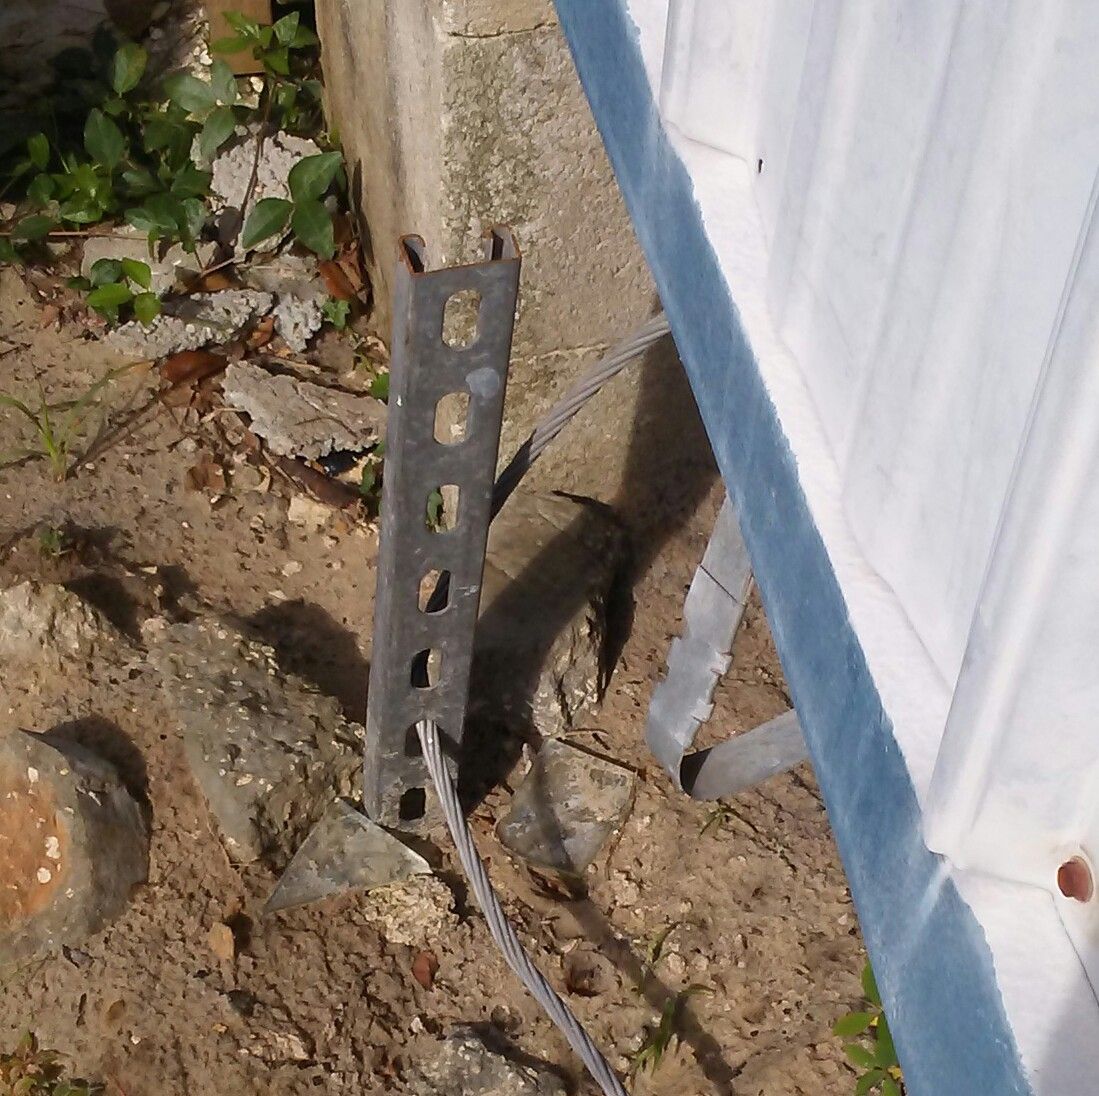
Here you can see a standard sheet metal strap dangling (I wanted to hook those too where possible but was out of time):
But I managed, got out in time for if it did hit, which it 'didn't', and I wasn't going to lose a finger whatever bit / stung me. And as I could tell we did have here winds go well beyond the 50MPH+ I seen last year, its wasnt too bad and the building was perfect.
Yeah I wanted to get this method posted earlier but the hassle caused by the 72 hour 'Hurricane Me' on the place, and the storm itself, in conjunction with this damn phone almost never shows up when I plug it into the computer here, this is as soon as I had the photos and everything ready.
DIY ICE
Note in the past I'd just make 'bars' / blocks. This year I realized I could fill gallon ziplock bags, double bag and then freeze them. This worked out well as they're kind of flat. I made about 8 of them and had everything else froze solid so when I pulled out of here I had 3 coolers of almost solid ice.
However, if you have the materials on hand and the space, my friend e took it up a notch and froze gallon jugs solid.
But the following insights work perfectly good too.
As posted elsewhere in the forum earlier this year:
Dont buy bags of ice. They melt in a day.
Get out all your plastic tupperware containers and make bars / blocks of ice. Start about 4-5 days out and keep rocking em. Just dont fill the containers over half full or the water swells up and breaks the tubs.
A coolers stuft with blocks/bars last up to a week.
In planning a big move its occurred to me to set about freezing everything I possibly can in the couple days before I break down the fridge. I have a ton of jars and bottles of fancy sauces and such for example. Basically freeze everything solid and cycle them back into the fridge (turned to max cold) while wrapping up as many item that last 48 hours. Creamy stuff frozen solid should hold its core temp longer than frozen water would. The more solid the item the better if you've ever tried to thaw a thick meat inside the fridge then you'll know it doesnt go so quickly. So make nice solid ice cubes out of your mustard, meat, etc. Everything but your produce really (fresh produce typically needs to be 'blanched' before freezing).
While rubbermaid type plastics crack if over half full with water while freezing, pretty much everything you buy that goes into the fridge should freeze solid fine without that issue.
So freeze your milk, and everything else that last couple days.
And make some bars of ice (see page 1) too if there's time.
And some cubes for making drinks.
Power goes off immediately open the fridge doors and start transferring everything into coolers (now afforded with not having to do it in intense haste.
And make sure you leave those fridge doors open the whole times it off.
Eat the ice cream asap, and then get drunk till the power comes back on...
There's lots of little things...
With meats, worse comes to worse and too much meat and too long of no power expected, cook all the meats on the grill and then pack back into coolers. Well, if you cant refrigerate, they might sit better at room temp NOT in dark in plastic bags (where mold becomes the menace).
Cooked meat has an entirely different bio profile than raw meat. Consider beef jerky for example. Raw meat goes bad in half a day a day in room temp. Cooked meats can go much much longer. Raw meat turns rancid. Cooked meat hardly does that. Other decomposition forces tend to do the job with cooked meat, and over longer periods. And don't forget, as long as meat isn't rancid just reheat it again. You're body wont let you it it for most of the worries. The thing with bacteria is, unless the meat came pre-loaded with disease germs then they aren't just going to appear because you left it out (especially not after a full cook). If you can eat cold pre-cooked meat from the fridge without hardly ever getting food poisoning your whole life then yeah. Truth is most the meat 'left out to long' metrics are for restaurants where lawsuits are on the line, where the cooking staff is doing everything assembly line style and need to maintain strict easy to follow standards. You at home with your personalized touch, you'll know whats whats, what each specimen has been thru since you got it home and you're not going to sue yourself so don't freak out too much about some of those semi-paranoid USDA numbers. Just recook it real well if you're not sure. You eat something on the order of pounds of bacteria every however many months. And for all you germaphobes: your very own body had some 15 pounds of bacteria living inside it, and you'd DIE without them.
Fish is an exception. Seafood really ins a whole nother animal in this. I'd tell you to follow the USDA guidelines, although I doubt your body would allow you to eat anything gone wrong.
If you keep a big jug of lemon juice (best purchased at little ethnic grocery stores) then you can store the fish at room temp in the lemon/lime juice, and it will actually "cook". AKA "Ceviche".
Water the other big one. It gets bad enough there's always water in the toilet tank, the hot water heat tank, the pipes under the house.
I've gone literally months remote with no water power etc. The thing I never read about in survival pages on the water topic is the water you 'need' (that you aren't going to drink).
Fill you tubs to the brim to run the toilets, and for wash.
Just scooping water out of a bucket you can actually get just about a full bathing off a gallon or two.
I'd prefer to have a bunch of rubbing alcohol on hand for the feet.
And those aloe 'adult baby wipes' for the rear.
Your rear and your feet are what get nasty. Keep those clean, if not breaking much of a sweat all day and not getting 'actually' 'dirty' you can go longer than you might expect without a shower and not even be nasty / smelly. Although getting sweaty necessitates a bathing more than just getting 'dirty', as your arms get all dirty you can just rinse them off real quick. Sweat is what makes your body sticky, and after you get that sticky feeling it makes you feel hotter than clean dry skin.
But make sure you have all your undies and socks clean in advance. You need to change those.
If you'll be sweating all day you'll want some medicated body powder from the dollar store.
And if you wear double layers of socks your feet wont get all nasty sticking to the bottoms of your shoes even on LONG hot labor intense days in dirty old work shoes.
COOLER TIPS
-Ice melts into... water! Everything is in there with it: You'll be compelled to drain the water, but to get maximum ice durability you must leave the water in there. You'll be compelled to pour the ice in from the bag it comes in, but you must leave it in the bag for maximum ice durability. This will help with the water issue, maybe. But count on water. Therefore have a big box of ziplock bags, and bag all that stuff up. If water could readily penetrate the an item once in the bag, then you need to double bag it (this include shredded cheese that's already in its own bag: it will fill with water if in only one added bag). If you're using your own ice and have some suitable bags bag it up. Keeping the air off the high surface volume ice is the key, whether it be in a bag, or in water (ideally both, in cells). One gallon tupperware tub can be nice to put stuff into of course, and it should float when the ice melts. But space is an issue to you'll just have to figure it out with what you've got, of course.
-Set one cooler up for stuff that you wouldnt get around to needing to get into the next 'up to a week'. Then have the other for the stuff you'll want the first few days of no power. The long haul cooler tape the seam, wrap it in space blankets, then pile blankets and stuff on top of it. And DO NOT OPEN IT unless you get some ice to dump in later. You can also throw extra insulative layers over the quick shot cooler as well.