Basic programming course: Lesson #5 Control structures. Part 2. Cycles
Hello everyone! Today I am here to participate in the basic programming course by @alejos7ven. It is about learning the basics programming specifically control structures. If you want to join then:

Explain the cycles in detail. What are they and how are they used? What is the difference between the While and Do-While cycle?
If we generally think about the cycles and implement in our daily life then we get to know that this is something which repeats itself. In programming cycles refer to the loops. These are the control flow structures. And they continuously repeat a set of instructions until a certain condition is met.
These loops allow the same code to be executed multiple times. So they help us in handling the repetitive tasks. Whenever we need to perform the same things with same scenario and structure we use loops.
There are different types of loops. And they are used for the iterative data. They wait for a specific condition or event to be met before executing. We can use loops for the continuous processing of the information.
Types of Cycles (Loops)
There are 3 types of loops which are given below:
- For Loop
- While Loop
- Do While Loop
For Loop
This loop repeats a block of code at a set number of times. It is used when we exactly know how many times we want to iterate our code. It has simple structure which includes intialization, condition and increment or decrement. And the syntax is written in a single line of code.
Syntax:
for (initialization; condition; increment/decrement) {

// Code to execute repeatedly

}
Initialization: This step is executed only once at the beginning. It is used to declare and set an initial value for a loop counter.
Condition: This condition defines that the loop will run as long as the condition is true. Once it becomes false the loop will stop.
Increment or Decrement: This part adjusts the loop counter after each iteration. If we use increment operator then it increments the value of the loop counter after each iteration and If we use decrement operator then it decrements the value of the loop counter after each iteration.
Example
 |  |
|---|---|
Here:
- I have intialized an integer variable i as
int i = 0 - I have given a condition for the number of iterations as
i < 5 - As I have started from 1 and I have to reach <5 so I need to increment the variable after each iteration so I have used increment operator as
i++.
This loop prints the numbers from 0 to 4. We can customize the iterations by changing the condition. Further we can change it to work in the backward direction. We can also maintain the increment and decrement values.
While Loop
A while loop is used when we do not know the number of iterations. But we want to repeat the code as long as a condition is true. The condition is checked before each iteration of the loop.
Syntax:
while (condition) {

// Code to execute repeatedly

}
Condition: This conditions defines at much extent the program will be executed. As long as the pre defined condition is true the program continue to iterate. And when the condition is false the program is terminated. If the first condition is false then the program will never run.
Example
 |  |
|---|---|
Here:
The loop starts with
i = 0and checksif i < 5.After each iteration
iis incremented by 1 untilireaches 5. When the condition becomes false then the loop stops its iterations.
Do-While Loop
A do-while loop is similar to the previously discussed while loop. The only difference is of checking the condition. In this loop the condition is checked after the execution of the block of the code. And it ensures that the code will run at least once either the condition is true or false.
Syntax:
 do {

// Code to execute

} while (condition);
Condition: It has the same condition like while loop that the code will continue to run until the condition is true. But the condition is checked after the execution of the code. The code will run at least once even the first condition is false.
Example
 |  |
|---|---|
Here:
The loop starts by printing
i = 0. And on the next line it incrementsiby 1.After printing it checks the condition whether
i < 5. The loop continues untilireaches 5.
How Are Cycles Used?
We use loops or cycles in different ways. Some of them are given below:
Data Processing: We use loops with other programming elements such as arrays or lists for collections of data to perform actions like calculations or formatting.
User Input: We can use them to get the user input with the help of the pre defined conditions. And they will force the user to input the valid value.
Game Loops: In games or simulations we use loops. They help us to keep the game running until a certain event happens in the happen. For example the game stops when the player quits or win the current level.
Automation: Cycles help us to automate repetitive tasks. We can continuously check the status of the server repeatedly or sending a notification at regular intervals.
So on the whole we can say that these cycles or loops are the foundations to any in which we need to handle the repetitive operations efficiently ad effectively.
Difference between the While and Do-While cycle?
Here are all the possible differences between the While loop and the Do-While loop:
| Aspect | While Loop | Do-While Loop |
|---|---|---|
| Condition Check | The condition is checked before the loop body executes. | The condition is checked after the loop body executes. |
| Execution | The loop body may not execute if the condition is false at the start. | The loop body executes at least once, even if the condition is false initially. |
| Minimum Iterations | Can execute zero times if the condition is false. | Will always execute at least once regardless of the condition. |
| Use Case | Used when you want to check the condition before executing the code. | Used when you want to ensure the code runs at least once before checking the condition. |
| Syntax | while (condition) { // Code } | do { // Code } while (condition); |
| Flow | 1. Check condition. 2. If true, execute the code. 3. Repeat until condition is false. | 1. Execute the code. 2. Check condition. 3. If true, repeat. |
| Example | while (x < 5) { x++; } | do { x++; } while (x < 5); |
On the whole While loop checks the condition before entering the loop. But the Do-While loop guarantees at least one execution before checking the condition.
Investigate how the Switch-case structure is used and give us an example.
The Switch-Case structure is a control flow statement. It allows us to execute one block of code out of many. And this execution is done based on the value of a variable or expression. Mostly we use it as an alternative to multiple if-else statements.
When we have a number of possible values for a variable and we want to execute different code for each value then except to use multiple if-else we can simply use Switch-Case. It executes the code and terminates the program when the specific condition is met and do not check the remaining conditions on the other lines.
How the Switch Case Structure Works
- Expression Evaluation: The value of an expression or variable is evaluated.
- Case Matching: Each
caseis checked to see if it matches the value expression or variable. - Execution: When the program found a
casewhich matches the defined codition then it executes that block of code. - Break Statement: After a
caseblock is executed then thebreakstatement is used to prevent the code from continuing to execute the following cases. It does not check the remaining cases. - Default Case: We can use optional
defaultto handle the values that do not match any of the specified cases. Then value of the default will be displayed on the screen.
Syntax of Switch-Case
switch (expression) {
    case value1:
        // Code to execute if expression == value1
        break;
    case value2:
        // Code to execute if expression == value2
        break;
    // We can add more cases as needed
    default:
        // Code to execute if none of the cases match
}
The syntax is very clear and simple where anyone can understand that there is a condition in the form of the expression. This expression can be a single variable or a complex expression.
The program checks each case keeping in mind the expression. And when the case meets the criteria of the defined expression the respective block of the code is executed. And then the break statement terminates the program at that point.
C++ Example
#include <iostream>
using namespace std;

int main() {
 int day;
 cout<<"Enter the number of the day: ";
 cin>>day;
    switch (day) {
        case 1:
            cout << "Monday";
            break;
        case 2:
            cout << "Tuesday";
            break;
        case 3:
            cout << "Wednesday";
            break;
        case 4:
            cout << "Thursday";
            break;
        case 5:
            cout << "Friday";
            break;
        case 6:
            cout << "Saturday";
            break;
        case 7:
            cout << "Sunday";
            break;
        default:
            cout << "Invalid day";
    }

    return 0;
}

Explanation
- The variable
dayis evaluated in theswitchexpression. - The program looks for the case that matches the value of
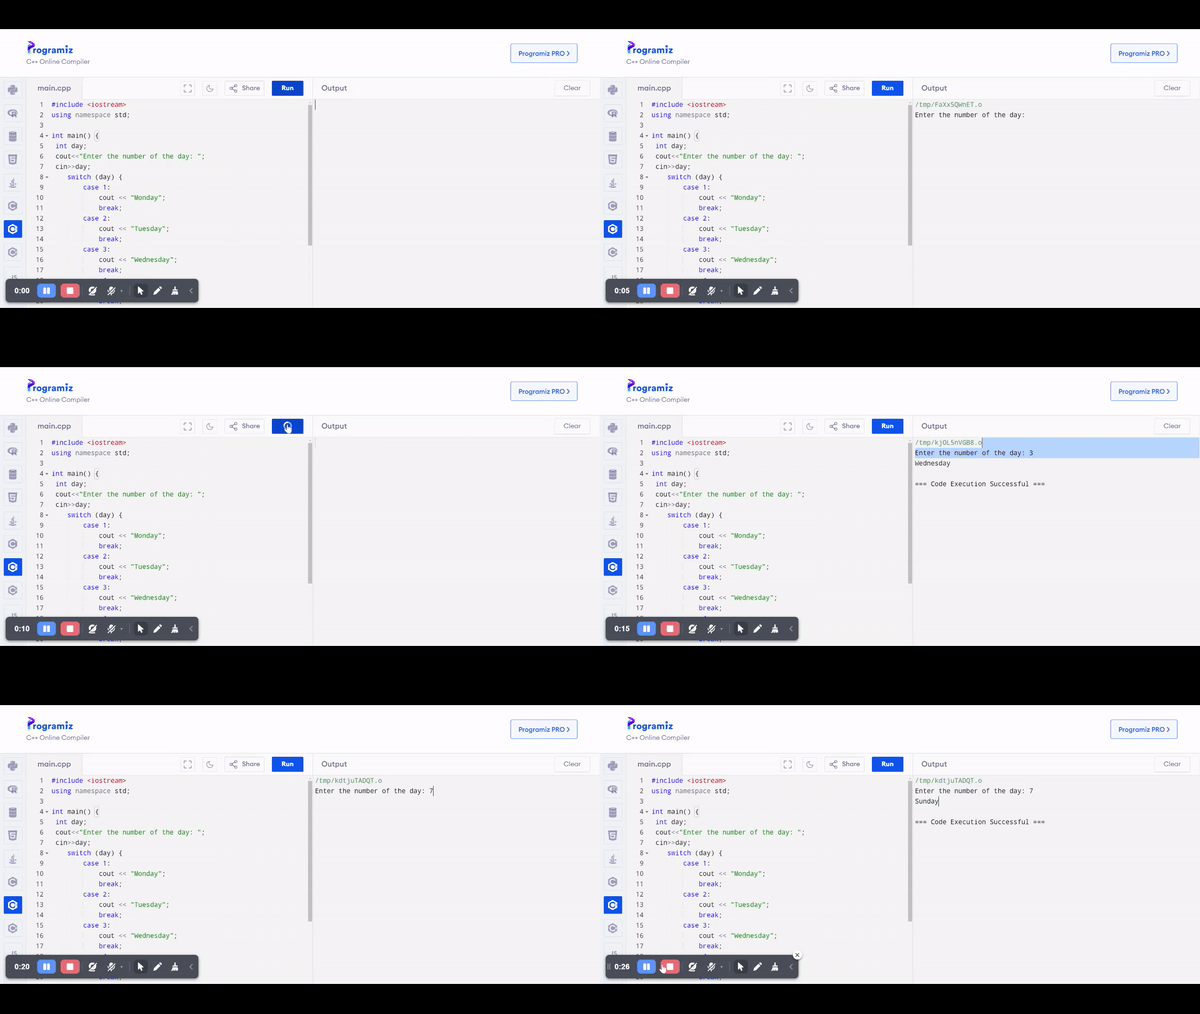
day. I have set the program to get the value of the day from the user. - Let us suppose a user enters 3. Since
day == 3the case for3is executed. And it prints"Wednesday". - The
breakstatement terminates the program at that point without checking the next conditions. - If none of the cases match means a user input value other than from 1 to 7 the
defaultcase will be executed. It is optional if we add it will work other not.
Key Points
- Break Statement: It is essential to include
breakin each case. Because it is the necessary part of the switch-case statement. It prevents the program from executing subsequent cases after a match is found. Withoutbreak, the program would "fall through" and execute all following cases until abreakis encountered. Thebreakstatement saves time. - Default Case: The
defaultblock is optional. But it is useful for handling cases where the value does not match any of the provided cases.
The Switch-Case structure is more readable and efficient than multiple if-else statements when dealing with multiple potential values for a variable.
Explain what the following code does
The given code is a pseudocode algorithm. It uses a switch-case structure. This algorithm displays a menu to the user to proceed to the next part. The user is presented with three options in a loop:
1.Sum numbers
2.Show results
3.End the program.
Program stays there until the user selects any option from the list.
Breakdown of the Code:
Variable Definitions:
op: Stores the selected option of the user.n: Number of numbers the user wants to sum.ns: The number entered by the user to be added.a: A variable that stores the sum of all the numbers entered.exit: A Boolean flag (TrueorFalse) to control the loop termination.
Initialization:
exit = False: The program starts the loop and continues running until this variable is set toTrue.a = 0: The variable for summing numbers is initialized to zero.
Main Loop:
- The program continuously displays a menu of options until
exitis set toTrue. - The user selects an option by entering a value (
op).
- The program continuously displays a menu of options until
Switch-Case Structure:
Based on the value ofop, the program executes one of the following cases:Case 1 (Sum Numbers):
- The program asks how many numbers
nthe user wants to sum. - Then it enters a
Forloop. It asks the user to enternnumbers. And these numbers will be added toa. - After the loop the program waits for user input and it clears the screen.
- The program asks how many numbers
Case 2 (Show Results):
- Displays the current value of
athe sum of numbers entered and added so far. - The program waits for user input and clears the screen.
- Displays the current value of
Case 3 (End Program):
- The program clears the screen. It displays a goodbye message. And it sets
exit = Trueto terminate the loop and end the program.
- The program clears the screen. It displays a goodbye message. And it sets
Default Case:
- If the user enters an invalid option such as anything other than 1, 2 or 3. The program displays an "Invalid option" message. The program waits for the user input and clears the screen.
Loop Continuation:
- The loop continues until
exitis set toTrue. At this point the program terminates.
- The loop continues until
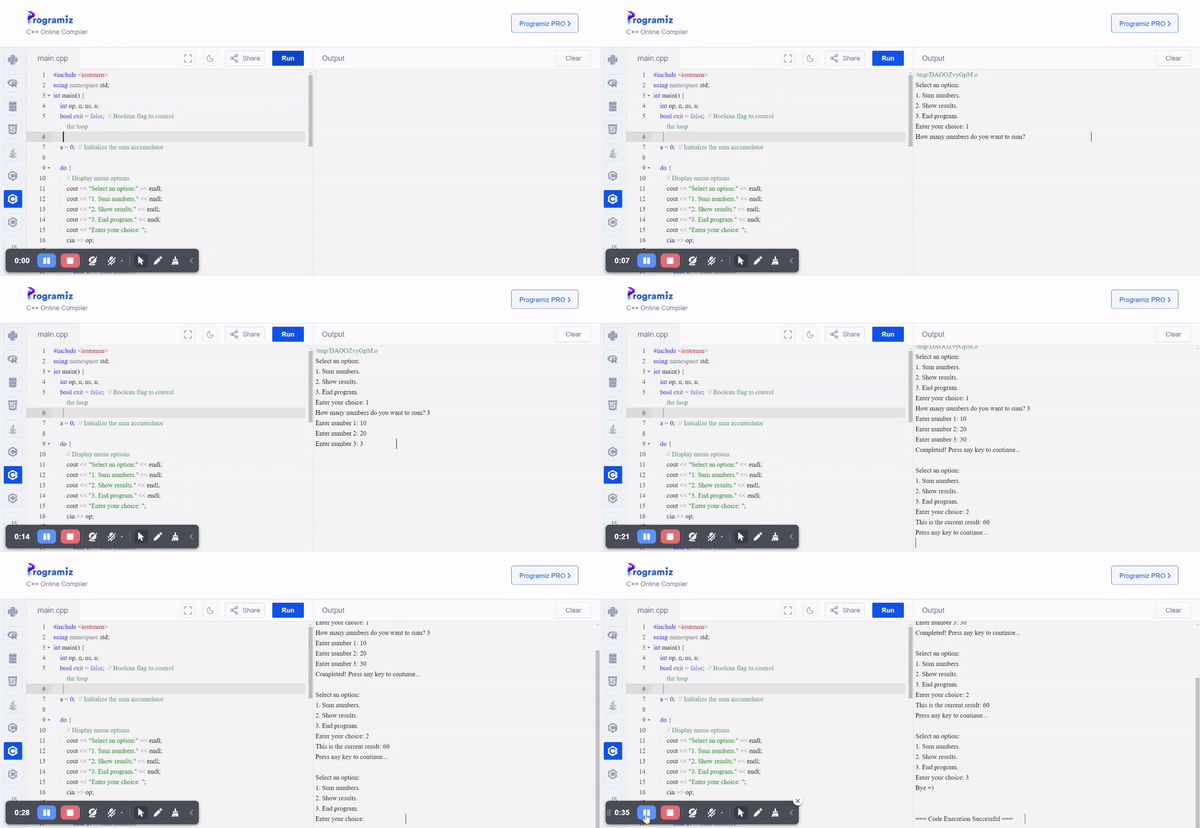
Example of How the Program Works developed based on the provided Pseudocode
Here is the C++ program to understand the pseudocode practically. I have implemented switch-case structure. It will show a menu interface to the user.
C++ Code:
#include <iostream>
using namespace std;

int main() {
    int op, n, ns, a;
    bool exit = false;  // Boolean flag to control the loop

    a = 0;  // Initialize the sum accumulator

    do {
        // Display menu options
        cout << "Select an option:" << endl;
        cout << "1. Sum numbers." << endl;
        cout << "2. Show results." << endl;
        cout << "3. End program." << endl;
        cout << "Enter your choice: ";
        cin >> op;

        switch(op) {
            case 1:  // Sum numbers
                cout << "How many numbers do you want to sum? ";
                cin >> n;
                for (int i = 1; i <= n; i++) {
                    cout << "Enter number " << i << ": ";
                    cin >> ns;
                    a += ns;  // Add each number to the accumulator
                }
                cout << "Completed! Press any key to continue..." << endl;
                cin.ignore();  // To clear the newline left by previous cin
                cin.get();     // Wait for user to press any key
                break;

            case 2:  // Show results
                cout << "This is the current result: " << a << endl;
                cout << "Press any key to continue..." << endl;
                cin.ignore();
                cin.get();
                system("clear");  // Clear screen
                break;

            case 3:  // End program
                system("clear");  // Clear screen
                cout << "Bye =) " << endl;
                exit = true;  // Set exit flag to true to end the loop
                break;

            default:  // Invalid option
                cout << "Invalid option. Press any key to continue..." << endl;
                cin.ignore();
                cin.get();
                system("clear");  // Clear screen
                break;
        }

    } while (!exit);  // Loop until exit is true

    return 0;
}

In this way the above code of the provided pseudocode works.
Write a program in pseudo-code that asks the user for a number greater than 10 (Do-While), then add all the numbers with an accumulator (While) Example: The user enters 15. The program adds up to 1+2+3+4+5+6+7+8+9+10+11+12+13+14+15.
Here is a pseudocode program that asks the user for a number greater than 10 using a Do-While loop and then sums all numbers from 1 to the entered number using a While loop with an accumulator.
Pseudocode:
Algorithm AddNumbersGreaterThan10
    Define num, sum, counter As Integer;

    // Step 1: Request a number greater than 10
    Do
        Print "Enter a number greater than 10:";
        Read num;
    Until num > 10  // Loop until the user enters a number greater than 10

    // Step 2: Initialize sum and counter
    sum = 0;
    counter = 1;

    // Step 3: Use While loop to sum all numbers from 1 to num
    While counter <= num Do
        sum = sum + counter;  // Add current counter value to the sum
        counter = counter + 1; // Increment counter
    EndWhile

    // Step 4: Display the result
    Print "The sum of all numbers from 1 to ", num, " is: ", sum;

EndAlgorithm
Explanation
Do-While Loop:
- The program first uses a
Do-Whileloop according to the requirement. It asks the user to enter a number greater than 10. - The loop continues until the user inputs a valid number such as
num > 10.
- The program first uses a
While Loop with Accumulator:
- Once the valid number is entered then the program initializes
sumto 0 andcounterto 1. - A
Whileloop is used to add all numbers from 1 up to the entered numbernum. - The loop keeps adding the value of
countertosumand increments thecounteron each iteration. - The loop continues until
counterexceedsnum.
- Once the valid number is entered then the program initializes
Output:
- After the loop the total sum is displayed to the user.
Example Walkthrough:
- Let suppose a User enters
20. - The program sums
1 + 2 + 3 + ... + 20, resulting in210. - The output will be:
The sum of all numbers from 1 to 20 is: 210.
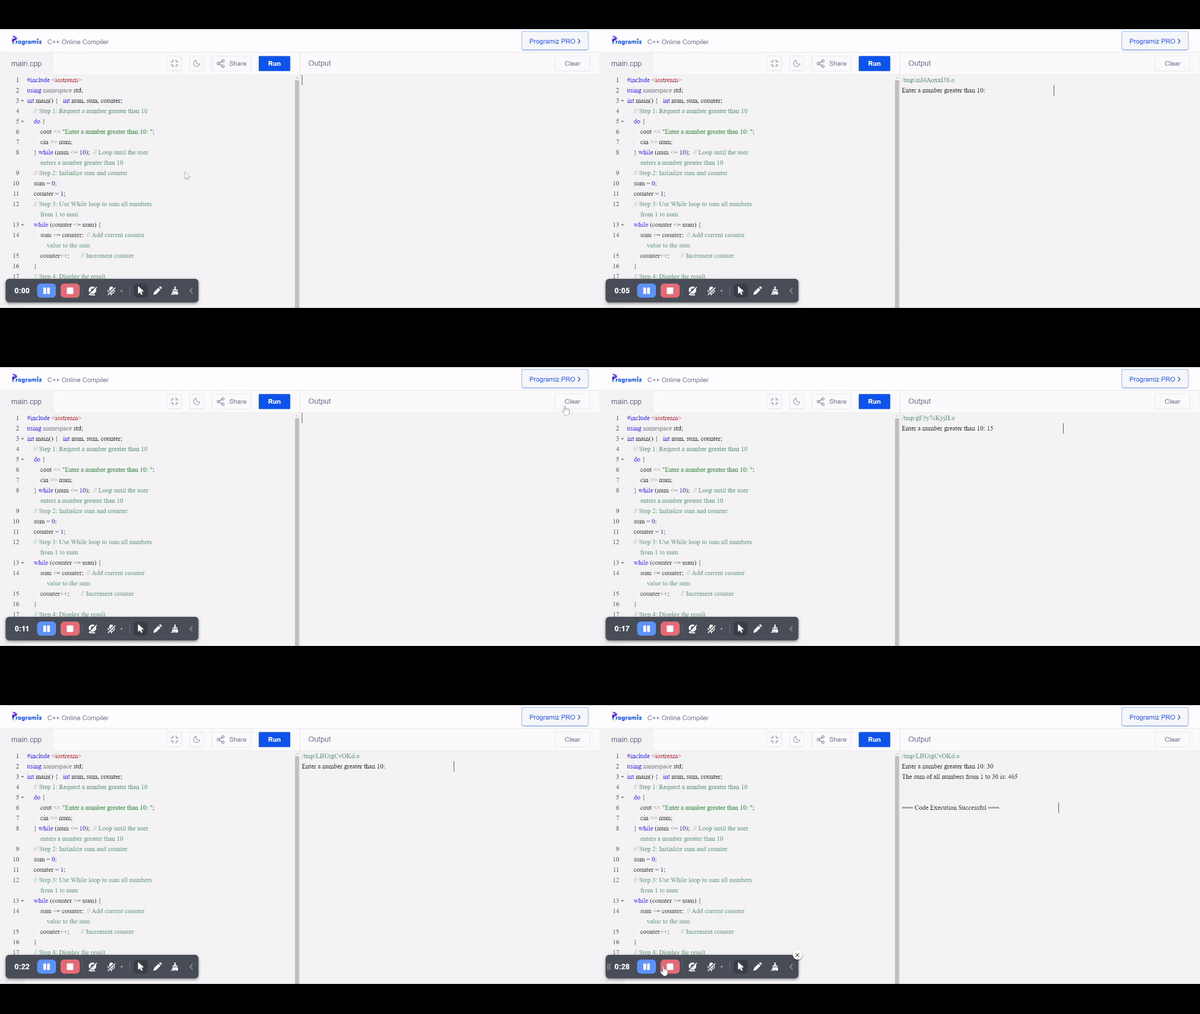
Practical Implementation of the Pseudocode using C++

X Promotion: https://x.com/stylishtiger3/status/1844029647996240268