Lochkamera Scans (selbstgemacht) - Pinhole Camera Scans (selfmade)
Die Technik
6x6 cm Rollfilm Kameraspaß mit quadratischem Format
Das Experiment
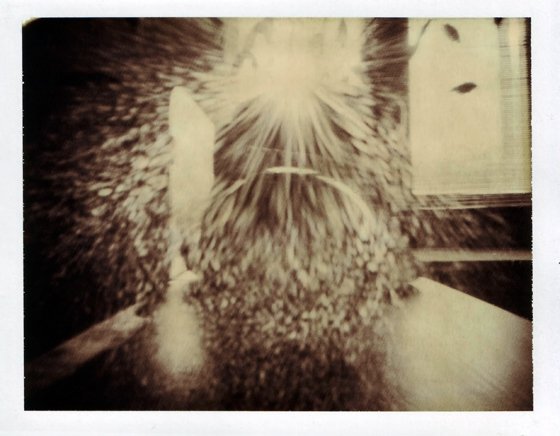
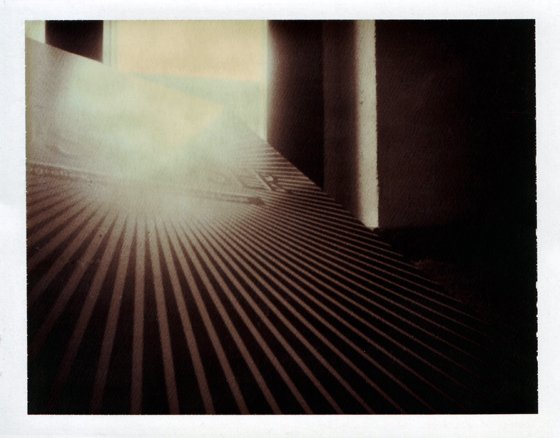
Je nach Lichtverhältnissen wird mit einer Lochkamera mehrere Minuten oder sogar Stunden belichtet. Eine Lochkamera ist die Mutter aller modernen Kameras. Licht, welches durch eine kleine Öffnung in einen abgedunkelten Raum fällt, ergibt auf dessen Rückseite ein auf dem Kopf stehendes Bild. Das auf der gegenüberliegenden Seite entstehende Bild lässt sich auf lichtempfindlichem Material festhalten. In unserem Beispiel kam in Bild 1 Kleinbildnegativ- und in Bild 2 Polaroidfilmmaterial zum Einsatz.
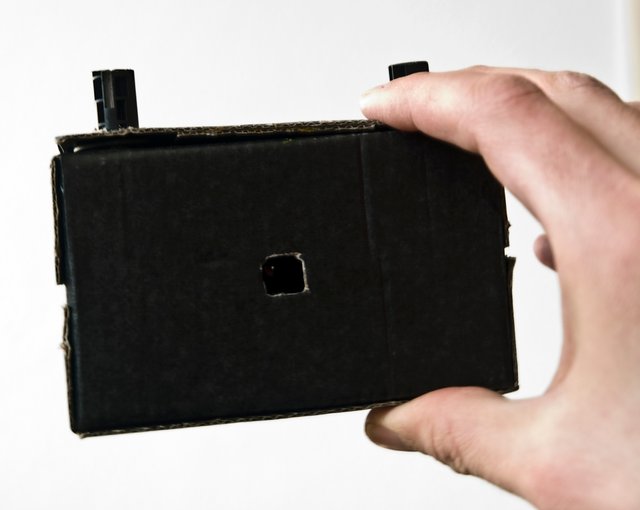
Beide Fotos sind während meiner Arbeit mit Schülern entstanden , wir bauen zuerst unsere eigene Lochkamera aus schwarzer Pappe und alten Kleinbildfilmrollen, die wir dann zerteilen und die später für den Filmtransport der Kamera gebraucht werden, damit können wir unseren Film drehen, eine kleine Öffnung an der Rückseite verrät uns dann die Bildnummer.
Die Filmrollen gab es übrigens gratis aus dem Fotolabor Studio 80 in Leipzig. Dann zerteilten wir noch dicke schwarze Müllsäcke für die lichtdichte Hülle der Kamera und zerschnitten eine Getränkedose für die Basisplatte des mit einer Nadel gestochenen Objektivs. Eine Tabelle verrät welcher Durchmesser beim Stechen die jeweilige Brennweite der Kamera ergibt.
Denn desto größer das gestochene Loch umso mehr Teleobjektiv hat unsere Kamera, kann also weit entfernte Dinge heran holen. Wollen wir dagegen mehr aufs Bild bekommen und eine Weitwinkelperspektive erreichen, brauchen wir ein sehr kleines Loch als Objektiv. Dabei muss sauber gestochen werden oder das Loch abgeschliffen, sonst kann es sein das man den Rand des unsauberen Lochs als störenden Rahmen im Bild hat.
In Bild 1 sieht man, dass bei der Kamera des Schülers eine Art Teleobjektiv gestochen wurde, das Klosterfenster relativ nah heran geholt wurde, obwohl die Kamera recht weit weg, ca. 20 Meter entfernt, auf dem Boden lag. Das gebaute Modell kann man sehr unsauber bauen (siehe Foto) oder sich dabei richtig Mühe geben. Das ist dann Geschmacksache des Besitzers. Wichtig ist die Größe des Lochs, Abdunklung der Kamera und ein möglichst funktionierender Filmtransport.
Wie man sich eine einfache Kamera baut, könnt ihr hier als Bauanleitung nachlesen: http://scienceblogs.de/astrodicticum-simplex/2011/01/03/bastelstunde-wir-bauen-eine-lochkamera/
Unser Modell ist eine Rollfilmkamera und sie kann 12 Bilder im 6x6 Format. Dieses coole Format sieht man leider in Bild 1 auf dem Scan vom Fotoabzug nicht mehr. Hier wurde bei der Entwicklung vom Schüler etwas ran gezoomt.Das Quadrat wurde zum Hochformat.
Das quadratische Format aber kann ich jedem beim Bau seiner Lochkamera nur empfehlen, macht es doch besonders Spaß. Unsere modernen Digitalkameras schaffen das Format meist nicht ohne Nachbearbeitung. Fertig gebaut und Film eingelegt, schrumpft die Zeit zum ewigen Moment und ihr werdet hinterher oft überrascht, manchmal enttäuscht und manchmal begeistert sein.
Die Bilder
Rollfilm
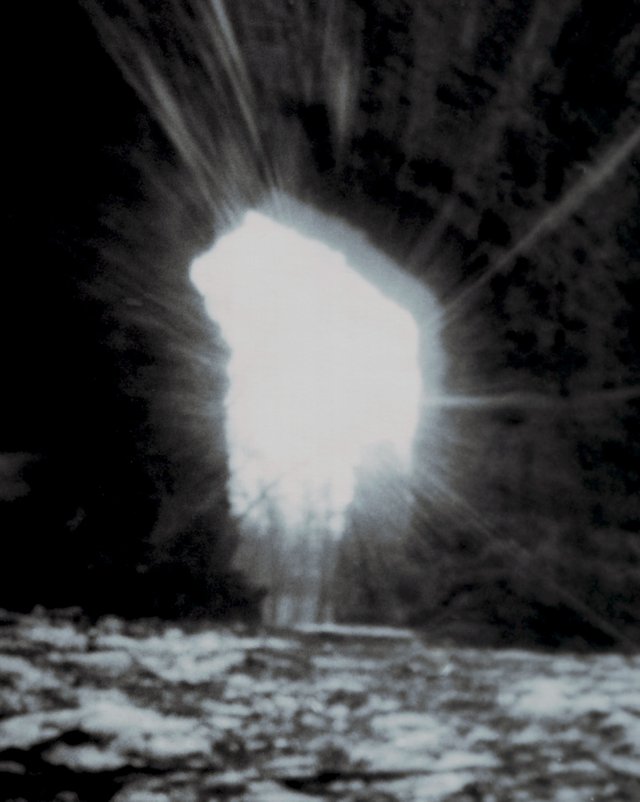
Kloster Nimbschen bei Grimma - Pappkamera, Schülerexperiment, sonnig,
Belichtungszeit ca. 5 Sekunden
Polaroid

The experiment
Depending on the lighting conditions, several minutes or even hours are exposed with a pinhole camera. A pinhole camera is the mother of all today's cameras. Light that falls through a small opening into a darkened room produces an upside-down image on its back. The image on the opposite side can be captured on light-sensitive material. In our example, 35mm negative film material was used in image 1 and Polaroid film material in image 2.
Both photos were taken during my work with students, we first build our own pinhole camera from black cardboard and old rolls of 35mm film, which we then cut up and which are later used for the film transport of the camera, so that we can shoot our film, a small opening at the back tells us then the image number.
By the way, the film rolls were available free of charge from the photo laboratory Studio 80 in Leipzig. Then we cut up thick black garbage bags for the light-proof cover of the camera and cut up a beverage can for the base plate of the needle-punched lens. A table shows the diameter of the focal length of the camera.
Because the bigger the stitched hole, the more telephoto lens our camera has, so it can fetch distant things. But if we want to get more on the picture and achieve a wide-angle perspective, we need a very small hole as a lens. Thereby, it has to be cleanly engraved or the hole has to be abraded, otherwise it could be that one has the edge of the unclean hole as a disturbing frame in the picture.
In picture 1 you can see that a kind of telephoto lens was engraved on the student's camera, the monastery window was brought relatively close, although the camera was quite far away, about 20 meters away, on the ground. The built model can be built very dirty (see photo) or you can try really hard. This is a matter of taste for the owner. Important is the size of the hole, darkening of the camera and a film transport that works as well as possible.
How to build a simple camera, you can read here as building instructions: http://scienceblogs.de/astrodicticum-simplex/2011/01/03/bastelstunde-wir-bauen-eine-lochkamera/
Our model is a roll film camera and it can take 12 pictures in 6x6 format. Unfortunately you can't see this cool format in picture 1 on the scan of the photo print. Here the student zoomed in a bit during the development and the square became a portrait format.
But I can only recommend the square format to everyone when building his pinhole camera, as it is especially fun. Our modern digital cameras usually don't manage the format without post-processing. Finished building and film inserted, the time shrinks to the eternal moment and afterwards you are often surprised, sometimes disappointed and thrilled by the memorial.
Super Aktivität um Begeisterung für Technik zu fördern! :)
Posted using Partiko Android
Aktuell hab ich einen Kurs mit 5. und 6. Klassenschülern einer Oberschule (Mittelschule), da ist an sowas frickeliges und mit Bastelarbeit verbundenes irgendwie diesmal nicht zu denken. Eher eine Art Bespaßungsprogramm, es ist Teil des Service, weil die Konkurrenz sowas nicht anbietet, um die Fotoaktionen als Auftrag durchführen zu können. Vielen Dank :)
An was denkst du für dieses Mal? :)
An dieser Schule habe ich für die Schüler 6 Kameras anschaffen dürfen, nachdem wir mit Lichtmalerei (siehe Beitrag v mir) anfingen, werden wir dieses mal die Kameras auspacken aber ich muss vorher noch mal Stress machen bzw. Ermahnung. Das letzte Mal war es zu wild und ich mache mir Sorgen um die teure Technik :)
Amazing. Might give it a go. I transformed my broken Lubitel 166 in to a pinhole, but never got anything as beautiful as these photos!
Posted using Partiko Android
Thank you, there is a book with forms to copy and cut for the built paperboard pinhole camera, the first camera that works with roll film. I didn't find the link yesterday, the book is somewhere on the shelf and I have to look where exactly to tell you the title.
The second chamber with the Polaroids is honestly not built by myself but one of my favorite parts, Fuji FP 100 films have to go in here and they are super expensive now. 10 pictures approx. 30-50€. it's called Pinhole 100. Costs about 100 dollars a piece of plastic. But you still get to buy that. Have fun with all experiments.
Congratulations! This post has been upvoted from the communal account, @minnowsupport, by ErnieGreenhill from the Minnow Support Project. It's a witness project run by aggroed, ausbitbank, teamsteem, someguy123, neoxian, followbtcnews, and netuoso. The goal is to help Steemit grow by supporting Minnows. Please find us at the Peace, Abundance, and Liberty Network (PALnet) Discord Channel. It's a completely public and open space to all members of the Steemit community who voluntarily choose to be there.
If you would like to delegate to the Minnow Support Project you can do so by clicking on the following links: 50SP, 100SP, 250SP, 500SP, 1000SP, 5000SP.
Be sure to leave at least 50SP undelegated on your account.