3D design - StarWars Obi Wan Lightsaber
In this 3d design tutorial I will show in easy to follow steps how to model Obi Wan's Lightsaber using the free CAD software Onshape.
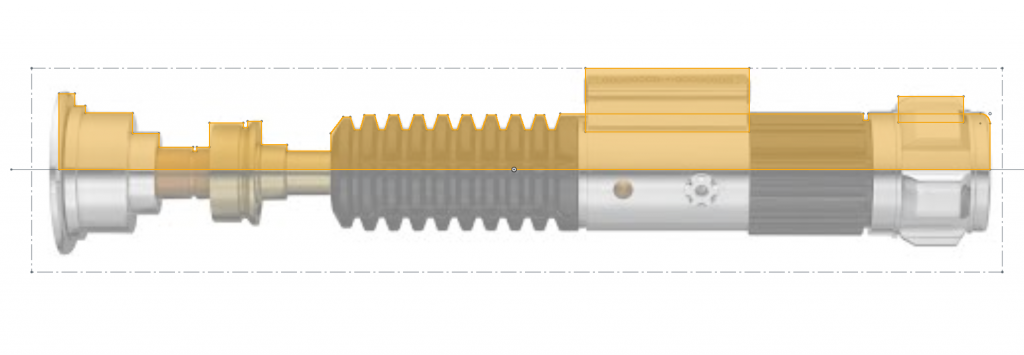
1. Get a reference picture of the Obi Wan Lightsaber.
It is good practice to use a reference picture for modelling if the thing already exists. Why reinvent the wheel, right!?After a quick search on google I found this image I will use for reference.

2. Select a sketch face (Front) and import the image.
To import a picture in Onshape first press the little + icon one the bottom left. Once imported you can start a sketch (I choose front face) and insert the image using the "insert image" icon.Please align the image around the center and give it a dimension (e.g. 60mm)

3. Start to Sketch but only half!
Since the Lightsaber has a symmetric shape, we can make it easy for ourself and just sketch the upper or lower part and than simply revolve around the middle line.First thing is to draw a horizontal line right through the middle of the Lightsaber image, than we can start with sketching (I do the top part).
4. The hard part is done! Now revolve.
Now that we have the upper shape of the Lightsaber, we can use the revolve tool an transform the sketch to an object.
- Select the parts (please don't select the switch and "bumper" at this point)
- Use the "Revolve" tool and select the horizontal middle line as 'Revolve Axis"

The final result after you pressed the tick box should look like this
5. Time to Rotate the bumper!
Now is a good time to start on the details at the end of the handle, I call them "bumper's" . (Happy to update the article if someone has the actual name for this?)
- To make it easy to see the sketch, lets first hide part1 (the revolved handle)
- Highlight than the area for the bumper and "Extrude" with 3mm. Please note to select symmetric under the drop down menu.

You should see now the bumper nicely aligned in the middle of the Lightsaber handle.Next just highlight the top face of the bumper and apply a "Chamfer" of 0.5 mm. The result should look like this.

Finally select part2 (bumper) and use the "Circular Pattern" tool.Choose 5 for "Instance count" and for "Axis of pattern" select the circle. The result should look like this.
![]()
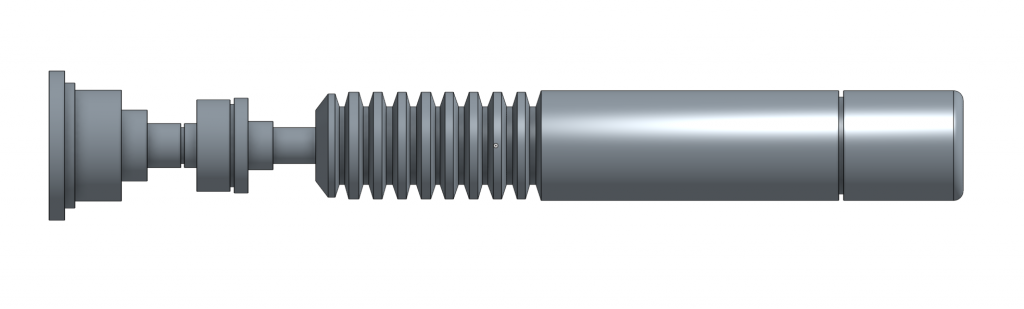
6. The Force is strong in you, complete you must on your own now!
The remaining items left to complete are the switch and a few fillets to make smooth the sharp corners. At this point you should know everything needed to complete the model your self. I encourage you to test what you have learned and complete the model. My final model looks like this.

I hope this was helpful.
If you are looking for a printable model, I have created a Lightsaber pencil top which is available on Thingiverse for free download.
Looks like you don't make an interaction on the handle bottom
Hi smailer, you are right, I did not add all details but just wanted to show how you can relatively easy create the lightsaber shape with just a few sketches and revolve / extrude tools