3d Design - Golden Table Mirror Tutorial.

In this tutorial I am going to show how to model a table mirror using mainly the Revolve, Sweep and Extrude tools.
Sketch - Table mirror base
- Start a sketch using the Front plane
- Use the Line tool to sketch the outline of half of the golden mirror stand. I am not using a reference image so we can be flexible with the shape.
Tip: Draw the vertical line starting from the center point to be sure the model will be in the middle.

- Once you are happy with your sketch we can use the Revolve tool.

- The lower part of the stand is almost complete, the only thing left is to apply some Fillets to round of the edges.

- We are going to start another sketch now to start with the upper part of the table mirror stand
- Create a Front plane sketch and draw a 2 point circle from the top of the stand.
- Than draw a Line that goes horizontal through the middle of the circle.
- Trim the line and upper part of the circle and horizontal middle line away.

- We have now a half circle that can be used the path for a Sweep.
For a Sweep we need a Profile and a Path. We have the path so let's sketch the profile.
- To align the profile perpendicular (90 deg relationship) to the path, we need to add a new plane.
- Under the Construction tools, select Plane Along Path and choose the half circle line as path
- Drag the plane until the end point of the half circle line.

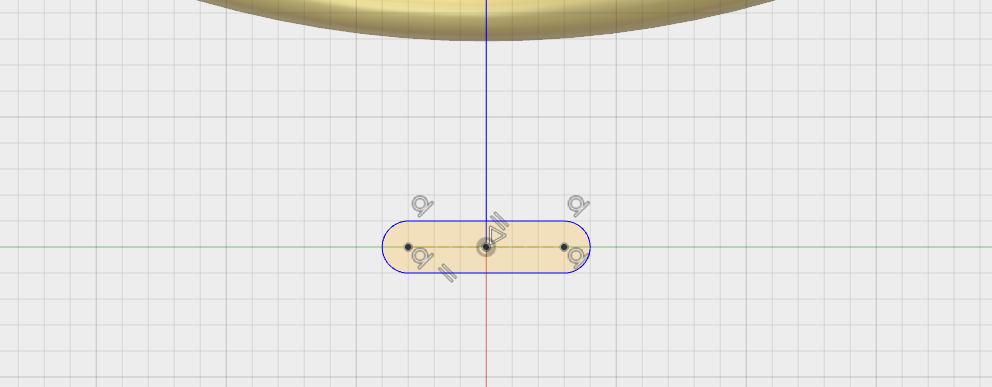
Now that we have a plane perpendicular to the half circle line we can start another sketch using this plane.
- Start a new sketch and choose the plane.
- Select the Slot - Center Point Slot tool and draw it as per below. This is going to be the mirror holder profile.
We have now all we need to complete the upper part of the mirror base using the Sweep command.
- Under Create press the Sweep command.
- For Profile select the Slot sketch.
- For the Path select the half circle line.
- Finally for operation choose Join.

Sketch - Table mirror
With the table mirror base in place we can go ahead now and start a new sketch for the actual mirror.
- Start a new sketch selecting the Front plane.
- Draw a circle using the 2 point circle.
- Offset the circle by 6 mm to create a surface we can Extrude.

- Once the sketch is complete Extrude the outer rim using symmetric.
- Than Extrude the inner circle also using symmetric but a bit smaller to create the "mirror in the frame effect".

- Finally create another sketch on the Right plane and draw a little circle on the upper end of the table mirror base.
- Offset the circle by a few mm.

- Select now the inner and outer circle and press Extrude
- Choose symmetric and Cut a whole trough the mirror and mirror holder

- Than Extrude just the inner circle outside of the frame holder and select new body.

Congratulation! You completed the majority of the model by now. The only thing left is to add the screws at the end of the inner circle we extruded and to apply some Fillets.
I hope you like it!

Great tutorial! Are you using Solidworks?
Thank you. No, I am using Fusion360 from Autodesk.