[Flutter] 플러터(Flutter) 모바일 앱 개발 - Pull to Refresh 구현하기
안녕하세요. @anpigon 입니다.
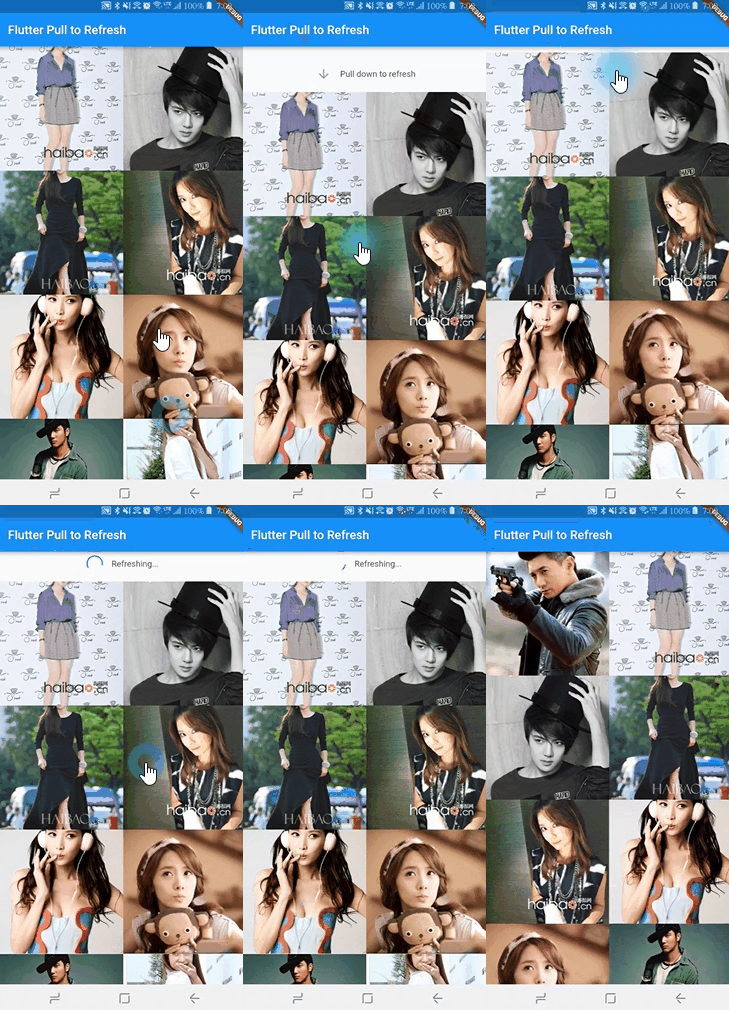
이번에는 Pull to Refresh 기능을 구현해봅니다. Pull Down 또는 Pull Up 동작으로 목록을 업데이트하는 것인데... 텍스트로 설명하기 어려우니 앱 동작 화면으로 설명을 대신하겠습니다. 아래는 Pull Down하여 목록을 업데이트하는 화면입니다.

Pull to Refresh 기능을 구현해놓은 라이브러리가 있어 덕분에 쉽게 구현할 수 있었습니다. pull_to_refresh 라이브러리와 샘플 소스는 아래 깃허브에서 다운로드 받을 수 있습니다.
᛫ ᛫ ᛫ ᛫ ᛫
이전 글
- 모바일 앱 개발 : Flutter 시작하기 #1 - Get started
- 모바일 앱 개발 : Flutter 시작하기 #2 - First Flutter App (1)
- 모바일 앱 개발 : Flutter 시작하기 #3 - First Flutter App (2)
- 모바일 앱 개발 : Flutter 시작하기 #4 - First Flutter App (3)
- 모바일 앱 개발 : Flutter 시작하기 #5 - First Flutter App (4)
- 플러터(Flutter) 모바일 앱 개발 - 스팀잇 피드 구현하기
᛫ ᛫ ᛫ ᛫ ᛫
Pull To Refresh 구현하기
아래와 같이 pubspec.yml에 필요한 라이브러리 추가한다.
  dependencies:
    http: ^0.11.3+17
    pull_to_refresh: ^1.1.6
᛫ ᛫ ᛫ ᛫ ᛫
서버에서 이미지 목록 가져오기
그다음 이미지 목록을 가져오는 함수를 구현한다. 한 번에 30개씩 가져오도록 하였다. 그리고 가져온 데이터에서 image_url만 배열로 반환한다.
import 'dart:async';
import 'dart:convert' show json;
import 'package:flutter/material.dart';
import 'package:http/http.dart' as HTTP;
import 'package:pull_to_refresh/pull_to_refresh.dart';

class _MyHomePageState extends State<MyHomePage> {

  int _indexPage = 2; // 페이지 번호
  int _rowCount = 30; // 행 개수

  Future  _fetch() {
    return http.get('http://image.baidu.com/channel/listjson?pn=$_indexPage&rn=$_rowCount&tag1=%E6%98%8E%E6%98%9F&tag2=%E5%85%A8%E9%83%A8&ie=utf8')
        .then((http.Response response) {
      Map map = json.decode(response.body);
      return map["data"].map((item) => item["image_url"]).toList().sublist(0, _rowCount);
    });
  }

// ... 이하 생략 ...
샘플 소스에 있는 로직을 그대로 사용하였다. 위에서 사용한 URL은 바이두 검색사이트에서 배우들의 이미지를 검색해오는 API이다.
᛫ ᛫ ᛫ ᛫ ᛫
initState 함수 구현하기
앱이 실행되고 첫 화면에 보여줄 데이터를 가져오는 함수를 구현하자. 아래와 같이 initState() 함수를 오버라이드(override)하여 구현한다. initState 함수는 State가 트리에 삽입되면 자동으로 호출된다.
  RefreshController _controller; // pull_to_refreh 컨트롤러
  List<String> _data = []; // 가져온 데이터를 담는 변수

  @override
  void initState() {
    super.initState();
    _controller = new RefreshController();
    _fetch().then((array) {
      for (var item in array) {
        _data.add(item);
      }
      setState(() => _indexPage++); // 화면 업데이트하고 페이지 번호 증가
    });
  }
᛫ ᛫ ᛫ ᛫ ᛫
이미지 위젯 구현하기
목록에서 보여줄 이미지 위젯을 구현한다. RepaintBoundary와 Image 위젯을 사용하였다. Image 위젯의 Image.network 생성자를 사용하면 URL에서 이미지를 바로 출력할 수 있다. 그리고 fit 속성에 BoxFit.cover를 사용하여 이미지를 crop해서 여백없이 이쁘게 보여주자. fit 속성에 대한 자세한 설명은 여기를 참고하자.
  Widget _buildImage(context, index) {
    if (_data[index] == null) return new Container(); // 이미지가 없는 경우
    return new RepaintBoundary(
      child: new Image.network(
        _data[index],
        fit: BoxFit.cover,
      ),
    );
  }
᛫ ᛫ ᛫ ᛫ ᛫
목록 위젯 구현하기
이제 목록을 출력할 위젯을 구현하자. GridView 위젯을 사용하여 한 행에 이미지가 2개씩 예쁘게 보이도록 한다. SliverGridDelegateWithFixedCrossAxisCount 클래스를 사용하여 그리드 레이아웃을 작성한다.
  Widget _buildBody() {
    if (_data.length > 0) {
      return  new SmartRefresher(
        enablePullDown: true,
        enablePullUp: true,
        controller: _controller,
        child: new GridView.builder(
          gridDelegate: new SliverGridDelegateWithFixedCrossAxisCount(crossAxisCount: 2),
          itemCount: _data.length,
          itemBuilder: _buildImage,
        ),
      );
    } else {
      return  new Center(
        child: CircularProgressIndicator()
      );
    }
  }
᛫ ᛫ ᛫ ᛫ ᛫
아래는 지금까지 구현한 화면이다. 아직 refresh 기능은 작동하지 않는다.

᛫ ᛫ ᛫ ᛫ ᛫
핵심 기능 Refresh 구현하기
이제 핵심 기능인 Pull Up 과 Pull Down의 콜백 함수 구현하자. _onRefresh() 함수가 받는 인자값 up가 True면 Pull Down이 호출된 것이고, False면 Pull Up이 호출된 것이다. 다시 쉽게 말하면 True면 상단 위치에서 아래로 당긴 것(Pull Down)이고, False면 하단 위치에서 위로 당긴 것(Pull Up)이다. 이렇게 설명하면 모두 이해했으리라 생각한다.
void _onRefresh(bool up) {
    if (up) {
      // Pull Down 이 호출된 경우
      _fetch().then((array) {
        for (var item in array) {
          _data.add(item);
        }
        _controller.sendBack(up, RefreshStatus.completed);
        setState(() => _indexPage++);
      }).catchError(() {
        _controller.sendBack(up, RefreshStatus.failed);
      });
    } else {
      // Pull Up 이 호출된 경우
      _fetch().then((array) {
        for (var item in array) {
          _data.add(item);
        }
        _controller.sendBack(up, RefreshStatus.idle);
        setState(() => _indexPage++);
      }).catchError(() {
        _controller.sendBack(up, RefreshStatus.failed);
      });
    }
  }
이제 앞에서 작성한 _buildBody() 함수를 수정한다. SmartRefresher 위젯에 SmartRefresher 속성을 추가하고 _onRefresh() 콜백 함수를 적용한다. 이제 목록에서 Pull Up이나 Pull Down 동작을 실행하면 _onRefresh() 함수가 호출 될 것이다.
  Widget _buildBody() {
    if (_data.length > 0) {
      return  new SmartRefresher(
        enablePullDown: true,
        enablePullUp: true,
        controller: _controller,
        onRefresh: _onRefresh, // 추가된 코드
        child: new GridView.builder(
          gridDelegate: new SliverGridDelegateWithFixedCrossAxisCount(crossAxisCount: 2),
          itemCount: _data.length,
          itemBuilder: _buildImage,
        ),
      );
    } else {
      return  new Center(
          child: CircularProgressIndicator()
      );
    }
  }
᛫ ᛫ ᛫ ᛫ ᛫
푸터 메세지 변경하기
목록 맨 하단에서 Pull Up 했을 때 표시되는 메시지와 아이콘을 변경해보자. 우선 _footerCreate() 함수를 구현하자. ClassicIndicator 클래스 속성에서 refreshingText는 진행 중일 때 표시되는 메세지이고, idleText는 실행되기 전 표시되는 메세지이다. 참고로 ClassicIndicator 클래스는 pull_to_refresh 라이브러리에서 제공하는 클래스이다. 더 자세히 알고 싶으면 소스 코드를 참고한다.
  Widget _footerCreate(BuildContext context, int mode) {
    return new ClassicIndicator(
      mode: mode,
      refreshingText: 'Loading...',
      idleIcon: const Icon(Icons.arrow_upward),
      idleText: 'Loadmore...',
    );
  }
그리고 다시 _buildBody() 함수를 수정하자. SmartRefresher에 footerBuilder와 footerConfig 속성을 추가한다.
      return  new SmartRefresher(
        enablePullDown: true,
        enablePullUp: true,
        controller: _controller,
        onRefresh: _onRefresh,
        footerBuilder: _footerCreate,      // 추가된 코드
        footerConfig: new RefreshConfig(), // 추가된 코드
        child: new GridView.builder(
          gridDelegate: new SliverGridDelegateWithFixedCrossAxisCount(crossAxisCount: 2),
          itemCount: _data.length,
          itemBuilder: _buildImage,
        ),
      );
᛫ ᛫ ᛫ ᛫ ᛫
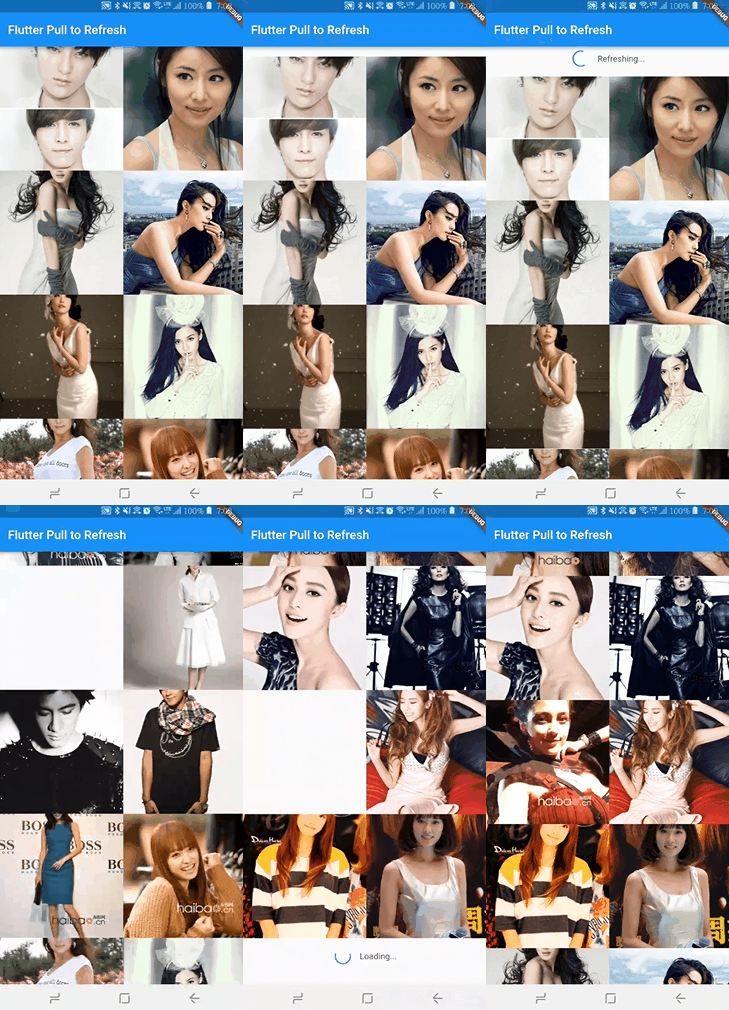
오늘 완성된 앱의 동작 화면이다. 스크롤 하면 한국 스타들도 많이 보인다.

᛫ ᛫ ᛫ ᛫ ᛫
플러터에서 제공하는 API 문서를 보면 플러터에서 제공하는 클래스와 컴포넌트가 상당히 많다. 그러나 API 문서의 내용을 모두 읽어보고 개발하기에는 문서 양이 너무 많다. 결국에는 문서만 읽다가 지쳐서 금방 포기하게 된다.
우리는 필요한 기능을 구현하면서 그때그때 공부한다. 그리고 초급일 때는 초급 수준까지만 공부하면 된다. 어려운 로직을 이해하려고 노력할 필요는 없다. 그리고 급하게 공부할 필요도 없다. IT기술은 빠른 속도로 발전하고 트렌드가 바뀐다. 방관하는 자세로 느긋하게 공부하면 된다.ㅋ
여기까지 읽어주셔서 감사합니다.
Sponsored ( Powered by dclick )
집앞 새로생긴 족발집
집앞 족발집이 생겨서 한번 먹어봤는데 ... 비싼데 맛이 반반... 싱싱한것과 오래된것을 반반...

이 글은 스팀 기반 광고 플랫폼
dclick 에 의해 작성 되었습니다.
I upvoted your post.
Keep steeming for a better tomorrow.
@Acknowledgement - God Bless
Posted using https://Steeming.com condenser site.
재밌네요. ㅎㅎㅎ 저도 뭔가 한 번 만들어보고 싶습니다. ㅎㅎ
유로보틱스님이 뭘 만드실지 기대가됩니다.ㅋ
아이고 영광입니다. ㅎㅎㅎ
방관하는 자세로 느긋하게 공부하는게 아니라
방관만 하고 있네요....ㅋㅋㅋㅋㅋㅋㅋ
좋은 자세입니다. 기다리다보면 또 기술이 바뀔꺼라서 그때 공부해도 늦지않아요.ㅋㅋ
나중에 시간내서 공부해 봐야겠네요.
저도 d3.js 공부해보고 싶은데 시간이 안나네요.ㅋ
Hi @anpigon!
Your post was upvoted by @steem-ua, new Steem dApp, using UserAuthority for algorithmic post curation!
Your UA account score is currently 2.468 which ranks you at #17175 across all Steem accounts.
Your rank has improved 44 places in the last three days (old rank 17219).
In our last Algorithmic Curation Round, consisting of 253 contributions, your post is ranked at #171.
Evaluation of your UA score:
Feel free to join our @steem-ua Discord server