Tutorial: Launching Your Own DAC on the Jungle Test Network with eosDAC
Update: You can now use the DAC Factory script to automate much of what is described here.

The future is decentralized. Lasting value will be created and maintained by communities and their network effect. Centralized hierarchies controlled by the unelected will increasingly be seen as an old, rigid model compared to dyanmic entities where everyone with skin in the game has a voice and those who create value are rewarded according to the consensus of the community expressed through elected custodians.
This is what eosDAC is working to build.
I'm regularly encouraged by friends in the cryptocurrency space excited about what eosDAC is doing who want to launch their own DACs using our open source technology. Our two reasons for existing are to be a community-owned EOS block producer and a DAC Enabler. The future vision for DAC Enabling includes a DAC Factory where anyone can launch their own DAC as easily as possible. We're not there yet as it will take plenty of work to streamline the automation of customizations, account creation, set contract actions, and permissions configuration, but we will get there eventually.
Our first goal is to finish up the eosDAC Member Client to have all the functionality required to run a DAC with an easy-to-use, decentralized interface. When we turned on Custodian voting a couple months ago, I wrote a post outlining some of the main EOS accounts that make the DAC run along with the Github repos involved: eosDAC Custodian Candidate Voting Is Live!. I was thinking about this again recently with a post describing how Steem could organize itself as a DAC: SteemDAC: A Plan We Can Start Today to Decentralize Steem Governance.
Most of the pieces are already in place for anyone to take what we already have today and launch their own DAC. Although this will be much easier in the future with the DAC Factory, I figured it would be useful to outline all the pieces involved for the many who are so excited about this they can't seem to wait before experimenting with their own DAC.
Update: I went ahead and recorded a full video walk through of this tutorial as well which you can see here:
Let's Get Started!
The following is a tutorial for how you can launch your own DAC right now using what we've built so far. One of the most powerful and useful aspects of a DAC is that authority is distributed among elected custodians. This protects funds and code through a multisignature permissions system updated every newperiod to include the top token-holder-elected custodians. This account for eosDAC is dacauthority which you can see here: https://bloks.io/account/dacauthority

This tutorial will walk you through everything, from start to finish, to create your own DAC authority account, along with all the other accounts and contracts which make the DAC function.
This tutorial was done on a Mac, but any computer with unix-based emulation will work as well.
To start, create a project folder (to make things easier, you can copy these commands together and run them all at once):
mkdir TestDAC
cd TestDAC
Get the version of EOS you want to work with, build, and install it (this will take some time).
git clone https://github.com/EOS-Mainnet/eos.git
cd eos
git checkout mainnet-1.5.1
git submodule update --init --recursive
./eosio_build.sh -s EOS
sudo ./eosio_install.sh
If you don't have the necessary tools or libraries on your computer needed to build these libraries, check the readme file on the EOS Github.
You'll also need eosio.cdt to compile your contracts:
cd ..
git clone https://github.com/EOSIO/eosio.cdt.git
cd eosio.cdt
git checkout v1.4.1
git submodule update --init --recursive
./build.sh
sudo ./install.sh
Let's set up a couple scripts to keep everything contained in this folder. Adjust this according to your own starting folder. Create keosd.sh as follows in the TestDAC folder:
#!/bin/bash

cwd=$(pwd)
$cwd/eos/build/bin/keosd --wallet-dir $cwd --http-server-address localhost:8900 "$@"
Set that to executable and run it:
chmod +x keosd.sh
./keosd.sh
In a new terminal window, create a script for running cleos to connect with the Jungle test network. Create jungle.sh as follows:
#!/bin/bash

cwd=$(pwd)
$cwd/eos/build/bin/cleos --url http://jungle2.cryptolions.io:80/ "$@"
And use it to create a wallet:
chmod +x jungle.sh
./jungle.sh wallet create --to-console;
Creating wallet: default
Save password to use in the future to unlock this wallet.
Without password imported keys will not be retrievable.
"PW5................................................"
Save this wallet password in a password manager or some other secure location.
Create and save an EOS keypair which we'll use for creating our accounts on the Jungle test network.
./jungle.sh create key --to-console
Private key: 5K..................................................
Public key: EOS6vuK27d4R1vqQmNQc1b7PjGLZ3cNABtD9HEDtPuyXdZKFkwirc
Next head over to the Jungle testnet monitor and create the various accounts we need to run the DAC. We'll start with the authority account: https://monitor.jungletestnet.io/#account I'll show the example names I used, but since those are already taken on Jungle, you'll want to use your own. Throughout this tutorial, just replace the account listed here with the account you've created.
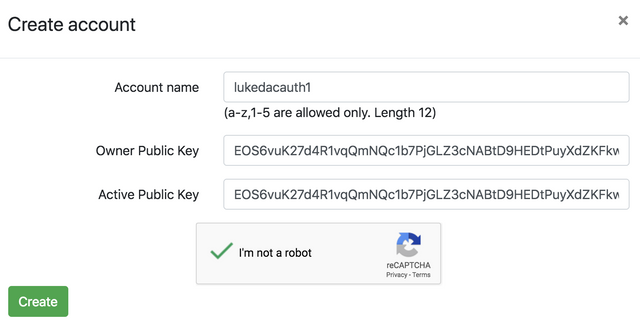
lukedacauth1
We also need a token account which holds all the token and membership code:
lukedactoken
The custodian account which handles custodian voting and more:
lukedaccusto
The main DAC account for holding DAC funds:
lukedachold1
And the multisig account where worker proposal payments will be managed:
lukedacmulti
You'll want to create your own variations of these account names, just remember they have to be 12 characters long and can't include any symbols, but only letters and numbers 1 though 5.
Hit up the Jungle testnet faucet for each account to ensure you have enough EOS needed for RAM, CPU, and Bandwidth:
https://api.monitor.jungletestnet.io/#faucet
Throughout this tutorial, replace your account names as needed.
Now unlock your wallet, import your private key, buy yourself some RAM, and stake some CPU/Bandwidth for each account (make sure keosd.sh is still running):
./jungle.sh wallet unlock
./jungle.sh wallet import
./jungle.sh system buyram lukedactoken lukedactoken "30.000 EOS"
./jungle.sh system delegatebw lukedactoken lukedactoken "10.000 EOS" "50.000 EOS"
./jungle.sh system buyram lukedacmulti lukedacmulti "30.000 EOS"
./jungle.sh system delegatebw lukedacmulti lukedacmulti "10.000 EOS" "50.000 EOS"
./jungle.sh system buyram lukedachold1 lukedachold1 "30.000 EOS"
./jungle.sh system delegatebw lukedachold1 lukedachold1 "10.000 EOS" "50.000 EOS"
./jungle.sh system buyram lukedaccusto lukedaccusto "30.000 EOS"
./jungle.sh system delegatebw lukedaccusto lukedaccusto "10.000 EOS" "50.000 EOS"
./jungle.sh system buyram lukedacauth1 lukedacauth1 "30.000 EOS"
./jungle.sh system delegatebw lukedacauth1 lukedacauth1 "10.000 EOS" "50.000 EOS"
If this were on the real mainnet, you'd want to adjust those numbers based on your actual needs.
Next we'll get into compiling and setting the code contracts for these accounts:
mkdir daccontracts
cd daccontracts
git clone https://github.com/eosdac/eosdactoken.git
git clone https://github.com/eosdac/daccustodian.git
git clone https://github.com/eosdac/dacmultisigs.git
You shouldn't have to modify anything on the token contract, so you can set that as is (adjust paths and account names as needed):
./jungle.sh set contract lukedactoken /Users/lukestokes/Documents/workspace/eosDAC/TestDAC/daccontracts/eosdactoken/output/jungle/eosdactokens -p lukedactoken
There are currently some tweaks we have to make for the daccustodian account, but in the future this may not be necessary.
Modifiy daccustodian/daccustodian.hpp:
Replace name authaccount = "dacauthority"_n; with name authaccount = "lukedacauth1"_n;
(but use the account name you created, as you should throughout this tutorial)
Modify the jungle compile script:
diff --git a/output/jungle/compile.sh b/output/jungle/compile.sh
index 8b180ff..8889d3b 100755
--- a/output/jungle/compile.sh
+++ b/output/jungle/compile.sh
@@ -1,5 +1,5 @@
 #!/usr/bin/env bash

-eosio-cpp -DTOKENCONTRACT='"kasdactokens"' -DTRANSFER_DELAY=20 -o output/jungle/daccustodian/daccustodian.wasm daccustodian.cpp
+eosio-cpp -DTOKENCONTRACT='"lukedactoken"' -DTRANSFER_DELAY=20 -o output/jungle/daccustodian/daccustodian.wasm daccustodian.cpp

 eosio-abigen daccustodian.hpp -contract daccustodian -output output/jungle/daccustodian/daccustodian.abi
and run it from the TestDAC/daccontracts/daccustodian directory:
./output/jungle/compile.sh
Next set it from the TestDAC directory:
./jungle.sh set contract lukedaccusto /Users/lukestokes/Documents/workspace/eosDAC/TestDAC/daccontracts/daccustodian/output/jungle/daccustodian -p lukedaccusto
Next we'll compile the dacmultisigs contract from TestDAC/daccontracts/dacmultisigs:
./output/jungle/compile.sh
Set the contract from the TestDAC directory:
./jungle.sh set contract lukedacmulti /Users/lukestokes/Documents/workspace/eosDAC/TestDAC/daccontracts/dacmultisigs/output/jungle/dacmultisigs -p lukedacmulti
Configuration
Now let's start configuring things.
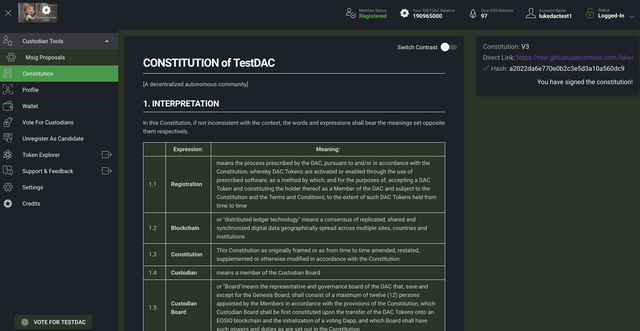
The DAC is bound by the Constitution the members agree to. You can host your Constitution anywhere, but the current design hosts it on Github and uses a hash of the document to verify integrity. You should get your own legal advice as to what your Constitution should include, but for demonstration purposes only, I'm going to fork and clone the existing eosDAC Constitution and modify it slightly.
After forking on Github,
git clone [email protected]:lukestokes/constitution.git
cd constitution
sed -i -- 's/eosDAC/TestDAC/g' constitution.md
git diff
git add .
git commit -m "Using TestDAC as an example"
git push
Get the md5 hash of your constitution via:
md5 constitution.md
Use that and the raw file (with the specific commit you just made) to create a terms.json file in the TestDAC directory (it's important to get the RAW link to the file):
echo '["https://raw.githubusercontent.com/lukestokes/constitution/50de655bf59656d317222dedeb3c417358a0ecd9/constitution.md", "a2022da6e770e0b2c3e5d3a10a560dc9"]' > terms.json
And set the terms on the account:
./jungle.sh push action lukedactoken newmemterms terms.json -p lukedactoken
If your wallet locks, you can unlock it with ./jungle.sh wallet unlock
You can validate that the terms were updated by using a block explorer: https://jungle.bloks.io/account/lukedactoken
Click Contract, Contract Tables, and then memberterms
Now update the token configuration:
echo "[lukedaccusto]" > token_config.json
./jungle.sh push action lukedactoken updateconfig token_config.json -p lukedactoken
Create and issue your own DAC tokens. In this example I'm using TESTDAC. Note, you can only do this once, so don't mess it up. :)
./jungle.sh push action lukedactoken create '["lukedactoken", "10000000000.0000 TESTDAC", 0]' -p lukedactoken
./jungle.sh push action lukedactoken issue '["lukedactoken", "1000000000.0000 TESTDAC", "Issue"]' -p lukedactoken
Get your config file for the DAC:
echo '[["35000.0000 TESTDAC", 5, 12, 60, "lukedacauth1", "lukedachold1", "", 1, 15, 3, 10, 9, 7, 7776000, "50.0000 EOS"]]' > dac_config.json
The values in that dac_config.json map to the following settings:
(lockupasset)
(maxvotes)
(numelected)
(periodlength)
(authaccount)
(tokenholder)
(serviceprovider)
(should_pay_via_service_provider)
(initial_vote_quorum_percent)
(vote_quorum_percent)
(auth_threshold_high)
(auth_threshold_mid)
(auth_threshold_low)
(lockup_release_time_delay)
(requested_pay_max)
To fully understand how these parameters are used, you may need to read the Constitution and the code. For now, we'll stick with similar values as what eosDAC is using. This can be updated at a later as needed.
Let's set our config:
./jungle.sh push action lukedaccusto updateconfig dac_config.json -p lukedacauth1
Note: the permissions on this call are a little unique in that the contract as currently designed requires the lukedacauth1 account which is why we had to make modifications earlier. This will be improved in a future release so the initial set up can be authorized by _self.
Set Up the Front End Client
Okay! Now we're ready to hook up the front end tools to our DAC contract accounts. Fork the https://github.com/eosdac/eosdactoolkit repo and make all your own customizations:
git clone [email protected]:lukestokes/eosdactoolkit.git
cd eosdactoolkit/eosdac-material/src
git checkout dev
grep -lr --exclude-dir=".git" -e "eosDAC" . | xargs sed -i '' -e 's/eosDAC/TestDAC/g'
git commit -a -m "Replacing eosDAC with TestDAC"
git push
Follow the readme here to get going: https://github.com/eosdac/eosdactoolkit/tree/master/eosdac-material
Make changes to the jungle config file like so:
diff --git a/eosdac-material/src/statics/config.jungle.json b/eosdac-material/src/statics/config.jungle.json
index 5b4bd96..fc0f04b 100644
--- a/eosdac-material/src/statics/config.jungle.json
+++ b/eosdac-material/src/statics/config.jungle.json
@@ -3,16 +3,16 @@
     "chainId": "e70aaab8997e1dfce58fbfac80cbbb8fecec7b99cf982a9444273cbc64c41473",
     "name": "jungle2",
     "default_node": "http://jungle2.cryptolions.io:80",
-    "authorityAccount": "dacauthority",
+    "authorityAccount": "lukedacauth1",

     "tokenContracts":{
       "eosio.token":[{"token": "EOS", "decimals": 4 }],
-      "kasdactokens":[{"token": "KASDAC", "decimals": 4}]
+      "lukedactoken":[{"token": "TESTDAC", "decimals": 4}]
     },

     "tokenContract": {
-      "name": "kasdactokens",
-      "token": "KASDAC",
+      "name": "lukedactoken",
+      "token": "TESTDAC",
       "decimals": 4,
       "totalSupply": 1000000000.0000
     },
@@ -22,12 +22,12 @@
       "decimals": 4
     },
     "custodianContract": {
-      "name": "dacelections",
-      "memo": "dacelections",
+      "name": "lukedaccusto",
+      "memo": "lukedaccusto",
       "enable_voting" : true
     },
     "msigContract":{
-      "name": "dacmultisigs"
+      "name": "lukedacmulti"
     },
     "systemContract": {
       "name": "eosio"
@@ -35,7 +35,7 @@
   },
   "api": {
     "bpNodeApiUrl": "https://eosdac.io/topnodes.json",
-    "memberClientApiUrl": "http://ns3119712.ip-51-38-42.eu:3000"
+    "memberClientApiUrl": "http://localhost:3000"
   },
Save and commit those changes:
git diff
git commit -a -m "Updating jungle config for our own needs."
git push
From the eosdac-material folder, install what you need and run the dev server (note: using the deploy script will remove any local changes you have that have not been committed to git):
cd eosdac-material
yarn install
cd ..
./deploy-eosdac-material.sh jungle dev true
If you have Scatter configured already for the Jungle test net, then you can add the lukedactoken@active account there to transfer tokens around as needed for more testing.
Congratulations! You've made great progress so far. Get yourself a beer or your drink of choice!
Setting Up our Chain Watchers and API
Now let's get that Profile Watcher working. First start up a local copy of mongod in its own window:
mongod
Then move on to the scraper. This tool watches the Jungle chain for member profiles and saves them to mongodb so they can easily be accessed by the member client later.
git clone [email protected]:lukestokes/Actionscraper-rpc.git
cd Actionscraper-rpc
git checkout dev
Edit watchers/config.jungle.js as needed:
diff --git a/watchers/config.jungle.js b/watchers/config.jungle.js
index afc7af6..647ef86 100644
--- a/watchers/config.jungle.js
+++ b/watchers/config.jungle.js
@@ -7,17 +7,17 @@ const config = {

     db: {
         mongoUrl: 'mongodb://localhost:27017/',
-        dbName: 'eosdac'
+        dbName: 'testdac'
     },

     contracts:{
-        custodian: 'dacelections',
-        token: 'kasdactokens',
-        msig: 'dacmultisigs'
+        custodian: 'lukedaccusto',
+        token: 'lukedactoken',
+        msig: 'lukedacmulti'
     }

 }
Get your config set up and start the watcher:
yarn install
cp watchers/config.jungle.js watchers/config.js
node watcher_custodian.js
On a production server, you'd want to use the start.sh script and pm2, but just running it via node is fine for our testing.
Now that we have our watcher going to look for profile changes, we need to get an API going for the member client to talk to by forking https://github.com/eosdac/memberclient-api:
git clone [email protected]:lukestokes/memberclient-api.git
cd memberclient-api
Make changes to the config file as needed and copy it to config.json
diff --git a/config.example.json b/config.example.json
index ab85c52..86ae7f8 100644
--- a/config.example.json
+++ b/config.example.json
@@ -14,7 +14,7 @@
   },

   "db": {
-    "name": "eosdac",
+    "name": "testdac",
     "url": "mongodb://localhost:27017/eosdac"
   },
cp config.example.json config.json
node api_endpoint.js
Next up we're going to modify the permissions on all these accounts so that everything will be controlled by lukedacauth1 which will get updated permissions every time a newperiod is called.
Using the tesnet permissions script here as a pattern: https://github.com/eosdac/DACtools/blob/master/eosdac-testnet/permissions.sh we can set everything up as we need.
First, let's get some permissions files set up:
echo '{
    "threshold" : 1,
    "keys" : [],
    "accounts": [{"permission":{"actor":"lukedacauth1", "permission":"active"}, "weight":1}],
    "waits": []
}' > resign.json

echo '{
    "threshold": 2,
    "keys": [],
    "accounts": [
        {"permission":{"actor":"lukedacauth1", "permission":"med"}, "weight":2},
        {"permission":{"actor":"lukedaccusto", "permission":"eosio.code"}, "weight":1}
    ],
    "waits": [{"wait_sec":3600, "weight":1}]
}' > daccustodian_transfer.json

echo '{
    "threshold": 1,
    "keys": [{"key":"EOS6vuK27d4R1vqQmNQc1b7PjGLZ3cNABtD9HEDtPuyXdZKFkwirc", "weight":1}],
    "accounts": [
        {"permission":{"actor":"lukedaccusto", "permission":"eosio.code"}, "weight":1}
    ],
    "waits": []
}' > dacauthority_owner.json

echo '{
    "threshold": 1,
    "keys": [{"key":"EOS6vuK27d4R1vqQmNQc1b7PjGLZ3cNABtD9HEDtPuyXdZKFkwirc", "weight":1}],
    "accounts": [
        {"permission":{"actor":"lukedacauth1", "permission":"high"}, "weight":1}
    ],
    "waits": []
}' > dacauthority_active.json
Now we can update things:
# These have to be set now because they are required in daccustodian_transfer.json
# These permissions are set in new period to the custodians with each configured threshold
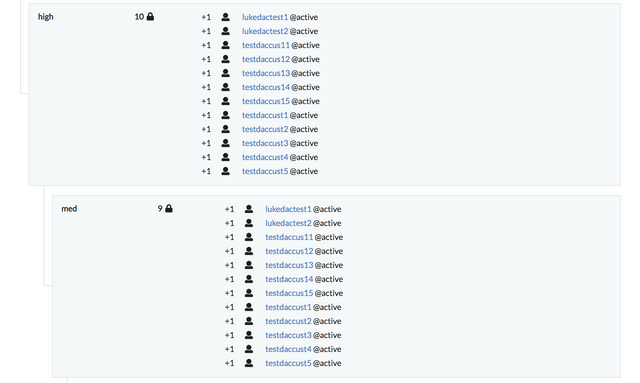
./jungle.sh set account permission lukedacauth1 high EOS6vuK27d4R1vqQmNQc1b7PjGLZ3cNABtD9HEDtPuyXdZKFkwirc owner -p lukedacauth1@owner
./jungle.sh set account permission lukedacauth1 med EOS6vuK27d4R1vqQmNQc1b7PjGLZ3cNABtD9HEDtPuyXdZKFkwirc high -p lukedacauth1@owner
./jungle.sh set account permission lukedacauth1 low EOS6vuK27d4R1vqQmNQc1b7PjGLZ3cNABtD9HEDtPuyXdZKFkwirc med -p lukedacauth1@owner
./jungle.sh set account permission lukedacauth1 one EOS6vuK27d4R1vqQmNQc1b7PjGLZ3cNABtD9HEDtPuyXdZKFkwirc low -p lukedacauth1@owner
# resign dactokens account to dacauthority@active
./jungle.sh set account permission lukedactoken active ./resign.json owner -p lukedactoken@owner
./jungle.sh set account permission lukedactoken owner ./resign.json '' -p lukedactoken@owner
# resign dacmultisigs account to dacauthority@active
./jungle.sh set account permission lukedacmulti active ./resign.json owner -p lukedacmulti@owner
./jungle.sh set account permission lukedacmulti owner ./resign.json '' -p lukedacmulti@owner
# resign dacowner account to dacauthority@active, must allow timelocked transfers
# from [email protected]
# daccustodian_transfer.json allows the contract to make transfers with a time delay, or
# dacauthority@med without a time delay. dacowner must have permission in xfer to transfer tokens
./jungle.sh set account permission lukedachold1 xfer ./daccustodian_transfer.json active -p lukedachold1@owner
./jungle.sh set action permission lukedachold1 eosio.token transfer xfer -p lukedachold1@owner
# Resign eosdacthedac
./jungle.sh set account permission lukedachold1 active ./resign.json owner -p lukedachold1@owner
./jungle.sh set account permission lukedachold1 owner ./resign.json '' -p lukedachold1@owner
# Create xfer permission and give it permission to transfer TESTDAC tokens
./jungle.sh set account permission lukedaccusto xfer ./daccustodian_transfer.json active -p lukedaccusto@owner
./jungle.sh set action permission lukedaccusto lukedactoken transfer xfer -p lukedaccusto@owner
# Resign daccustodian
./jungle.sh set account permission lukedaccusto active ./resign.json owner -p lukedaccusto@owner
./jungle.sh set account permission lukedaccusto owner ./resign.json '' -p lukedaccusto@owner
# Allow high to call any action on daccustodian
./jungle.sh set action permission lukedacauth1 lukedaccusto '' high -p lukedacauth1@owner
# These 2 actions require a medium permission
./jungle.sh set action permission lukedacauth1 lukedaccusto firecust med -p lukedacauth1@owner
./jungle.sh set action permission lukedacauth1 lukedaccusto firecand med -p lukedacauth1@owner
# Allow one to call the multisig actions
./jungle.sh set action permission lukedacauth1 lukedacmulti '' one -p lukedacauth1@owner
# set dacauthority@owner to point to [email protected]
./jungle.sh set account permission lukedacauth1 active ./dacauthority_active.json owner -p lukedacauth1@owner
# Only run this once you are done making any code changes:
#./jungle.sh set account permission lukedacauth1 owner ./dacauthority_owner.json '' -p lukedacauth1@owner
In the example above, we keep the key on owner and active in case something breaks in the code and you can't quickly get a multisignature request together to fix it, but in production you'd want to remove the keys from dacauthority_active.json and dacauthority_owner.json and run that last commented out command.
Now you can go in and use your Jungle test net accounts to register as custodian candidates and vote. They will need TESTDAC tokens so you can transfer them around like so:
./jungle.sh transfer -c lukedactoken lukedactoken testdaccust1 "50000.0000 TESTDAC" "" -p lukedactoken
In order to launch the DAC and call newperiod, you'll need a full 12 custodians, so you can create a bunch on Jungle like so:
testdaccust1
testdaccust2
testdaccust3
testdaccust4
testdaccust5
testdaccus11
testdaccus12
testdaccus13
testdaccus14
testdaccus15
Just use
./jungle.sh create key --to-console
To create a key for them to use. You can either use the Scatter interface and your member client or you can do things via cleos.
To register as a member, stake TESTDAC tokens, nominate yourself as a custodian candidate, and vote for yourself via cleos you use the Constitution hash we saved above (make sure you import the key you need with ./jungle.sh wallet import) like so:
./jungle.sh push action lukedactoken memberreg '["testdaccust1", "a2022da6e770e0b2c3e5d3a10a560dc9"]' -p testdaccust1
./jungle.sh transfer -c lukedactoken testdaccust1 lukedaccusto "35000.0000 TESTDAC" "lukedaccusto" -p testdaccust1
./jungle.sh push action lukedaccusto nominatecand '["testdaccust1", "1.0000 EOS"]' -p testdaccust1
./jungle.sh push action lukedaccusto votecust '["testdaccust1",["testdaccust1"]]' -p testdaccust1
Assuming we have 12 custodian candidates in place, you can call newperiod to actually unlock the DAC:
./jungle.sh push action lukedaccusto newperiod '{"message":"New Period"}' -p testdaccus15
And that's it! You now have your very own DAC to play with!
You should see the permissions of your authority account update like so:
For fun, let's go ahead and customize the member client a bit by changing some colors:
diff --git a/eosdac-material/src/css/themes/common.variables.styl b/eosdac-material/src/css/themes/common.variables.styl
index a04237f..0c48881 100644
--- a/eosdac-material/src/css/themes/common.variables.styl
+++ b/eosdac-material/src/css/themes/common.variables.styl
@@ -15,8 +15,8 @@
 // to match your app's branding.
 @import "core-override.variables.styl"

-$primary   = #4a1289
-$secondary = #26A69A
+$primary   = #1a9c41
+$secondary = #076a61
 $tertiary  = #555

 $neutral   = #E0E1E2
@@ -25,12 +25,12 @@ $negative  = #DB2828
 $info      = #31CCEC
 $warning   = #F2C037

-$dark      = #272B35
+$dark      = #2b3527
 $p-light   = #7c41ba
 $dark2     = #1E2128
 $dimwhite  = rgba(255,255,255,0.6)

-$body-background = #272B35
+$body-background = #2b3527
 $body-color = #ffffff
 $modal-body-color = $white
 $modal-background = $dark2
And adding a different logo image (be sure to copy the image to the statics/img folder):
diff --git a/eosdac-material/src/layouts/default.vue b/eosdac-material/src/layouts/default.vue
index b7e7ecf..8d51a3b 100644
--- a/eosdac-material/src/layouts/default.vue
+++ b/eosdac-material/src/layouts/default.vue
@@ -7,7 +7,7 @@
         <q-icon v-else name="icon-menu-9" />
       </q-btn>
       <q-toolbar-title class="text-white q-pl-none">
-        < img src="statics/img/icon-signet-eosdacmemberclient175x48.svg" style="height:48px;" :title="$t('default.member_client')">
+        < img src="statics/img/do_you_want_to_build_a_dac.jpg" style="height:48px;" :title="$t('default.member_client')">
       </q-toolbar-title>
       <div class="xs-hide sm-hide md-hide" >
         <MenuDropdown class="no-pointer-events animate-fade" v-if="getAccountName && getRegistered && getTokenBalance" iconColor="white" :label="$t('default.member_status')" :statusLabel="1" :sublabel="$t('default.registered')" icon="icon-role-3" />
(Note: the space added after the "<" above should be removed. It was included because of this bug.)
Here's the result:
And that's it! Congratulations! You've created your own Decentralized Autonomous Community on the Jungle test net! Customizing the member client involves learning a bit about Material Design, the Quasar framework, and Vue.js. You can also adjust your DAC settings by having more or less than 12 custodians, changing the voting weights, and more.
We'd love to get your feedback on this as you start to use it to organize and empower your own communities. To support this ongoing work, please vote for the EOS blockproducer eosdacserver or use a proxy who supports us. We'd also really like to see more DACs launch and airdrop the tokens they create to our eosDAC members (currently just over 1,900 accounts) who have supoorted us and made this possible. Thank you!
Luke with the incredible work and help of Michael, Dallas, Piecesnbits, Nod74, and many more.
Please vote for eosdacserver
Join our newsletter to stay informed and follow us on your favorite social media platform:
Steemit | Discord | Telegram | Facebook | Twitter | Google-plus | Github | Instagram | Linkedin | Medium | Reddit | YouTube | Weibo| VK| Bihu
I'm actually powering down on steem and I'm inactive for months. But this post is VERY helpful. I'm a eosio developer and I learned a lot with this :) thank you guys!
One thing I didn't understand is from where the xfer and the dacowner came from... Are they contracts? Accounts? Permissions?
xfer is a custom permission. Not sure what you mean by dacowner. That's an account which holds the funds of the DAC. The code-level transfers will be handled there in the future. For eosDAC, that's this account: https://bloks.io/account/eosdacthedac
Oh sorry, it was too early in the morning and my brain was still booting (I didn't made the connection dacowner = lukedachold1). Now I get it :)
Thank you very much for all your work. I've been reading and learning from eosDAC project in github. Learning a lot with you guys. Thanks :)
Generally speaking this should be the treasury account, the only exception is the daccustodian account which holds the custodian stakes. If we wanted to transfer any other token than EOS from the eosdacthedac account then we would have to add additional linkauth's to the xfer permission
I just resteemed your post!
Why? @eosbpnews aggregates updates of active EOS BPs and conveniently serves them in one place!
This service is provided by @eosoceania. If you think we are doing useful work, consider supporting us with a vote :)
For any inquiries/issues please reach out on Telegram or Discord.
Awesome!
Posted using Partiko Android
Good stuff. Keep up the good work. We need more pioneers like eosDAC who can enable the future.
great guide, thank you very much!
Congratulations @eosdac! You received a personal award!
Click here to view your Board