Ultimate Cryptocurrency Buying Guide for New Zealanders
I started investing in cryptocurrency in mid 2015. Over time, my friends and family started asking me how they could reap some rewards from the booming crypto market. This guide was developed to help them purchase cryptocurrency. It was written in September 2017.
Before I begin, do be aware that this guide is purely to show you how to buy cryptocurrency in New Zealand. It will likely still be of use for those who do not live in NZ, but some particulars may be specific to our country. Do note that I am not a trained or licensed investment advisor and any information contained is my opinion only, so take it with a grain of salt – I could be wrong.
I will also not be explaining the basics of crypto. All of this information can be found online. I would recommend looking at the following websites: Investopedia, Cryptojunction and EthAdvisor.
Finally, I also recommend reading this entire guide before making a start at investing in crypto. You might find crucial advice in the later sections which you’ll wish you had read before starting.
Section One
Important Things To Know Before Investing In Cryptocurrency
1. RISK
Important Things To Know Before Investing In Cryptocurrency
1. RISK
All investments have a level of risk. By risk, I mean the chance that you could lose all of your money. Some investments are less risky (eg. term deposits with the bank) and others are high risk (eg. options, foreign emerging markets). In general, the higher the risk = the higher the reward. The most important thing to know about investing in cryptocurrency is this:
Cryptocurrency is a HIGH RISK investment.
Although you may have heard about bitcoin skyrocketing so many thousand % per year, or keyboard warriors making millions from putting their pocket money into bitcoin, don’t get your hopes up. Past performance is never an indicator of future success. Even though Bitcoin has risen lately, it has also dropped plenty in the past (it went from US$1230 in mid-2013 to a low of around US$225 in 2015). We could be in another bubble right now and it is possible that the bubble will burst.
You are also probably aware that there are other cryptocurrency coins beside Bitcoin. Bitcoin is the most well-known and has been around the longest, so we call all the others alternate coins, or ‘altcoins’. Popular altcoins include Ether, Litecoin, Ripple and Monero. Each coin has slightly different characteristics, purposes or economic models. For example, Bitcoin was created as a form of digital money. Monero was created for the same purpose, but unlike Bitcoin all of the transactions which take place with Monero are completely anonymous, and this has made it a popular currency for buying/selling shady stuff on the dark web. The reason I mention this is that there are in fact over 700 altcoins. The vast, vast majority are absolute shit, or they used to be popular and then failed in their desired purpose and lost all of their value. Any coin you invest in could do exactly this.
The crypto market is new, it is crazy and it is unpredictable. While your investment could make some tidy gains, it could just as easily crash and burn, leaving you with an empty wallet and even worse, broken dreams. Therefore:
Only invest what you can afford to lose.
Don’t be an idiot and re-mortgage the house to invest in cryptocurrency. Don’t drop your life savings into it. Treat this investment as a high risk, high reward opportunity. Would your life be in dire straits if you had $20k stolen from you right now? If yes, don’t invest that much. Stick with a low enough figure that if it disappears you won’t be too worried, even if it is just a few hundred bucks.
2. INVESTING VS TRADING
You need to work out what strategy you plan to take in order to profit from cryptocurrency. There are generally two different styles, trading or investing.
The goal of investing is to gradually build wealth over an extended period of time through the buying and holding of a collection (portfolio) of investment instruments, such as shares, bonds or in this case, cryptocurrency. Investors make these purchases and then wait until they grow in value. As all markets fluctuate, investors will “ride out” the downtrends with the expectation that prices will rebound and eventually be recovered. You may also hear this called a ‘buy and hold’ strategy.
Trading, on the other hand, involves much more frequent buying and selling of the share/cryptocoin. Profits are made by buying when prices are low and selling when prices are high, all within a relatively short period of time. In movies these are the dudes dressed in suits in skyscrapers who sit in front of their computers looking at stock market graphs all day, buying and selling in order to turn a quick profit. They use technical analysis (chart reading) to try and predict what the market is going to do.
I don’t mind which strategy you choose, but be aware that this guide will focus mainly on investing. Trading is not only higher risk but it requires hours of daily dedication for monitoring changes in the crypto market and making transactions based on these changes. For me, I’ve already got a day job. My strategy has basically been to buy cryptocurrency and sit on it. I’ll keep a bit of an eye on the price every few days and keep updated with what’s happening through blogs, but I’m mainly interested in what the price of my coins is going to be in a few years’ time rather than a few hours. Occasionally I skim a bit of profit off a coin which has returned me >200% or so in order to diversify and buy more coins, but mostly I just hold.
Of course you can combine both strategies too. For example, you could invest a chunk of money and then keep a small amount online to trade with for a bit of fun. Do whatever you like, but know what you are going to do before you start putting money online.
3. RESEARCH
It goes without saying. Only invest in a coin which you feel you have read enough about and are excited enough about its prospects. This is relatively easy for the popular coins like Ether as there are tonnes of articles online about them, but for some of the smaller altcoins which haven’t had huge amounts of exposure it can be difficult to get an idea about their potential, why they could be useful, and if they will still be around or have gone up in value in a few years. There is a lot of information to be found on reddit, but keep in mind that a lot of it is people’s personal opinions and if they have already invested in a coin they are likely to be biased towards it.
4. PORTFOLIO CREATION
Ideally, before investing any money you should have an idea about the structure of your portfolio. By portfolio I mean the type and proportion of coins you plan to buy. Here’s an example portfolio for someone who wanted to invest $5,000 into cryptocurrency:
• Ether: $4000 (80%)
• OMG: $500 (10%)
• Stratis: $250 (5%)
• Verge: $250 (5%)
You need to tailor your portfolio to your own risk profile. The above portfolio puts the majority of money into Ether, which in my opinion is slightly lower risk (despite still being high risk). However, Ether is also hundreds of dollars per coin at the moment, so your potential profit may not end up being that big. Therefore the remaining 20% is split between higher risk altcoins. These coins could easily fail, but if they go crazy like some of the more popular coins they could be huge earners (you can buy hundreds of thousands of Verge for $250 at the time of writing. This portfolio is just one example. Feel free to put it all into smaller altcoins or put it all into Bitcoin or Ether – just be aware of portfolio risk level. In general, the coins in the top 10 on the CoinMarketCap list are probably lower risk to invest in.
5. PRIVACY & SECURITY
It is crucial that you keep every bit of information about your cryptocurrency investment safe and private/confidential. This means you need to keep secret all usernames, email addresses, passwords and wallet addresses/keys (we’ll talk about wallets later). The cryptocurrency markets are not regulated and protected like the sharemarket, so occasionally shit goes down. For starters, websites can crash and your trades can get messed up or you can lose your money. There are also people out there who hack the cryptocurrency exchanges – in 2014 one of the online exchanges, Mt Gox, lost 1 million Bitcoin to hackers (worth NZ$3.7 billion). Hackers can also access your computer to get your logins and passwords. So you need make sure your cryptocurrency info is stored as tight as possible. Here are a few recommendations before getting started:
Create a completely new email account which is completely unrelated to your personal one and is dedicated solely to crypto investing. Gmail is probably best as it allows 2-Factor Authentication (see point 4).
When making passwords, they need to be intense. Your cat's name isn’t going to cut it. I would suggest going to an online random password generator, setting the password length to 50, and copying the generated password into a notepad document. Then add a whole bunch of completely random characters throughout the generated password. You should end up with something like: sHBS)?Yb3VeA9D+~F=4n,+nqzJ=K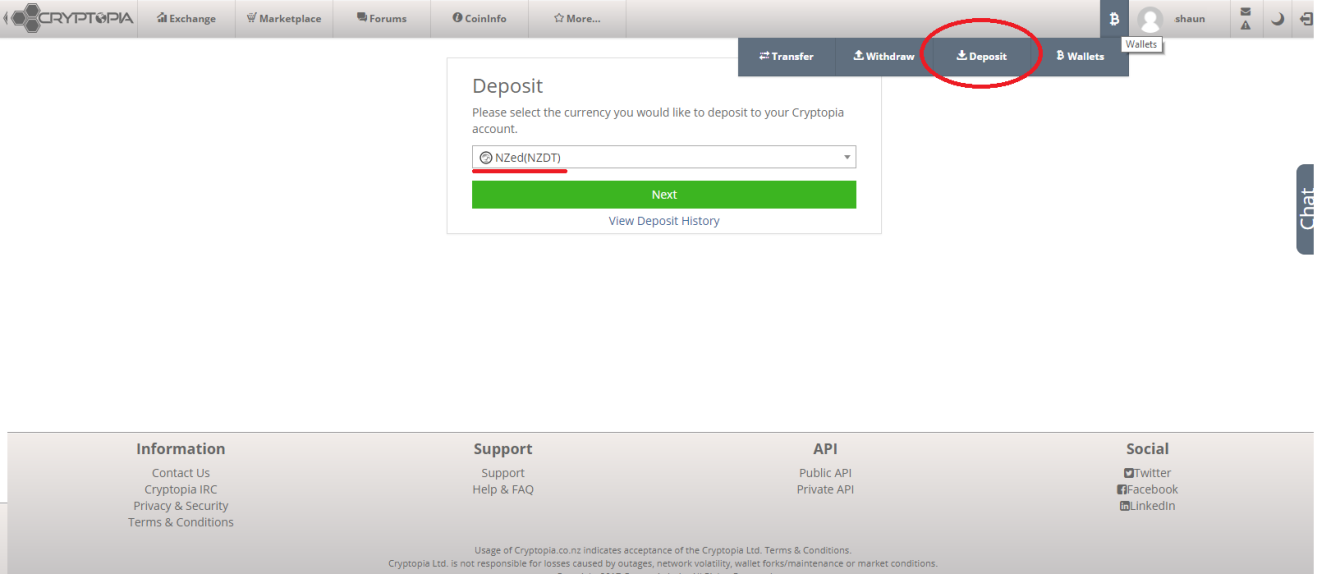
On the navigation bar at the top, hover over the ‘B’ for bitcoin next to your username and select Deposit. Use the dropdown box to find NZed (NZDT), as shown above. You’ll be told you need to verify your account. Click on the green Verify button. The first verification level should be complete. You will now need to complete the second verification level, which involves submitting photos of your driver’s license or passport, and a photo of your holding that item of ID. Don’t worry, it’s all legit. The banks need this info when you apply for a new account right? Once this info has been submitted, the Cryptopia team will verify your ID and email you when you’re to go. This can take a max of 48hrs, but is usually done in 12 hours or less.
Now we need to get your money onto an exchange. Log in to Cryptopia and follow the same steps as above: select Deposit on the navigation bar and then find NZDT in the dropdown box. NZDT stands for New Zealand Dollar Tether. When you buy it, you are essentially buying a cryptocurrency asset which is tied 1:1 with NZ Dollar. Tethers were created to facilitate the buying and selling between digital currency and ‘real life’ money, known as fiat. Instead of being faced with the verification page, you should now be provided with the Cryptopia bank account and required reference. Simply arrange a bank transfer of however much money you want to deposit using this info. I would recommend sending small amounts (<$5000) as some banks get iffy about their customers buying crypto. Your money should appear in Cryptopia within a day or so. To check, go into your Cryptopia wallet by hovering your mouse over the ‘B’ next to your username on the navigation bar and select ‘Wallets’. Your NZDT should now be shown here.
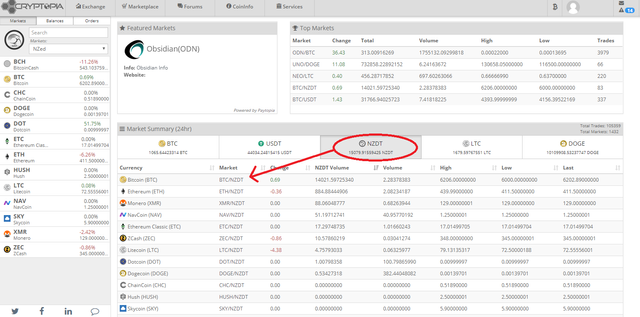
** Now we want to convert our NZ Dollars into Bitcoin.** On the top navigation bar, hover over ‘Exchange’ and then click ‘Markets’. You’ll be faced with a complicated screen like below. As shown, under the Market Summary box, click on ‘NZDT’ and then BTC/NZDT.
The next screen will look even more complicated, with a green and red candle chart at the top. Scroll down until you see something which looks like the below screenshot. Let’s work through what you’re seeing here.
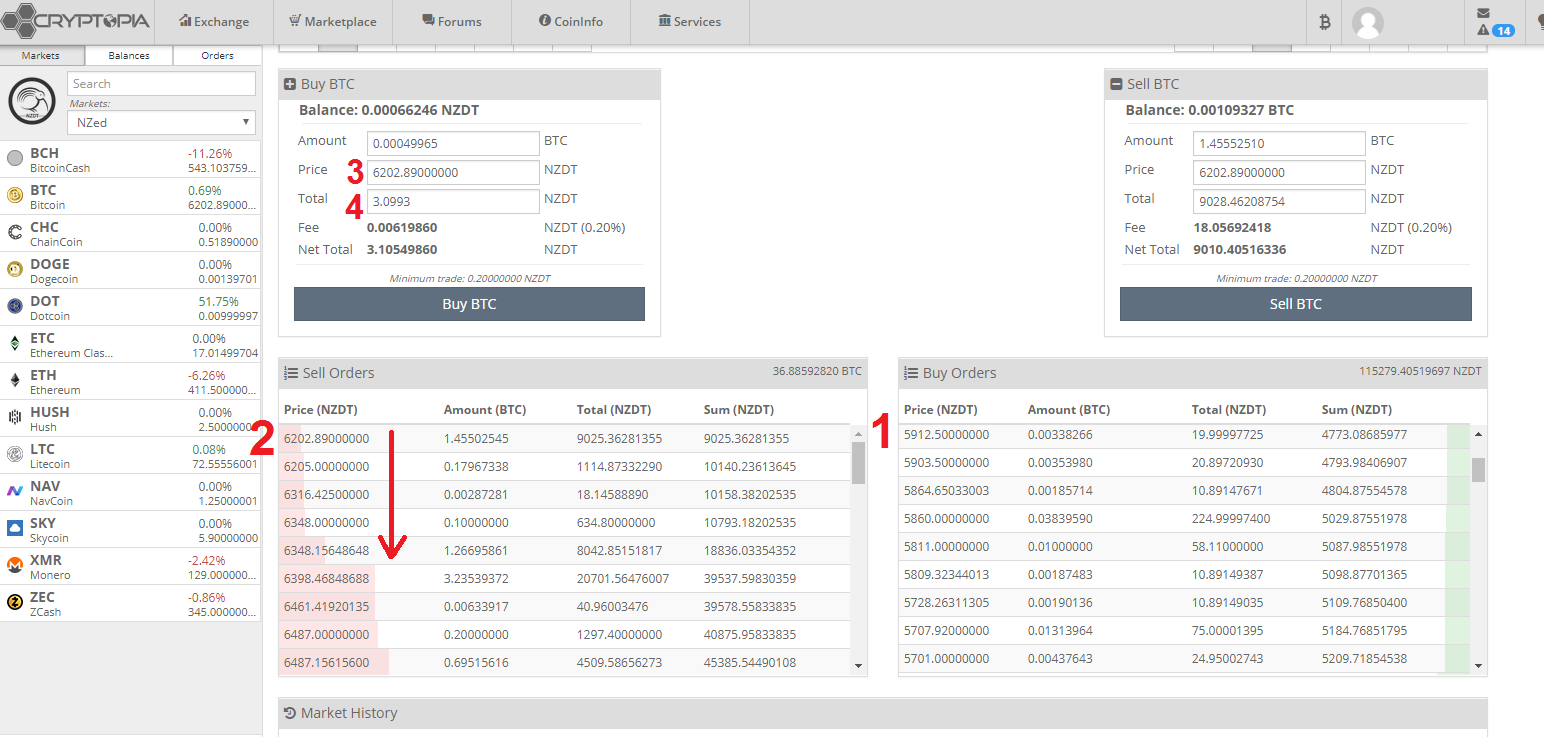
The Buy and Sell Orders at the bottom show the current offers for buying and selling Bitcoin with NZDT. I’ll demonstrate using Bitcoin, but you can buy Ether if you want (or some of each). To buy Ether, just change the display over to it by changing to ETH/NZDT on the main market screen. When choosing which one to buy, I would suggest that you go for whichever coin is more stable at the time of purchase (you can see the 1 month price charts to see how stable they have been here: Bitcoin and Ether. I say this because if there is a sudden drop in the price of whatever coin you buy, you will lose some value when you then go to purchase other altcoins. So you don’t want to buy a coin which has been behaving erratically. Bitcoin also has an advantage here because on the larger exchange there are more altcoins you can purchase with Bitcoin compared to Ether. This isn’t a huge deal, because if you do buy Ether you can always exchange it for Bitcoin on the larger exchange and then buy other altcoins, but this is an added transaction which we might as well avoid.
Let’s make our way through the BTC/NZDT trade screen. At the bottom right in the Buy Orders box you can see that someone wants to buy 0.00338266 at NZ$5912.50 per Bitcoin (total of just NZ$19.9), indicated by the red number 1 . At the top of the orange Sell column you can see someone is selling 1.455 BTC at $6202.89 (red number 2). As the buy and sell offer prices are ~$290 apart, unless someone offers to buy BTC for a higher price, or someone offers to sell BTC for a lower price, nothing will happen. As the market is active you’ll see new offers appearing and others disappearing. This means that if you place an offer and it is lower than the current sell price your offer will just sit there until the price of BTC drops or someone is willing to sell to you at that price.
In the ‘Buy BTC’ box is where you can enter your buy order. You should see your NZDT balance shown here also. To begin, enter the amount of NZDT you want to spend in the ‘Total’ line (red number 3). Then, you need to decide how much you want to offer per Bitcoin. If you want to buy at market price (the lowest price offered out of all the buyers), you must first click in the ‘Price’ line (red number 3), and then click on the highest sell offer which in this case is $6202.89 per BTC (again, red number 2). It’s always worth checking how many BTC are actually being offered by the sellers. The reason for this is that, in this case, if you wanted to buy 1 BTC, you’d get it for exactly $6202.89. If, however, you wanted to buy 2 BTC, you’d buy all of the 1.374 BTC at $6202.89, the 0.17 BTC at $6205, and so on down the sell offers until your order for 2 BTC is filled (as shown by the red line). This means that if you are placing a large buy order you need to be careful that you aren’t buying coins at an expensive price. Sometimes sellers will try to catch you out by placing a sell order for a tiny amount of coins at the cheapest price and place the next order at a significantly more expensive price, hoping that you will buy the few cheap coins and a bunch of expensive coins accidently.
Of course, you can also choose the price that you want to buy your BTC. For example, if you wanted to buy 1 BTC but not pay the current top seller price, you could enter to buy 1 BTC at $5850. Your purchase wouldn’t go through until someone offers to sell at that price, so sometimes patience is required. The risk you face is that if the price of BTC skyrockets, your offer to buy will be left stranded. However, if the price drops, you’ve got your BTC at a better price. You can also stagger your purchases, so set a buy offer for 0.25 Eth at $6000, 0.25 at $5900 and so on.
One downside to having to buy coins on these smaller exchanges is that the purchase price is always higher than the actual Bitcoin or Ether price, so you are paying more per coin. At the time of writing the actual price of BTC in NZ dollars was ~$6000, but as you can see it would have cost $6202 to buy one BTC at the market price. It’s a bit shit, but that’s the way it goes for us in little NZ.
If you only plan on purchasing only Bitcoin, you can move onto section three. If, however, you want to buy other coins, you can now go back to the main market screen. Click BTC in the ‘Market Summary’ box and select the exchange of whatever coin you want to buy, eg. BTC/ETH, BTC/ODN. Follow similar instructions to those above for buying coins. And follow the reverse process if you ever want to sell coins, except you’ll obviously be using the ‘Sell BTC’ box on the right side, and you get to select the price you sell at. Keep in mind that if you want to keep a portion of the Bitcoin you have purchased and not convert it or trade it, for safety reasons you are best to get it off the exchange and withdraw it to a wallet as soon as possible. Read section three for how to do this.
There may come a time when you want to transfer your Bitcoin to another exchange. This usually happens when you want to send it to a larger exchange in order to buy an altcoin unavailable on Cryptopia. Therefore, we now need to learn how to transfer your purchased Bitcoin from Cryptopia onto a large exchange. For this example I will use Poloniex.
Go to Poloniex and make an account. Use your dedicated crypto email but create a new password, as described in the previous section. Follow the Poloniex process to get your account authorised.
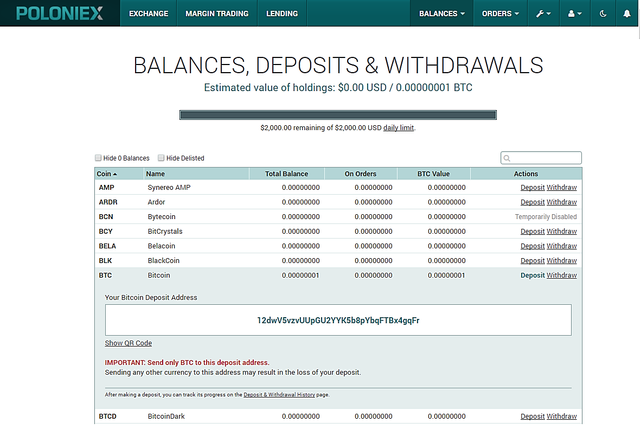
The next thing we need to do is transfer your purchased Bitcoin from Cryptopia onto Poloniex. Go to Poloniex. On the top menu bar, click on Balances --> Deposits & Withdrawals. You’ll be shown a screen with a list of all the current supported coins. Move down the list until you find Bitcoin and click deposit. Your Poloniex deposit address for Bitcoin will now be shown, as in the screenshot below. This is the address where you will send the coins from Cryptopia. Copy this address now. You’ll be given a different address if you choose to receive a different coin, so only use this for BTC.
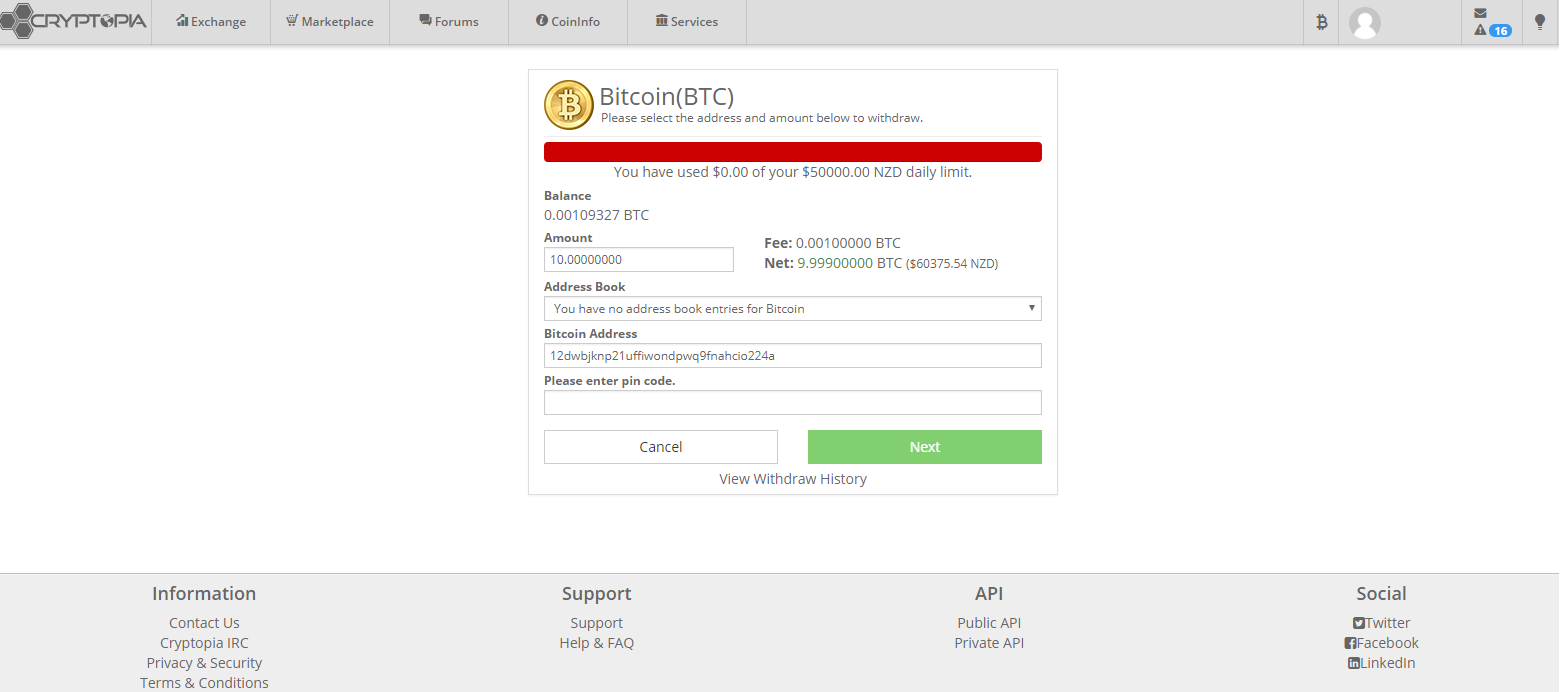
Once this is done, go back to Cryptopia, hover over the ‘B’ and click ‘Withdraw’. Find Bitcoin and click next. Here you should see your available Bitcoin balance and the form you need to fill out to withdraw BTC, as shown in the screenshot below. In the box, enter the amount you wish to withdraw to Poloniex according to your portfolio structure. For example, if you have 1 BTC and want to keep 80% of it but use 20% for changing into altcoins, you’ll only need to transfer 0.2 BTC across to Poloniex. Ignore the Address Book dropdown. Under ‘Bitcoin Address’, paste your deposit address which we copied from Poloniex just before. Make sure it is correct. If you get the address wrong, nothing can be done to retrieve your money. You can enter a comment/reference if you want, but don’t have to. Enter your Cryptopia pin code and click next.
That’s it. Your Bitcoin will soon show up in Poloniex. You can find your transferred money in Poloniex under the same area as before, Balances --> Deposits & Withdrawals. Bitcoin transfers can take up to 15 mins, but other coins are faster, usually done in a few minutes. This could be a bit longer if Poloniex is crazy busy. If there are any remaining coins in your Cryptopia account, I would high recommend you skip to the next section and learn how to transfer these into a wallet before proceeding. For safety, you want to keep coins on exchanges for as short a period as is possible.
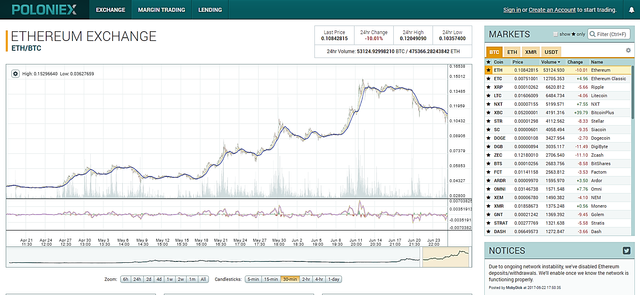
To buy altcoins using your newly deposited Bitcoin, go to Poloniex and click on ‘Exchanges’ on the top bar. You’ll see a screen similar to below. It shows the price graph for whichever coin you select and the current 24hr trade information for all of the supported coins in the list on the right.
The first thing to do is click on BTC or ETH under the Markets tab (as shown in the red circle) depending on which coin you transferred over from Cryptopia. The list beneath this is the list of altcoins you can purchase using Bitcoin or Ether. You’ll note that the list of altcoins you can buy using Bitcoin is much higher than Ether, as explained earlier – at the time of writing you could only buy 7 altcoins using Ether, whereas with Bitcoin you can buy shitloads. You can however buy plenty of altcoins with Ether through Bittrex.
By clicking down through the list of altcoins you will now bring up that coins price graph and current trading data. The information shown includes its ticker (eg. BTC, ETH), its current price, the 24hr volume of trades that have taken place, 24hr % change in price, and full name. One thing to point out is that the price shown here is no longer in dollars – the price shown is relative to the coin which you have selected (in the red circle). For example, in the above screenshot the price of ETH is 0.10842815. This doesn’t mean that one ETH is worth 10.8 cents, it means it is worth 0.10842815 Bitcoin. In order to convert to dollars you can use google, eg. “0.10842815 Bitcoin in USD”. Google doesn’t direct convert BTC to NZ dollars, so if you need to know this you’ll have to then convert the USD to NZD. CoinGecko does convert a number of coins directly into NZD however.
It is also sometimes interesting to note the volume of trades that have taken place that day per coin. This is shown next to the price and again is relative to the coin you have selected. In the screenshot above, the amount of buying/selling of Ether in the previous 24hrs equated to over 53,100 Bitcoin (>US$132 million!). This information gives you an idea about which coins are being heavily traded. Being heavily traded could be a good thing (eg. lots of people buying it because they think it is undervalued) or it could be bad too (eg. lots of selling off, concern that the coin is overvalued, just wanting to take profits or cut losses). On this particular day ETH was getting shat on (the price dropped from US$330 to $270) which you can see because its 24hr change number is red.
The process for buying other altcoins is similar to that as on Cryptopia, just on a bigger scale, with more coins to buy and more buy/sell offers in play. In the two big boxes below you’ll see the current buy and sell orders for the coin. New offers will appear and old ones will disappear all the time, because there are a lot more people buying and selling. The good thing about this is that as there are more coins floating around, you can generally purchase your coins at or around the actual price of the coin as opposed to having to overpay (as we found with Cryptopia, where we had to pay extra per coin because there wasn’t a lot on offer). The downside is that Poloniex can sometimes be so busy that new offers can swamp any offer you place so quickly that you have to change your offer until you successfully make a trade. For this reason it is often easier to buy altcoins at market price, but feel free to try and get a better price for your coins but offering less than the current highest sell offer.
Now that you’ve had a run down about what’s happening with this screen, let’s make some purchases. Running down the list of altcoins, click on the one you want to purchase. You’ll be shown the price graph and trading data similar to the screenshot above. Next, scroll down the page and you should come to the buy/sell boxes for the coin, which will look similar to the screenshot below. As an example, we’ll pretend that we want to buy NZ$8500 worth of Stratis

There are three boxes at the top: Buy, Stop-Limit, and Sell. Ignore the Stop-Limit one for now. Do remember to look into at some point however (especially if you plan on getting into trading), because it can stop you from losing money if the price unexpectedly bottoms out – you can have read about it here. Obviously we want to focus on the Buy box. Here you will already see the current price of 1 Stratis in Bitcoin (0.00275250) and the remaining parts will be empty. There are a few different ways you can fill these remaining ones out. If you already know how many Stratis you can buy with your money then you can enter this directly and Poloniex will automatically calculate any remaining digits for you. Unfortunately you can’t just enter how many NZD you want to spend, so first you need to calculate how many Bitcoin your money is worth. If you aren’t sure how to do this, I’ll explain that now.
As mentioned earlier, for our example portfolio we want to buy NZ$8500 worth of Stratis. First we need to work out many Bitcoin are in $8500. Option 1 is to use Google – you’ll need to convert your NZD into USD, and then convert this into Bitcoin. Using this method I worked out that my NZD$8500 = 2.7525 BTC. I now enter this number into the ‘Total’ part of the Buy box and Poloniex calculates that this equates to 1000 Stratis. Option 2 is to use CoinGecko
– click on the coin in the list you want to buy, then on the next page click on the coin Price button (to the right of the price graph). Here you should see a whole bunch of blue buttons – click on the one that says NZD/STRAT – on this page will be a conversion tool which will show you exactly how many Stratis your money is worth.
Using this method I calculated that on the day of purchase NZD$8500 = 1000 Stratis. I enter this into the ‘Amount’ part of the Buy box, and Poloniex does the rest for me. Sorted.
All you need to do now is place the order and you will see your buy offer appear in the ‘Buy Order’ box on the right. Usually it gets completed in a few moments, but if the coin is very active and other buy offers which are lower than yours are being placed at the same time, occasionally none or only part of your order is filled. In this case you can either leave it there and hope that it sells, or you can increase the amount you’re willing to pay per coin. Remember that you can always cancel or change your orders by scrolling further down the page to find your open orders, clicking on this and selecting cancel or adjust.
This is how you buy your coins at market price. If you want to offer less per coin and try get them for cheaper, just reduce the amount in the ‘Price’ part of the buy box – in our example case you’d be changing 0.00275250 BTC to something like 0.00274000.
You’ve now purchased another crypto coin. Repeat the process until your portfolio is completed. You’ll be able to find the current amount of coins you own by going back into Balances --> Deposits & Withdrawals. Once you’ve spent all your hard-earned money and are ready to sit tight on your investment until you (hopefully) make it big, now is the time to get all of that shit off the exchanges. Every day it’s kept on there is just another day you risk getting robbed by hackers. That’s why we have wallets.
Section Three
Wallets
A wallet can be thought of as a place where your coins are kept. In reality it is a lot more complicated than this. It is actually a public address – a line of code – on the public blockchain which you own a private key for, so you can access and control that address (send coins from it for example). You’ll already be familiar with the public address/key – this is the one you copied from Poloniex before sending your coins from Cryptopia to it.
The important thing here however is the private key. While the public key allows you to receive coins, the private key allows you to send coins. If you lose your private key, you can’t send coins your wallet – your money is lost. If someone else gets your private key, there’s a high chance they’ll gain access to your wallet and you’ll probably lose all of your coins. Therefore, keeping your private key secure (safe from hackers) is of the utmost importance. Again, even if you only have a few hundred dollars in your portfolio when you start out, in ten years that could be worth thousands of dollars, so make sure your money is on lockdown.
There are a lot of different kinds of wallets, which simply represent the different ways of securing your private key. There are also some altcoins which require a specific type of wallet, for example, you can only store SiaCoin on the specific Sia desktop wallet. It is worth checking into this before you decide to buy a particular altcoin, so that you know how you’re going to store it before you buy.
Wallets are not immune to cyber-attacks. However, they are much more difficult to penetrate than the online exchanges. And, some types of wallet are more secure than others. Still, like your usernames and passwords, a large part of the security of your wallet comes from using best practices like keeping everything about it offline, such as on a USB stick or piece of paper. This is what we call cold storage, or at least as close to it as is practical for our purposes. Making a wallet truly “cold” in cryptocurrency means essentially, the private key has never been exposed online and has never been recorded or entered on any device which has ever or ever will be, online or on a network.
As opposed to cold storage, hot storage is when a wallet is always connected to the internet and is therefore much more vulnerable to cyber-attacks. In general, cold wallets should be used for storing the bulk of your investment, whereas hot wallets are for transferring or trading cryptocoins. As a good rule of thumb you should only keep as much money in a hot wallet as you would in your wallet in real life.
Here is a quick breakdown of the different types of cryptocurrency wallets:
• Online wallet: A web-based wallet. Data is hosted on an online server and controlled by a third party. Generally the data is heavily encrypted to ensure it is safe. Still, it is probably the least safest form of wallet.
• Software wallet: The most common type of wallet, this includes desktop and mobile wallets. This is usually an app that connects directly to the coin’s server/interface.
• Paper wallet: This is a physical document that contains copies of the public and private keys that make up a wallet. Often it will have QR codes, so that you can quickly scan them and add the keys into a software wallet to make a transaction. The benefit of a paper wallet is that the keys are not stored digitally anywhere, and are therefore not subject to cyber-attacks or hardware failures. The disadvantage of a paper wallet is that paper and ink can degrade, and paper is relatively fragile. If you lose a paper wallet (or can’t read what is on it), you’ll never be able to access the coins sent to its address.
• Hardware wallet: Dedicated hardware built to hold cryptocurrency. This includes USB sticks, including encrypted ones built specifically for crypto such as Ledger Nano S and Trezor. These devices can go online to make transactions and get data and then can be taken offline for transportation and security. They are generally considered the safest form of wallet.
Personally, I wouldn’t bother with online wallets. I would also only use a software wallet if it was necessary for the coin I had chosen to buy. I currently use a Ledger Nano S for the majority of my crypto and then paper wallets for those coins which aren’t yet compatible with my Ledger. If you do want to take the leap and buy a Ledger I highly recommend it. You can buy them through Coined and Coinstop.
However, if you aren’t quite sure if you want to go straight to a hardware wallet, then there is another way. It’s less secure but a good compromise for a beginner. I did this method when I first started out - it uses a combination of a paper wallet plus a dedicated USB stick. I’ll show you how I do this now. With this method, the USB stick is only ever connected to the computer when the computer is in airplane/offline mode. This is ‘cold storage’ – it is not ultra secure, but unless your portfolio is worth tens of thousands of dollars it is likely to be enough. It’s important to use this method to protect the information used to access your main storage wallet, but you can be a bit more lax with the info used to access your email or exchanges (as long as you don’t have a shitload of money stored on the exchange). As Ether is my largest investment, I’ll demonstrate to you how to store your Ether safely. The concepts are similar for the other main coins, but the websites used will be different. Essentially, if you want to work out how to store a different coin, just Google it or find a demo video on Youtube. Just make sure the website used is legit – you could also see what the folks on reddit or Crypto New Zealand suggest.
To begin, you’ll need a pen, paper and one (or ideally two) brand new USB sticks.
First we need to create a new wallet. Go to myetherwallet.com (I’ll call this MEW from now on). MEW is not an online/desktop wallet – it is simply a website which allows you to interact with the Ethereum blockchain. With MEW you can access your wallet in a few ways, but we’re going to set up access to it using a keystore file. A keystore file is essentially a heavily encrypted version of your private key. In order to access your wallet using a keystore file, you also need a password. While you can access your wallet using just your private key alone, this also means that other people can access your wallet without a password, so for safety’s sake it is best to use a keystore file.
You’ll be greeted by a screen that says ‘Create New Wallet’ and ask you to enter a password. Create an intense password using the random password generator as described earlier. Open up a new notepad document and paste your password into it. Then paste this password into MEW and click the ‘Create New Wallet’ button.
The next page will instruct you to save your keystore file – download this now. You’ll receive a file which begins with ‘UTC--’. Immediately once this is downloaded, turn your computer into airplane/flight mode. Now insert one of the USB sticks. Transfer the keystore file onto it as well as the notepad document that contains your wallet password. If you want an additional USB backup, repeat this process with a new USB stick. If you want to be hardcore, keep the keystore file on one USB and the password on another, so that no one will be able to access your wallet without both USBs. This does increase your risk of losing one of them though, which could be disastrous.
When that is done, click on the ‘I Understand’ button. Even though you are still offline, it will take you to the next page. This one is very important – it shows you your private key. Remember, with this key anyone can access your wallet without a password, so keep it for your eyes only. It’s up to you what to do with the private key. If you decided to keep your keystore and password on the same USB then you might as well keep your private key with them too (because if anyone stole that USB they’d have access to your wallet anyway). Probably the best option provided by MEW is to download or print a paper wallet. To do this you will need to reconnect to the internet (remembering to disconnect your USB stick for a moment) and then click ‘Print Paper Wallet’. You’ll be shown something like this (don’t worry, this isn’t my real private key):
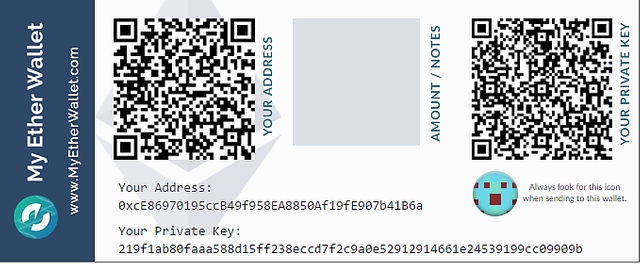
This paper wallet contains your public address (for receiving coins) and your private key (for accessing your wallet/sending coins); plus QR codes for each. You can either print this out or download it and save to USB (remember to go into airplane mode when connecting the USB).
Keep your USB sticks and paper wallets safe – they are the essential to accessing your wallet at a later date. In the crypto world there is no customer service team who will kindly help you retrieve your lost funds. Without the keys, goodbye money. Now that your wallet is set up, I’ll show you how to access it and then send coins to it for storage. On the top bar, click ‘View Wallet Info’. You’ll see this screen:
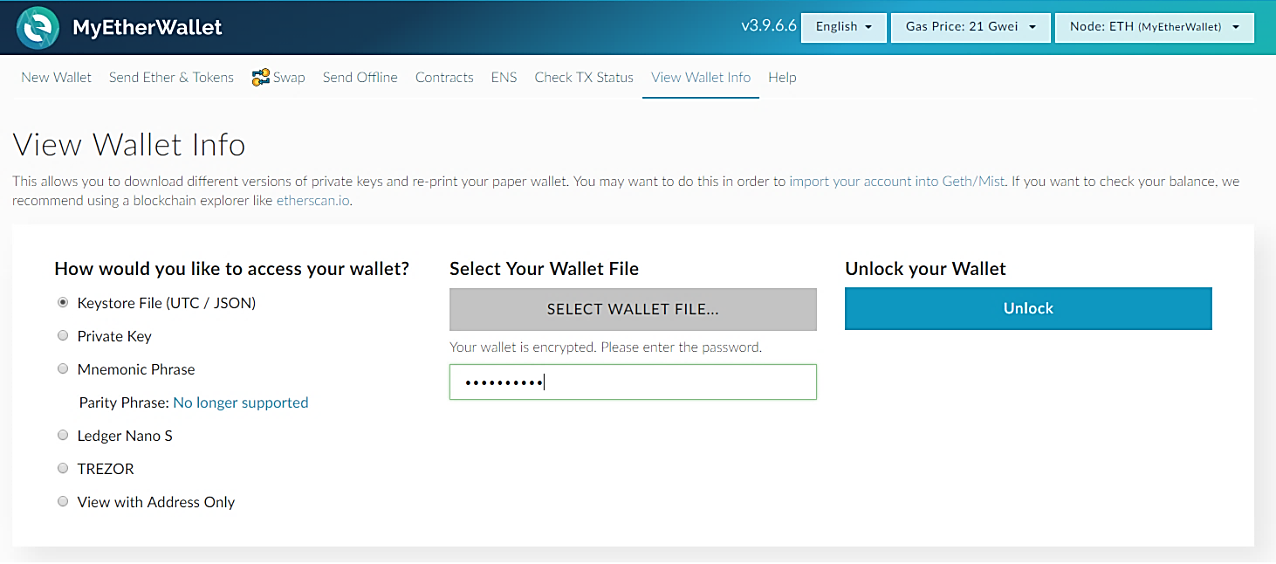
Go back into airplane mode and connect the USB stick which contains your keystore file. Underneath where it asks you how you would like to access your wallet, click Keystore File, then press the ‘Select Wallet File‘ button and find it on your USB stick. Enter your password, and then unlock your wallet. The good thing about MEW is that you can access your wallet while offline, however your Ether balance may not show up until back online – I’ll show you a safer, faster way of checking your balance without having to go through the airplane mode rigmarole shortly.
Here you’ll see all of your wallet info, including public address (account address), private key and account balance. It also allows you to print your paper wallet and download your keystore file if you ever needed to do this. If you want to send Ether somewhere at a later date, all you need to do is click ‘Send Ether & Tokens’ on the top bar and enter the receiving address.
Let’s now send your purchased Ether from the exchange to your wallet for safer storage. In your Ether wallet, select and copy your account address. Paste it in a notepad document temporarily. As this is a public key and is only used for receiving coins (not accessing your wallet), you don’t have to be secure with this one. Remove your cold storage USB stick and reconnect to the internet.
Log in to Poloniex and go the ‘Balances, Deposits & Withdrawals’ page. Scroll down to find Ethereum and click ‘Withdraw’. In the Address line, paste your Ether wallet public address (the one you copied onto a notepad). It should look like this:
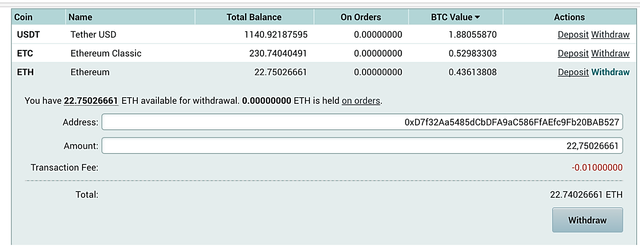
Before you send all of your Ether to your wallet, I would highly recommend sending a small amount first as a test transaction. By this, I mean send 0.01 Ether to your address to make sure it shows up. Enter this into the ‘Amount’ line and then click withdraw. Now check your wallet balance.
Important: If you just want to check your wallet balance without having to open up your wallet, you should do it via Etherscan. All you have to do is enter your public address in the top right search box and it will show how much Ether you have plus any transactions which have taken place. Doing it this way saves you the risk (and hassle) of having to use your cold storage USB stick to access your wallet via keystore file.
Once the 0.01 Eth shows up in your wallet, feel free to withdraw however many Ether you want to your address. Then nervously wait until it shows up. Again, this is often just a minute or two but can take longer in some cases.
Congrats. You’re now holding Ether and the coins are on lockdown. Keep those USB sticks/ wallets safe and sit tight.
Section Four
Cashing Out
There will come a time when you want to take your profits and run. How and when you do this is up to you. One year, two years, ten years, whatever. Hopefully you manage to hold for long enough that the value of your coins have skyrocketed and you can turn a pretty penny. You will need to monitor the price of your coins intermittently and don’t be afraid to cash out once you’re happy with your profit. You don’t need to become a millionaire. Even if you turn $1000 into $10,000, this is a better return than most people make playing the stock market.
At the time of writing, the easiest way to convert your coins back into NZ dollars is to follow the reverse of the process we have done over the last three sections. That is, send the coins from your wallet directly to Cryptopia (using your address), convert back to NZDT, then withdraw these to your NZ bank account. Another company which offers this is Independent Reserve, but it is Australian based. Probably a good idea to send a small test amount before making the big transaction first. I won’t go into much detail here because to be honest, if you’re cashing out in 5-10 years’ time there are probably going to be easier ways of doing so, such as Crypto ATMs. Once crypto goes truly mainstream, you may not even need to 'cash out' – everything you currently use fiat for could also accept crypto.
That’s all from me. Hopefully this guide has given you some practical advice regarding purchasing cryptocurrency. Give me an email if you have any queries or suggestions. If you make millions off this guide, feel free to send a beers worth of crypto to one of my addresses:
ETH: 0x08F1bB7231cA95052de2b24f935B77dd958B437F
BTC: 3LiN3w2FykbUERK9LSxWpPM2ufDAx4zsRg
Cheers!
Thank you for all the great information. Love it.
Pleasure!