Cryptocurrency 101: Chapter 3 Connection to Current Banking System
Table of Contents
- Wide Adoption Have Not Started
- Crypto Debit and Credit Cards
- Fiat Digital Wallet
- Find other adoptions and leave a comment if you know more.
- Centralized/Custodial Exchanges
Wide Adoption Have Not Started
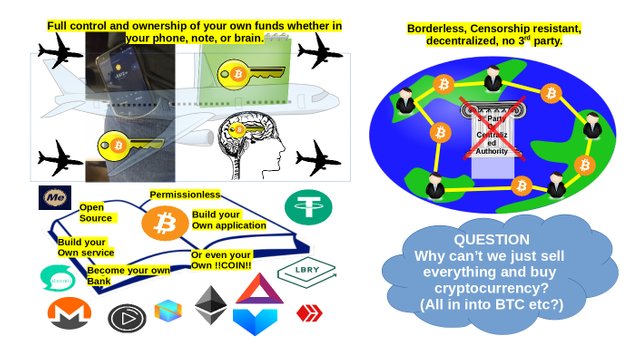
Eventhough cryptocurrency can potentially be a revolution in finance, is still only a potential. This means that you cannot switch from the current centralized fiat system to the new decentralized system like flicking a switch or changing a bit from 0 to 1 and vice versa. This is because the age of decentralized finance has not yet come.
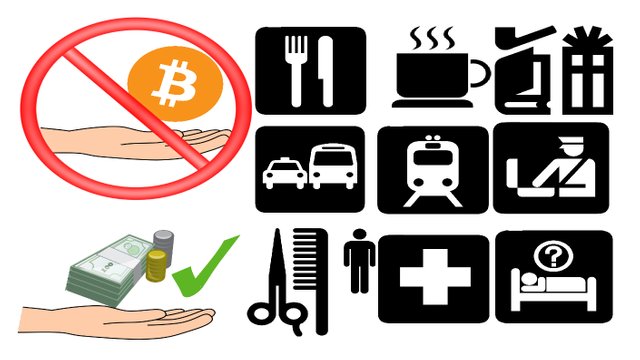
Unless you are in a specialized region, you will have a difficult time living if you sell all your fiat currency to cryptocurrency. Like the fiat currency (dollar, pound, euro, yuan, yen, etc) that you hold, cryptocurrency is just a tool to express value. Your true desires are not these money or currencies, but the goods and services that you can obtain with these such as food, water, shelter, and luxuries. Although the value of cryptocurrencies rises in terms of fiat, it is not enough adopted. People still prefers to trade in paper currencies such as it is hard to buy items with cryptocurrencies while anyone are willing to accept your dollar for items. Therefore, you need a bridge that can quickly and easily switch between fiat and cryptocurrencies.
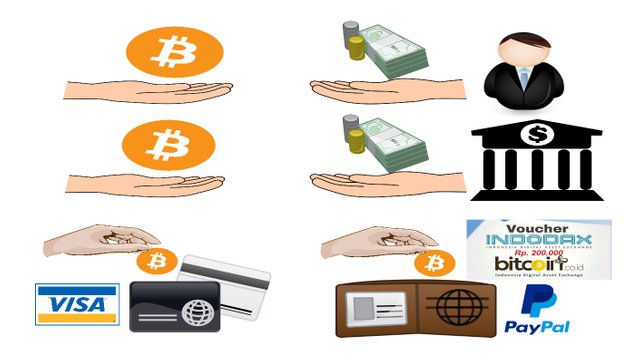
The simplest bridge that you can find are people who are will to buy and sell cryptocurrencies. Next in line are merchants who are willing to accept cryptocurrencies for payments. However, they are difficult to find for now as cryptocurrency is still in a socialization phase. The easiest bridge that you can find today are online 3rd parties that are willing to buy and sell cryptocurrencies.
Crypto Debit and Credit Cards
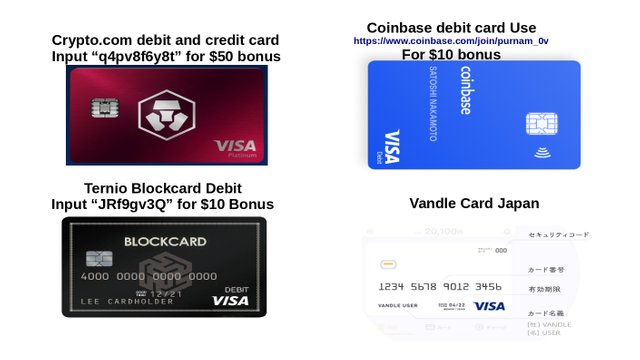
Another way to spend your cryptos are by using cryptocurrency powered debit and credit cards. The simple mechanism is first you power your cards with crypto coins and second use the card in any stores and automated teller machines (ATM)s that accepts VISA and Mastercard. You can also shop online for as long as they accept VISA or Mastercard powered debit and credit cards. I know only three, so please comment if you now more.
- Crypto.com. Today, crypto.com is globally on the center stage for crypto powered debit and credit cards. Many people trust them, they support many coins, and they have other great services. Also they are big and are very good at marketing. Their card offers many cashbacks and discounts where for crypto enthusiast, the cashbacks are in crypto coins. The best deal I can offer you is by registering using mine or other's referral link https://platinum.crypto.com/r/q4pv8f6y8t where if you input q4pv8f6y8t in the referral section, not only me but also you will get a $50 welcome bonus in MCO. Although you need to apply for a Ruby Card by staking 50 MCO for 180 days to unlock your welcome bonus. Well, if you are rich, you can stake more MCOs and apply for better cards. Currently the card ships in US, EU, UK, and New Zealand, and more countries are coming soon.
- Ternio Block Card. If I'm not wrong, I found this from advertisements which is also a debit card that you can power with few cryptocurrencies. You can get cashback in crypto tokens as well. Use my referral link https://dashboard.getblockcard.com/i/JRf9gv3Q and deposit $100 and we both will receive $10. There is a monthly service fee, therefore do not deposit if you do not plan to use.
- Vandle Card Japan. In Japan, my friend found a debit card called Vandle that can be topped up using bitcoin or bitflyer. This card is challenging for foreigners because it is all in Japanese, so get help from Japanese or use translate app.
- Coinbase Card. Coinbase also releases a card and use my link to get $10 bonus after exchanging $100. They are available in Austria, Belgium, Bulgaria, Croatia, Cyprus, Denmark, Estonia, Finland, France, Greece, Hungary, Iceland, Ireland, Italy, Latvia, Liechtenstein, Lithuania, Luxembourg, Netherlands, Norway, Poland, Portugal, Romania, Slovakia, Slovenia, Spain, Sweden, and the UK.
Fiat Digital Wallet
The hottest news currently is that Paypal and Venmo plans to provide buying and selling bitcoin in their services. I admit that I rarely heard about fiat digital wallet that supports direct bitcoin exchange. For now, I only heard about the following:
- You can deposit and withdraw using OVO in Indodax.
- You can deposit to OKEX using Gojek.
- LINE Japan made a patnership with BITMAX.
So leave a comment if you know more.
Find other adoptions and leave a comment if you know more.
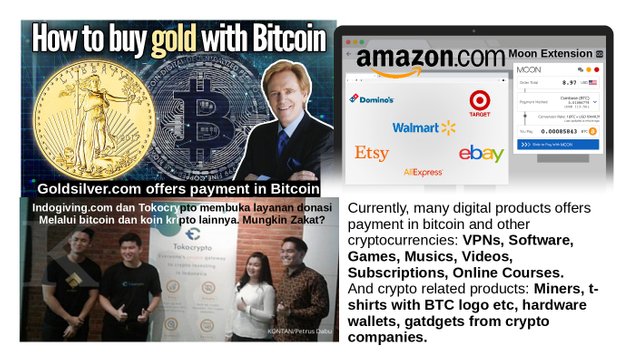
- You can buy gold and silver using BTC in goldsilver.com
- You use Moon Browser Extension to shop online such as on Amazon and Ebay with BTC and some other cryptocurrencies.
- Indogiving collaborated with Tokocrypto to accept donations in cryptocurrency and below is my experience:
*   00:00 Opening
*   00:20 Indogiving website
*   00:30 Finding cause to donate
*   00:40 First donation in ETH
*   01:15 Sending ETH to the donation address from Indodax wallet but does not work
*   02:25 So I have to rally to Tokocrypto and does not work either
*   03:30 So tried using Binance wallet and succeeded
*   05:05 Input the TXID as the proof of payment
*   05:30 But it failed
*   06:30 So I contacted the support
*   07:00 Finally succeeded and a lesson not to use exchange wallet for transaction
- Software services such as VPNs, phone credit, musics, videos, subscriptions, games, etc. Another one is crypto related goods and services such as miners and a t-shirt with Bitcoin logo. Below is my experience paying my friend's online course using Bitcoin:
*   00:00 Africa Blockchain Alliance Developer Program
*   00:25 Payments that they accept
*   00:50 Choosing Bitcoin payment
*   01:24 Bought Bitcoin at Coincheck Exchange
*   01:35 Pay from Coincheck Exchange (Withdraw)
*   03:35 Payment detected
*   03:52 Explore bitcoin transaction
*   04:20 Payment complete
*   04:30 Receipt and proofAnother example is buying Futurebit Moonlander 2 Scrypt ASIC miner with USDC:
*   00:00 Opening
*   00:25 Getting my cupon in Yahoo mail.
*   00:55 The Scrypt ASIC miner in cart.
*   01:55 Overview of their product.
*   02:20 Finish payment and choose to pay with Coinbase.
*   03:00 Choose USDC as payment.
*   04:25 Send USDC from Indodax wallet.
*   07:04 Payment confirmed.
*   08:00 Explore USDC transaction.
*   10:00 Exploring their website more.
*   11:40 Check delivery status.
*   13:15 Delivered and unpacked.
Centralized/Custodial Exchanges
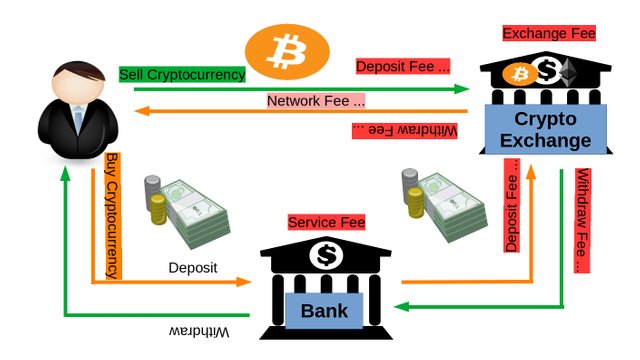
For common people who have bank accounts, the easiest bridge for them are centralized or custodial exchanges because they supported crypto to fiat exchange and fiat withdraw to bank accounts. Another reason is because the system is still similar to the current banking system which means everybody is familiar with them, while decentralized exchanges are something that most people do not yet understand. The best exchange to start with is the nearest to you for example, if you can visit their office, then that's probably the best starting point. At the very least, find an exchange that is in your home country and your country of residence.
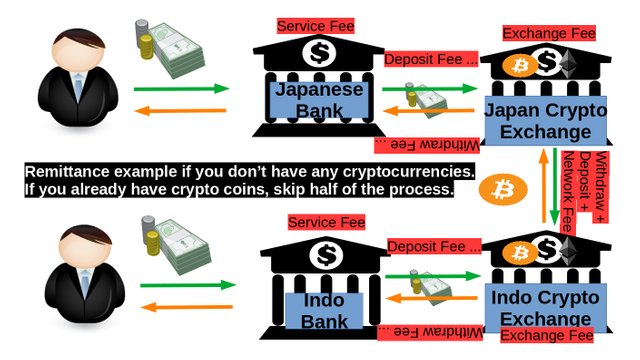
Remittance Example
This figure shows an example of remittance for those who does not have cryptocurrency. If you already have cryptocurrency, you can skip 3 steps. The steps are:
- Deposit your fiat currency into a bank.
- Deposit/transfer that fiat currency to a cryptocurrency exchange.
- Buy a cryptocurrency.
- Withdraw/send that cryptocurrency to a cryptocurrency exchange in another country.
- Sell that cryptocurrency to the country's local fiat currency.
- Withdraw/transfer that fiat currency to a bank in that country.
- Withdraw cash from the bank or ATM.
Exchange to Start
My home country is Indonesia where I have most of my identifications and accounts and most likely I will stay there often so for my case I will register for cryptocurrency exchanges in Indonesia such as Indodax, Tokocrypto, Upbit, Luno (input "S24B5E" in referral to get your bonus), Pintu (input "FAJAR199" in referral to get your bonus), Zipmex, Tokenomy. If you are staying in your home country then you can finish your starting phase up to this point but for me, I'm currently studying in Japan therefore, is a good choice and also an opportunity to register to exchanges in Japan. For now only registered in Coincheck, and BTCBOX (input "HNRCWSLFLF" in referral to get your bonus).
Why should you start with the closest first? Because they are centralized or custodial which means you are giving your funds to them and trusting them that they will manage your fund properly. The moment you give them your funds, they can take it and use it as they wished, which is why trust is very important and is the weakness to the current system compared to the new decentralized system. There are many variables that builds trust such as being regulated, many users, good reviews, clean history, and among them is physically close to your distance where if anything happens to your funds, you can just visit their office.
Example Usage Guide
Actually this post is for my friends and maybe potential future seminars that I will host to introduce cryptocurrency to new people. I will give an example guide of using one of the exchanges in my home country which is Indodax and one of the exchanges in my country of residence which is Coincheck. However, once you know how to use one of them, you mostly likely can use the rest with few difference because they may introduce different functions but the basics are:
- Have an email address and prepare your identification documents.
- Opening their websites, registering, verify email address & mobile number, login, explore, etc.
- Deposit and withdraw cryptocurrency.
- Deposit and withdraw fiat from or to bank account.
- Buy and sell coins instantly.
- Read charts, orderbooks, and bid prices in an auction-like market.
Finally, the fees that you need to check whether there is or not:
- exchange rate
- deposit fee
- withdraw fee
- trading fee
- other transaction fee
You can check on their websites because they can change for example Indodax's fees: https://help.indodax.com/bagaimana-rincian-fee-di-indodax-com/ and Coincheck's fees: https://coincheck.com/info/fee.
Simple Indodax Guide
Indodax Registration
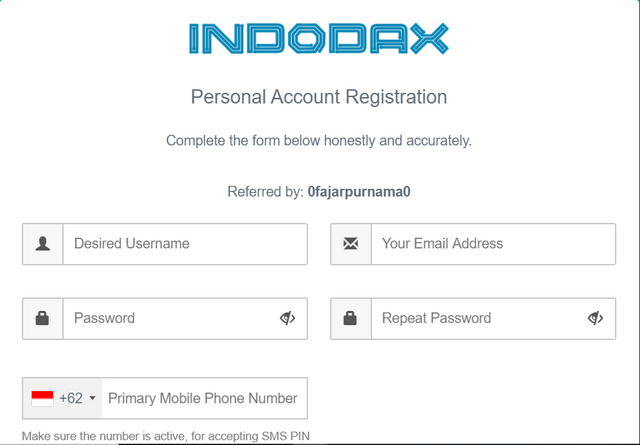
1. Prepare your identity cards, your email address, paper and a marker, and visit https://indodax.com/ref/0fajarpurnama0/1. Fill in your desired username, email address, desired password, and phone number.
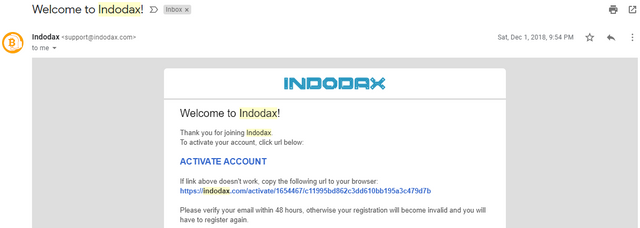
2. You will get an email to verify your Indodax's email address. Click the link.
Indodax Verification
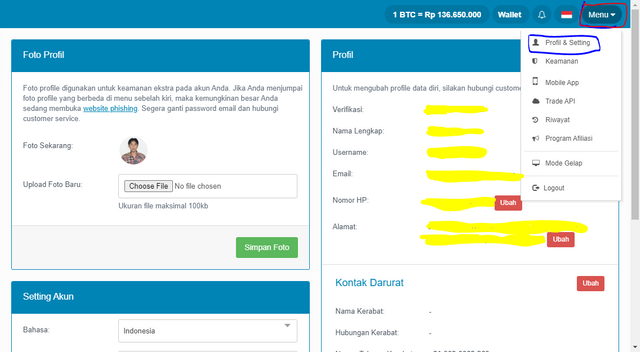
3. If not automatic, go to menu and profile, and fill in your profile. Finally, click the verification button.
4. Fill in the form and upload your identity card.
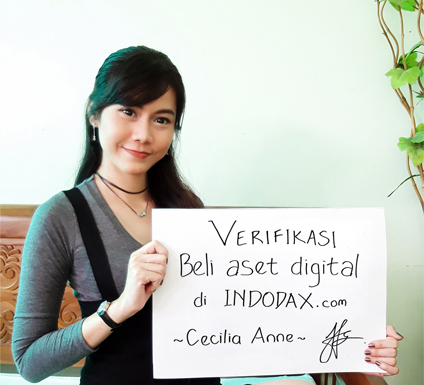
5. From Indodax, take a selfie like on this image and upload. Wait for their instruction and if all is well, then you are fully verified.
Indodax Deposit and Withdraw
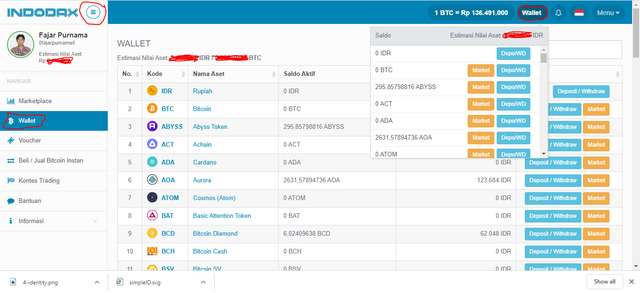
6. Go to wallet either on the top or left menu.
7. To deposit or withdraw Indonesian Rupiah from or to bank, choose IDR and the deposit/withdraw menu.
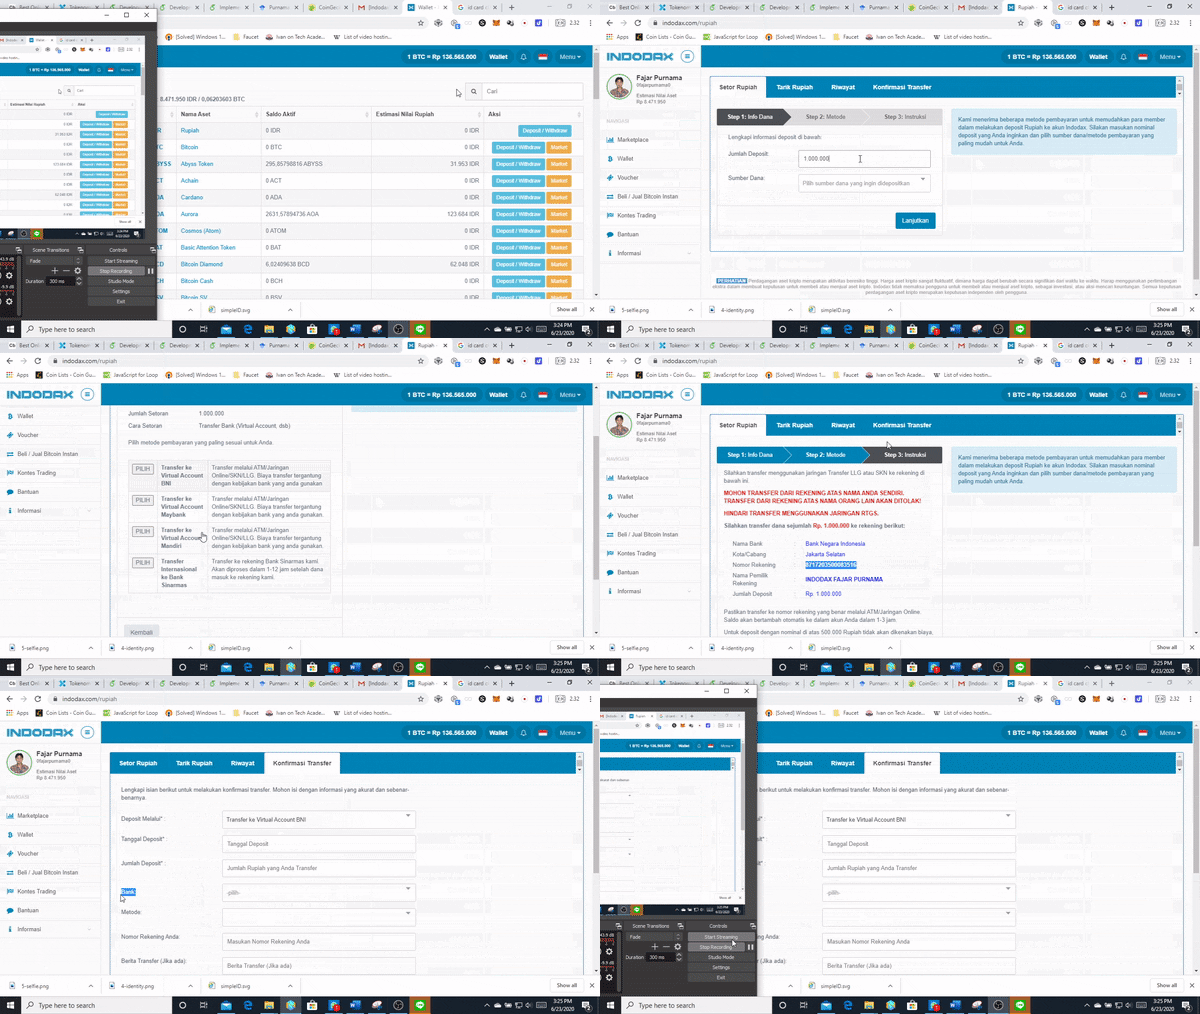
8. If you don't have any coins, you can start buying here but before that you have to deposit Indonesian Rupiah. Just find the deposit button and follow the instruction and finally find the confirmation button to confirm your transfer.
I also made a video of depositing IDR from OVO digital wallet if you are interested:
- 00:00 Opening
- 00:12 Already in Indodax website
- 00:35 Click wallet menu to find OVO deposit menu
- 00:38 Choose IDR
- 00:41 Choose deposit
- 00:51 Choose OVO
- 00:51 Choose OVO
- 00:01:00 automatically use registered phone number
- 00:01:10 receipt issued to OVO application
- 00:01:35 final result
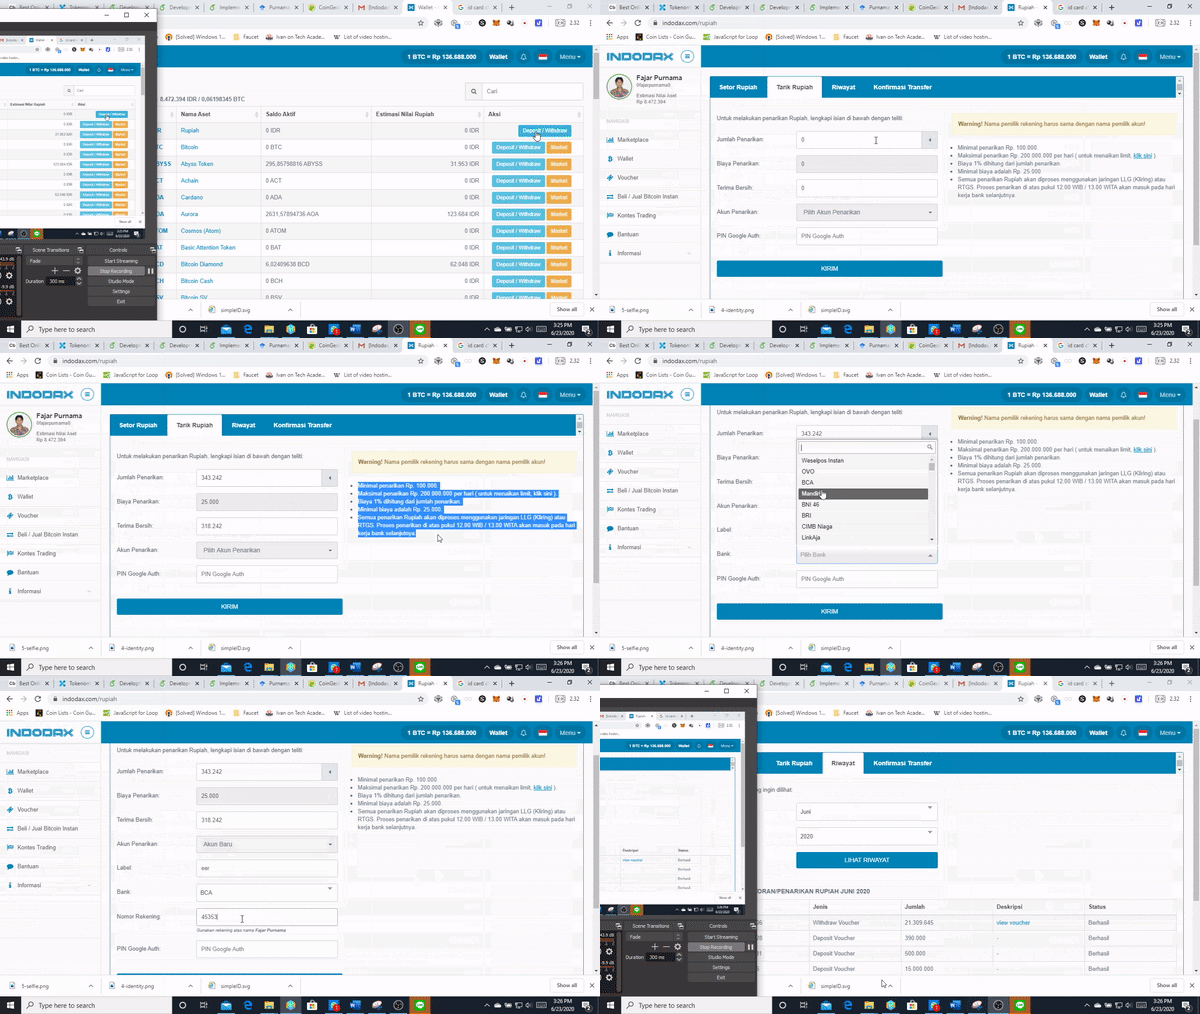
9. Now one of the highlights of this chapter is to withdraw fiat to bank account where in this case is Indonesian Rupiah. Just click the withdraw button and follow the instruction. If you are still in coins and don't have IDR, you have to sell your coins first.
Here I successfully withdrawn my IDR to my Bank Negara Indonesia (BNI) account. In Indodax, the IDR withdrawal is fast where for me took only an hour or two but the fees are high which is 1% and minimum 25k IDR.
- 00:00 IDR withdrawal menu.
- 00:27 Input amount, bank name, and account number.
- 02:35 Confirm through email.
- 03:20 Withdrawn successful proof.
Another example is that I withdraw using Luno (input "S24B5E" in referral to get your bonus). It's cheap with only 6.5k IDR but took almost 3 business days although they stated that it should only took 1 business day.
- 00:00 0 deposit fee for other than BTC
- 00:11 0.0001 BTC deposit fee
- 00:21 Send BTC from Exodus to Luno
- 01:16 Exchange BTC to IDR
- 01:36 Add bank account
- 02:02 Request IDR withdrawal to BCA
- 02:38 Withdrawal successful with 6500 IDR fee but took 3 days
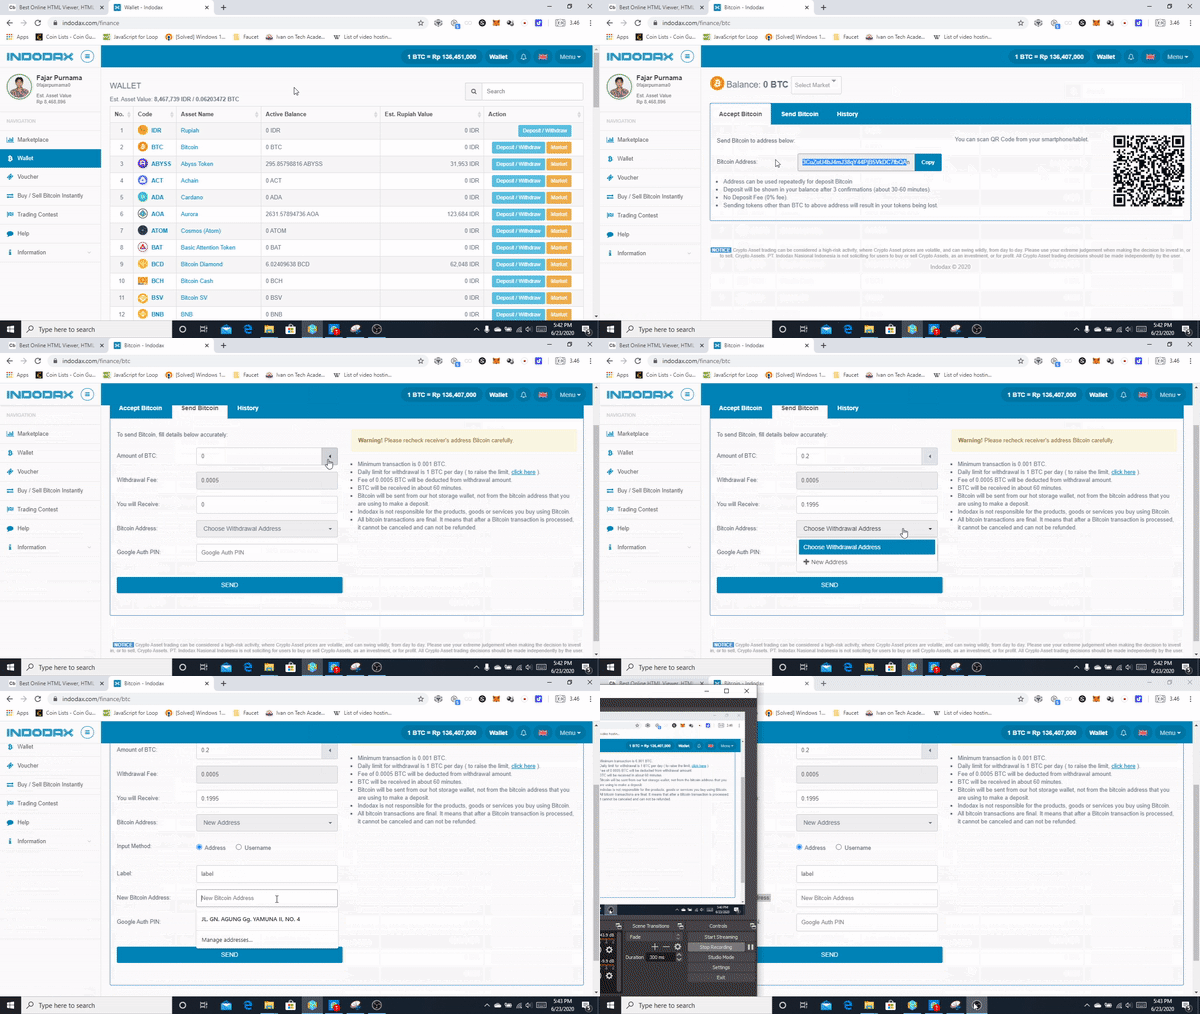
10. To send or receive coins, choose the desired coins and follow the instruction. The method is the same as chapter 2 of how to send and receive cryptocurrency by copy and pasting the address or scanning QR code and make sure to double check as the process is irreversable.
My example of directly withdrawing Raven Coin that I mined in MiningpoolHub.
- 00:00 MiningpoolHub withdraw menu.
- 00:37 Registering Indodax account receiving address.
- 02:10 Request withdrawal.
- 03:12 See transaction history.
- 04:20 Withdrawal successful.
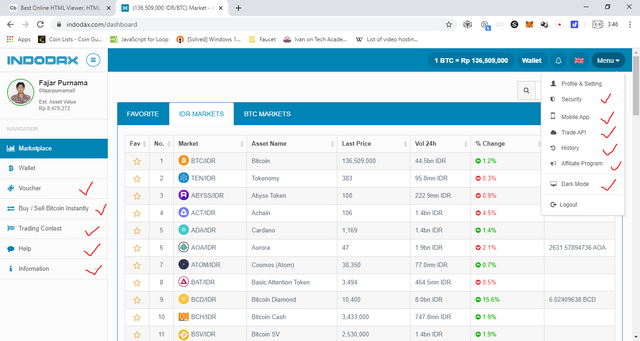
Check Other Menus
11. Check other menus yourself:
- Security: set password, phone number, 2FA, etc.
- Mobile App: help page to mobile app.
- Trade API: for 3rd party program such as TabTrader or writing your own program.
- History: see your transaction history
- Affiliate program: get commission for referring other for example my referral link is https://indodax.com/ref/0fajarpurnama0/1.
- VOUCHER: the only way I know to send IDR between Indodax and Tokenomy members without fees.
- Help and other menus: just visit yourself
Market
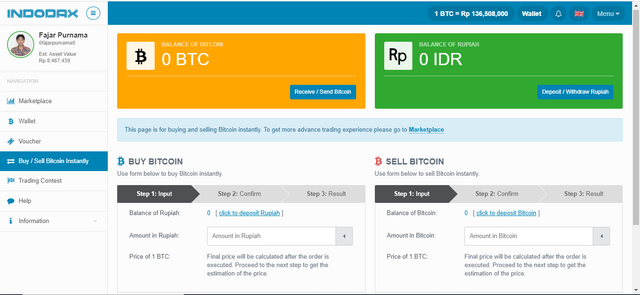
12. If you only want to buy and sell bitcoin instantly using IDR without complicated methods than just go to "Buy/Sell Bitcoin Instantly" menu.
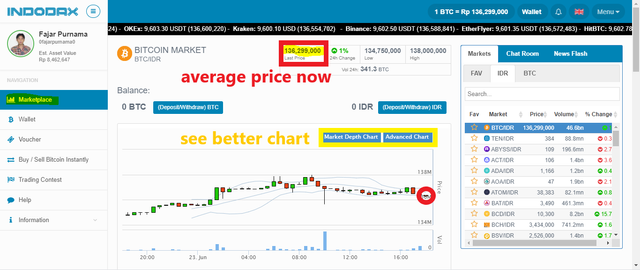
13. If you want to get other coins or trade then go to market, choose a coin to trade, and you will greeted with a price chart.
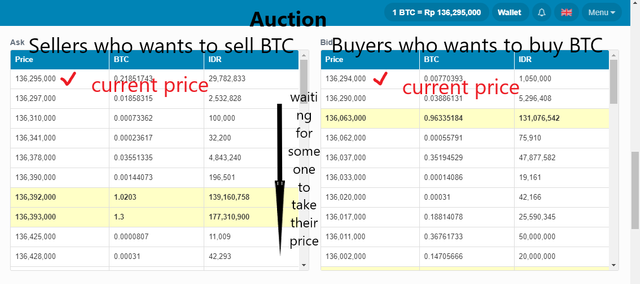
14. You are on an auction like market where you bid prices. You need to get familiar with the order book. This is where sellers and buyers book prices. You can see the latest price sellers offers and buyers bid, and how much supply and demands there are.
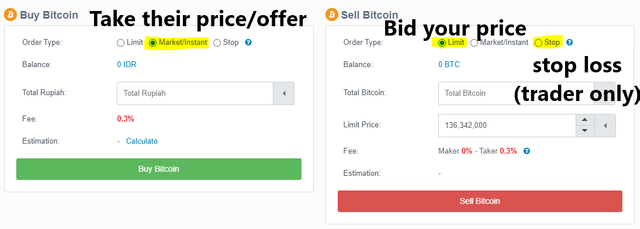
15. Once you read the chart and the order book, now you are ready to trade. The "instant" option means you accept the latest price and trade instantly, while "limit" you set your price, usually you want to book cheaper price for buying and more expensive price for selling. You then wait hoping that someone accepts your offer. "Stop" loss are for traders who trade only to seek profit and it is an option to cut their losses.
Simple Coincheck Guide
Coincheck Registration
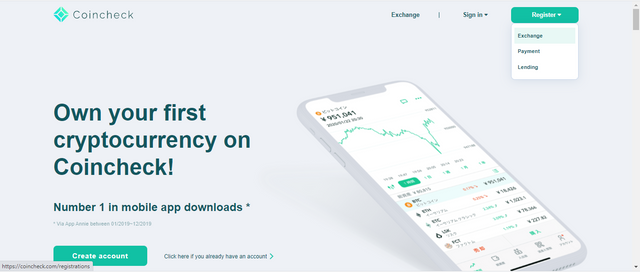
1. Prepare your identity cards, your email address, paper and a marker, and visit https://coincheck.com/registrations. Fill in your desired username, email address, desired password, and phone number. You will get an email to verify your Coincheck's email address. Click the link.
Coincheck Verification
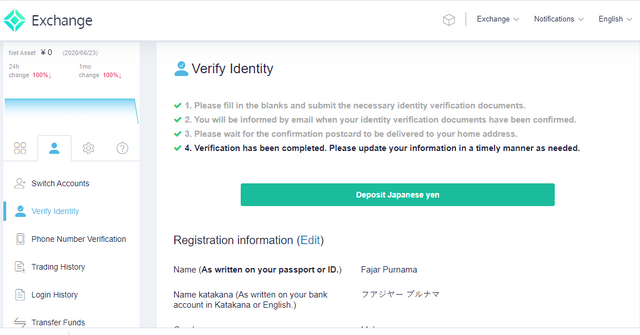
2. If not automatic, choose the person icon, and fill in your profile. Finally, click the verification button.
3. Fill in the form and upload your identity card. Take a selfie with your identity card. Exchanges in Japan are stricter than in Indonesia. Additionally, you need to upload a document that proofs your address such as electric bill and official letter from local government. The more you are rejected, the harder the requirement gets until you are asked to take a video of yourself. If you are not a Japanese, it can be extra challenging as you are required to write your name in Katana and if you are living in Japan, you are required to write your living address exactly in Japanese character as on your identity card.
Coincheck Deposit and Withdraw
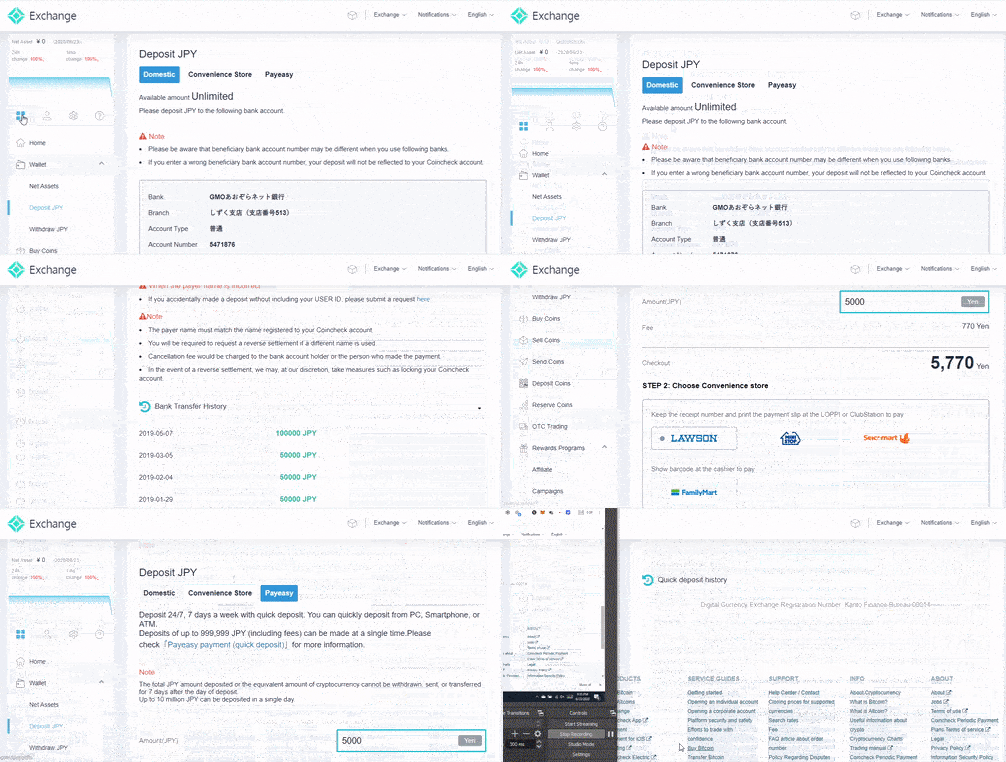
4. To deposit Japanese Yen from bank, choose main menu, then wallet, finally deposit. Usually there is no fee once a month if you transfer from the same bank as they requested, if not, it usually cost ¥440. You can also transfer from convenient store in Japan and also use paypay, although they are more convenient but usually more expensive.
I also made a video of depositing JPY from Japan Post Bank for foreigners in Japan:
- 00:00 You need to pass know your customer (KYC) first.
- 01:25 In website, go to wallet and choose deposit Japanese yen.
- 02:19 A detailed instruction of where to transfer.
- 02:40 Go to JPPost Bank
- 02:54 Choose Remmittance.
- 03:05 Input pin and choose other bank.
- 03:20 Input "su" and find SBI, then "ho" and choose account.
- 03:45 Insert the account number instructed on the web.
- 04:05 Input deposit amount.
- 04:20 Do not use your default name, change to user id etc as instructed.
- 05:55 Input your phone number.
- 07:35 Deposit successful.
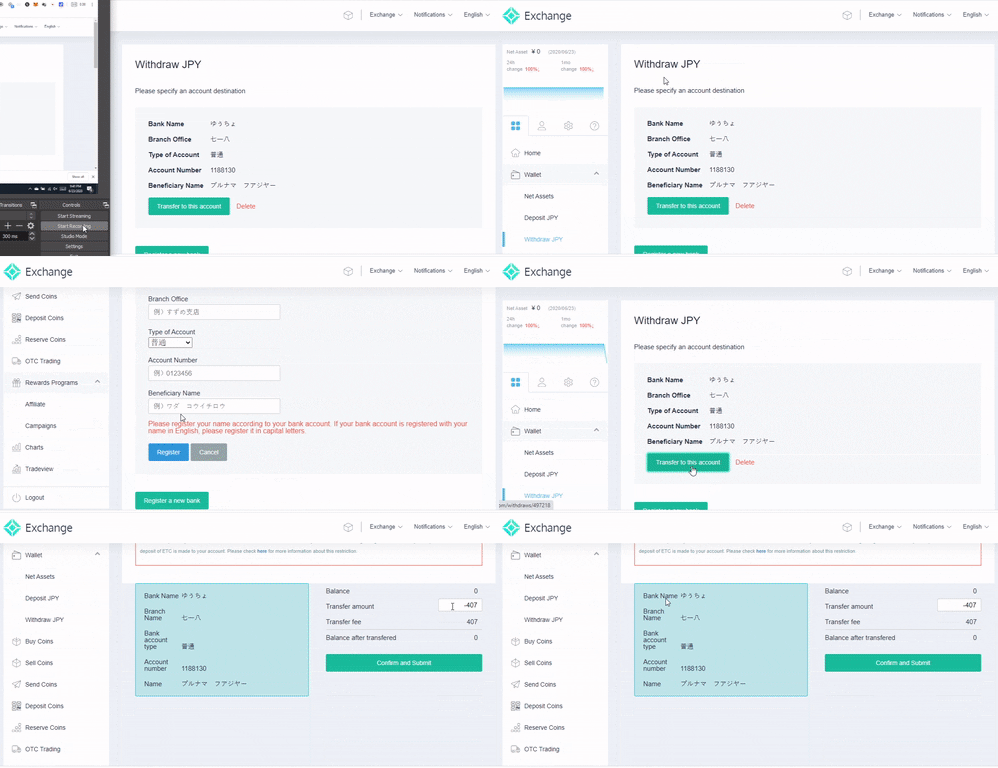
5. To withdraw Japanese Yen to bank, choose main menu, then wallet, finally withdraw. Register your bank information, there's a fee for withdrawing, and finally press withdraw button after filling in your desired amount.
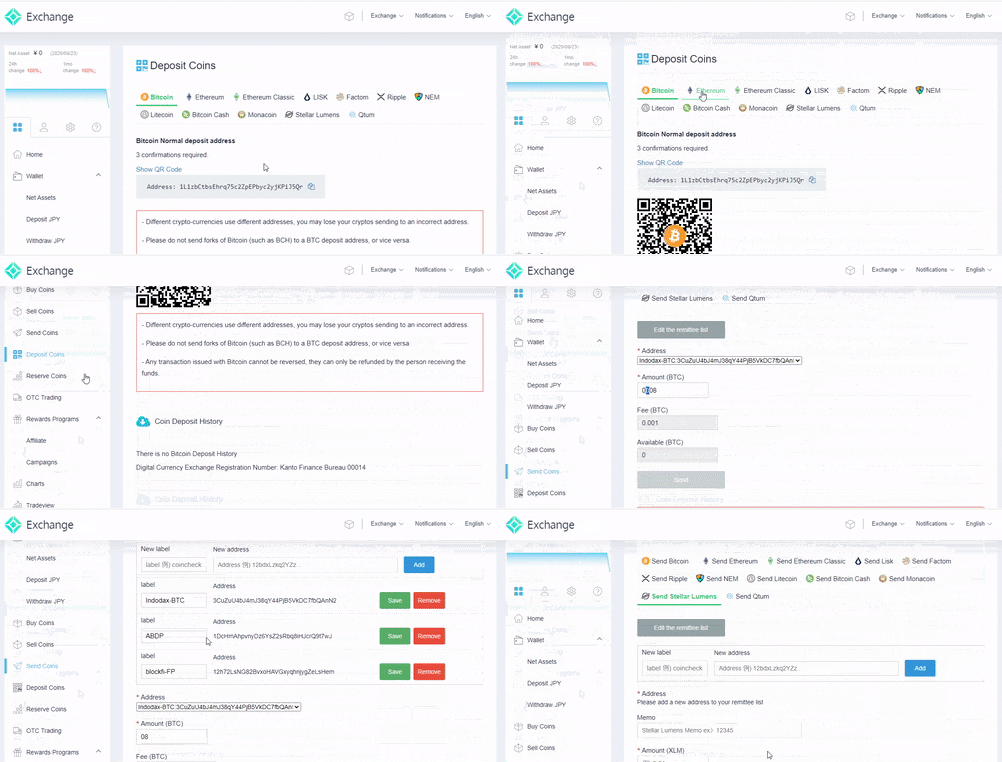
6. To send or receive coins, choose send or deposit coins, then choose desired coins and follow the instruction. The method is the same as chapter 2 of how to send and receive cryptocurrency by copy and pasting the address or scanning QR code and make sure to double check as the process is irreversable.
I made an example of transferring coin from Coincheck to Indodax and also possible fees if remmitting JPY to IDR from Japan to Indonesia:
- 00:00 Send BTC from Coincheck to Indodax
- 03:35 Fee calculation
- 08:40 Sell BTC to IDR
Market
If you prefer my video explaination:
- 00:00 default trading page
- 00:30 buy and sell coin instantly
- 00:40 chart, orderbook, etc.
- 02:00 demo trading.
- 05:40 open order.
- 07:50 demo instant coin buy.
- 10:30 coincheck's beautiful trading view.
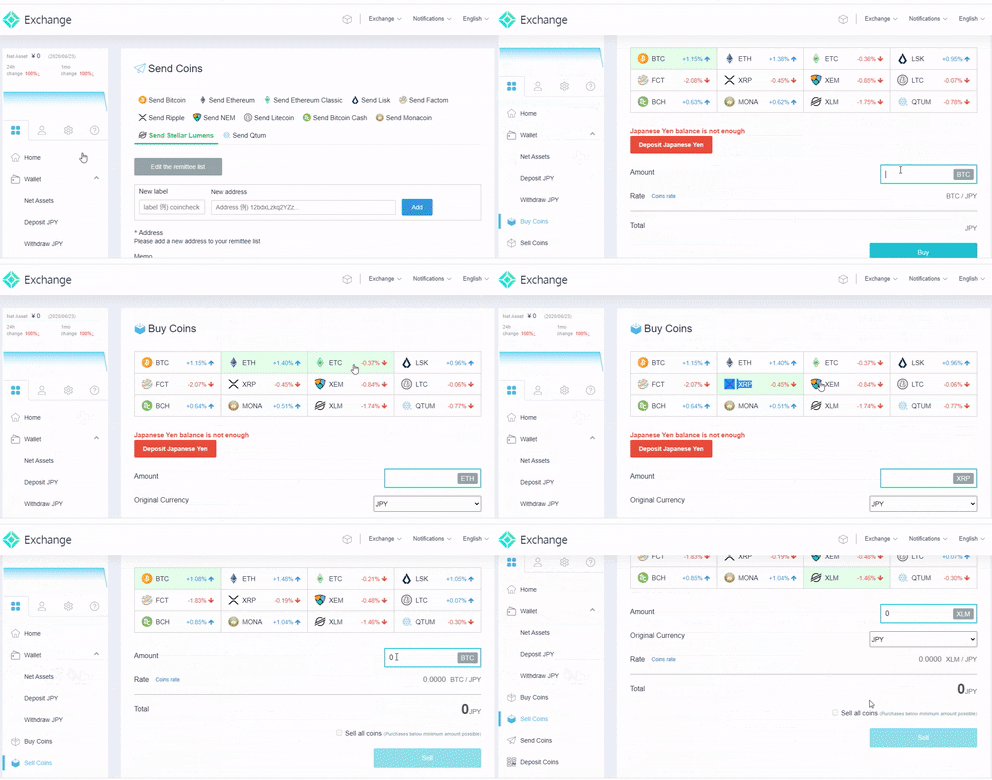
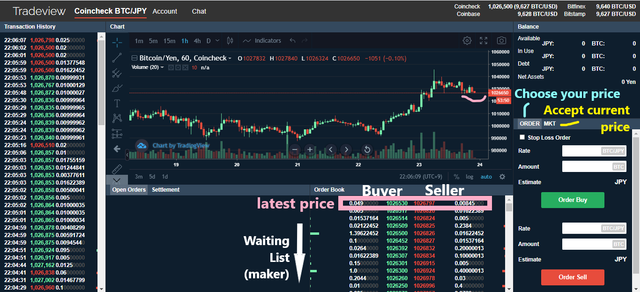
7. If you only want to buy and sell coins instantly using JPY without complicated methods than just go to "Buy Coins" or "Sell Coins" menu. It's the opposite to Indodax where Coincheck have many coins for instant transaction and only Bitcoin for trading.
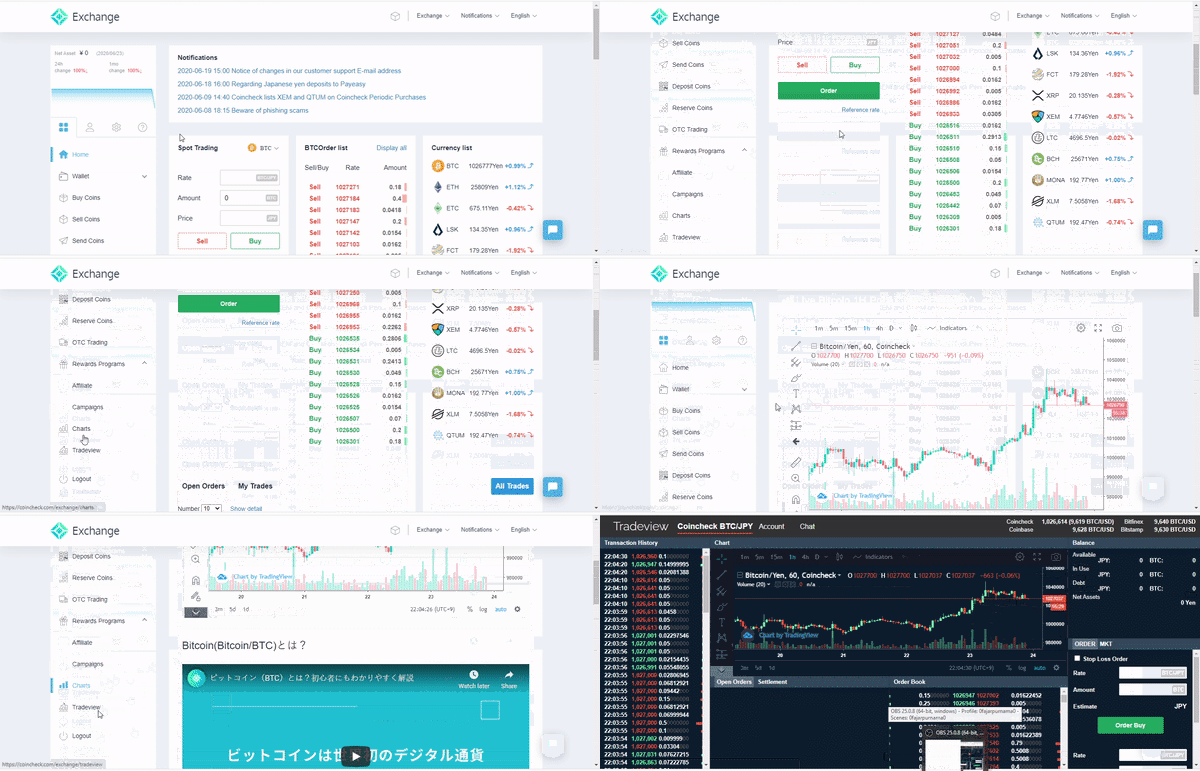
8. The default home menu at top takes you to trading Bitcoin. The chart is on the separate menu, but for me, I prefer using the tradingview for trading.
9. Coincheck's trading view is one of my favorite function. You are on an auction like market where you bid prices. You need to get familiar with the order book. This is where sellers and buyers book prices. You can see the latest price sellers offers and buyers bid, and how much supply and demands there are. Once you read the chart and the order book, now you are ready to trade. The "instant" option means you accept the latest price and trade instantly, while "limit" you set your price, usually you want to book cheaper price for buying and more expensive price for selling. You then wait hoping that someone accepts your offer. "Stop" loss are for traders who trade only to seek profit and it is an option to cut their losses.
Check Other Menus
10. Check other menus yourself:
Mirrors
- https://www.publish0x.com/0fajarpurnama0/cryptocurrency-101-chapter-3-connection-to-current-banking-s-xroxowl?a=4oeEw0Yb0B&tid=steemit
- https://0darkking0.blogspot.com/2020/06/cryptocurrency-101-chapter-3-connection.html
- https://medium.com/@0fajarpurnama0/cryptocurrency-101-chapter-3-connection-to-current-banking-system-eb6e73f29f11
- https://0fajarpurnama0.github.io/cryptocurrency/2020/06/27/cryptocurrency-101-chapter-3
- https://0fajarpurnama0.tumblr.com/post/622049767854391296/cryptocurrency-101-chapter-3-connection-to
- https://hicc.cs.kumamoto-u.ac.jp/~fajar/cryptocurrency/cryptocurrency-101-chapter-3.html
- https://0fajarpurnama0.wixsite.com/0fajarpurnama0/post/cryptocurrency-101-chapter-3-connection-to-current-banking-system
- http://0fajarpurnama0.weebly.com/blog/cryptocurrency-101-chapter-3-connection-to-current-banking-system
- https://0fajarpurnama0.cloudaccess.host/index.php/uncategorised/55-cryptocurrency-101-chapter-3-connection-to-current-banking-system
