Arionum series # 3 - Let the CPUs Fly! - How-to Mine Arionum (ARO) Debian Linux edition

In parts 1 and 2 of my Arionum series, we took some time to explore some of the aspects that make Arionum a perfect candidate for the next great cryptocurrency and then did a quick walk-through on getting started with an Arionum wallet and trading ARO coins. If you didn't get a chance to read my last two posts, the links are below.
https://steemit.com/cryptocurrency/@clshipp91/arionum-the-new-php-based-cpu-minable-cryptocurrency
https://steemit.com/cryptocurrency/@clshipp91/arionum-series-2-let-s-trade-aro-the-how-to
Now that we've gotten started with the basics of Arionum, let's take a look at what it takes to mine your first ARO. There are several ways to mine Arionum on both Linux and Windows but, by far the most effective and full featured mining client is the Java miner created by ProgrammerDan. It provides the highest hashrate and has some pretty cool monitoring functionality. Not to mention, if ever you have any problems with the miner, ProgrammerDan is always ready and willing to help you out in the Arionum discord channel. So let's get started setting up your first Arionum miner.
The good thing about Arionum is that it is a CPU optimized coin, so you don't need a $1000 GPU or ASIC to be able to make mine some ARO. All you need is a decent computer with a pretty good CPU or if you are really serious you can purchase some cloud virtual servers from a cloud provider. Either way you should be able to join the mining party.
Dan's Java miner works for both Linux and Windows but, today I want to focus of the Linux version and we will walk through the Windows version in a later post. Let's get to it!

Familiarize yourself with GitHub
All of ProgrammerDan’s source code for the Arionum Java Miner is stored in a public GitHub repository at (https://github.com/ProgrammerDan/arionum-java). If you're not familiar with GitHub and git, they are open source version control tools that allow you to share source code and collaborate with other developers. I have a link to a good article that summarizes both at the bottom of this post.
Within ProgrammerDan's Arionum repository you can take a look through all of the source code we are going to use to compile and run the Java miner. I encourage you to look through the documentation and code (or find a friend who can do so). It's always a good idea to check source code yourself before you start running programs on your machine.
Within the Arionum-miner folder of this repository you'll find the README.md file, this will be the basis for what I'll be explaining below.

Installing Dependencies
Once you've familiarized yourself with the repository we'll need to install a few Dependencies that are required to compile and run the Java miner client.
The first step I usually perform is execute the update command to update all of the package lists on my machine. This just makes sure that when we install all of the dependencies, we are installing the most up to date versions. To do this execute the following in the terminal:
sudo apt-get update
When ramping up a new Arionum client the first thing I usually do is make sure I have “Screen” installed. I do this because I usually run Ubuntu from the terminal and I find Screen very useful in keeping the miner running in the background.
What screen allows you to do is start the miner on a screen and then disconnect and close the screen without terminating the miner. If you'd like to use Screen, make sure it is installed by executing the following command in the terminal:
Sudo apt-get install screen
The next step is to install the dependencies required to compile the miner. These include git, maven, 64 bit Java 8 JDK, gcc, make, and build-essentials. Build-essentials may or may not be necessary for your machine, I've never had to install it but, some versions of Linux do require you to install this. To install these dependencies execute the following command in the terminal:
sudo apt-get install openjdk-8-jdk maven git gcc make build-essential -y
That should install all of the dependencies you'll need to compile and run the miner. If for some reason one or more of the dependencies didn't install, try running sudo apt-get install for one item at a time. I've found that this usually fixes the problem.
Now that we have all of our dependencies installed, we can close the git repository to out local machine.

Cloning and Pulling the Arionum-java Repository
Whenever working with source code from GitHub, you'll need to clone the repository to a local directory in order to compile the program. What this clone command does is copy all of the repository to your local home directory. You can do this by executing the following command in the terminal:
git clone git://github.com/ProgrammerDan/arionum-java
That should copy all of the files in ProgrammerDan’s repository to your home drive. Get excited because, you now have all of the files you'll need to install the Arionum Java miner.
Note: ProgrammerDan does provide periodic updates the the miner to enhance features and fix any bugs that exist. You can check the most recent version here: https://github.com/ProgrammerDan/arionum-java/releases
If there is a newer version than what you currently have installed execute the following command in the terminal and then repeat the steps below like you did on the initial install:
git pull
Compiling the Miner and building argon2i libraries
Now that we have all of our files ready, it's time to compile the program and build the local argon2i libraries. The first thing we need to do is navigate to the arionum-miner folder from our home directory. If using a GUI version of Linux like Ubuntu you can use the GUI file explorer and click arionum-java->arionum-miner. Then right click in the folder and click “Open Terminal”. This will open a terminal session in that folder. If you don't have a GUI or would rather just use the terminal (since it's quicker and we're already here) just execute the following command:
cd arionum-java/arionum-miner
Your current line should now show that you are in the arionum-miner folder.
Now we can use maven to build the package for the miner. To do so execute the following command in the terminal:
mvn clean package
Your terminal will start processing and building the miner. Once it finished you should see a message that says “Build Successful”. If your message does not read “Build Successful”, go back and make sure your package list is up to date and that all of the dependencies we're installed.
Once your package is successfully built, we'll need to modify the permissions on the build-argon.sh file so we can build the argon2i libraries. To do this execute the following command:
chmod +x build-argon.sh
You won't see any message letting you know the command ran successfully. The command line will just move to the next line and wait for you to enter something. If you do get some sort of message saying that the file/directory doesn't exist, you either misspelled something or the mvn clean package command did not execute successfully. If you get this error execute the following command to view the contents of the arionum-miner file:
ls -la
Look for a file called “build-argon.sh”. if you don't see it rerun the “mvn clean package” command.
Now once you've successfully changed the file permissions on the “build-argon.sh” file, we can run this program to build the local argon2i libraries. These get used by the miner to increase the performance. To do this execute the following command in the terminal:
./build-argon.sh
Read the output and if you see a message explaining that the command wasn't found or no directory exists, make sure gcc and make are installed and up to do. Then, rerun the ./build-argon.sh command.
That's it! You've now successfully compiled the Arionum Java Miner.
If you're still having problems, head over to the Arionum Discord #mining channel and ask for help. Someone, probably ProgrammerDan, will be more than happy to help you.
Running your Miner
Now that we have everything compiled we can run the Miner. First be sure you are still navigated to the arionum-miner folder. If you would like to use Screen to create a disconnected background session for your Miner run the following command in the terminal, if not skip this command:
Screen
Then click enter. To start the miner run the following command:
./run.sh
The first time you run the miner you'll be prompted to enter a few items for the config file.
The first asks you if you want to use local libraries. Type y.
Then it will ask you if you would like to mine in the pool or solo. I suggest you select pool since it's the easier option and probably the more profitable for you. To do so, type pool.
Then it will ask what pool you would like to use. The default selection is the official aropool. Just hit enter. This is the only mining pool as of now.
Now you'll be asked to enter your around wallet address. Enter your address, be sure to enter correctly or you won't get a payout.
Then you'll be asked to select the number of hashers to use. The default value uses all available hashers. I would start with the max number and look at your hashrate. If you think you should be getting more hashrate, you can edit the number of hashers later in the config file.
The last question asks if you want to enable colors. This one is up to you but, I think it looks cool with colors.
After you click enter, your Miner should start running. You may see a message that one or two of your CPU cores couldn't be affirmed. This is ok.
If you are using Screen you can disconnect and close the screen by using Ctrl+a then Ctrl+d. You can always open the session back up by opening a new terminal and typing the following command:
Screen -r
Monitoring your Miner
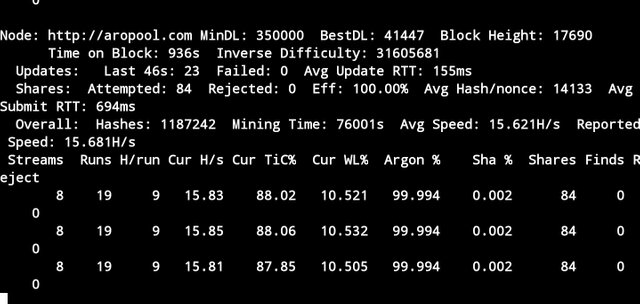
Now that you have your Miner up and running you can do a few things to monitor how you are doing. Every few seconds the miner will display a new stats line. Your hashrate will be displayed in h/s. You can take a look at the benchmarks page here: http://aropool.com/benchmarks to see how your performance is stacking up.
The confirmed column will show you how many nonces you've submitted.
The finds column will show you if you find any blocks. Don't worry if this stays zero for a long time, it's very hard to find a block. But, if you do find one, celebrate because you just got almost 400 ARO coins!
The last column to keep an eye on is the rejection column. If this column starts to pick up fast and you have a high percentage of rejections, you may want to restart the miner or rebuild the miner.
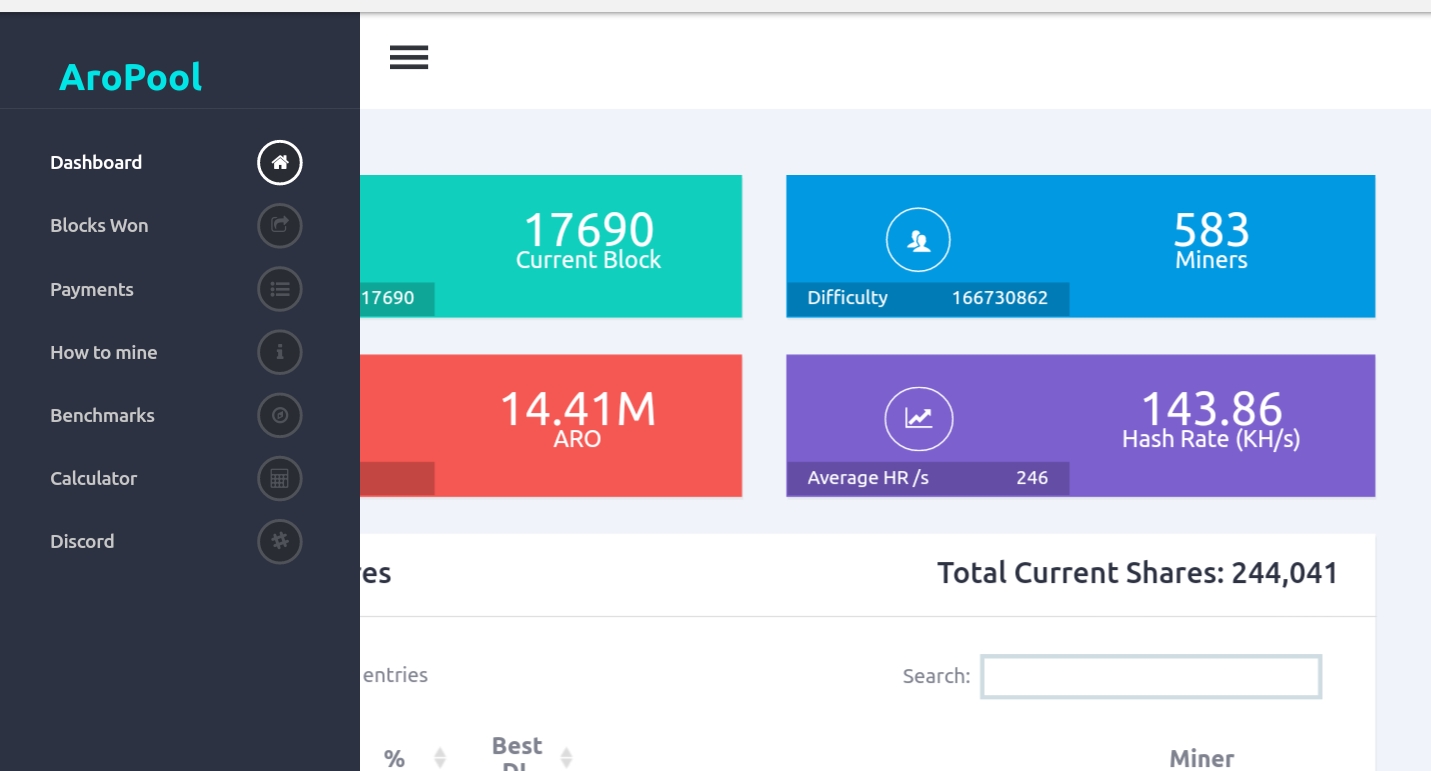
If you're mining on the aropool you can check your performance here: http://aropool.com. The first table shows the current shares. This is everyone who's submitted shares on the current block, you may or may not show up here, it just depends if you submitted shares on the current block. This section resets after each block.
The next section is historical shares. This is a collection of shares submitted over several blocks. You'll start to show up here as you submit shares. Your payout is also shown in this table, it will stay pending until you reach 3 ARO then you'll get a payout to your address.
That should be it, you are now officially mining ARO! If you have questions feel free to ask the Arionum community, they are very helpful.
Lastly, ProgrammerDan has put a lot of hard work into the Java Miner, all on his own time. He does not include a mandatory Dev fee in his miner like some others do. So if you like his work (you should), you can donate to his addresses below.
Send Arionum donations here: 4SxMLLWRCxoL42gqgf2C2x5T5Q1BJhgfQvMsfwrcFAu4owsBYncsvVnBBVqtxVrkqHVZ8nJGrcJB7yWnV92j5Rca
Send BTC donations here: bc1qucem39g0lamacevmvj7qnkfjh3mqkr0jmlnlt3 (segwit) or 1MXcQyo1jbaTYdWUqeAQumsKUDnytiFAe5 (standard)
Send CureCoin donations here: BFDK84Z29zb4caNMArKBZVBXAxGqGMRMfq
Send FoldingCoin donations here: 1HH3SQNf1KPfsAGC5BAvDj849oHoAsYEms
Git and GitHub Intro: https://www.howtogeek.com/180167/htg-explains-what-is-github-and-what-do-geeks-use-it-for/
Hot damn that was a clean tutorial. Gold star!
Thanks, good luck mining!