How to Build and Run a 6 GPU mining rig for Zcash or Ethereum with Nvidia GTX 1070
GPU pricing got a little crazy this year for a few months, and I took a break from building new GPU mining rigs because they were too expensive. I believe AMD GPU’s are still a little overpriced and hard to buy, so I decided to build six Nvidia GPU based mining rigs.
AMD RX 480 and 580 GPU’s work really well on Ethash mining algorithms, and do a decent job on Equihash. Nvidia GPU’s are the opposite – they do better on Equihash and are decent with Ethereum.
If you watch my latest youtube video, CryptoCurrency Mining Strategies and What I am Mining Sept 2017 (below), you will see that I advocate mining with many different types of miners, and mining many different types of cryptocurrencies, all at the same time. For example, in the past few months I have mined BTC, DGB, BCH, ETC, EXP, ETH, UBQ, ZEN, ZEC, LTC, MUE, DASH, and others. I also run masternodes and stake different cryptocurrencies to participate in other crypto generating activities.
Although the leaders in the cryptocurrency mining space are BTC, ETH, LTC, DASH, ZEC, and XMR, there are benefits to mining lesser known cryptocurrencies, if you are able to hold them for a while. The smaller crypto’s are volatile, and as long as they have a good team developing and improving them, they will go up in price over time. By holding then converting a portion of your mined crypto’s to Bitcoin or Ethereum when the price doubles, you improve your mining profitability substantially. And as long as the cryptocurrency has good prospects, if you hold it for a long time it might go up in value 5x, 10x, or even 100x. This has happened in the past, and will happen in the future.
Anyway, to make a long story short, Nvidia GTX 1060, 1070, and 1080 GPU’s are good for mining ZEC and ZEN, and since I believe both project have good long-term prospects, I figured I needed to be making some Nvidia based GPU miners. This is a list of what to buy and how to set it up to get you mining quickly.
Bill of Materials
Equipment list – Links are to Amazon or Parallel Mining product page. Buy from wherever you can get the best deal!
- Motherboard – Biostar Motherboard TB250-BTC – $95
- Processor – Intel Celeron Kaby Lake 2.9GHz LGA 1151 processor – $41
- Memory – 4GB Single DDR4 DIMM 288-Pin Memory – $36
- SSD – EthosDistro 16GB with operating system and application pre-installed. – $49
- Case – ParallelMiner BAREBONE – ALL ALUMINIUM 6.1 GPU OPEN AIR MINING CASE – $220
- Power Supply – Corsair HX1200 1200W 80 Plus Platinum – $240
- Risers – ITHOO USB3.0 PCI EXPRESS 1X TO 16X EXTENDER RISER CARD ADAPTER W/ 24″ CABLE from parallel miner – Qty 6 – $64
- GPU – ASUS GeForce GTX 1070 8GB ROG STRIX OC Edition – $460 – qty 6 -> $2760
- Optional – ATX power switch – two pack – $10
- Case screws:
- Motherboard to case – PC Mounting Computer Screws M3 x 1/4-Inches Long – qty 50 – $2
- Risers and GPU’s to case – Maxmoral 200pcs Toothed Hex 6/32 SCREW 6 – 32 Computer – qty 200 – $9
Total Cost for Bill of Materials: ~$3500
Build Instructions
Here’s some basic instructions for the most efficient order of operations when building the machine. The idea is to get a basic computer built, troubleshoot any potential issues, install the operating system and application, then build the rest of the machine.
Hardware Build
- Assemble the Case
- Put the CPU, CPU fan, and memory on the motherboard. Plug in the CPU fan.
- Optional – attach the ATX power switches and LED’s to the power header.
- Plug the SATA cable into the motherboard.
- Put the motherboard in the case and screw it in with the smaller screws.
- Attach the power supply to the right side of the case. Use the screws that came in the box. Attach power cables from the power supply to the Motherboard, CPU power, SSD.
- Screw in one of the PCI-E Riser cards in the second slot (right above the CPU fan), plug it into the second PCI-E slot on the motherboard closest to the processor, and plug in power from the power supply.
- Put a GPU into the PCI-E riser card, screw it into the case, and attach a PCI-E power cable to it.
- Attach a keyboard to the motherboard and HDMI monitor to the GPU card.
- Plug the power cord into the power supply, turn on the power switch.
- Press the ATX power button, or short the power button header pins with a screwdriver. The machine should boot.
If it doesn’t boot, this is the time to do basic troubleshooting. Don’t add any more graphics cards until you get at least one working.
If it does boot, configure the BIOS, connect an Ethernet cable to the network that can get to the internet, and reboot.
Motherboard BIOS Settings
Turn off unneeded services on the BIOS, keep all the PCI settings on Auto, set the graphics TOLUD to 3.5GB. Make the power come on whenever power is applied to the board. Here is a set of pictures for BIOS settings for a similar motherboard.
Setting up EthosDistro mining operating system
This is a purpose built version of Linux that is optimized for GPU mining. It works really well, better than running Windows or Ubuntu for mining. By using EthosDistro, I save time and don’t need to mess around with the operating system. You can, of course, use the same hardware build and run Windows or Linux and mine with it, but I recommend using a purpose built operating system.
What I really like about EthosDistro is how it has settings for adjusting power, fans, core clock speed, and memory clock speed. This allows for overclocking and power limiting of the GPU’s. You can also set up a single configuration file on a webserver, and by changing one file on your miner, have it go to that configuration file on boot, pull its config, and start mining. It even checks the file every few minutes while running, so it’s possible to reboot the miner to have it accept new settings.
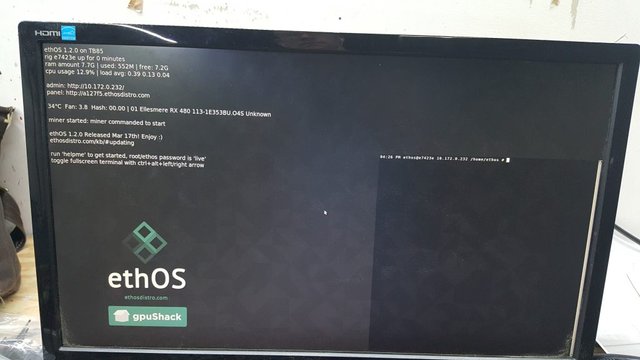
After setting the BIOS, connecting Ethernet, and rebooting, EthosDistro boots to a screen that is more user-friendly than just a command line:
This shows one GPU is successfully mining Ethereum. There are a few important pieces or information you need from this screen.
- IP address of the miner itself – access by SSH – this one is at 10.172.0.232
- name of the miner – this one is e7423e
- URL of the website with statistics. Depends on the IP address of your location. – this one is http://a127f5.ethosdistro.com
It is mining to the EthosDistro address. That needs to be changed. I recommend not using this screen for making changes, and instead using SSH from your PC. Here are some options for SSH on different operating systems:
- Linux – use the Terminal command line
- Mac – use the Termminal command line
- PC – use the Bash command line, or download and use Putty
If you don’t know the first thing about Linux you may want to learn at least the basics. Get started learnin Linux nhere.
Setting up EthosDistro to Mine for You
The screen shows the IP address. SSH to the IP address like so:
ssh [email protected]
(enter password live)
The system is designed to download a file from a website and run. If you don’t want it do that, edit remote.conf with nano or vim, and make it a blank file. When the system boots, it will copy whatever file is referenced in remote.conf into local.conf, unless there is nothing in the remote.conf file.
For just a single miner, edit the local.conf file with nano or vim to configure the miner to work for you. Here is an example configuration for mining Zcash. Put this at the beginning of the local.conf file:
globalminer ethminer
maxgputemp 90
stratumproxy enabled
flags --cl-global-work 8192 --farm-recheck 200
globalfan 85
autoreboot 12
globalpowertune 7

#zcash flypool
ewbf-zcash=proxywallet t1baES7LZ8Wx1mATYqQxeCShQwVbwTgnhuU
ewbf-zcash=proxypool1 us1-zcash.flypool.org:3333

# nvidia miners
miner 4288a0 ewbf-zcash

# nvidia
#pwr 4288a0 160 160 160 160 160 160
#cor 4288a0 1923 1923 1923 1923 1923 1923
#mem 4288a0 4314 4314 4314 4314 4314 4314
I like to keep the configurations for multiple mining pools in the file, commented out with the # symbol. That way if I want to change what I am mining I can just alter the configuration without looking everything up again. Before you start mining, you definitely want to have a wallet address of your own to mine to, which in this configuration is set by the proxywallet configuration item.
For any Bitcoin based cryptocurrencies, like ZEC and ZEN, I actually prefer to mine to a software wallet, then transfer to a hardware wallet every week or two. At this point, you can mine to a hardware wallet for ETH, ETC, and ZEC, and a software wallet for ZEN.
If you mine to a hardware wallet or exchange, change your pool settings so it only deposits once a day. More than once a day deposit into a hardware wallet or exchange can cause issues. And perform maintenance on your hardware wallet!
After you get the miner working with 1 GPU, then get the miner working with all 6 GPU’s. I like to plug them in one at a time then reboot, so I can figure out if I have a bad riser or card. The most common problem you will probably have is bad risers. I always order extra so I can quickly swap out a bad riser.
EthosDistro Documentation
There are two main sources of documentation for EthosDistro. The first is the local.conf file. A working example of the pool.txt for ethereum is posted online, with all the comments and examples. The pool.txt and local.conf file documentation is dense, so it takes a few times reading it through to figure it out. I had to read it through about 10 times before I understood how to change the settings to make it work. The second source of documentation is the EthosDistro Knowledge Base.
If you have more than one GPU miner, or want to be able to make changes remotely, you can create a text file and post it on a web server. The example above is a portion of my web server based configuration file. A fuller one is below:
globalminer ethminer
maxgputemp 90
stratumproxy enabled
flags --cl-global-work 8192 --farm-recheck 200
globalfan 85
autoreboot 12

globalpowertune 7

proxywallet 0x9F0EBB3e7A799e7F974e2F0cC5b5869132d1C4C5
proxypool1 us1-etc.ethermine.org:4444
proxypool2 us2-etc.ethermine.org:4444

#proxywallet 0x5E517e1E4E978deBca3752B0ac64CB34F7dEb86F
#proxypool1 us1.ethermine.org:4444
#proxypool2 us2.ethermine.org:4444

#zencash luckpool
claymore-zcash=proxywallet znT2g6zxEyFPhDTVN9QF9XrDvPzbWdr71sG
claymore-zcash=proxypool1 ssl://luckpool.org:3058
ewbf-zcash=proxywallet znT2g6zxEyFPhDTVN9QF9XrDvPzbWdr71sG
ewbf-zcash=proxypool1 luckpool.org:3057

#zcash flypool
#claymore-zcash=proxywallet t1baES7LZ8Wx1mATYqQxeCShQwVbwTgnhuU
#claymore-zcash=proxypool1 ssl://us1-zcash.flypool.org:3443gethelp
#ewbf-zcash=proxywallet t1baES7LZ8Wx1mATYqQxeCShQwVbwTgnhuU
#ewbf-zcash=proxypool1 us1-zcash.flypool.org:3333

# nvidia miners
miner 4288a0 ewbf-zcash
miner 428a3a ewbf-zcash

# nvidia
pwr 4288a0 160 160 160 160 160 160
cor 4288a0 1923 1923 1923 1923 1923 1923
mem 4288a0 4314 4314 4314 4314 4314 4314

pwr 428a3a 160 160 160 160 160 160
cor 428a3a 1984 1984 1984 1984 1984 1984
mem 428a3a 4360 4360 4360 4360 4360 4360

# amd miners
miner 315e24 claymore-zcash

#amd miners
cor 315e24 1226 1226 1226 1264 1226 1226
mem 315e24 2000 2000 2000 1750 1750 1750
pwr 315e24 5 5 5 5 5 5

#reboot - increment number to reboot
reb 4288a0 26
reb 428a3a 26
reb 315e24 26
Put just the url, nothing else, in the remote.conf file. The first time I did this I left in two comment lines, then the url, and it did not work. My remote.conf file has only one line, and looks like this:
https://blockoperations.com/ethos/ethos_classic_shaftoe.txt
There are many different ways to host a text file on a webserver, but that is beyond the scope of this article.
Useful Commands for EthosDistro
I only use a few commands when checking on miners.
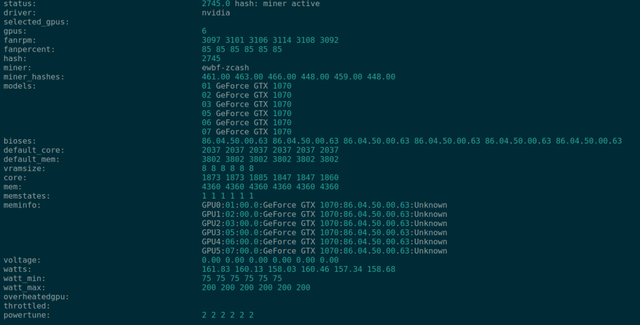
gethelp will create a url with lots of information about the system I use that to check what the actual speed of the GPU’s are:
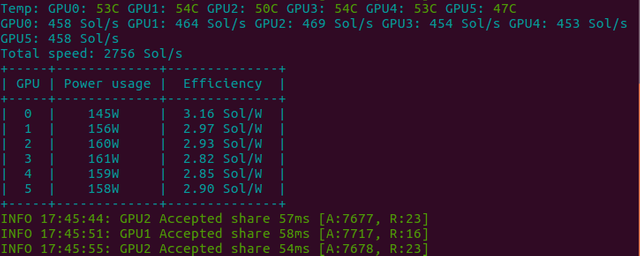
show miner gives an output of the miner log. For EWBF it looks like this:
Operating EthosDistro and Checking the Panel
With your copy of EthosDistro, you get a web panel with realtime statistics for every miner at your location. This is a portion of the GPU miner panel I am running at my medium size mining location:
Here is the link to the current page http://48061f.ethosdistro.com.
You can see some of the miners have issues and are not running all 6 GPU’s. Those issues are due to bad risers – I got a bad batch from a different supplier I tried. Sometimes with bad risers they just don’t work. With this batch, the bad risers run for 1-3 hours, then stop. It makes troubleshooting tedious and slow. As soon as I get some better ones, I am going to be a lot happier.
Tuning the GPU’s for Maximum Performance
Nvidia GPU’s are very easy to tune with EthosDistro. In the example configuration above, I included three tuning settings. How you set them depends on what you want to accomplish. I prefer a mix of maximum hash rate with moderate power usage. Others try to maximize the hash per watt.
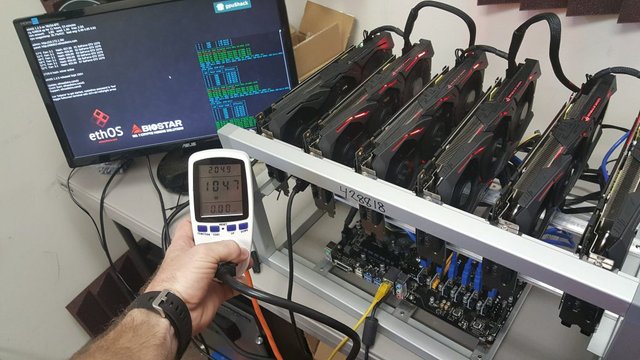
For tuning the power, you can see the max power of each of the GPU’s is 200 Watts in the gethelp output. I found that setting the maximum power to 160 watts worked the best. After that, I worked to increase the memory speed as much as possible. In the the case of the ASUS Strix I was able to raise the memory speed from the default of 3802 to 4360. When operating, ethosdistro will turn the GPU processor speed down to keep the card within power limits. As you can see in the graphics above, this tuning produced about 460 H/s per GPU, for a total of 2745.
How Much Will the GPU Miner Earn?
I usually put my miners on one cryptocurrency and leave it there for a month or two. Since prefer to mine and hold, I like to mine a cryptocurrency that has less competition. Some people are not able to mine and hold, and instead must mine and sell the rewards that they mine. I still like to make sure that I am mining one of the more profitable coins, so as long as it is close to the most profitable, I am fine with that.
Check the potential profitability at WhatToMine.com or Coinwarz.com. For this specific configuration of six GTX 1070’s at 2745 H/s and 1050 watts, I entered the info up top. These GPU’s will hash Ethereum at about 170 MH/s, so I put that in for comparison also. These are the settings:
This is the result:
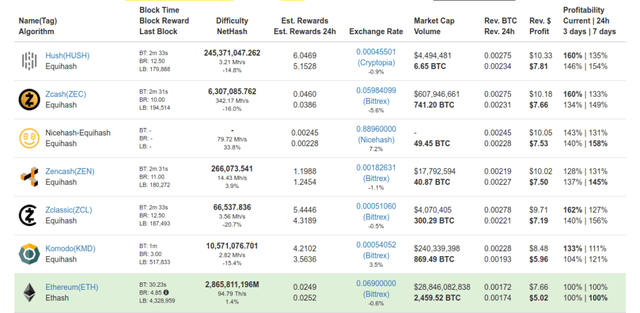
All five equihash coins are fairly similar in profitability. HUSH, ZEC, KMD, ZCL, and ZEN are all similarly profitable on the calculator, so any would be a good candidate to mine and immediately sell. Nicehash is an interesting option also – if you point your GPU miner at it you will get paid in Bitcoin. For mining and holding, you should do your research and determine which ones you think have the longest term potential to increase in usefulness, value, and price.
At about $7.50 profitability per day, that’s about $225 per month, or $2700 per year. Assuming everything stays the same (system hash rate for each coin, price, etc.), the 6 rig GPU system gets paid back in about 15 months. At this point in time, Zcash has a price of $260.
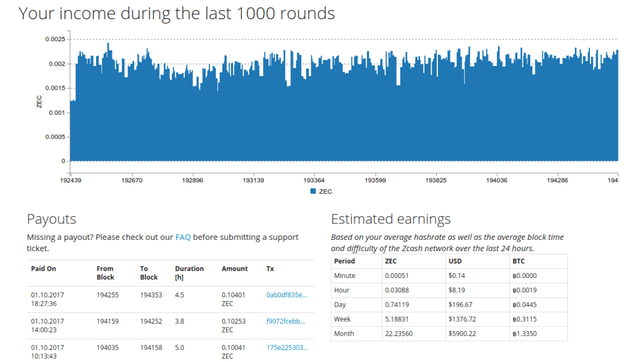
Now, to double-check the Whattomine calculator against reality, you have to check your mining pool. For the past few days I have been mining Zcash on flypool, so let’s take a look at what the hashrate has been there, and what the payouts have been:
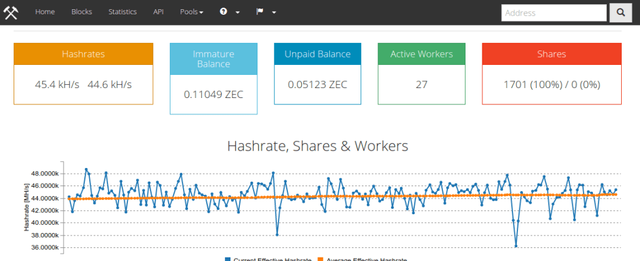
The hashrate for the 27 miners I have mining ZEC right now has averaged about 44.6 kH/s. Most of these miners are AMD GPU based, and have lower equihash hash rates of 1800 H/s.
For the 45 KH/s, flypool is estimating about a $5900 per month payout. That does not include my cost of electricity, but a quick couple of calculations shows that the payout estimate is $0.132 per 1 H/s per month. With 2750 H/s, that’s $364 revenue per month per Nvidia miner. If each miner is using 1050 Watts, that’s 756 kW-hr per month. At $0.10 per kW-hr, the electricity cost per miner is $75.60, so net profit per miner is about $288. That’s pretty close to the WhatToMine calculation.
Profitability, however, is a constantly moving target. Zcash has been as low as $170 and as high as $450 per ZEC. If it is a cryptocurrency you believe in, mine it, hold it, and sell some when the price spikes higher to help offset your costs.
Summary
I like GPU miners. They are straighforward to build, flexible, and profitable. You can start with however much you can afford, and add GPU’s as you go. For most people just getting into mining, I tell them that it is great to have grand plans, but that they should start mining with just one miner first, because it is a learning experience. After they run out of room at their house or apartment, then they can look at getting more and putting them into a place that has more electricity and cooling.
Cryptocurrency mining is for everyone who wants to participate – best of luck!


Thanks for introducing an inexpensive but best GPU mining.
This is an EPIC post, very complete guide on GPU mining, I am just getting myself started but I am already finding it a lot of fun. Currently mining ETC but may move to ZEC or ZEN soon.
Very good post about mining... very valuable. I am sure a lot of people who are into mining or at least wants to take a look will have lots of benefits out of this. Thanks for sharing!
Fantastic post. Thank you for this. Here is heading a local.conf that works for ZenCash with global rules. This is for people who don't feel comfortable setting each GPU individually. I plugged all GPUs in at once and it worked right away. Of course replace with your own wallet address.
globalminer ewbf-zcash
maxgputemp 90
stratumproxy enabled
proxywallet znbByzymrCmWqoL6wn9QzZLeqSbvHK4Ktvn
proxypool1 luckpool.org:3057
flags --cl-global-work 8192 --farm-recheck 200
globalfan 85
I also read the Zen whitepaper and I am very impressed with the project. Good luck!
Great job Thank you
How to determine whether you became a victim of secret mining?
https://steemit.com/cryptocurrency/@rinaalone/how-to-determine-whether-you-became-a-victim-of-secret-mining
Very simple and straight procedure to setting up mining rig..............
Thanks
Is this still a good setup to build? Can you start with just 1 or 2 GPUs or is that not worth the trouble? I see these prices have all gone up so is there any other cards that can work? Can you use old gaming systems like XBOX or PS to mine with? Thanks again for all the great info.
Yes, you can just start with a couple GPUs - if you are buying the rest of the mining rig from scratch, however, make sure you get a motherboard with more PCIe slots so that you have the ability to add more in the future. I started with a simple 2-GPU mining rig and just added a third GPU as funds allowed.
Here is a good resource site for choosing what GPUs to buy: http://miningcharts.com
There is a comparison chart here http://miningcharts.com/gpu-mining-comparison-chart/best-price-and-power-usage/ that actually helps calculate purchase and power cost for GPUs over the course of a year. I was going to start very cheap and just get a 1050Ti or two as they are about $100 each, but based on power usage and purchase cost, instead of a few 1050 Ti's I went for a single 1070 Ti. It uses less power, and even costs less per hash to purchase (granted, if you only had $100 to spend you could get a 1050 ti and you would have to save up $400 more to buy a 1070 Ti)
Appreciate the info and if you have any additional resources I'll definitely take a look.
thanks, super helpful
Good post i liked it thx
Ughhh I just don't see mining as a very viable investment to get into at this stage... but god damn I so want a lit colorful piece of artwork sitting beside me at my workstation.
I know how you feel. When I run the numbers, mining does not make financial sense. But then I actually buy, build, and operate the miner, and it makes me more than I expect. So I keep doing more and more.
Although, when ASIC miners and GPU's change over to newer model semiconductors in a few years, I will have to be quick to upgrade to the 10nm or 7nm technology while selling my 14/16nm gear.