FREE GRIDCOIN FROM GOOGLE'S CLOUD - WHAT'S THAT? #not_minig
Free Gridcoin with Cloud Computing
Ladies and Gents! THIS IS NOT A MINING GUIDE!
Due to large amounts of comments from people that didn't even read the guide and made assumptions based on the title alone, I need to make this clarification.
It's against terms and conditions of majority of Cloud Computiong providers to run Cryptocurrency mining software on their services. The software we'll run has nothing to do with mining and never had, and it's over 7 years old. If you post a comment saying what I present is not legal, you only spam, add nothing new to conversation, show your lack of technical knowledge and end up looking like a fool.
Wether you want to earn some coins, help develop our sciences and solve important social problems or spark interest to learn about cryptocurrencies and get your hands on some good coins for free this is the place.
There's a number of reasons (some above) to get interested with Gridcoin (GRC) - a cryptocurrency with innovative PoR (Proof of Research) system that allows users from all over the internet to contribute their computers' computing power to major research projects and institutions around the world and in exchange get rewarded with Gridcoin!
It happens with use of software called BOINC developed by Berkeley University.
BOINC splits extremely large processes into smaller tasks, then distributes them to be computed on all willing machines, then sends back the results. It allows each separate machine, to become a part of an online super-computer.
BOINC is completely independent of Gridcoin and on it's own is older than most (if not all) cryptocurrencies.
There are huge numbers of volunteers contributing to the projects, most direct contributors are highly specialized organizations with very large computing power. Some of the volunteers join their forces and form "groups" to work together on larger projects in a more organized fashion with additional benefits.
One of the groups in BOINC is Team Gridcoin, this is what ties the coin to the research. TeamGridcoin offers their members a list of white-listed projects taken from a much larger general pools. By being part of the group TeamGridcoin their administration is able to inspect which projects each member is working on and how much computing work they have contributed - and distribute GRC accordingly.
BOINC is actively being developed, has great user-base, support and infrastructure so attaching to it is an obvious head-start for Gridcoin (GRC) (compared to ideas like Golem) .

At the time of writing this post GRC is worth quite roughly 0.031 USD,
but considering the foundation for this project, increasing user-base and general increase in popularity of cryptocurrencies - this token is very likely to be worth a lot more in the future.
You can get it NOW FOR FREE - and I'll tell and show you how.
The set-up takes around 15-20min and the amount of gained coins can varry depending on chosen projects and settings, it will be running on a virtual machine hosted by google servers, so we skip the need for buying parts as well as electricity charge for computing :).
It's also a great way to learn about cryptocurrencies, GRC rewards and investing in general.
This guide is divided in 3 (pretty detailed) sections:
- GRCPool account and registration - set-up of accounts needed to participate in GRC rewards system
- Google Cloud Registration - registration for cloud platform, creation and set-up of the Virtual Machine (VM)
- Software configuration - download and configuration of BOINC software, establishing connection to the pool, starting research
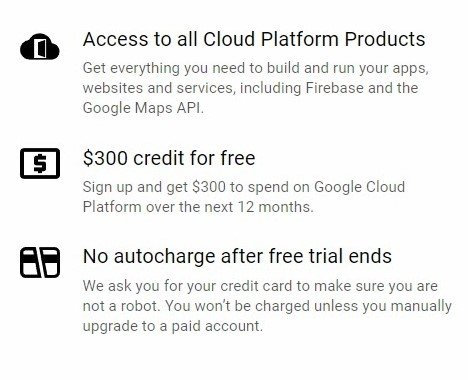
We will be using google cloud free trial and free 300usd credits to set up the virtual machine that is going to run our projects.
Requirments:
- gmail account
- credit card details for verification (NO chargers)
If you're new to Gridcoin, first you will have to register a pool account. If already have some Pool or Solo experience, you can go straight to point 2 - Google Cloud Registration.
1. GRCPool account registration and initial set-up
For those with personal-use-grade equipment the competition on general pool is too intense to efficiently work, therefore Gridcoin organized a dedicated pool that distributes its' white-listed projects and then sends the results from all the computers in the GRCPool to the General Pool as if it was coming from a single super-computer. Here GRC is awarded very similarly to General Pool, except users don't need to join any groups, as the whole pool is on Gridcoin's side.
GRCPool
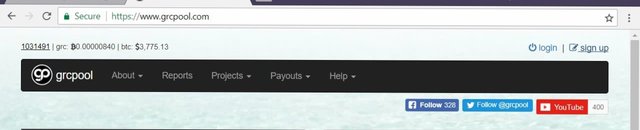
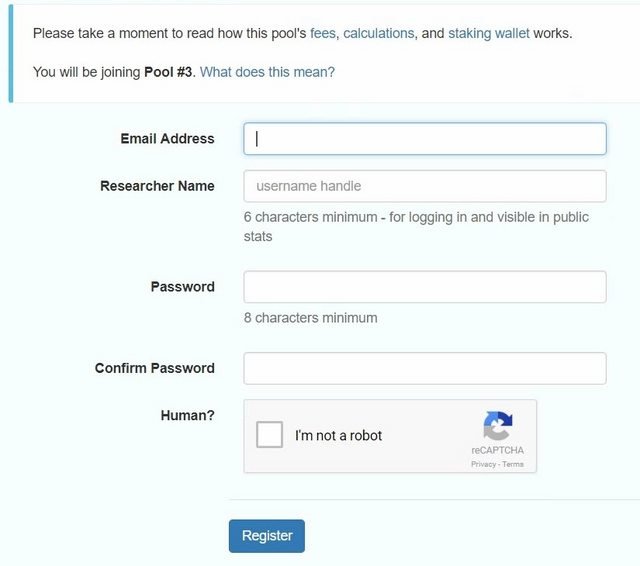
Open the link above and in the top right corner click on "Sign Up",
Fill the form with correct details, remember that your researcher's name is going to be your login and click register.
Make sure you use alpha-numeric password without special characters, as this could could later problems with boinccmd commands ~ Thanks @toofasteddie
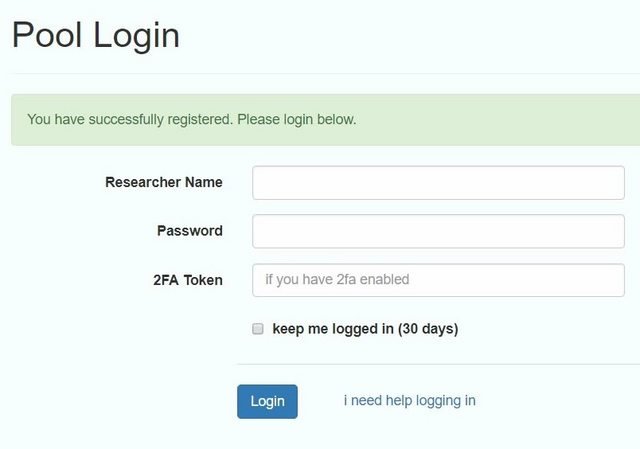
Now log in using your details.
You will be taken to your dashboard with general information.
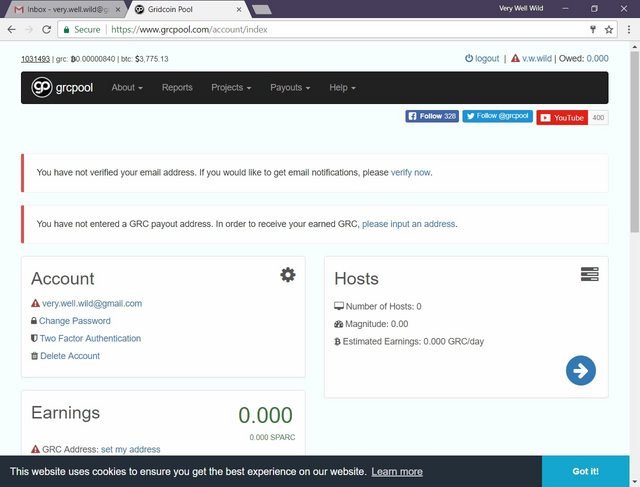
As you see there are few small notifications in different areas of the dashboard. Don't worry about that.
At this point your hosts should show all values at 0, since we didn't connect any machines yet.
Scroll down to "Earnings" box.
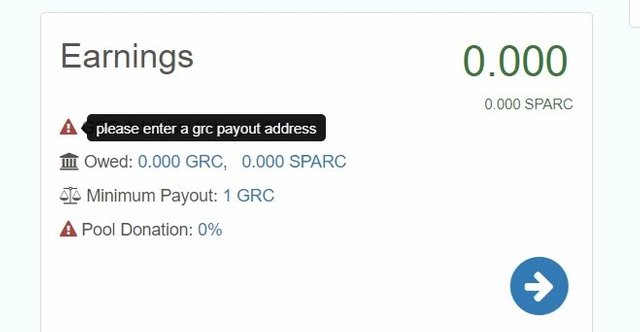
Here you can review your withdrawal details such as wallet address (you need it before you want to withdraw, at this point we can proceed without, to set up your Gridcoin wallet read this guide GridCoin Research Wallet)
Click on "Minimum Payout Amout" value. You will be taken to Payout Settings page.
Set Minimum Payout Amount to 500 and click "set minimum amount" under.
Make sure to set up your wallet and withdrawal address before you reach 500 (should take few weeks to get first 500, later the longer you participate the more reward you get).
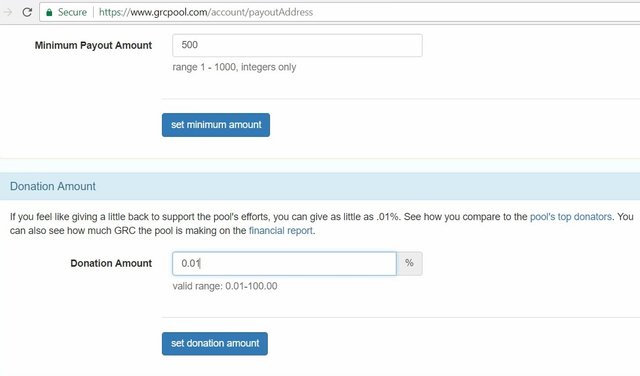
Then scrool down to Donation Amount and set it to 0.01 (donations are for upkeep of the network, so it's good idea to donate something), confirm with clicking "set donation amount".
Now click on your researcher's name in the top right corner (you might need to scrool up to the top to see it) and confirm that Earnings Settings were changed correctly.
Look up at the "Account" box, make sure your e-mail is spelled correctly, click on it and in the next screen request a confirmation. Click on your researchers name in the top right corner to return to the dashboard.
2. Google Cloud Registration
We're going to be running our BOINC on a virtual computer in google's cloud, we are offered a generous free 12 month trial that comes with 300 USD free credit to use for your projects - this way we won't have to spend anything at all.
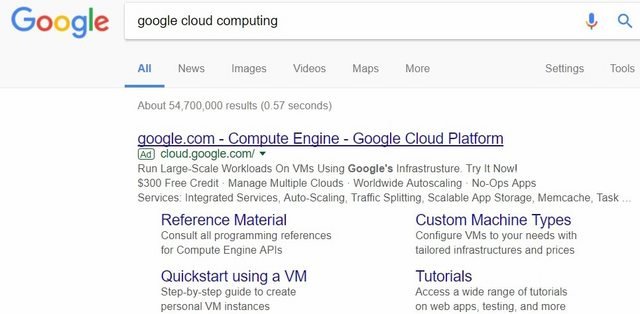
Go to Google Cloud Platform and click on "Try it Free" button.

In the first step you'll have to choose your google account to connect with cloud services.
Next you need to provide country and agree to terms and conditions and continue.
And in the last step you need to fill the form (some) details and provide credit card details
for authorization.
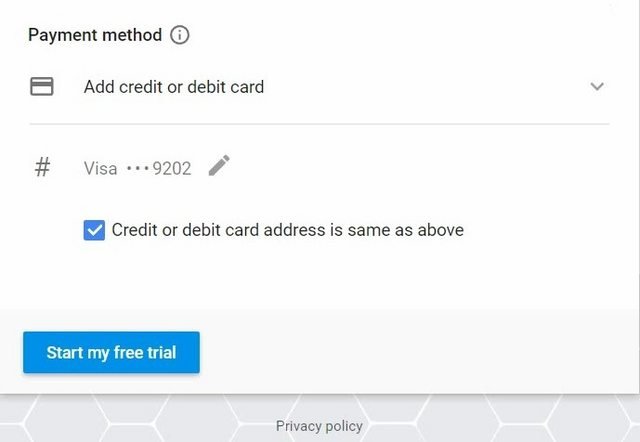
THERE WILL BE NO CHARGE AT THIS TIME AND NO AUTOMATIC CHARGES AFTER TRIAL EXPIRES!!!
So go on and provide your details (feel free to use a CC with 0 balance, like I did).
Once all the details are correct click "Start My Free Trial"
Wait for few minutes until your Trial finishes setting up.
Now you should see your Google Cloud Platform Dashboard
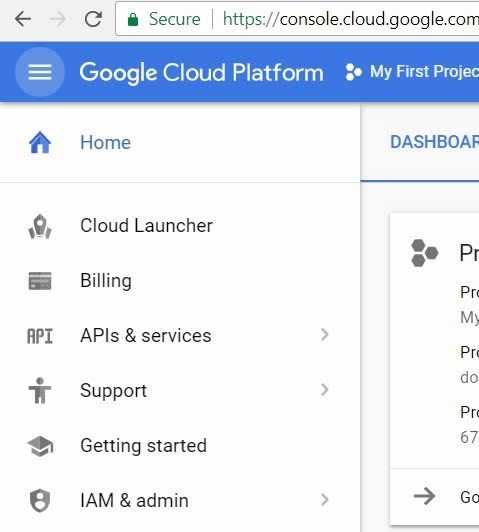
On the left side menu choose "Cloud Launcher" (if you don't see the menu, it can be switched between shown/hidden by clicking on the three horizontal lines in the top right corner).
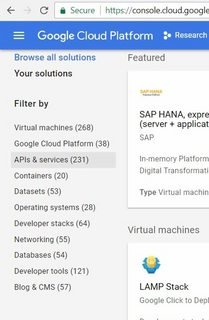
Choose the second filter - "Google Cloud Platform" in the "Filter By" menu on the right hand side.
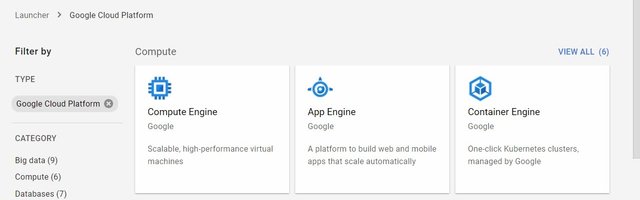
Choose "Compute Engine" under "Compute" category (for me it's the first item on the list).
And confirm "Go to Compute Engine".
This might take a few minutes to set up.
Once it's ready you will be taken to another page with list of your Virtual Machine instances, we don't have any machines yet and the "space is still being prepared" but after a short while an information box will appear with blue "Create" button.
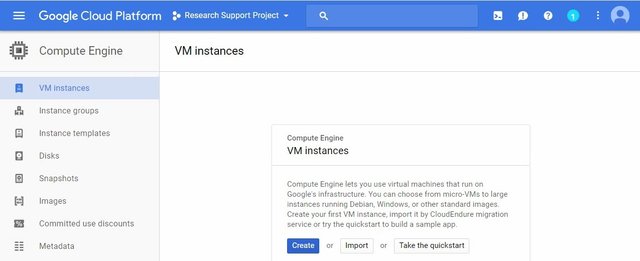
Click it now.
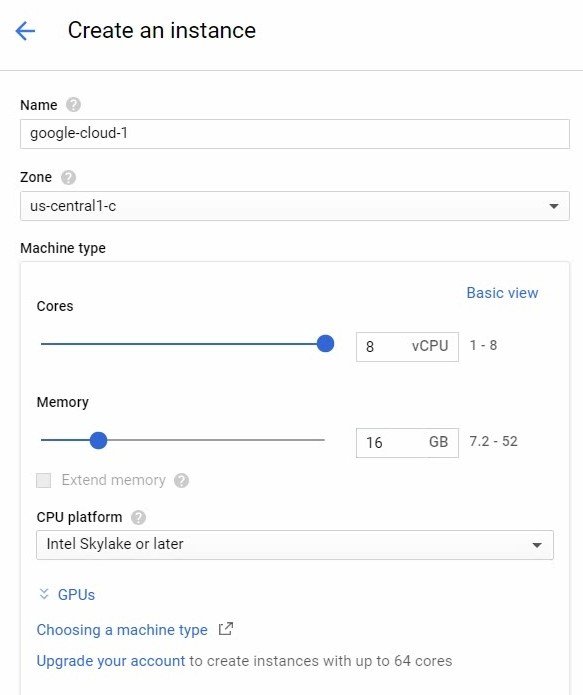
We'll have to fill the form.
*Name - this will be the name of your computer in your hosts-list in GRCPool, choose something easy.
*Zone - depending on location of the servers, there are different monthly charges (deducted from your free 300 usd credit) I recommend using us-east1-c, as it comes out quite cheap.
*Machine type - that's the most important part.
Click on the customize button on the right side.
Set cores to 8, memory to 16 and CPU platform to Intel Skylake or later.
*Boot Disk - It is set to Debian GNU/Linux 9 (strech) by default.
I tested BOINC on Debian and on Ubuntu and it works flawlessly on both, but for the sake of this guide we'll set up an Ubuntu based system.
Click on the "Change" button next to the Boot Image details.
A list of available images will slide out from the right, scroll down to Ubuntu 17.04 and mark it.
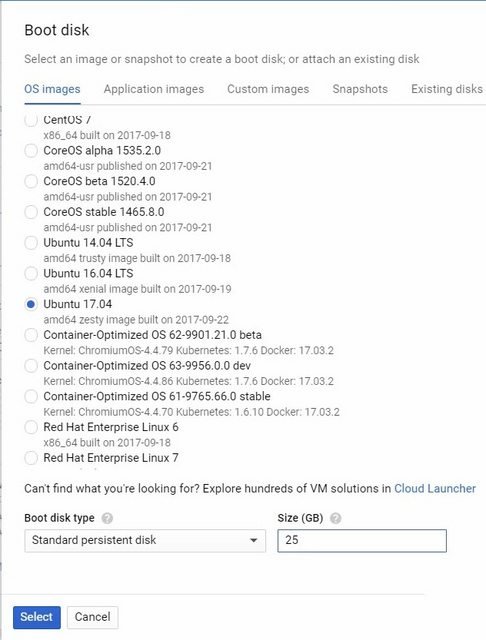
Below change the "size (GB)" to 25 and click "select" on the bottom left.
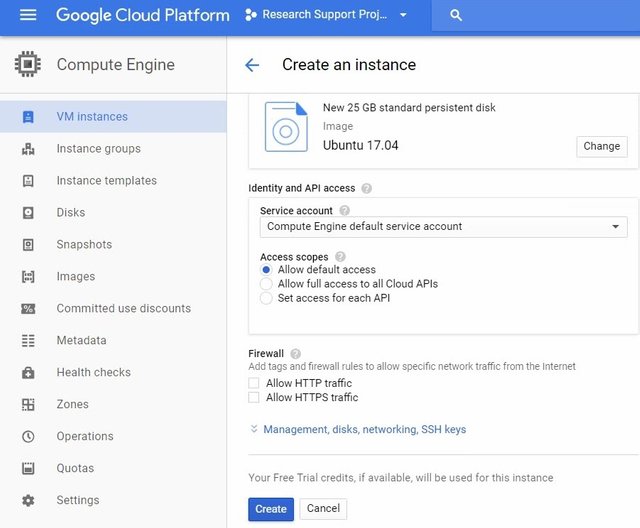
Leave rest of the settings unchanged, scroll to the very bottom and click "Create".
The process can take up to few minutes and once it's ready you will see your instance on the list.
If everything went correct, there should be a green ticked orb next to the instance's name.
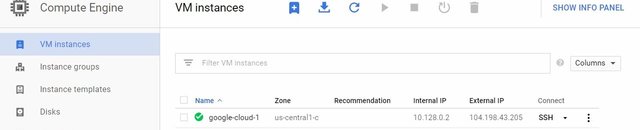
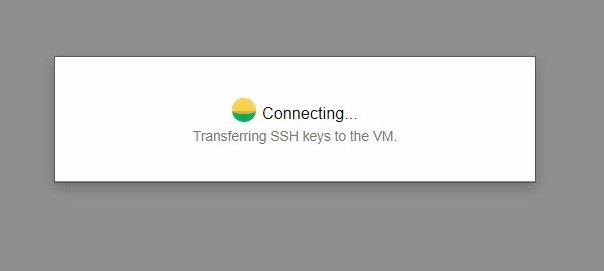
Now click on the "SSH" button in Connect column. This will initiate a new window, which will allow you for remote access to the console on the virtual machine.
##3. Software Configuration
We're in the console window, system has automatically set up and it's time to install BOINC software.
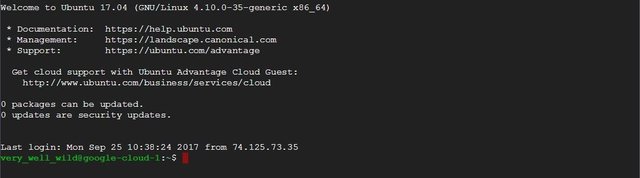
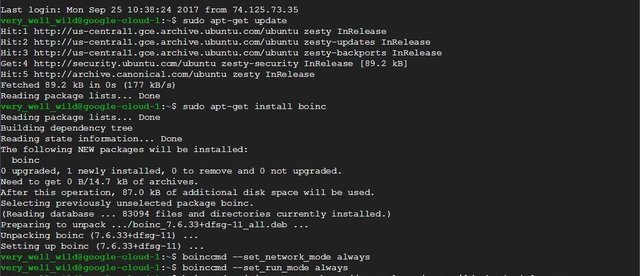
First make sure your system is up to date by typing:
sudo apt-get update
and confrim with enter
now let's download BOINC, type :
sudo apt-get install boinc
confirm with enter. When prompted type in "Y" (without quotemarks) and confirm again with enter.
Once the installation has finished we need to make sure that BOINC will run always and that it will have access to internet to download and upload tasks and results.
Type in the console:
boinccmd --set_network_mode always
boinccmd --set_run_mode always
and confirm with Enter.
Connecting BOINC & GRCPOOL
Now we need to connect boinc to the GRCPool, which distributes project tasks to different computers in the pool.
Type in
boinccmd --join_acct_mgr http://grcpool.com USERNAME PASSWORD
(USERNAME - enter your GRCPool researchers name, PASSWORD - enter your GRCPool password)
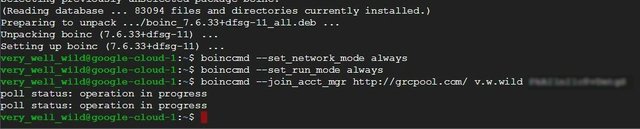
Console should print out few times "Pool status: operation in progress".
This should have our machine registered with GRCPool. Keep this window opened.
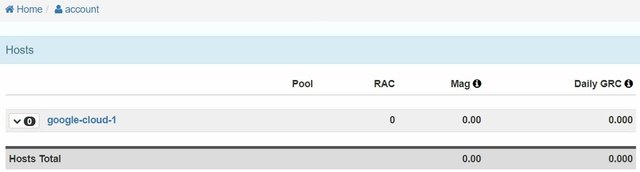
In another tab go back to GRCPool.com and log in to your account, click on your researcher's name in the top right corner to view your dashboard. In the hosts tab "Number of Machines" should now show 1 (if it's a new account, or simply one more than there was before if it isn't ;).
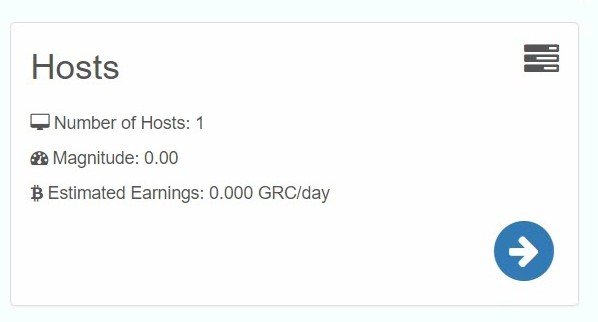
Click on the Hosts information.
On the lists of your hosts click the Host name that you set for the VM.
Scroll to the "Projects for Pool #3", click on the "--- choose project ---" scroll down list and select a project that supports only CPUs (if you need help with that click "project advice" next to the list).

At this point I would recommend NFS@Home if you plan running it for a little while, you're sure to have enough tasks and can earn the coins almost without attending the account.
Once you chose the project click on "Add" button.
Make sure resource Share is set 100. Leave No CPU unmarked, but mark "No Nvidia GPU, No ATI Gpu, No Intel GPU" and click "Save Project Settings".
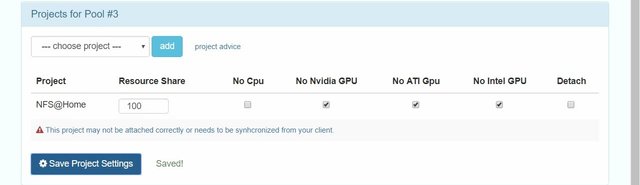
You'll see a notification under a project. In order to fix it, we need to synchronize our BOINC with GRCPool 2-3 times.
So go back to the console window and type again
boinccmd --join_acct_mgr http://grcpool.com/ USERNAME PASSWORD
confirm with enter, wait untill the process is finished.
Press 'arrow up' on your keyboard to recall last used command
boinccmd --join_acct_mgr http://grcpool.com/ USERNAME PASSWORD
and again confirm with enter, wait for the process to finish and one last time - arrow up then enter.
Now let's see if BOINC has gotten the information, type in
boinccmd --get_projects_urls
A url address of your project should be printed.

If this is all fine, go back to your host details tab (where we added project before)
and refresh the page. The notification under the project name should've dissapeared.
If it persists you'll need to synchronize BOINC few more times (but usually it shouldn't necessary).
Check if the tasks are already being executed on your machine, type
boinccmd --get_tasks
If it prints a list of tasks - we're nearly done.
To store account manager details and enable text-UI we'll download boinctui.
Type in:
sudo apt-get update
sudo apt-get install boinctui
and confirm when necessary.
Once the installation is done, you can type
boinctui
To see the textUI, press "Esc" to cancel the intial configuration when you open it first time.
It should show lists of available and running tasks.
Now you can close all the windows and sit back.
Check your GRCPool statistics after 24h to see first results.
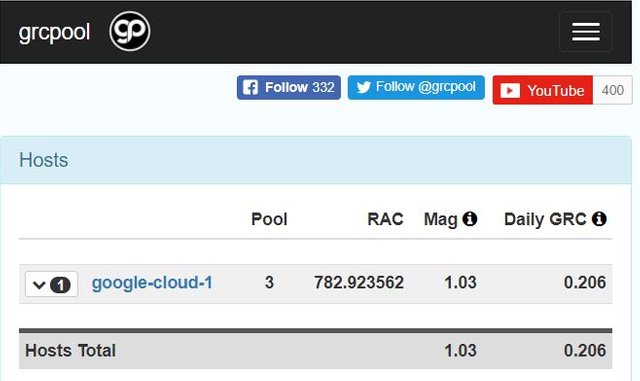
(EDIT: below are my results after a little less than 24h - thanks @theissen for the request)
TIPS&EXTRAS:
PROBLEM: Localhost not found - Probably boinc is not running as a daemon, type
/etc/init.d/boinc-client start
PROBLEM: Authorization error: -155 - There's very little information on this on the internet even less in regards to this particular setup. If you sucesfully managed to synchronize with GRCPool using
boinccmd -join_acct_mgr
then you have nothing to worry about, however if while trying to do so you get this error, you might need to delete your instance and repeat creation of the instance.
Google Cloud Dashboard > "Go to the Computer Engine dashboard" on the bottom of Computer Engine box and chart >Click on 3 dots in last column of your instance row and choose "Delete".
In the meantime go back to GRCPool, go to your dashboard, click on hosts box. If you don't have any hosts here that's fine you can close the window for now. If you see your old VM-instance host on the list, click red button below that enables host deletion, then click the arrow by the end of the row with the host name and click >Delete Host and confirm with "Ok"
Go back to your VM instances list, and click that small blue icon with + inside to create a new instance.
From this point you can return to the guide and continue from the instance setup.
Thanks to @toofasteddie for pointing it out
HOW MUCH I CAN MAKE Daily GRC payout depends on how long you're mining, it roughly doubles everyday (so if you'll get 0.1grc for first day, you'll most likely reach 0.2 by second, 0.4 by third, 0.8 by fourth and 1.6 by fith - you get the idea - give it at least a week to get to speed.
THIS GUIDE WORKS IN THE SAME WAY WITH ANY CLOUD COMPUTING PLATFORM
you can set up multiple accounts with google, or use any of the providers that allows Debian or Ubuntu VMs, once you launch your VM instance, repeat stepps 3 and 4 for each host. As of this moment I recommend 3 trials to sign up and set up, some of them are more complex in setting up, but all of them are free and with extra credit.
GOOGLE CLOUD PLATFORM
AMAZON WEB SERVICES CLOUD
MICROSOFT AZURE CLOUD
Optionally
IBM SoftLayer Cloud (long registration and tricky to SSH). EDIT: Free credit not available for VMs anymore 27/09,
I've managed to set this up two weeks ago, now it's not available anymore, but my IBM VM is still running.
'I'm honored to be part of this beautiful social network project. 'Tis my first entry so I shall say "Hello community and thanks for having me!" If there's anything you'd like to learn about or read about, let me know and I'll share what I know.
I would like to point out in the google cloud platform FAQ it says
https://cloud.google.com/terms/free-trial/ in the section titled "Restricted actions"
Dude, read comments before spamming please. It's been said and replied to many times. I'd be happy to provide some solution, more in-depth answers and technical knowledge. What you ask is even explained in the guide. Why do you people do this?
While you could argue that it's not mining or that it is mining; if Google finds out they will most likely shut down your account. To them, it would probably be considered mining. On their side they would see consistent high CPU usage, they wouldn't care that BOINC isn't traditional mining. Google would see that you are using their cloud platform to earn Gridcoin and would terminate your account. I don't mean for this to sound harsh, but I think it's important to know.
What if you don't sign up for Gridcoin? And use BOINC like it was used for 6 years up to one year ago? If someone lauch a cryptocurrency that is awarded for using a search-engine, you think "searching" would be considered mining? Because, no - that's not how definitions work.
Well, definitions do change. Langauge changes. As to using BOINC without using team Gridcoin, Google doesn't want people using their cloud platform 24/7 for non-cloud related things. Let's follow your example with the imaginary search-engine cryptocurrency. If you were just using a search engine without using the cryptocurrency, that wouldn't be mining. Let's say you were, in fact, using it to earn this cryptocurrency. Many would consider that mining. Just like if you run the SHA-256 Hash for no reason, it isn't Bitcoin mining, but if you intend to earn Bitcoin, that would be mining. Many people would define mining as earning cryptocurrencies through some action that timestamps the blockchain either alone or in a group (maybe not in those exact words, but something similar). I am not saying that your definition of mining is inherently wrong. Rather I am saying that Google's definition would have the final say in whether or not your account would/should be terminated.
Now, I agree with most of what you said.
Who knows what's google's real intentions. We've got terms and conditions to specifically and accurately make sure the intentions are satisfied.
In my opinion, and by consumer's rights any unclarity in such circumstances should be considered towards consumer's benefit, at least until the terms are clarified. However if there is a specified time offer, the terms can't be changed without both sides consent before the agreed time has expired - That would be the case of most commercial legally-binding offers.
I don't want to go on any warpath over this method. All I'm saying is that as for now it is fine to use it and doesn't breach terms and conditions. Shall google ever relate to this specific use of their service - I will be the first one to post this information as an update for the guide.
Currently I simply appreciate google's generosity and gladly and smartly contribute to research that really matters.
Also @roboticmind , you're the first person to approach this controversial subject with logic, manners and intelligence. So I'm happy to upvote your comment.
ill give this a go at the weekend. I’ve tried gridcoin a few years ago and recently came back to it! I previously registered with amazon
Stay tuned and I'll drop Amazon Web Services guide within two days. So we can double the benefits.
Looking forward to it. I’ll get both set up this weekend if I get the chance.
Waiting for your tutorial mister!
This is an excellent guide. I set it up last night and after a couple of issues, I got it working. Have you thought about a troubleshooting guide? I have checked back 12 hours later and I have an RAC of 0.12 no mag and therefore no predicted GRC daily. When I log into the management console it looks like its working but CPU at only 60%. Any ideas? Thanks
This was posted previously here:
https://steemit.com/gridcoin/@grider123/how-to-get-2grc-per-day-for-free
It's good that you have created a new post on the subject and added to the original as older posts can easily get buried.
Wow! I did use a search before posting and I didn't find it in the results. I've worked on this guide for few days. I'm glad it turned out that it's more content rich and more accessible for beginners, also now - thanks to the SteemIt community help it has some troubleshooting and estimated gains, that the other one doesn't provide.
I already thought about setting this up.
Could you provide information about how long the 'free trial' will run with this setup and how much grc you are earning with your chosen project?
I'm currently making a little comparison of different providers cloud offers in respect of GRC farming.
I've got Google, IBM, Amazon and Microsoft, they are running for nearly a week now. I will give it some more time (few days up to a week) and will publish the results on Steemit.
#GRC
The instance I set yesterday for the sake of taking screenshots for the tutorial at this moment (less than 24h later) has 0.2 daily GRC. This is on new account with no MAG. - see bottom of my comment
It's safe to assume it will be 0.4 tomorrow or more.
THIS RESULT IS EXPECTED TO BE SOMEWHAT REPEATABLE (results depend on particular projects' participants and progress, but in such large projects like NFS@home it shouldn't really shift that quickly)
The important thing is that you don't need to worry once you've set it running it will keep going until you run out of free credits then shut down leaving you with all the coins it earned for you. :)
With the price efficency - with 8 cores, Skylake and 16gb ram it should run over a month for free credit, however if you make small adjustments, select slightly lower tier and 4 cores, you can go half-year free. I chose this setup because I was mainly aiming at new-comers and wanted to give them quick visible results to spark some excitement and interest.
As you are setting up the instance on the right hand side you can see hourly full-power rate and approximate monthly rate. You start off with 300-(instance_setup_price) so you can plan this accordingly.
It's not meant to make you money soon, but it is a FREE of charge investment portfolio for which you could possibly buy a car or holiday in few years.
Just remember the login details.
HERE ARE UPDATED RESULTS SINCE YESTERDAY

Are you a fool? Cryptomining is strictly forbidden from google cloud trials.
Have you got no manners?I'm not mining. I'm supporting research with BOINC, this software is used in Unis around the world for calculations. I'm doing exactly the same. Gridcoin is barely a token on top of research, which appeared recently, while BOINC is many years old. Mining is about securing transactions and verifying block-chains. This has nothing to do with that, this is a research support program that rewards smart users. Feel free to report me, I'll post all the communication with google here for the sake of people trying the guide.
I'd be careful with that statement. You clearly intend to get rewarded GRC for the boincing. Though many have done it before, I don't think that is what Google has in mind for the service.
The service is meant to be used for similar purposes (like BOINC, not mining). What's the point of having cloud computing if you're restricted in such silly ways.
I said silly because BOINC is a scientific research program, independent of Gridcoin. Gridcoin's relation to BOINC is that TeamGridcoin is merely one of many Boinc Groups in General Pool.
On top of that, they provide rewards for participants of their group, but it doesn't in any way affect how BOINC operates, therefore there is no use of the VM intended to work directly with any block-chain structure, mining or upkeep of the network... In no way this can be precisely called mining or minting. It's like saying it's not cool to run research software on your VM, because you can make profit from the results... Even thought it's aimed at Businesses.
Again, you are foolish to be posting this guide. You explicitly outline how to install and run the gridcoin wallet, which is a cryptomining application. It doesn't matter the relation to BOINC and research. At the end of the day, it's cryptomining, and that is how google or any other cloud computing service is going to see it.
It has nothing to do with manners, and all to do with how you are instructing people to use a service that clearly states in its documentation that what you are instructing people to do is against their terms of service.
Should have read the fine print before you went through all this work, and don't lash out at me because of your ignorance.
This is your rude opinion nothing more. All it does is proves your lack of technical knowledge. Show me in which step we install the gridcoin wallet and tell me in which way just having a gridcoin wallet can be interpreted as mining. I think most of you (who post those comments) read only the title and think you know everything - that's ignorance. But I explicitly clarify everything in the body of the guide.
I thought I read somewhere that it's better to have four instances setup with two cpu's each then having one instance with 8 cpu's. Thoughts?
Thanks for the question :)
My thoughts:
There's one way to find out for sure, a little experiment to do.
Make a new google account, register new Pool account.
Sign up for google cloud. Create 3 instances - 1 with 8 cores (8CPU), and 2 with 2 cores(2CPUa & 2CPUb).
Install boinc and connect each of them separately to the same account.
Sign them all up for the same project.
Run them all for a week.
Check your hosts panel for details.
If
8CPU-MAG > 2* (2CPUa+2CPUb)
then
It's more efficient to run 1x 8 core, than 4x 2 core
else
4x2core is more efficient
Hi wellwild!

good post, congratulations.
I am trying to install but I have a problem and maybe you can tell me how to fix it:
I'm in the following point:
boinccmd --join_acct_mgr http://grcpool.com/ USERNAME PASSWORD
I am entering my data,of course, introducing my username and password, as usual and I'm getting the following error message every time:
Authorization failure: -155
Do you know what I'm doing here wrongly?
Cheers
It's not necessarily you doing something wrong, this might be up to Google or GRC Pool as well.
I didn't get this message ever before, but I just got it now upon checking. I've done a little bit of testing and didn't manage to figure out easy solution, however I noticed that my VM was still able to comunicate with GRCPool with use of boinctui (it's later on in the guide), send and receive tasks and synchronize with saved manager. While if I tried again with boinccmd -join_acct_mgr command it was either unable to find localhost and on some settings unable to Authorize like in your case.
You're luckily not loosing much because there's no risk of loss of MAG if you didn't have any in the first place.
All my other VMs that have been running for around a week now are still able to communicate with the pool.
I didn't check if boinccmd fails to join the manager.
I deleted my instance
Google Cloud Dashboard > "Go to the Computer Engine dashboard" on the bottom of Computer Engine box and chart >Click on 3 dots in last column of your instance row and choose "Delete".
In the meantime go back to GRCPool, go to your dashboard, click on hosts box. If you don't have any hosts here that's fine you can close the window for now. If you see your old VM-instance host on the list, click red button below that enables host deletion, then click the arrow by the end of the row with the host name and click >Delete Host and confirm with "Ok"
Go back to your VM instances list, and click that small blue icon with + inside to create a new instance.
From this point you can return to the guide and continue from the instance setup.
Thanks for your answer and help, I will try to do what you told me.
Just a question, do you have more VM working?
Cheers
Still does not work dude :-(
Sorry to hear that, I have 4 Google VMs running fine without any problems.
I also have VMs from other providers and non give me trouble.
Maybe try to go with default Debian system instead of Ubuntu (that shouldn't make a difference thought) then when you will be typing the install commands type without "sudo" so
and later
Dear Friend!
Was impossible for me to attach the grcpool to the BOINC in the instance of the Google Cloud.I think that I know why, it is because there is a problem with my password which uses a symbol that creates a conflict with the boinccmd :-)
Took ages to discover that... at the end, the only way to solve it was, either by changing the password which would create problems with the other computers I have attached or by creating an instance for windows server. The second works perfect so now I have another 8 core machine with boinc and fully working with grcpool.
Thanks for your attention and help!!
keep on crunching!!!
Good to know (i'll add this the the guide). THANKS TOO!
I'am currently having this problem, so removing symbols from the password worked? It did not work for me, same problem comes up, only other solution I came across on the net was using weak authentication key but does not explain the command, and I'm a newb... I have gotten it to work once on a new account so may go that route. @toofasteddie @wellwild
I did not change the password because was a mess...
What I did is install windows instead of ubuntu and then intall BOINC manager for windows, that's all
I know this was 3 months ago, but in case someone else is having this problem, try first to change to the installation folder (like cd /etc/init.d on Debian) and then try again. Your user might have permissions only on that folder.
Amazon Web Services also have a Free Usage Tier which is similar
It's been listed on the bottom of my Story. In fact there's 2 more easy-to-sign-up free trials offering free VM with credits.
Edit: Register already, AWS takes more than 24h to let you set up your VM ;)
Edit2: AWS set-up guide will be posted tomorrow or day after. Heads up ;)
Great guide. Exactly what I was looking for. Got it going in under 20 minutes!
Now with my other devices I have 12 hosts, hopefully I will be able to stake and solo mine within 6 months.
To all the people posting saying this violates Googles ToS:
https://www.reddit.com/r/gridcoin/comments/7vhku5/fyi_we_are_allowed_to_run_boinc_on_google_cloud/
This guide is brilliant. I just set up a google cloud instance to boinc on NFS@Home with in minutes. Thanks @wellwild! Ill update on the grc returns soon as something reflects on my grcpool account.
Update: Project - Cosmology@Home over 17 days maxes out at 15.53 Mag and earns around 3.4GRC per days.