Guide on how to setup a mining rig! (GPU/CPU/Scrypt mining)

Today I've decided to spend a few hours creating this tutorial and help desk, it will be updated frequently and its to support all kinds of members varying from noobies to advanced miners. If you got questions, you can ask me in the comments.
Contests of this install guide:
How to get started in buying a mining rig, working out your budget and what GPU's to purchase for Scrpyt mining.
How to install these parts to the motherboard/ power supply.
How to set-up Teamviewer/Cgminer and install all the files needed to mine.
How to keep your Rig's cool and stable.
Best pools to use, and how to add a failover pool in-case your main one goes down.
My setup.
- How to get started in buying a mining rig, working out your budget and what GPU's to purchase for Scrpyt mining.
- 1a: First of all what is your budget for mining?
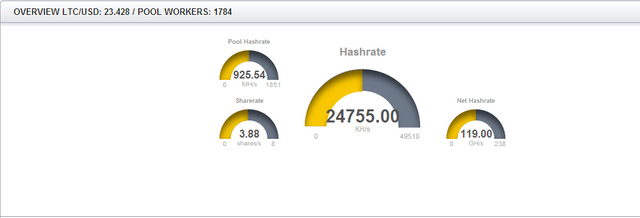
I've spent around 2000 dollars per rig for averaging around 3,000Khs which personally i think is awesome,
Come up with a budget you're happy to spend. I wouldn't recommend spending less than $1,000 for a mining rig due to the profit income. It would be more beneficial and profitable if you spent that $1000 directly on a coin to make money.
- 1b: What to buy once figured out budget?
Use these resources and shops to help you make your mind up:
https://en.bitcoin.it/wiki/Mining_hardware_comparison
(Scroll down to: Graphic Cards)
I would recommend a R9 280x (Very quiet and good temps, also runs at around 750KH's if you use the right settings)
Or a R9 7950 (Cheap card, great performance, Kinda noisy but they're decent)
If you have extra dollars and luck to find them, you can buy AMD RX 480 or similar from RX series (All are out of stock)
http://www.overclockers.co.uk/
http://www.scan.co.uk/
& Of course, EBAY.
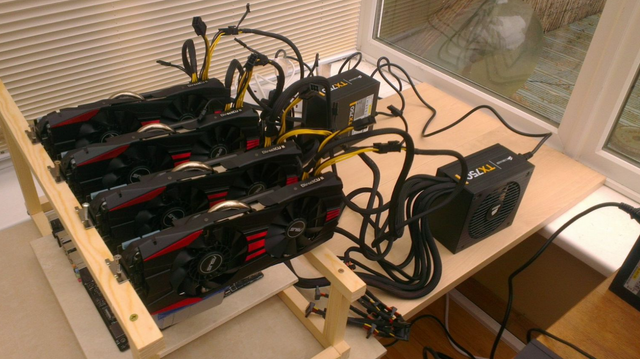
Here is my setup.
Graphic card:
https://www.scan.co.uk/products/3gb-asus-radeon-r9-280x-directcu-ii-top-6400mhz-gddr5-gpu-1070mhz-2048-cores-dvi-d-hdmi-dport
Motherboard:
https://www.scan.co.uk/products/asus-crosshair-v-formula-z-amd-990fx-s-am3plus-ddr3-pcie-20-(x16)-quad-sli-3-way-crossfirex-2x-esata
Power Supply:
http://gyazo.com/03900591d8f694078aa043ad282feefb
(I have two of these, and use double psu connector for two power supplys)
RAM:
https://www.ebay.co.uk/p/Kingston-KHX1600C10D3B1-8G-8-GB-PC3-12800-DDR3-1600-DDR3-SDRAM-1600-MHz-DIMM-240-pin-RAM-Module/136291078?_trksid=p2047675.m4097.l9054
CPU:
https://www.ebay.co.uk/sch/sis.html?_itemId=131045457291&_nkw=AMD+Sempron+145+2+8GHz+Processor+L2+Cache+1MB+Socket+AM3+SDX145HBGMBOX&_trksid=p2047675.m4099.l9146
Hardrive:
USB or 60GB Kingston.
(Get four risers, or two and two powered riser cables)
For two psu's on one motherboard:
Dual PSU Power Supply Adaptor Cable Connector
Optional / fan for the top of the GPU's to remove hot air:
https://www.ebay.co.uk/sch/sis.html?_itemId=321228880267&_nkw=Corsair+Air+Series+AF120+Performance+Edition+High+Airflow+120mm+Fan+Single+Fan+w&_trksid=p2047675.m4099.l9146
Ok that's what i bought for a few rigs just to give you an idea, once you've ordered what you decided to go for wait for the parcels to be delivered.
Once the goods have been delivered we can begin to assemble our rig!
- How to install these parts to the motherboard/ power supply.
First of all, we start with a place to put our rigs. We need them cool and out of the way since these bad boys will be on 24/7 bringing you in $$$.
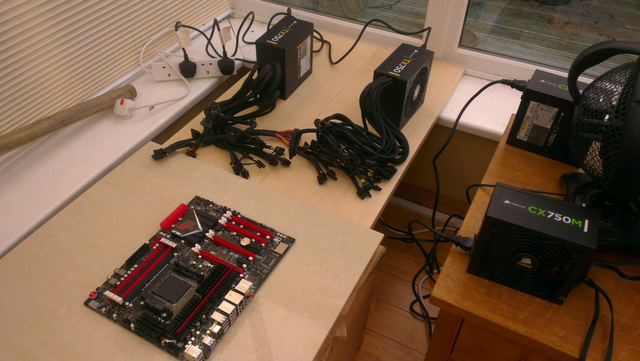
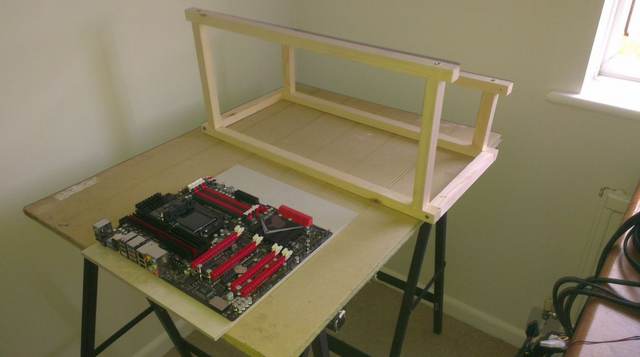
Once you've found where you can store them, you will need a few requirements to put the motherboard/psu's on. You could go with a simple desk but that's more money. Here are just two of my NEW rigs when assembling:
You can of course just use what you want, but just wanted to share with you guys what i did for this.
- 2a: Ok, now we have a good place and a good platform. Now we need a stand for the GPU's, i just made a stand using some cheap wood, you can see my design in the previous images.
Once thats sorted, we can now build our rig!
-First, we place the motherboard on the tile for example.
-now we can add the CPU and Ram to the mobo.
-then the dual power connector (thats of course if you have 2psu's)
-connect the power supplies to the connector.
-Add the riser cables to the pci-slots.
-Then place and mount the gpu's on the stand, here we can connect the riser cables to the gpu.
Then add the fan to the motherboard, (12v corsair, thats of course if you have one)
Finally add the cables from the PSU to the top of the gpu.
Add the Monitor to the Motherboard.
Thats it! Simple as that, once thats all connected.. We can now move on to adding Ubuntu or windows to the rig.
How to set-up Teamviewer/Cgminer and install all the files needed to mine.
- Setup the system
3a: download Ubuntu 12.04.2 LTS image which can be found here: http://releases.ubuntu.com/precise/
- make the install iso - use:
http://unetbootin.sourceforge.net/
3b: Once you have extracted the ubuntu iso, and inserted it into your motherboard, power on your mobo and rapidly hit the delete key so you can get into the bio's settings. Here you will need to go to the settings tab which displays the boot setup, select your USB storage device.
When you've installed Ubuntu, open up "Terminal"
- Preparation
2a: Login as root, update the system and download necessary upgrades:
2b: Use the current commands:
Code:
sudo su
apt-get update && apt-get upgrade
-Now the Compiler files needed for this install.
-Install additional tools like svn, git …
Code:
sudo su
apt-get install -y build-essential gcc make cmake mc python-dev subversion git bzip2 unzip
- Install AMD Catalyst drivers
Code:
sudo apt-get install fglrx-updates fglrx-amdcccle-updates fglrx-updates-dev
sudo aticonfig --lsa
sudo aticonfig --adapter=all --initial
sudo reboot
3a: After your computer reboots, you can verify that everything worked by typing:
Code:
sudo aticonfig --adapter=all --odgt
3b: If you see all of your GPUs listed, with “hardware monitoring enabled” next to each, you’re good to go.
- Download CGMINER, APP SDK v2.9 with OpenCL™ & AMD SDK V 6.0
4a: Once download use the following commands:
Code:
mkdir amdapp_2-9
cd amdapp_2-9
tar -zxvf ~/Downloads/AMD-APP-SDK-v2.9-lnx64.tgz
sudo ./Install-AMD-APP.sh
sudo reboot
4b: Now we can download Cgminer:
Code:
git clone -b 3.7 git://github.com/ckolivas/cgminer.git cgminer
4c: Download ADL SKD V 6.0
http://developer.amd.com/tools-and-sdks/graphics-development/display-library-adl-sdk/
-Once downloaded, use the following commands:
Code:
mkdir ADL_SDK
cd ADL_SDK
mv ~/Downloads/ADL_SDK_6.0.zip .
unzip ADL_SDK_6.0.zip
cp include/* ../cgminer/ADL_SDK
4d: Now just to be safe, while installing cgminer i would recommend downloaded all these commands i have added and researched from my own mistakes:
Code:
sudo apt-get install libtool
sudo apt-get install libcurl4-openssl-dev pkg-config libtool libncurses5-dev libudev-dev screen xterm
sudo apt-get install libcurl4-gnutls-dev
sudo apt-get install autoconf
sudo apt-get install -y build-essential gcc make cmake mc python-dev subversion git bzip2 unzip
4e: Once thats all downloaded, we can now begin to make cgminer.
Code:
cd cgminer
-Once in the cgminer directory, use this command:
Code:
./autogen.sh && ./configure --enable-opencl --enable-scrypt && make
4f: You will most likely get an error, but thats normal. Now use this command:
Code:
./configure --enable-opencl --enable-scrypt
4g: Let linux do its thing. then you should get an option to Make install.
Code:
sudo make install
4h: Once completed do the following command to check if its installed correctly:
Code:
cd cgminer
export DISPLAY=:0
export GPU_USE_SYNC_OBJECTS=1
./cgminer -n
Congratulations, thats cgminer installed. Now we can do the necessary setup and conf parameters needed for cgminer to run.
- Install SSH, Curl, and package updates
5a: Download putty or teamviewer for remote desktop access, Putty is recommended:
http://the.earth.li/~sgtatham/putty/latest/x86/putty.exe
5b: Install SSH by typing:
Code:
sudo apt-get install openssh-server byobu
5c: Install Curl and package updates by typing (or copying & pasting into Putty) the following commands:
Code:
sudo apt-get install curl
sudo apt-get update
sudo apt-get upgrade
5d: Once you've installed putty, you can now turn off the monitor on your rig and go on your main desktop to connect to your rig to copy and paste the following commands.
- Create cgminer startup script
Code:
cd ..
6a: create a new file for cgminer:
Code:
sudo nano cgminer_startup.sh
6b: Once in the file copy and paste the following, make sure you edit the blanks which contain for example "Your username" change this, you will need to create a pool account to add a worker, i would recommend:
https://wdc.d2.cc
6c: Create a worker, then go back to the file and change the user and password.
6d: You can also change the parameters, the following code is good start for a r9 280x
Code:
#!/bin/sh
export DISPLAY=:0
export GPU_MAX_ALLOC_PERCENT=100
export GPU_USE_SYNC_OBJECTS=1
cd /home/YOUR_XUBUNTU_USERNAME/cgminer
./cgminer --scrypt -I 13 --thread-concurrency 21712 -o stratum+tcp://wdc.d2.cc:3335 -u USERNAME -p PASSWORD
-save the file by doing "CTRL O & then to exit do CTRL X"
Once out of the file, do the following:
Code:
sudo chmod +x cgminer_startup.sh
- Create an alias to easily check on cgminer
7a: Type the following into the terminal
Code:
sudo nano .bashrc
7b: Scroll to the end of the file, and then add this text above the line that reads “# enable programmable completion…”
Code:
alias cgm='screen -x cgm'
7c: save and quit out of that file.
- Start the script by closing the terminal and re-opening it again.
8a: To start the script do the following command:
Code:
./cgminer_startup.sh
8b: It should now start up cgminer, give it a few mins. Once is fully loaded and you can see your temps, and accept shared. do the following commands.
Code:
S
Enter.
Code:
W
Enter.
Code:
Enter
8c: It should save you a conf. file, close cgminer by doing the following command.
CTRL C
8d: Once out of cgminer and back into the terminal, do the following command:
Code:
sudo nano /home/YOUR USERNAME HERE/.cgminer/cgminer.conf
8e: You should now be in the conf file so you can edit all the parameters needed for you GPU setup. Once you've changed everything to your standards, exit the conf. file
CTRL O < Saves it.
CTRL C < Exit the file.
8f: Then open to run cgminer now, all you need to do is type cgminer into the terminal like this:
Code:
cgminer
Congratulations thats it!
-Now we got the rigs up and running, we need to keep them cool and stable while they run for 24hours.
- How to keep your rigs cool and stable
4a: To keep them low temps i would purchase a few fans, i would recommend the following:
Honeywell Black Tilt and Pivot Turbo Fan - 7 Inch.
4b: Keep your windows open, not to wide incase it rains and you dont want water on your mobo lol. Fans is the most efficient way and best solution to keeping them cool.
- Best pools to use and most stable, just a few recommendations:
https://wdc.d2.cc
https://ltc.hashfaster.com/
http://poolerino.com/
Many more out there though, but these are the ones i use.
- My Setup
--

Join Steemit SlavChat @ discord.gg/kStC5AH
--


This is a great post! I have been thinking of setting up a mining rig and this is just what i needed!
Upvoted, Resteemed, followed.
Thanks :)
wow, this is a great post, so lengthy and detailed! I'm not into mining but I can definitely see how much effort you put into this one! I wish you luck! Upvoted.
Thanks :)
@vodenoff
Why all links for the hardware are broken/unable to open ? You can't use ... in a link.
Or that was on purpose ?
Everything works perfect now :)
@vodenoff - Quite better now. And please read the post I've mentioned you in carefully, it's quite useful for your own good, since you will earn money from it. Try Resteem as well.
I'm writing my reply right now :D
Ops :D Will repair them in a minute :)
Very nicely explained. Thank you.
You're welcome :)
@vodenoff - Dead pool in content :) https://wdc.d2.cc
I'll tonight publish post that is re-polished version of this, with your credentials on it. There are also issues about installing ATI proprietary shit in Ubuntu/Kubuntu/KojiKuracBuntu :) in releases 16 and 17, fglrx is locked in another repository under OS. So, configuration of multi-gpu's is fairly level of IMPOSSIBLE for regular user at home. I've managed it, but pffff, google is not giving proper answers, so common users are dead.
I'll try to create bash script for half of the steps (especially apt-get install and update parts) and host it for a download from post, so they can just run 2-3 words instead of being lost somewhere in repositories missing :)
Btw, post about GPU Mining that i want to redo is by following your tutorial and re-creating rigs(desktops) in my own way, trying to experiment with very low price(investment)/ok value in earnings :) One GPU per MB. One PSU per Case. I'll have tonight 2 cases ready. Kubuntu done, looking for pool now. I also did cooling by air, overclocked CPU, RAM and will play with GPU clocks before i start posting. CPU is 44C and MB 33C which is for me fine. GPU's i want see dying, crashing, burning and limits. Let's call it true benchmark with a lot of Collateral Damage :)
Case setup:
GPU used R7 250X 1GB DDR5
16GB DDR3 Geil EvoTwo 2400OC
random CPU AMD 2 cores (what i have in leftovers)
CoolerMaster G650M
:) Later will play with some NVIDIA's :) I think should produce more than ATI even earlier generations GTX550Ti and such :))))
What you think ?
Sorry for my late response. It is normal to have problems with my post because it is a bit outdated. I'm not active miner because of the high electricity bills in my country and the lack of space in my apartment because I am poor student :D Your rig is excellent for education purpose and you cannot expect to make a big profit from it. You also can calculate your income using this. Have in mind that not only kh/s is important. If your video card is power hungry, your bills will be higher than the amount you had mined. Search for the cheapest mining hardware with efficient hash rate/power and you will find nice threads, which can give you ideas for next purchases. If you have any questions, feel free to ask me :)
Hey, very useful answer, but im currently in part of Asia where electricity is super cheap.
Current hardware i have in stock, so i'm removing dust and giving it better purpose.
Rig/Case is more for home users, where they can have their own setups for really cheap money and make few hundreds a month if they make enough of them.
Im still busy with cgminer :) It's killing me to find nice pool or decide where to start testing :)