Create Your Own Personal VPN Service - A Step by Step guide for Windows, Mac and Ubuntu Linux
Why Bother?
While we can all hopefully agree that running your traffic through a VPN (Virtual Private Network) is good basic OPSEC practice when working with cryptocurrencies (be it trading, spec-mining or shitposting) it might not be immediately obvious why running your own VPN server offers significant advantages over an 'off the shelf' commercial VPN service.
The key issue to consider is, as always, trust:
- Do you trust the commercial VPN provider when they say they don't keep any logs of the traffic passing through your VPN connection?
- Do you trust that the VPN provider are technically competent enough not have their network, or billing (or logging) systems compromised?
- Do you trust that your VPN provider aren't themselves, a bad actor? Or that they don't have bad actors working, covertly, within their organisation?
A second issue to consider is that of attack surface, obscurity, and target worth.
Issues '2' and '3' above carry weight because a large VPN provider presents a large (and interesting) target of worth.
Sufficiently large and interesting for a bad actor to consider investing their time and effort in compromising it.
Running your own personal VPN service helps to address the above because:
- it means you can be absolutely certain what logs (if any) are kept (at the protocol level, at least).
- your own little server (and even the hosting company it's hosted with) simply don't present the large and juicy attack surface that a commercial VPN provider does.
Your server is obviously still a target (as all public servers are) but a less obvious, less valuable one for a bad actor to consider investing time in going after.
Isn't it difficult?
It needn't be. This guide aims to make it as close to a step-by-step process for any user with average technical skills to get up and running.
Isn't it expensive?
Not necessarily - you can run a VPN from a VPS (Virtual Private Server) in the $5-$10 a month range, making it competitive with commercial VPN services.
Disclaimer
The information in this guide is provided in good faith, but is not intended to be comprehensive or exhaustive in scope. The application of this guide and information contained herein may not be appropriate to your own circumstances and Internet usage and security requirements. This information is provided without warranty, express or implied, and can be used only at the reader's own risk. Best effort has been made to ensure the accuracy of all information provided, but no guarantee of accuracy is provided. By using this guide, in part or in totality, you indemnify the author against any liability for any and all losses arising from, or connected to, usage of the content and methods described and contained herein.
Be careful. Use at your own risk.
Requirements
First off, to make things easy you're going to need a VPS provider that uses the 'KVM' virtualisation technology.
In simple terms, this means that what they provide to you is as close to an actual real (non virtualised) server as possible.
While running a VPN on a non-KVM VPS can be done, there may be unnecessary technical complications in doing so that are best avoided.
You'll also need to make sure you have the option to boot the VPS from a custom .iso file (as we won't be running any standard distribution to set this up - rather, we'll be using the 'Zeroshell' Linux Router software instead - https://zeroshell.org/).
One provider that meets these requirements is:
https://www.edis.at (not an affiliate link)
but there are many others. For the purposes of this guide we'll assume you've gone with 'edis.at'. Once you've placed the order, your provider will tell you the IP address of your new VPS when it's ready to use.
You'll also, ideally, need a domain name to use with your VPS, it doesn't have to be anything expensive or fancy, here's somewhere you can register such:
https://www.namesilo.com/ (not an affiliate link)
Having done so, you'll likely want to create an 'A' record pointing at the IP address of your new VPS as per:
https://www.namesilo.com/Support/DNS-Manager
So, for example, if you registered:
mysuperdupervpn.com
you might then create an 'A' record for 'vpn' pointing at the IP of your new VPS. So:
vpn.mysuperdupervpn.com -> xxx.xxx.xxx.xxx
where ('xxx.xxx.xxx.xxx' is the IP address of your new VPS).
Getting Started
The first step is to gain access to your new KVM VPS and to get it to boot from the Zeroshell .iso file to install this software as its operating system.
The screenshots in this guide assume that you've chosen 'edis.at' above as the provider, but the steps are broadly the same for any KVM VPS provider.
Contact 'edis.at' support to have them add the latest Zeroshell .iso file to your control panel.
In this case, the .iso we're looking for is the 'x86_64' release from:
https://zeroshell.org/download/
At the time of writing, 3.9 is the latest version, so the ISO you want them to make available to you in your control panel is:
http://www.zeroshell.net/listing/ZeroShell-3.9.0-X86.iso
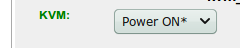
Once this is done, you need to activate 'VNC' access so that you can see what your new server is doing during the installation process. On the 'edis.at' control panel you can do this as per:

You'll likely be asked to set a password for VNC access. VNC is a protocol to allow you to view the screen and control the mouse and keyboard of a remote machine.
You'll need some VNC client software on your own machine to be able to log into your new server using this method. A couple of options are:
http://www.tightvnc.com/download.php (Windows)
https://bintray.com/tigervnc/stable/tigervnc/1.9.0 (Windows, Mac, Linux, Java)
Point your VNC client at the IP address and port of the VNC server shown on the 'edis.at' control panel:

and log in (using the password you just set above).
You'll likely see a Debian Linux login prompt at this point. Ignore that for now, and back on the 'edis.at' control panel cause the Zeroshell 3.9.0 CD to be inserted into the CD-ROM drive:

Then, trigger a 'Soft-Reset' to reboot the VPS by toggling:
Quickly after doing so, back on the VNC screen, hit 'Esc' immediately to bring up the boot menu:

Choose '3' for to boot from the CD-ROM/DVD drive. You should see the following:
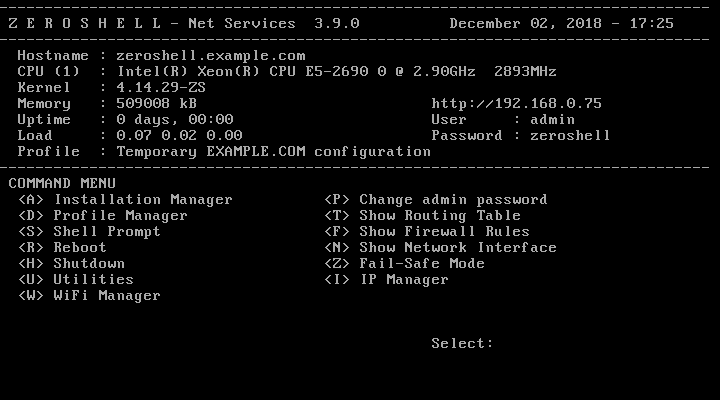
Type 'A' for 'Installation Manager' and hit return. You should see:

Hit '1' to install ZeroShell on the first available hard disk. You'll be asked to confirm this action by typing 'yes' and hitting enter.
You'll then be asked to select a bootstrap console. 'VGA', the default, is probably fine, so just hit enter to continue.
Again, just hit enter when asked for kernel parameters.
After a short while you'll be asked if you want to create a configuration profile, hit enter.
Give your profile a description (e.g 'VPN1').
Now you'll be asked for a hostname. This is going to be the domain name you registered above in conjunction with the 'A' record you set up. So, in this example:
vpn.mysuperdupervpn.com
Then choose an admin password - something strong, long, unique and random.
Just hit 'enter' when asked about the 'LDAP Base'.
For 'KERBEROS 5 REALM' we're going to use the domain name you registered above, i.e.:
mysuperdupervpn.com
(don't worry if you get this wrong, it can be changed later).
Hit 'enter' when asked to select the 'Management Interface'.
For the IP address to assign to this, however, you want to use the IP address of your VPS as shown on your VPS provider's control panel or in the setup e-mail they sent to you.
Next you'll be asked for the 'Netmask'. This is shown on the 'edis.at' control panel under 'IPv4 Network Properties' (or in their setup e-mail) and likely begins '255.255...'.
Similarly enter the IP of your default gateway when prompted (also provided to you by your VPS provider).
That should conclude the installation process, hit enter to return to the main menu.
Now it's time to initiate a reboot - press 'R' and this will boot from the VPS's hard drive instead of its CD-ROM with a ZeroShell installation using the details you've just provided.
Tweaking the Firewall
ZeroShell has a web-based interface, but with the default configuration it won't be accessible externally.
Once you've rebooted the VPS, log back in via VNC. We'll need to tweak the firewall rules to allow connections from your own IP address to the web interface.
First, if you're not sure how to find out what your own IP address is, visit a site such as:
and make a note of the IP address shown. This is the external IP of your own broadband connection. Ideally, this should be a static IP (one that doesn't change from time to time). A good ISP will be able to supply you with a static IP for a small fee (or none at all).
Back on the VPS (using VNC to access it) hit 'S' to load a shell prompt. You'll be asked to input the admin password, which you set previously above.
You should now have a command prompt that looks like:
root@hostname ~>
First, let's have a look at the existing firewall rules for the 'SYS_HTTPS' chain. Type the following:
iptables -L SYS_HTTPS --line-numbers
You should see something in response like:

We need to temporarily insert an appropriate firewall rule to allow your own IP through to the web interface before line '6' above. To do so, type:
iptables -I SYS_HTTPS 5 -s xxx.xxx.xxx.xxx -j ACCEPT
where 'xxx.xxx.xxx.xxx' is the IP address of your broadband connection, and hit enter.
You should now be immediately able to access the web interface of your ZeroShell at a URL of the form:
https://vpn.mysuperdupervpn.com/
(where 'mysuperdupervpn.com' is the domain you actually registered for this purpose). If you didn't register a domain name, you should still be able to gain access to the ZeroShell control panel on your VPS at:
https://yyy.yyy.yyy.yyy
(where 'yyy.yyy.yyy.yyy' is the IP address of your VPS).
You'll likely receive a 'Invalid Certificate Authority' warning when loading the web interface. For now, just bypass that (hit 'Advanced' on Chrome/Chromium followed by the 'Proceed to..' link).
You should see the ZeroShell login screen:

Log in with your 'admin' username and the corresponding password you set above previously.
First, let's make that firewall change permanent so that you'll be able to log in in future.
Hit the 'Web' link in the blue bar at the top of the screen:

A popup window will appear:

Enter the IP address of your broadband connection (as previously revealed by http://www.ipchicken.com) in the IP box and select 'ETH00' from the 'Interface' dropdown menu, and hit the '+' button. You should see details of your IP appear in the main body of the 'Allow access from' box:
Hit 'Save' at the top of that popup window.
While we're here, we may as well remove web access for the default local area networks. Highlight the three lines beginning with 'Subnet' in turn and hit the '-' button for each, then hit 'Save'.
Incidentally, this is also the dialog box where you'd install your own SSL certificate for the web interface to avoid future warning messages when loading the admin screen. The details of such are beyond the scope of this guide, however.
Reboot your VPS and confirm that you can still gain access to the web interface. If you can't, you'll likely have made a mistake regarding the firewall configuration steps above.
Assuming all is well, let's now configure the VPN.
Configuring the VPN
In the Zeroshell web interface, select 'VPN' from the main menu:

Then hit 'Host-to-LAN (OpenVPN)' in the VPN menu across the top of the page:

Put a tick in the 'Enabled' box and hit 'Save'.
We're going to use local 'Kerberos 5' for authentication purposes so click on that in the bottom of the main menu:

Then hit 'Add' in the bar along the top of the screen to add a new user for yourself:

On the next screen choose a username for the 'Principal' box, choose a password for the 'Password' box, confirm that password in the 'Confirm' box and hit 'Submit' as per:

The VPN is now ready to use. The next step is configuring your VPN client software.
Note: If you're going to have more than one computer connected to your VPN at the same time (say, a desktop and a laptop) go ahead and create some more users - you'll need one for each computer that is simultaneously connected.
The software on your Zeroshell box should be smart enough to NAT your VPN connections automatically, but for the avoidance of doubt, let's enable NAT for the ETH00 interface.
Click on 'Setup' at the top of the main menu bar on the left hand side.
Then select 'Network' from the blue bar across the top of the page.
Hit the 'NAT' button underneath the blue bar.
In the dialog that appears, select 'ETH00' on the left hand side and use the '>>>' button to move it to the right hand side. Hit 'Save'.
Configuring your VPN Client Software
Zeroshell uses the 'OpenVPN' software (https://en.wikipedia.org/wiki/OpenVPN) for the VPN functionality we've enabled above.
Some operating systems have built-in support for this (Ubuntu Linux) and others will require you to install client software (Windows, Mac) to connect to the VPN.
Windows
Download and install the OpenVPN client software (community edition) which you can get from:
https://openvpn.net/community-downloads/
(click on 'See Details' and then select the 'Windows Installer' option to download the '.exe' installation file, and then run it when it has completed downloading):

You can just hit 'Next' through the installer and leave the default options.
Eventually, you'll be presented with a 'Readme' file and a 'OpenVPN GUI' icon on your desktop:

Double-click on this icon. You should get an error message:

Pay close attention to the first file path noted there, it will likely be of the form:
C:\Users\[yourname]\OpenVPN\config
Download a copy of the default configuration file from:
http://www.zeroshell.net/listing/zeroshell.ovpn
and move it into the directory above.
Now open that 'zeroshell.ovpn' file in a text editor ('Notepad' is fine - right click on the file and select 'Open With...' then select 'Notepad') and change line 6:

to reflect the hostname of your Zeroshell VPS (or its IP address if you didn't bother to buy a domain and set up a subdomain pointed at the IP address of your VPS).
So, if you previously registered the domain 'mysuperdupervpn.com' and pointed 'vpn.mysuperdupervpn.com' at the IP address of your new VPS, change line 6 to read:
remote vpn.mysuperdupervpn.com 1194
And if you didn't bother to register a domain, it's going to be:
remote xxx.xxx.xxx.xxx 1194
Where 'xxx.xxx.xxx.xxx' is the IP address of your VPS.
We also need to grab a copy of the CA certificate of your Zeroshell installation.
To do this, in the Zeroshell web interface click on the 'X.509 CA' option in the main menu on the left hand side of the web interface. Then click on 'Trusted CAs' in the bar across the top:

In the popup that appears, highlight the 'Zeroshell (Local CA)...' line in the main body of that window and then hit 'Export' (making sure 'PEM' is selected in the corresponding drop down menu):

A file called 'TrustedCA.pem' will be saved to your local computer, probably in your 'Downloads' folder. Move that file into the same folder mentioned above, the one of the form:
C:\Users\[yourname]\OpenVPN\config
This file will be used by your OpenVPN client software every time it connects to verify that you are actually connecting to the Zeroshell server you've set up (and not a substitute supplied by a malicious third party as part of a 'man in the middle' attack).
Back in your 'zeroshell.ovpn' configuration file that you still have open in a text editor, you need to modify line 28 to point at the 'TrustedCA.pem' file you've just downloaded and moved.
Change line 28 from:
ca CA.pem
to read:
ca C:\\Users\\[yourname]\\OpenVPN\\config\\TrustedCA.pem
(Yes, those are double back-slashes!)
Obviously, where '[yourname]' has been replaced with whatever was shown in the error message about a dozen paragraphs above. So, if you log into your Windows machine as user 'bob' it's going to be:
ca C:\\Users\\bob\\OpenVPN\\config\\TrustedCA.pem
Save the zeroshell.ovpn file in Notepad.
Back on your Desktop, double-click on that 'OpenVPN GUI' icon. You'll likely get an error message that it's already running, and that it's present in the bottom right hand corner of your taskbar.
It looks like this:

Right-click on that icon and hit 'Connect' in the menu that appears. You should be presented with something like this:

Enter your username and password - the ones you created under 'Configuring the VPN' above - and hit 'OK'.
All being well, you should see a lot of diagnostic information scroll past and a popup in the bottom right hand corner of your screen - 'zeroshell.ovpn is now connected'.
I'd suggest visiting a site such as:
in a web browser at this time to confirm that your traffic is being routed through your Zeroshell VPS.
When connected, the IP shown in a site like the one above should be that of your VPS, rather than your broadband connection. Try the same thing after disconnecting from the VPN (right-click on the task bar icon, and select 'Disconnect') and note the difference (you'll have to refresh the page).
Finally, you may wish for the VPN to connect automatically when you first log into Windows. To enable this, click on the OpenVPN taskbar icon again, and select 'Settings'. Then hit the 'Launch on Windows startup' checkbox:

Mac
Download and install the 'Tunnelblick' OpenVPN client software which you can get from:
(click on 'Download Latest Stable Release' to download the '.dmg' file).
Run the .dmg file by locating its icon and double-clicking it. You should see:

Double-click on the 'Tunnelblick' icon where indicated.
You'll likely receive a warning reminding you that you just downloaded this file from the Internet. Clicking on 'Open' will continue the installation process.
On the next screen, you have the option to uncheck 'Check for updates' or 'Check for IP address changes'. In the spirit of leaking as little information as possible, you may with to uncheck both of these before clicking 'Continue'.
You'll now encounter a security warning asking for you to input your local Macintosh password (the one you log in with) to allow the installation to complete. Do so, and hit 'OK'.
You may receive a warning about icon placement in the menu bar - indicate your preference and continue on.
You should now see:

Click on 'I have configuration files'. Some information about installing configurations will be displayed, you can click 'OK'.
Just as with the Windows instructions above, we must now grab both a configuration file and the CA certificate.
Download a copy of the default configuration file from:
http://www.zeroshell.net/listing/zeroshell.ovpn
(visit that URL in a web browser, and hit 'Save As' to save it somewhere you can locate, taking care not to have MacOS append an extra '.txt' suffix to the file name - you should call it 'zeroshell.ovpn' and not 'zeroshell.ovpn.txt').
Open that 'zeroshell.ovpn' file in a text editor ('TextEdit' is fine - right click on the file and select 'Open With...' then 'Other' and choose 'TextEdit')
Change line 6 to reflect the hostname of your Zeroshell VPS (or its IP address if you didn't bother to buy a domain and set up a subdomain pointed at the IP address of your VPS).
So, if you previously registered the domain 'mysuperdupervpn.com' and pointed 'vpn.mysuperdupervpn.com' at the IP address of your new VPS, change line 6 to read:
remote vpn1.mysuperdupervpn.com 1194
And if you didn't bother to register a domain, it's going to be:
remote xxx.xxx.xxx.xxx 1194
Where 'xxx.xxx.xxx.xxx' is the IP address of your VPS.
Also change line 28 from:
ca CA.pem
to read:
ca TrustedCA.pem
We also need to grab a copy of the CA certificate of your Zeroshell installation.
To do this, in the Zeroshell web interface click on the 'X.509 CA' option in the main menu on the left hand side of the web interface. Then click on 'Trusted CAs' in the bar across the top:
In the popup that appears, highlight the 'Zeroshell (Local CA)...' line in the main body of that window and then hit 'Export' (making sure 'PEM' is selected in the corresponding drop down menu):
A file called 'TrustedCA.pem' will be saved to your Mac.
Put both files:
zeroshell.ovpn
TrustedCA.pem
in the same folder, somewhere on your Mac.
You'll note that the installation of 'Tunnelblick' resulted in the addition of its icon in your menu bar:

We need to drag and drop the 'zeroshell.ovpn' file that you've edited on to this icon to allow Tunnelblick to be configured with your own settings. Do so, and you should see:

Click on 'Only Me' (or indeed 'All Users' if you want all users using this Mac to connect through the VPN).
You'll be prompted for your password again (the one you use to log into your Mac).
Enter it, and you should see a message that the installation has been completed successfully.
To connect to the VPN, click on the 'Tunnelblick' icon in the menu bar:
and select 'Connect zeroshell'.
You'll be prompted for a username and password. This is the username and password you chose when you created the VPN in the Zeroshell web interface above (under 'Configuring the VPN' above).
Enter those and hit 'OK'.
You should see a 'Tunnelblick' dialog box appear, with text in yellow that turns to green when the connection is successfully made. If not, click on the 'Tunnelblick' icon in your menu bar to call it up:

I'd suggest visiting a site such as:
in a web browser at this time to confirm that your traffic is being routed through your Zeroshell VPS.
When connected, the IP shown in a site like the one above should be that of your VPS, rather than your broadband connection. Try the same thing after disconnecting from the VPN (click on the 'Tunnelblick' menu bar icon, and select 'Disconnect All') and note the difference (you'll have to refresh the page).
Finally, you may wish for the VPN to connect automatically when you first log into MacOS.
To enable this, click on the 'Tunnelblick' menu bar icon again, and select 'VPN Details'.
Then hit the 'Settings' and choose from the 'Connect' drop down menu 'When Tunnelblick launches':

Ubuntu Linux
Just as with Windows above, we need the configuration and CA files.
Download a copy of the default configuration file from:
http://www.zeroshell.net/listing/zeroshell.ovpn
(visit that URL in a web browser, and hit 'Save As' to save it somewhere you can locate). You can just 'wget' it if you're familiar with the Linux command line.
Open that 'zeroshell.ovpn' file in your text editor of choice (personally, I like 'vim' but 'pluma' might be a good choice too).
Change line 6 to reflect the hostname of your Zeroshell VPS (or its IP address if you didn't bother to buy a domain and set up a subdomain pointed at the IP address of your VPS).
So, if you previously registered the domain 'mysuperdupervpn.com' and pointed 'vpn.mysuperdupervpn.com' at the IP address of your new VPS, change line 6 to read:
remote vpn1.mysuperdupervpn.com 1194
And if you didn't bother to register a domain, it's going to be:
remote xxx.xxx.xxx.xxx 1194
Where 'xxx.xxx.xxx.xxx' is the IP address of your VPS.
Also change line 28 from:
ca CA.pem
to read:
ca TrustedCA.pem
We also need to grab a copy of the CA certificate of your Zeroshell installation.
To do this, in the Zeroshell web interface click on the 'X.509 CA' option in the main menu on the left hand side of the web interface. Then click on 'Trusted CAs' in the bar across the top:
In the popup that appears, highlight the 'Zeroshell (Local CA)...' line in the main body of that window and then hit 'Export' (making sure 'PEM' is selected in the corresponding drop down menu):
A file called 'TrustedCA.pem' will be saved to your Linux machine.
Put both files:
zeroshell.ovpn
TrustedCA.pem
in the same directory, somewhere on your Linux machine. For example:
/home/user/vpnconf
where 'user' is your username on your Linux machine.
Now, let's install the OpenVPN software that'll be used with the Network Manager.
Open a terminal and type:
sudo apt-get -y install network-manager-openvpn network-manager-openvpn-gnome
(you'll be asked to input your password to authorise this).
Once that's installed, restart the network manager by typing:
sudo service network-manager restart
Now open the 'Network Connections' control panel You can get to it by right-clicking on the 'network' icon in your panel (top right hand corner) and selecting 'Edit Connections':

On the dialog that appears, select 'Add':

From the drop down menu under 'VPN' select 'Import a saved VPN configuration...':

and hit 'Create'.
In the file selection dialog that appears, choose the 'zeroshell.ovpn' file from the directory you've stored it in.
In the window that appears, most options will have been pre-populated for you now from the config file.
However, you'll need to enter the username and password for your VPN connection that you created previously via the Zeroshell web interface (under 'Configuring the VPN' above):

and then hit 'Save'.
To activate the VPN, right-click on the 'network' panel icon, select 'VPN Connections' and then 'zeroshell' to toggle the connection up:

I'd suggest visiting a site such as:
in a web browser at this time to confirm that your traffic is being routed through your Zeroshell VPS.
When connected, the IP shown in a site like the one above should be that of your VPS, rather than your broadband connection. Try the same thing after disconnecting from the VPN (right-click on the 'network' panel icon, select 'VPN Connections' and then 'zeroshell' to toggle the connection down) and note the difference (you'll have to refresh the page).
Finally, to auto-enable the VPN go back to 'Edit Connections' from the 'network' panel icon. This time, however, select the Wi-Fi or wired connection(s) that you want the VPN to auto-enable for and select the 'General' tab:

and put a tick in the 'Automatically connect to VPN when using this connection' box.
Best Practice
Your Zeroshell VPS is itself a server on the Internet that needs to be kept secure. If it were to be security compromised, a bad actor could potentially use it to attack any machine connecting to it for VPS access.
It would probably be advisable to log into the Zeroshell web interface regularly, and check the 'Message Board' section on the main screen for security updates (which can be installed in a couple of clicks if you're willing to make a small donation to the ZeroShell project to obtain a subscription key).
It would be prudent to be very careful with the credentials used to access your VPS provider's control panel - two factor authentication is generally recommended .
It goes without saying that all passwords set for each different purpose (VPS control panel, Zeroshell admin page, VPN users, etc) should be unique, strong, long and randomly generated.
Buy Me A Beer
If you find this guide at all useful, feel free to buy me a beer. Or part of a beer. Or a keg. Or two:-
BTC: 3CgKQSqzYZnLhfj58L1MgNsiAhWGvmLsaK
LTC: LcorMkmmMpbVn2vBy5dUCGNDytnmHSW5vy
DOGE: D8PUDKoF7ZkHN43ELdRZZGNUv6iZ9xLScL
This is great! Thanks!
Congratulations @docdagbjort! You received a personal award!
Happy Birthday! - You are on the Steem blockchain for 1 year!
Click here to view your Board
Hello @docdagbjort! This is a friendly reminder that you have 3000 Partiko Points unclaimed in your Partiko account!
Partiko is a fast and beautiful mobile app for Steem, and it’s the most popular Steem mobile app out there! Download Partiko using the link below and login using SteemConnect to claim your 3000 Partiko points! You can easily convert them into Steem token!
https://partiko.app/referral/partiko
Congratulations @docdagbjort! You received a personal award!
You can view your badges on your Steem Board and compare to others on the Steem Ranking
Vote for @Steemitboard as a witness to get one more award and increased upvotes!