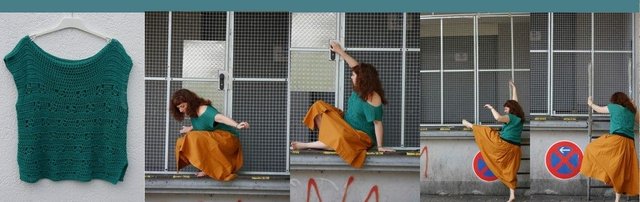
Free crochet pattern: The am I naked or wearing a shirt shirt
 Today it is warm, super-duper warm, although just one week ago it felt like winter. My wardrobe is confused and so am I. Just a few days ago I started a new knitting project – a very cute striped sweater – well then….? It is much too warm and of course it is not finished, because I am knitting at snail’s pace.
So, there is absolutely no other possibility than immediately starting a new project, if not what should I wear during the warm season, because my wardrobe is completely empty?
(Beware Irony –I am proud to present this creative excuse to 1. buy new yarn 2. start a new project 3. make more clothes for myself)
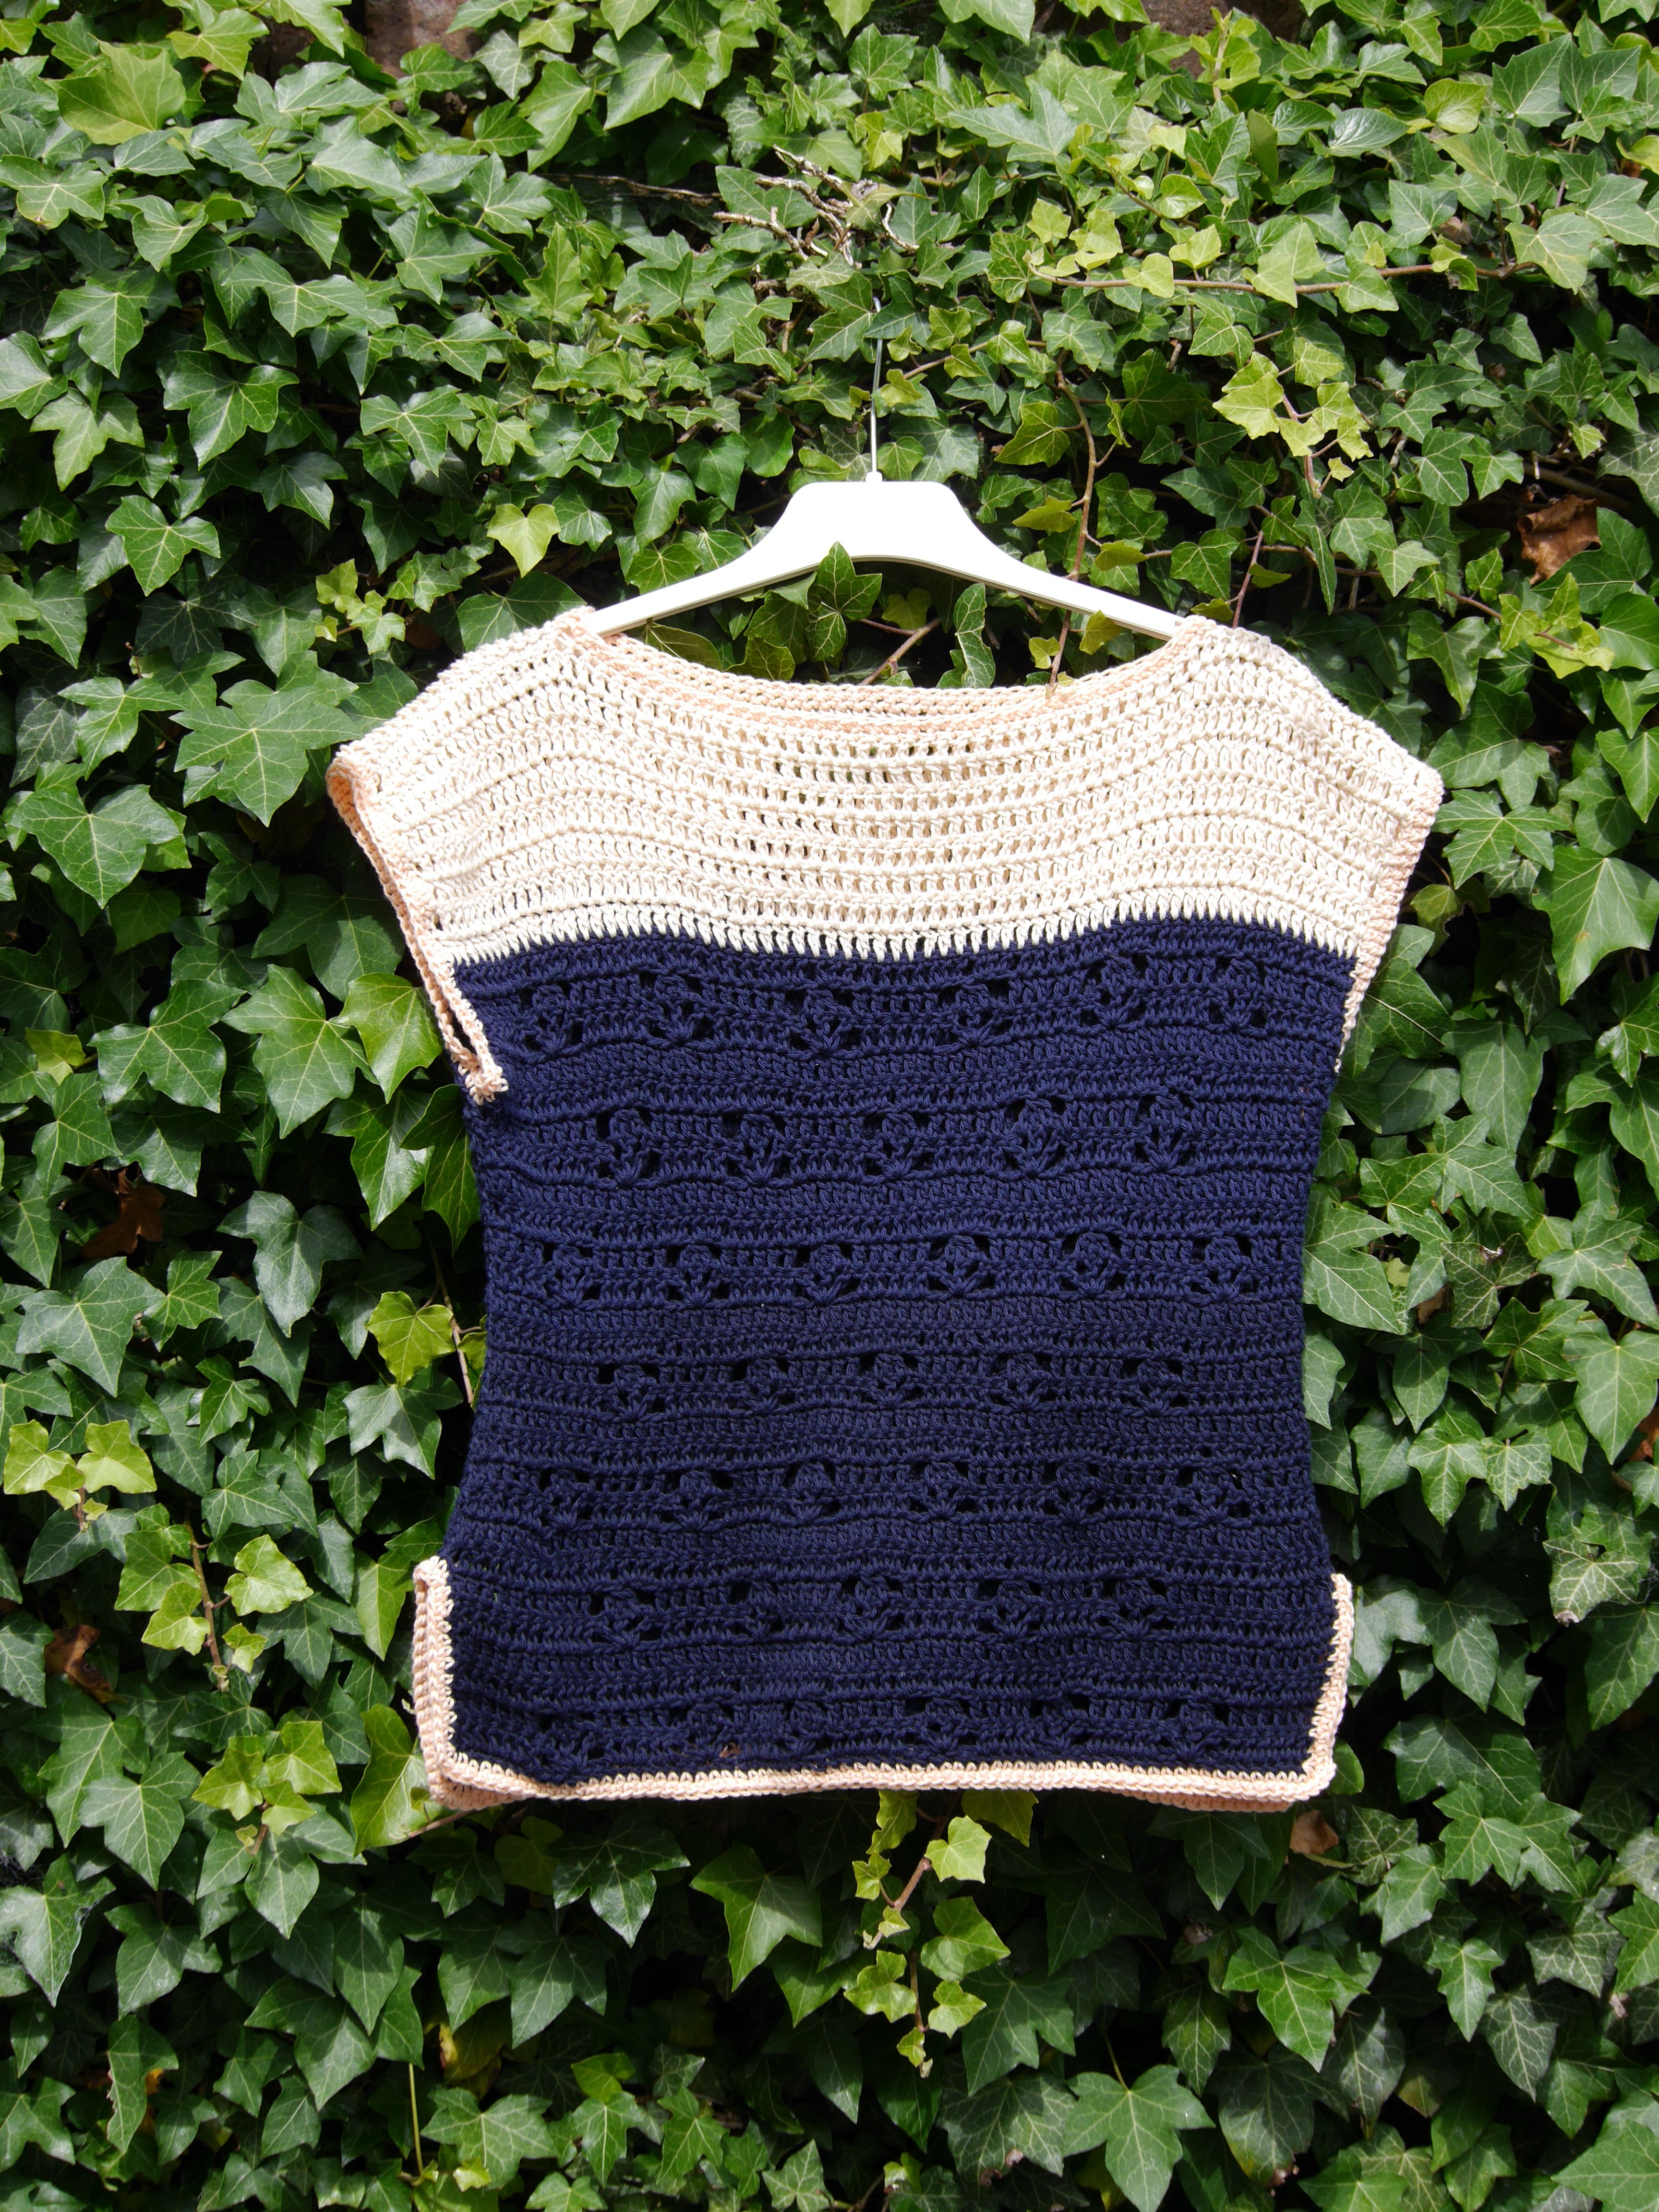
Corresponding to the high temperature I crocheted an airy shirt, so airy, that my husband wants me to wear it every day, always, regardless of the weather. My best friend on the other hand, thinks it would be better to wear something beneath it. Here I will share the pattern with you, the moral decision I will leave to you.
The shirt is slightly tailored with short sleeves. It is made of breathable cotton yarn which is cro-cheted loosely. Front and back part are worked separately and then sewn (or crocheted) together. The pattern evolves over two rows and alternates with two rows of double crochet. The tailored fit is attained by slits at the sides and by changing to smaller sized hooks.
If you want the top to be boxy, simply stay with the same hook size throughout the whole project. On the other hand, if you want an even more tailored fit, you can not only change the hook size but decrease the stitchcount. I explain this variation on the last two pages.
The small sleeves are worked by increasing the stitches from the bustline upwards. The neckline is straight and wide and if desired you can turn it in a off the shoulder neckline. To give the shirt a tidy finish, hem, neckline, and side slits are garnished with one or two rows of single crochet
You can download the pattern for free in english and german from my ravelry account
http://www.ravelry.com/designers/simone-neumann-salva
Material
5 skeins Rico Creative cotton dk colour 024 Alga,
50 g / 115 m
The top weights 240 g
Hook 4,5mm, 4mm und 3,5mm
scissors
tapestry needle
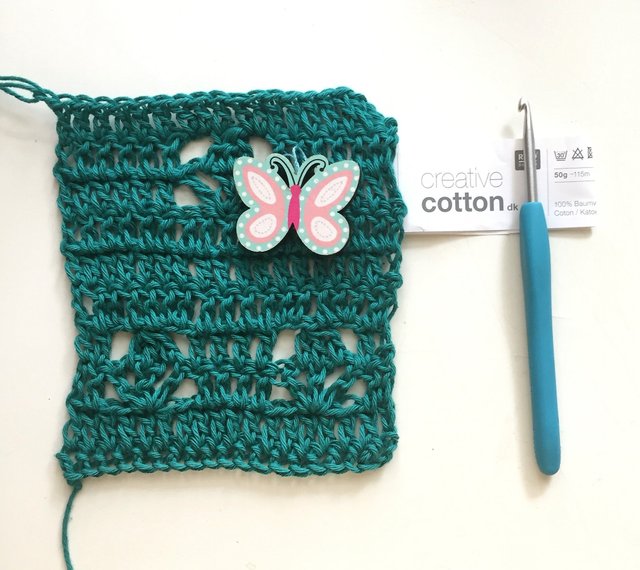
Tension
Tension with hook 4,5
14 stitches and 7 rows in pattern are 10 cm x 10 cm
Please keep in mind, that I crochet very loose. Possibly you need to go up in your hook size to attain the same tension.
Size and numbers
Width
Hem 50 cm
Waist 46 cm (44 cm)
Shoulderwidth 60 cm
Neckline 36 cm
Heigth
Armhole to hem 31 cm
Armhole 20 cm
Total heigth 51 cm
Slit 10 cm
Fit
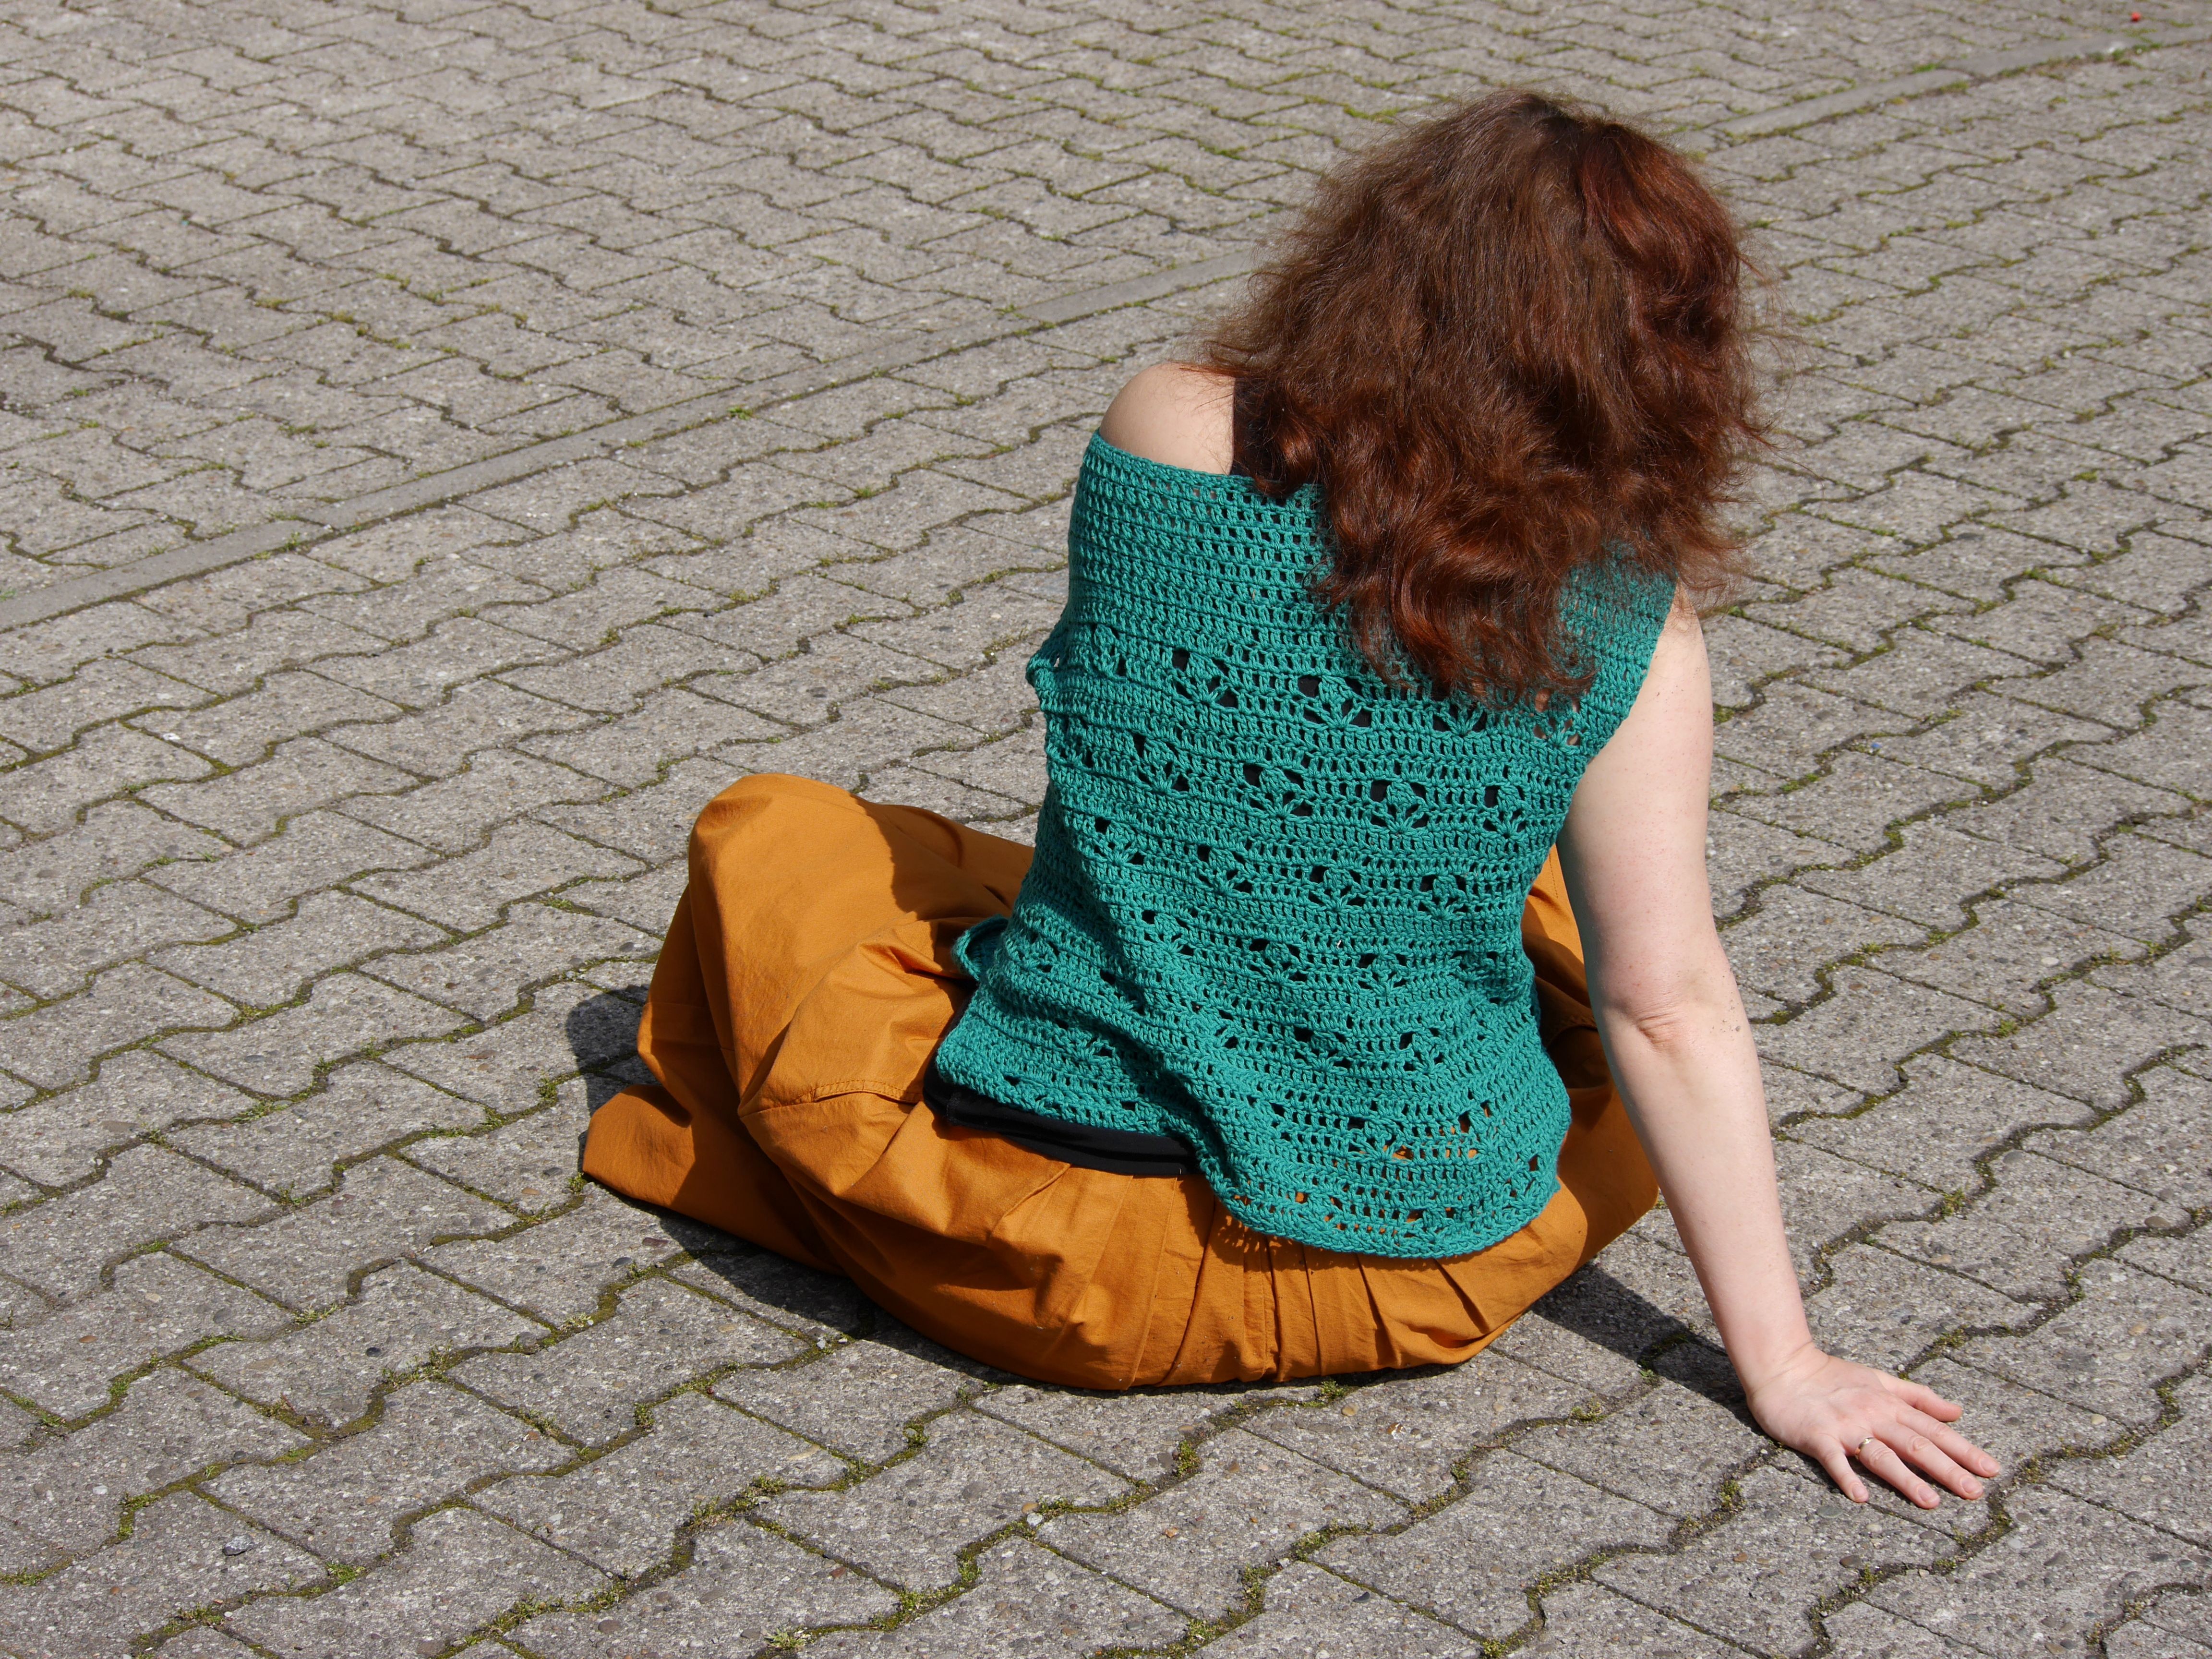
The shirt has a slightly tailored fit, and drapes soft and wide over your shoulders. Around the waist-line and the hip, it has approximately 4 cm ease.
The shirt tapers out to the top so the shoulders are the sleeves at the same time.
The neckline is straight and very open and the sleeves are also very roomy. If you wear the shirt regularly it will grow a little bit in length and width because of the cotton yarn.
The fit is very flexible und you can easily change the pattern to your liking and your body shape. I give you two variations: for a more tailored fit you can follow the instructions on the last two pages or if you want a top with a roomy waistline, just stay with the bigger hook size.
You can also customize the neckline by simply closing more or less of the shoulder seams. The same applies to the sleeve openings. If you want to modify width or length of the shirt, the following formulas could help:
(Desired width x stitches per 10 cm) / 10
If I fill in my measurements - my tension and my desired width – the result is 68,9 stitches. 0,9 stitches are a little bit difficult to crochet so I decided to start with a 69 foundation single crochet.
(49 cm x 14 stitches) / 10 = 68,6 stitches
After sewing and working the sc edge the shirt measures 50 cm in width at the hem.
If you want to make a smaller shirt you can omit up to 3 dc at the beginning and the end of each row. If this is not enough, you can also leave out a whole pattern repeat, then you have at one swoop 10 stitches less per row.
On the other hand, you can insert some dc at the beginning and end of each row, to make the shirt wider. Or you choose to insert a whole pattern repeat, then you will get 10 stitches more per row. The lenght is much easier to vary, just put the shirt on and decide if hem, waistline, or neckline are at the right places. If not insert or omit some rows. Nevertheless, I’ll give you the formula to calcu-late the right length:
(Desired height x rows per 10 cm) / 10
(51 x 7) / 10 = 35,7
I rounded up and worked 36 rows.
Pattern
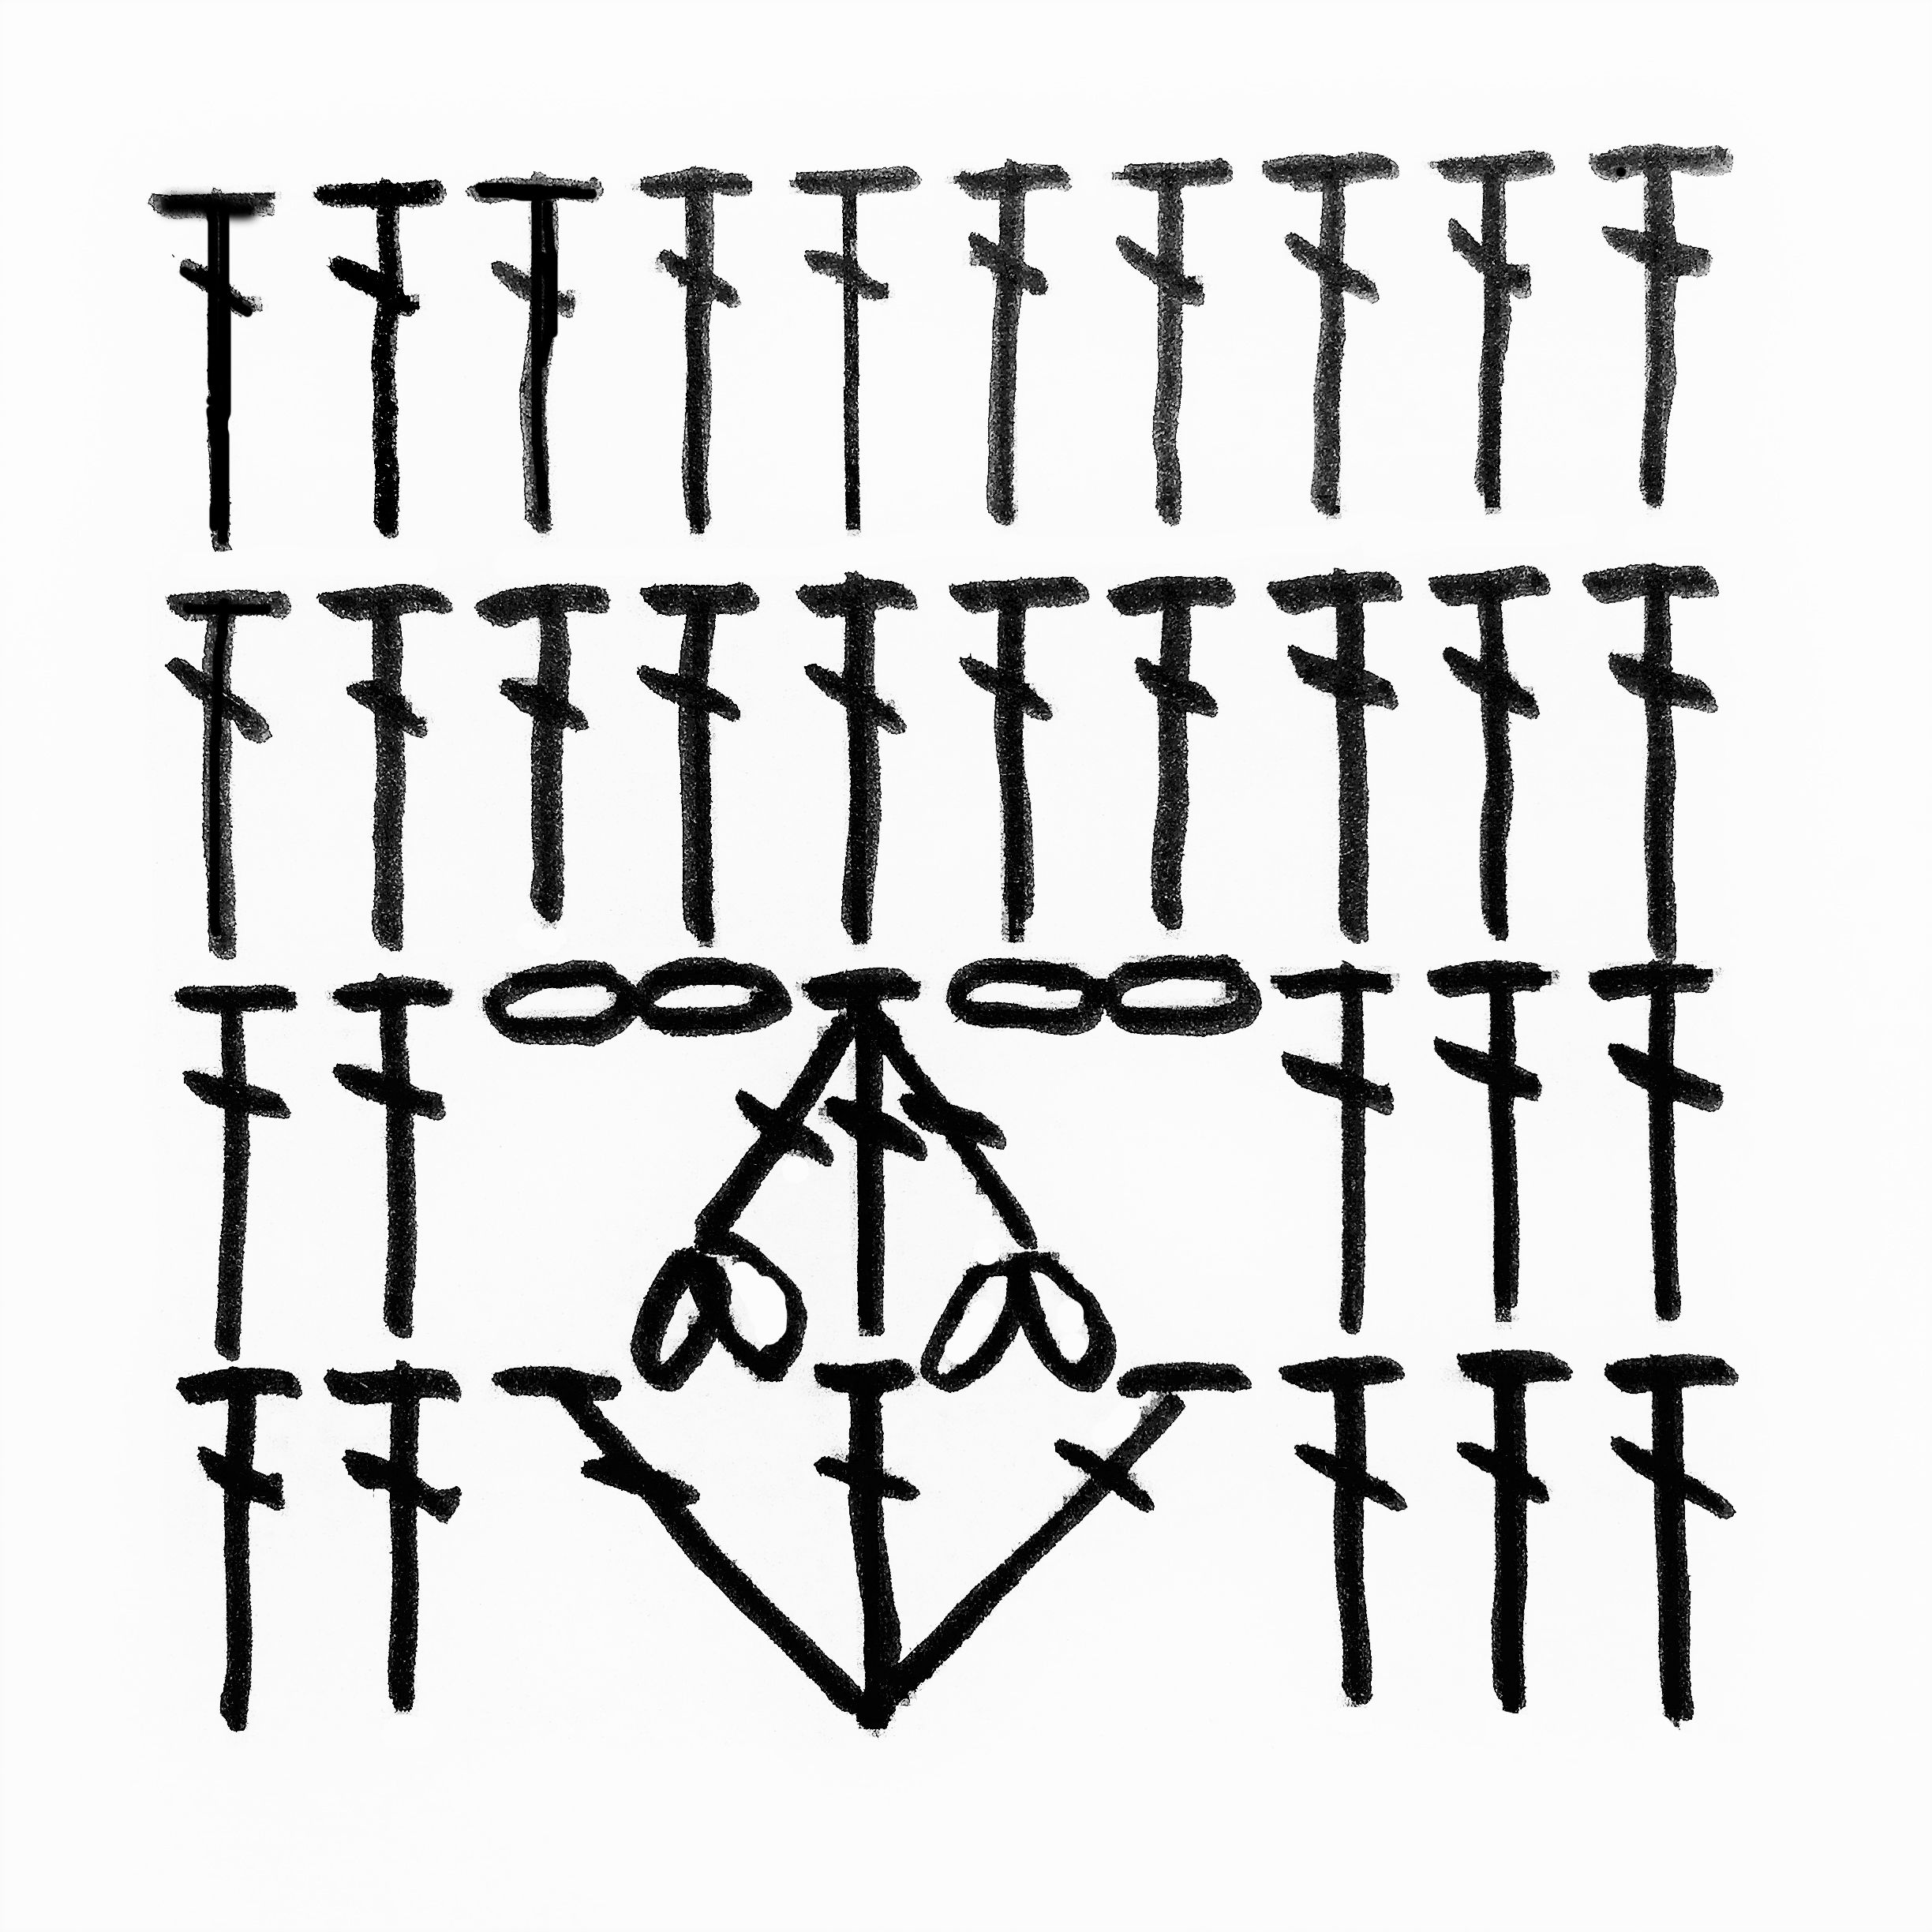
The pattern repeat has a multiple of 10 stitches and is built up out of a two row repeat which is fol-lowed by two rows of dc.
The first row shows a fan stitch. It is formed by three dc which are crocheted in the same stitch and are connected by two chains. This motive is completed in the next row by a cluster, which is worked over three stitches. The cluster is worked as follows:

Yo, insert hook beneath the chains, pull up loop, yo (3 loops on hook) and pull through two loops on hook, yo, insert hook in the middle dc of fan, pull up loop (4 loops on hook), yo and pull through two loops on hook (3 loops on hook), yo, insert hook beneath the chains, pull up loop, yo (5 loops on hook) and pull through two loops on hook (4 loops on hook), yo and pull through all loops on hook.
Skills used / Abbreviation
yo = Yarn over
ch = Chain
fsc = Foundation single crochet (UK foundation double crochet)
ss = Slip stitch
sc = Single crochet (UK double crochet)
dc = Double crochet (UK treble crochet)
dc2tog = decreasing, two double crochet worked together (UK decreasing, two treble crochet worked together)
inc = increase, 2 double crochet in one stitch
The ch 3 at the beginning of the row counts as dc throughout. Remember to skip the first stitch directly below the turning chains. Only to increase a dc at the beginning of the row you must work in this first stitch.
Rows 1-9 and 21-36 are worked with hook size 4,5. Rows 10-12 and 17-20 are worked with hook size 4 and the rows 12-16 with hook size 3,5.
Front and back part
(make two times)
Start with hook size 4,5
Row 1: 69 Fsc.
Row 2: ch 3, dc in next 3 stitches, dc in next 3 stitches, skip the next 2 stitches, [1 dc, 2 ch, 1 dc, 2 ch, 1 dc] in next stitch, skip the next 2 stitches, dc in next 2 stitches, repeat from *to *, dc in last 5 stitches. (69 stitches)
Row 3: ch 3, dc in next 3 stitches, dc in next 3 stitches, 2 ch, skip 1 dc, work cluster, 2 ch, skip 1 dc, dc in next 2 stitches, repeat from * to *, dc in last 5 stitches. (69 stitches)
Row 4: ch 3, dc in every stitch. (69 stitches)
Row 5: ch 3, dc in every stitch. (69 stitches)
Row 6: ch 3, dc in next 8 stitches, dc in next 3 stitches, skip the next 2 stitches, [1 dc, 2 ch, 1 dc, 2 ch, 1 dc] in next stitch, skip the next 2 stitches, dc in next 2 stitches, repeat from *to *, dc in last 10 stitches. (69 stitches)
Row 7: ch 3, dc in next 8 stitches, dc in next 3 stitches, 2 ch, skip 1 dc, work cluster, 2 ch, skip 1 dc, dc in next 2 stitches, repeat from * to *, dc in last 10 stitches. (69 stitches)
Row 8: ch 3, dc in every stitch. (69 stitches)
Row 9: ch 3, dc in every stitch. (69 stitches)
Change to Hook size 4
Row 10: ch 3, dc in next 3 stitches, dc in next 3 stitches, skip the next 2 stitches, [1 dc, 2 ch, 1 dc, 2 ch, 1 dc] in next stitch, skip the next 2 stitches, dc in next 2 stitches, repeat from *to *, dc in last 5 stitches. (69 stitches)
Row 11: ch 3, dc in next 3 stitches, dc in next 3 stitches, 2 ch, skip 1 dc, work cluster, 2 ch, skip 1 dc, dc in next 2 stitches, repeat from * to *, dc in last 5 stitches. (69 stitches)
Row 12: ch 3, dc in every stitch. (69 stitches)
Change to hook size 3,5.
Row 13: ch 3, dc in every stitch. (69 stitches)
Row 14: ch 3, dc in next 8 stitches, dc in next 3 stitches, skip the next 2 stitches, [1 dc, 2 ch, 1 dc, 2 ch, 1 dc] in next stitch, skip the next 2 stitches, dc in next 2 stitches, repeat from *to *, dc in last 10 stitches. (69 stitches)
Row 15: ch 3, dc in next 8 stitches, dc in next 3 stitches, 2 ch, skip 1 dc, work cluster, 2 ch, skip 1 dc, dc in next 2 stitches, repeat from * to *, dc in last 10 stitches. (69 stitches)
Row 16: ch 3, dc in every stitch. (69 stitches)
Change to hook size 4
Row 17: ch 3, dc in every stitch. (69 stitches)
Row 18: ch 3, dc in next 3 stitches, dc in next 3 stitches, skip the next 2 stitches, [1 dc, 2 ch, 1 dc, 2 ch, 1 dc] in next stitch, skip the next 2 stitches, dc in next 2 stitches, repeat from *to *, dc in last 5 stitches. (69 stitches)
Row 19: ch 3, dc in next 3 stitches, dc in next 3 stitches, 2 ch, skip 1 dc, work cluster, 2 ch, skip 1 dc, dc in next 2 stitches, repeat from * to *, dc in last 5 stitches. (69 stitches)
Row 20: ch 3, dc in every stitch. (69 stitches)
Change to hook size 4,5
Row 21: ch 3, dc in every stitch. (69 stitches)
Row 22: ch 3, dc in next 8 stitches, dc in next 3 stitches, skip the next 2 stitches, [1 dc, 2 ch, 1 dc, 2 ch, 1 dc] in next stitch, skip the next 2 stitches, dc in next 2 stitches, repeat from *to *, dc in last 10 stitches. (69 stitches)
Row 23: ch 3, dc in next 8 stitches, dc in next 3 stitches, 2 ch, skip 1 dc, work cluster, 2 ch, skip 1 dc, dc in next 2 stitches, repeat from * to *, dc in last 10 stitches. (69 stitches)
Row 24: ch 3, dc in every stitch. (69 stitches)
Row 25: ch 3, dc in every stitch. (69 stitches)
Row 26: ch 3, dc in next 3 stitches, dc in next 3 stitches, skip the next 2 stitches, [1 dc, 2 ch, 1 dc, 2 ch, 1 dc] in next stitch, skip the next 2 stitches, dc in next 2 stitches, repeat from *to *, dc in last 5 stitches. (69 stitches)
Row 27: ch 3, dc in next 3 stitches, dc in next 3 stitches, 2 ch, skip 1 dc, work cluster, 2 ch, skip 1 dc, dc in next 2 stitches, repeat from * to *, dc in last 5 stitches. (69 stitches)
Row 28: ch 3, do not skip the first stitch, but make a dc, dc in every stitch across, make 2 dc in last stitch. (71 stitches, increased 2 stitches)
Row 29-31: ch 3, dc in every stitch. (71 stitches)
Row 32: ch 3, do not skip the first stitch, but make a dc, dc in every stitch across, make 2 dc in last stitch. (73 stitches, increased 2 stitches)
Row 33-36: ch 3, dc in every stitch. (73 Stitches)
Secure yarn and fasten off.
Finishing instructions
Turn front and back on the wrong side and pin both together. You want to have all seams and yarnends on the left side, which nobody will ever see. I closed on both sides 17 dc which results in a 12 cm shoulder seam. 13 rows I left open form the armhole. The side slits are 7 rows high. Alto-gether I closed 16 rows for the side seams.
After sewing everything together I worked two rows of sc around the neckline. Therefore, I at-tached the yarn with a slip stitch on the backside and worked one sc in every fsc. I closed the first row with a slip stitch in the first sc, ch 1 and made another row. Then fasten off. In the same man-ner, I worked one row of sc for the hem and side slits.
And now (sighhhhhhh) secure all yarnends on the left side.
When you are ready put the shirt on, make sure your naked skin is well lit, take photos and become a star on Instagram (or another social media platform of your choice)
Or do something completely different… because: We are all stars already 😃
More tailored variation
Row 1-9 are worked the same as in the standard pattern above.
Row 10: ch 3, dc2tog, 1 dcdc in next 3 stitches, skip the next 2 stitches, [1 dc, 2 ch, 1 dc, 2 ch, 1 dc] in next stitch, skip the next 2 stitches, dc in next 2 stitches, repeat from *to *, dc in last 4 stitches. (67 stitches, decreased 2 stitches)
Row 11: ch 3, dc in next 2 stitches, dc in next 3 stitches, 2 ch, skip 1 dc, work cluster, 2 ch, skip 1 dc, dc in next 2 stitches, repeat from * to *, dc in last 4 stitches. (67 stitches)
Row 12: ch 3, dc in every stitch. (67 stitches)
Change to hook size 3,5.
Row 13: ch 3, dc2tog, dc every stitch, but leave last stitch unworked. (65 stitches, decreased 2 stitches)
Row 14: ch 3, dc in next 6 stitches, dc in next 3 stitches, skip the next 2 stitches, [1 dc, 2 ch, 1 dc, 2 ch, 1 dc] in next stitch, skip the next 2 stitches, dc in next 2 stitches, repeat from *to *, dc in last 8 stitches. (65 stitches)
Row 15: ch 3, dc in next 6 stitches, dc in next 3 stitches, 2 ch, skip 1 dc, work cluster, 2 ch, skip 1 dc, dc in next 2 stitches, repeat from * to *, dc in last 8 stitches. (65 stitches)
Row 16: ch 3, dc in every stitch. (65 stitches)
Change to hook size 4
Row 17: ch 3, dc in every stitch. (65 stitches)
Row 18: ch 3, dc in next stitch, dc in next 3 stitches, skip the next 2 stitches, [1 dc, 2 ch, 1 dc, 2 ch, 1 dc] in next stitch, skip the next 2 stitches, dc in next 2 stitches, repeat from *to *, dc in last 3 stitches. (65 stitches)
Row 19: ch 3, dc in next stitch, dc in next 3 stitches, 2 ch, skip 1 dc, work cluster, 2 ch, skip 1 dc, dc in next 2 stitches, repeat from * to *, dc in last 3 stitches. (65 stitches)
Row 20: ch 3, dc in every stitch. (65 stitches)
Change to hook size 4,5
Row 21: ch 3, do not skip the first stitch, but make a dc, dc in every stitch across, make 2 dc in last stitch. (67 stitches, increased 2 stitches)
Row 22: ch 3, dc in next 7 stitches, dc in next 3 stitches, skip the next 2 stitches, [1 dc, 2 ch, 1 dc, 2 ch, 1 dc] in next stitch, skip the next 2 stitches, dc in next 2 stitches, repeat from *to *, dc in last 9 stitches. (67 stitches)
Row 23: ch 3, dc in next 7 stitches, dc in next 3 stitches, 2 ch, skip 1 dc, work cluster, 2 ch, skip 1 dc, dc in next 2 stitches, repeat from * to *, dc in last 9 stitches. (67 stitches)
Row 24: ch 3, dc in every stitch. (67 stitches)
Row 25: ch 3, do not skip the first stitch, but make a dc, dc in every stitch across, make 2 dc in last stitch. (69 stitches, increased 2 stitches)
Row 26-36 are worked like the standard pattern. The only difference is, that I worked two rows of sc at the hem and around the armholes.
In this more fitted version I used dark blue (013) for the rows 1-28, rows 29-36 are worked in powder (006). The sc border is worked in salmon (022).
Sieht toll aus! Der Artikel hat bestimmt viel Arbeit gemacht.
Danke schön... ja hat schon Arbeit gemacht, vor allem das Überprüfen ob auch wirklich alles stimmt. Aber das kennst du ja bestimmt :-D Ich stelle ihn die Tage auch auf deutsch rein, mal sehen ob es sich lohnt.
Ja, es lohnt sich. Stell den Artikel under dem Tag #deutsch ein. Ein paar Leute helfen der deutschen Community zu wachsen, z.b. @twinner. Er gibt meist einen Hinweis auf den deutschen Chat Channel bei deinem ersten deutschen Post. Geh in den deutschen Chat für Fragen. Ansonsten gibt es Hilfsprogramme für Minnows (Anfänger) z.B. #minnowsupportproject (@minnowsupport). Für englische Posts #whalepower, außerdem noch @randowhale. Aber ließ dich erst einmal in die Programme ein, ob das was für dich ist. LG
Und gib nicht auf! Am Anfang ist es schwer und man bekommt vielleicht nicht so viel und man muss erst einmal Kontakte knüpfen. Aber ich glaube, dass es irgendwann besser wird. Ich bin zwar auch erst Anfänger und kann jetzt nicht extrem viel Erfahrung vorweisen, aber ich glaube an die Sache.
Wir Handarbeitsfreunde können uns gegenseitig helfen zu wachsen :)
Dank dir für die ganzen Infos... im Moment finde ich diese Plattform erstmal etwas verwirrend und habe auch den Eindruck das Themen aus dem Bereich Handarbeit oder Kunst nicht so stark vertreten sind und es vielleicht auch an Publikum mangelt. Ich werden mich langsam einarbeiten und bin gespannt ob es Vorteile gegenüber Ravelry, Instagramm oder youtube gibt. Noch sind sie mir nicht ersichtlich. ...aber ich befürchte, das liegt an meiner Unkenntnis :-)
Bist du bei ravelry?
Und yes: support crafts!!!
Nein, ravelry hab ich noch nicht ausprobiert. Lohnt sich das? Ja, es gibt kaum Handarbeitsleute, aber ich bemerke einen starken Zuwachs. Es melden sich immer mehr Leute an wie du. Vielleicht ist das auch ein Vorteil, so sind wir die ersten ;)
Also für mich hat ravelry sich total gelohnt. Nicht nur dass man dort sehr unkompliziert eigene Muster frei oder gegen Geld veröffentlichen kann, man hat in der Regel auch recht viele Zugriffe darauf, da die Teilnehmenden alle das gleiche im Sinn haben :-D Außerdem ist es (zumindest für mich) eine Quelle der Inspiration und der Hilfe, da man sehen kann wie andere Leute mit Anleitungen umgegangen sind, ob es Fehler gab, wie man sie verbessern oder anpassen kann.
Für Stricker ist es noch ergibiger (ich häkle eher)
Schau mal auf meinen Blog. Ich habe für dich einen richtig guten Artikel für Neulinge resteemed. Falls du noch Fragen hast, melde dich oder frag im #deutsch channel auf steemit.chat. Ansonsten kann ich nur den Tip geben, weiter zu posten und gute Kommentare bei anderen Steemians zu hinterlassen. So kannst du auf dich aufmerksam machen.
Werde direkt lesen... wenn ich diesen Post dann upvote, hilft das dir, dem ursprünglichen Autoren oder euch beiden? Letzteres wäre natürlich am besten :-D
Übrigens helfen deine Upvotes dem Autor, seine Reputation (Zahl hinter Namen) zu steigern, auch wenn der Vote kein oder kaum Geld bringt. Denk daran auf deine Voting Power zu achten. Du kannst sie nachschauen unter steemitnow.com!
Dem eigentlichen Autor. Ich glaube, ich bekomme nichts dafür.
schade hätte es dir gegönnt :-D
Wow I loved your post, so cute, I would like to learn more about make an sweet shirt like yours, u have my vote! You can go to my page if you want, be happy!
thank you so much and happy crocheting :-) I think the shirt would look beautiful on you....aaaand I followed you :D
Great top and post. Welcome to steemit.
Thank you very much and a big hello back and followed you
I hope I have found a fellow crochet addict ;-)
You have, although I haven't got my hooks out in quite some time.
oh now, how come...?
No real reason, I'm what my mum calls a slutty crafter because i can't stick to just one craft.
I had to smile... I am intermitted obsessiv. I learn something, go on for some years and then a new obsession starts, but thankfully the old passions seldom die completely
I'm the same although some obsessions last longer than others, I think the correct term for it is Multipotentiality.
This would be a nice title for a blog post!