Personalised Handmade Straw Hat 👒 - How-To Guide (English/Deutsch)
Hi Steemians!
English
Today I want to share with you how to change your straw hat to an eyecatcher :)

In only 2 simple steps and a few materials you can have your own Straw hat ready for the pool party or a day on the beach.
WHAT YOU NEED
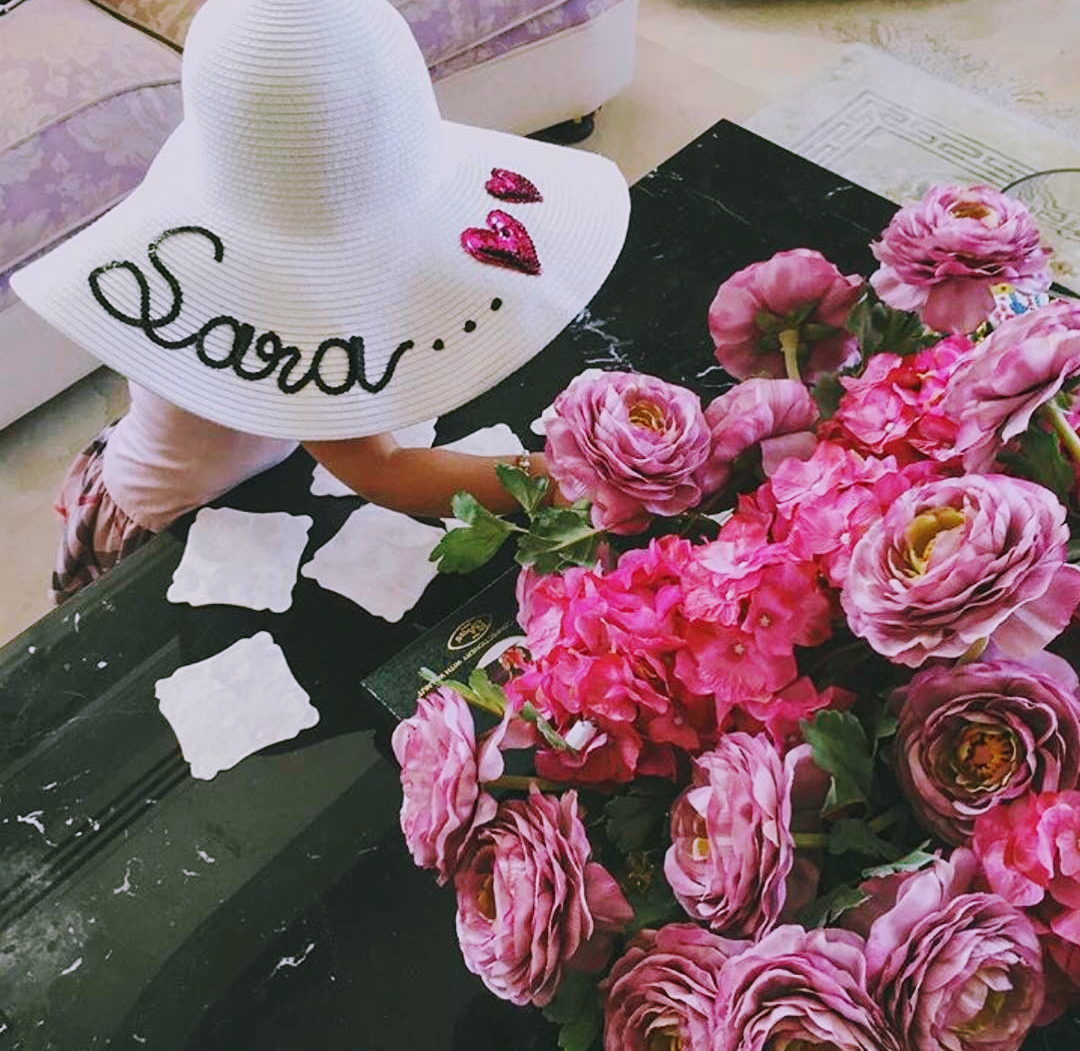
Straw Hat - you can choose any color you like from red to white, even orange or black. The wider the brim is, the easier it will be to add your text and the bigger the text will be.
Sequins String / Yarn / String - you can chose to use some yarn or string or even some thin ribbon. The sequins is easy to apply and adds a nice touch. Depending on the color of your hat, you will want to chose a script color that either pops or one that is more tonal and subdued. This is a personal choice and really up to you to decide what look you want to achieve.
Pencil - preferably HB or B. The softer the pencil, the easier it will be to apply and is more visible.
Glue gun and glue
Small scissors ✂
STEP 1
First you will want to figure out what to write on your hat.
Some examples:
"Hello Summer"
"salty kisses"
"La Vie Est Belle"
"Summer Lovin"...
Once you have decided what to write, you will want to practice writing the words to get a feel for the letters as well as the placement of the words on the hat. Then write directly on your hat. Try to follow the lines on your hat to guide and to make sure your writing is following a straight line. Make sure all your letters are the same height.

STEP 2
After that heat your glue gun ( is better than fabric glue). What is nice about the glue gun is that you can easily remove any excess glue by scratching it off. I still recommend being diligent and going slow. When applying the glue to your hat work in small section of a few centimeters at a time.
Don't forget that you'll have to line out a letter only once. For example the letter n will require you to put the glue gun on the hat twice (once for the line and once for the arc) instead of 'writing' it as you normally would.
So you take the glue gun and apply the glue bit by bit and apply your material to the sections until you have completed all your letters.
🔆 👒 And now I wish you a lot of fun 🔆 👒
Looking forward to everyone sharing their own designs and ideas on your customized summer straw hats!!!

Deutsch
Heute möchte ich euch zeigen wie ihr euren Strohhut zu einem echten Hingucker zaubern könnt.
In nur zwei Schritten und wenige Materialien habt ihr euren eigenen individuellen Strohhut, perfekt für den Strand und Pool Parties.
Was ihr dazu benötigt:
einen Strohhut- sucht euch eine Farbe aus die euch gefällt.
Beachtet nur; je breiter der Hutrand ist, desto einfacher ist es euren Text anzubringen und desto größer und ersichtlicher ist euer Text.Pailletten Band, Garn etc ihr könnt es natürlich individuell gestalten. Ihr könnt auch verschiedene Materialien kombinieren. Das Pailletten Band ist jedoch von der Anbringung am einfachsten und man bekommt dadurch einen sehr schönen touch besonders, wenn die Sonne scheint und die Pailletten von der Sonne angelacht werden :)
Abhängig von der Hutfarbe könnt ihr eure Farbe für den Text wählen. Das ist aber nätürlich alles reine geschmackssache.Bleistift- HB oder H: je weicher der Stift ist, desto einfacher das Anzeichnen und sichtbarer ist es.
Heißklebepistole und passender Kleber
Schere ✂
Schritt 1
Als erstes denkt euch einen Text aus.
Hier einige Beispiele:
"Hello Summer"
"salty kisses"
"La Vie Est Belle"
"Summer Lovin"...
Anschließend schreibt den Text einige Male auf, um ein Gespür für die Schrift bzw. die Größe des Textes zu bekommen. Wenn ihr euch sicher genüg fühlt schreibt den Text auf euren Hut. Achtet bitte darauf, dass alles auf der selben Höhe ist.

Schritt 2
Erhitzt nun die Heißklebepistole ( ich bevorzuge diese, da "normaler" Kleber doch etwas unsauber ist ). Das Gute an der Pistole ist, fehler oder zu viel angebrachter Kleber kann einfach korrigiert bzw. beseitigt werden ;)
Ich empfehle euch das von euch ausgewählte Material langsam; centimeter für centimeter anzubringen.
Beachtet dass bei einige Buchstaben zwei- oder sogar dreimal angesetzt wird. Ein Beispiel dafür ist der Buchstabe 'n' hier sollte man zweimal ansetzen.
🔆 👒 So und nun wünsche ich euch ganz viel Spaß 🔆 👒
Ich würde mich sehr freuen, wenn ihr eure eigenen Kreationen mit mir teilen würdet.
Sehr nette Idee. Tolle Bilder. Resteemed :-)
Vielen dank :)
Serh gerne und du hast auch einen neuen Follower :-)
👍 😊
süße Idee!