How To Build A PC. What you need to know in order to assemble your PC.
WHAT YOU NEED
Here is a complete list of what you will need to have a fully-functioning PC.
- Case
- Motherboard
- CPU (Central Processing Unit)
- GPU (Graphics Processing Units)
- RAM
- Power Supply
- HDD(Hard Drive Disk) or SSD(Solid State Drive)
- Monitor
- Keyboard
- Mouse
- Operating System
Preparation
- Phillips Head Screwdriver, This may be your most important tool throughout the whole build process. You are going to need to screw and unscrew many things throughout the build, so get a hold of one of these. A magnetic Phillips Head screwdriver would be a better option just in case you were to drop a screw or something.
- Workspace, you are going to want a nice workspace with little obstacles to get in your way. Make sure you are not building on metal because this could damage your parts due to electrical current. It would be smart to touch a piece of metal every now and then to avoid static build up, which could damage your parts.
Step 1: Installing The CPU
Start by getting your motherboard out of the box and anti-static wrap and place it on top of the box that it came in.
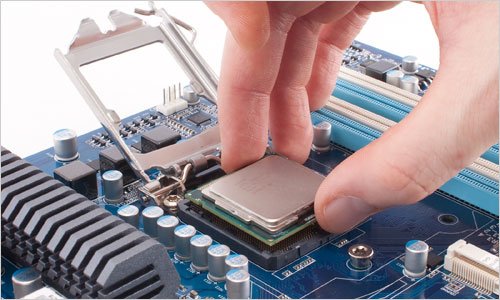
Once you've gotten your motherboard out, we are going to install the CPU into the motherboard. We are going to start by taking the CPU out of the box and hold it by the sides, careful not to bend any of the pins on the bottom.
Lift up the latch on the motherboards socket and line up the triangle on the CPU with the triangle on the motherboards socket and lay the CPU down gently. It should fall right into place.
Pull the lever on the socket down, this may take a little force but don't worry.
Step 2: Installing the heatsink
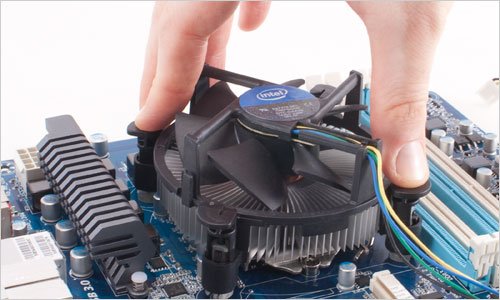
We are going to install the CPU heatsink.
Your CPU will most likely come with its own heatsink and fan. To start, align your heatsink with the 4 holes around your CPU. Press them in until you hear a click with all four corners. Then, plug the case fan in where it is labed "CPU FAN"
If you have any trouble consult to your manual.
Step 3: Installing The RAM
Note: If you are using two RAM sticks you can use dual channel for faster speeds, consult your manual for help on which slots to insert them into.
Locate the ram slots on your motherboard. pull the lever on both side of the latch. Then align the notch on your RAM stick with the notch on the RAM slot and press the RAM into the lost until the latches close themselves. This may take a little force.
Step 4: Installing The Motherboard
Place your motherboard inside the case and align the motherboard screw holes with the standoffs inside the case. Take the screws that came with your case and screw in the motherboard. Do not tighten down too hard, this could damage your motherboard. Then put your I/O shield, that came with your motherboard, on the case.
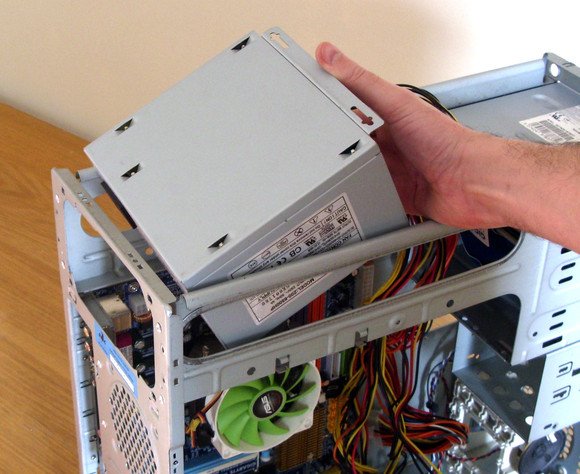
Step 5: Installing The Power Supply
This step is easy, just mount your power supply into your case. Use your manual for help.
Step 6: Case Fans and Hard Drives
This is another very easy step. Mount your hard drive or SSD in one of the slots. Mount your case fans, not much to it. Refer to your manual if you have any problems.

Step 7: Installing The GPU
Locate the PCI-E slot. Line up the GPU with the PCI-E slot and firmly press it in until it clicks in. Then you are going to want to screw your GPU into the case. You may need to remove two of the metal covers on the back of your case to do so. Now take your PCI-E power connector and plug it into your GPU (If needed).
Step 8: Wiring
Note* refer to your manual for more help on the wiring.
This is probably the hardest step, or least the most tedious step.
Start by plugging in the 24 and 4 or 8 pin connector from the power supply into the motherboard. And plug in any case fans.
Then plug your CPU in on the motherboard where it is labeled "CPU".
Next, give your hard drive/SSD power with a SATA cable and then plug your hard drive or SSD into your motherboard, simple.
Now here is the tricky part. Your case will come with HDD led, Reset switch, power switch, led +/led -, USB, and sometimes HD audio out. Pug these into there correct labeled place on the motherboard. Consult to your manual for this.
Step 9: Cable Management (Optional)
Use zip ties to tie cables together and put them in the back of your case.
Step 10: Turn the PC on
You have finished! Just screw your side panel back on, plug your power supply into the wall, plug in your monitor, mouse, keyboard, and hit the power button.
It should come right on, now slap on whatever operating system you prefer and install your drivers and you are good to go.
Hopefully this helps you out. :)
Good guide, though I'd say it's probably better to first at least try whether the PC posts before you install it into the case as it's much easier to find what the issue is while it's still outside the case.
Great post! Would you mind if I included it in today's "best of gaming"?
Not at all :) and yes you're probably right about that
very essential post
Congratulations @eli.ryan! You have completed some achievement on Steemit and have been rewarded with new badge(s) :
Click on any badge to view your own Board of Honor on SteemitBoard.
For more information about SteemitBoard, click here
If you no longer want to receive notifications, reply to this comment with the word
STOPVery solid info!
Nice post. I just bought 1080ti. :)
muy buen post!!