My Experience Sharing – How to Post on Wordpress to Steemit via Vornix and Steempress Tutorials|Perkongsian Pengalaman Saya – Tutorial Bagaimana Mengepos di Wordpress ke Steemit Melalui Vornix dan Steempress|我的经验分...
Howdy to everyone!|Apa khabar semua?|大家好!
English Version
Frankly, I've been knew about Vornix and Steempress since last month. However, since I need spend some time writing all the recaps and highlights for each match of World Cup 2018 – I just didn't got a chance to explore the Vornix and Steempress myself.
About two days ago, I saw one of the cn-Malaysia members - @auleo posted an article about Vornix and Steempress (For more information, please check this link) I asked him and he told me it's quite hassle free to get started with it.
Hence, I just dive in and join the Vornix and Steempress big family on yesterday!
If you didn't blog with Wordpress before, come and check out the below step-by-step tutorial:
Step 1 – You need to make the payment first!
Ahem, don't runaway when you see the above statement. Compare with the yearly domain name and hosting cost – the one time 3SBD payment is absolutely an unbeatable deal.
All you have to do is transfer 3SBD to @vornix and fill in this word “Wordpress” on the memo. In within 24 hours, they will create a new account, starting with xxxxxx.vornix.blog for you.
You will see the note “Received 0.001SBD from vornix”.
In able to retrieve your Wordpress account information, please logout your Steemit account and re-login again with your main Password.
Go to your wallet page and you will see the following details:
"# Your wordpress blog is created. Here are the details."
Admin Domain: http://xxxxxx.vornix.blog/wp-admin
Username: Your own Steemit username
Password: xxxxxxxxxx
Do remember to change your admin email and password after logging in. Thank you for using our service.
Step 2 – Login to your Wordpress account for the first time
After you’ve login to your Wordpress account, don't don't don't forget to change your email and password immediately!
Just hover your mouse cursor to the top right of your avatar (You'll see "Howdy, your name"), select “Edit My Profile” and click it.
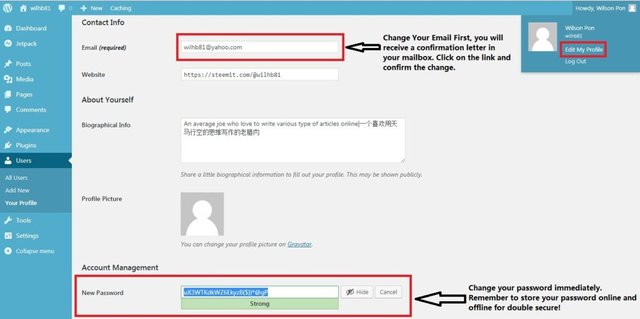
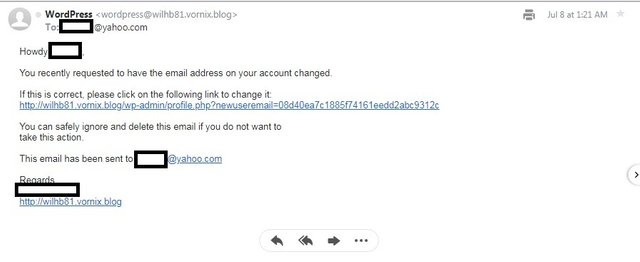
Then, scroll down to the “Contact Info” and change your Email first. Once you've changed your email, remember to check on your mailbox. They will send a confirmation email to you. Click on the long link and confirm it.
After that, don't forget to change your password. You can either use the password generate by Wordpress or using your own password.
When you're done, click the “Update Profile” button to proceed to the Step 3.
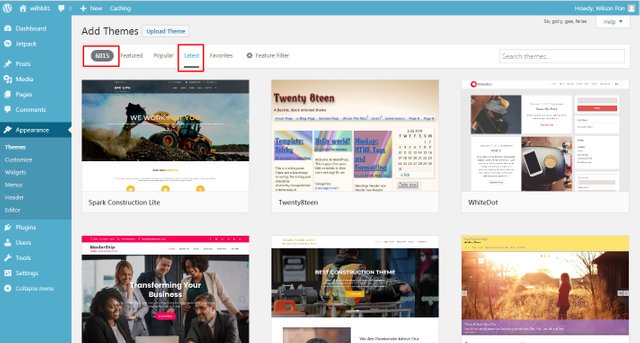
Step 3 – Choose your appearance or theme you want
The Wordpress is using the default “Twenty Seventeen” theme. If you're okay with it – then just skip it to Step 4. Else, you can click the “Add New Themes” and choose one from the thousand amazing themes you are fancy with.
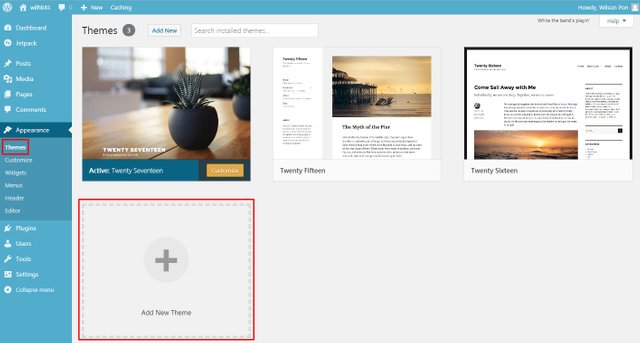
(Note: Remember to select the “Latest” tab, if you want to see all those latest six thousands themes)
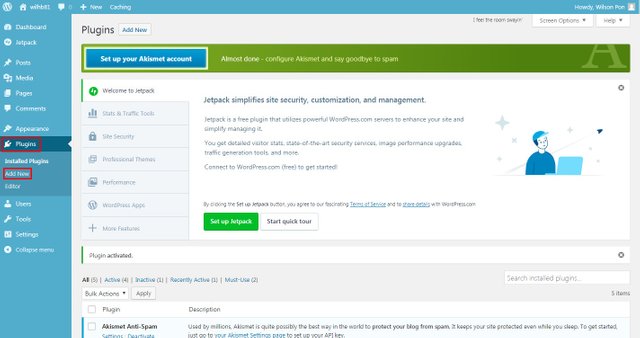
Step 4 – It's time to connect your Vornix Wordpress with your Steemit's account
If you didn't execute this step – the articles you post on Wordpress won't be showing up in your Steemit's account!
For doing this, you need to download a plugin to link both Vornix Wordpress and Steemit.
Just choose “Plugins > Add New” to proceed.
Step 5 – Find the “Steempress” plugin and install it onto your Vornix Wordpress
Just simply type in the word “Steempress” in the search box, the Steempress plugin will show up.
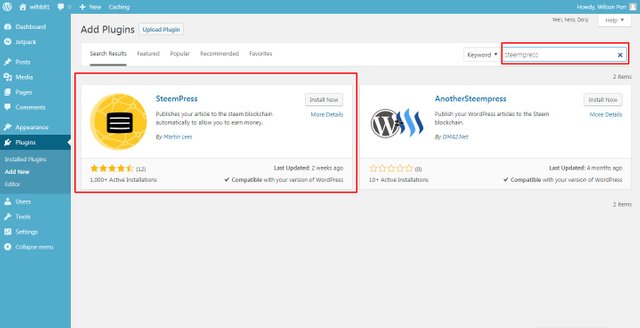
Click the Steepress “Install Now” button and activate it right away!
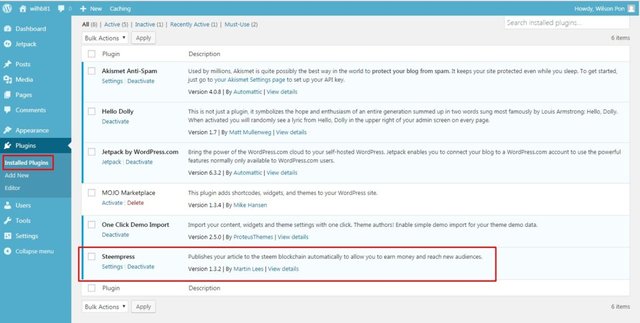
Once you're done, go to the Plugins > Installed Plugins to see, whether the Steempress plugin has been successfully installed and activated.
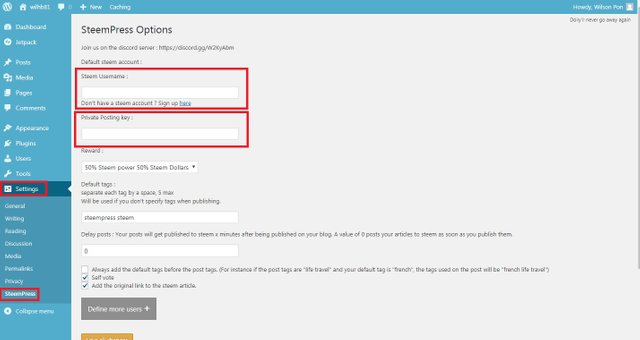
Step 6 – Fill in Your Steemit username and Private Posting Key
Don't forget to click on the “Settings > Steempress”, fill in your Steemit username and Private Posting Key.
Well, there you go. Congratulation and hooray! You've accomplished one of the most unbelievable tasks on Vornix Wordpress and Steemit.
Now, just kick start and show your masterpieces to all the people around the world!
PS: Thank you very much for the Those behind the Vornix's team - @fre3ze , @jrvacation & @seandeanayao
PSS: Also, I would like to say a big thanks especially to @fre3ze for answering my question and given me a suggestion to overcome the syntax markdown problem. Kudos bro!
Versi Bahasa Melayu
Secara terus terang, saya sudah tahu tentang Vornix dan Steempress sejak bulan Jun yang lalu. Walau bagaimanapun, disebabkan saya perlu meluangkan masa untuk menulis semua rekod dan sorotan bagi setiap perlawanan Piala Dunia 2018 – Jadi saya tiada kesempatan untuk meneroka Vornix dan Steempress dengan lebih mendalami.
Kelmarin, saya terbaca salah seorang anggota cn-Malaysia - @auleo menyiarkan artikel mengenai Vornix dan Steempress (Untuk maklumat lanjut, sila merujuk pautan ini) Saya menanya tentang hal ini dan dia memberitahu saya bahawa ia agak senang untuk memulakannya .
Oleh itu, saya telah membuat keputusan untuk menyertai keluarga besar Vornix dan Steempress semalam!
Jikalau anda tidak pernah berblog dengan Wordpress sebelum ini, jom dan semak tutorial di bawah yang diajar langkah demi langkah:
Langkah 1 - Anda perlu membuat pembayaran terlebih dahulu!
Ahem, jangan melarikan diri ketika anda melihat kenyataan di atas. Jika dibandingkan dengan nama domain tahunan dan kos hosting - bayaran 3SBD sekali gus adalah satu promosi yang tiada tandingannya.
Apa yang anda perlu lakukan ialah membayar 3SBD kepada @vornix dan isikan perkataan "Wordpress" ini pada memo. Dalam masa 24 jam, mereka akan membuat akaun baru khas untuk anda, di mana ia bermula dengan xxxxxx.vornix.blog.
Nota "Menerima 0.001SBD dari vornix" akan dipaparkan di halaman dompet Steemit anda (Wallet Page)
Untuk mendapatkan maklumat akaun Wordpress anda, sila log keluar akaun Steemit anda dan log masuk semula dengan Kata Laluan utama anda.
Pergi ke halaman dompet anda dan kamu akan melihat butiran seperti berikut:
’# Blog wordpress anda telah dibuat. Berikut adalah butirannya.’
Domain Admin: http://xxxxxx.vornix.blog/wp-admin
Nama pengguna: Nama pengguna Steemit anda sendiri
Kata laluan: xxxxxxxxxx
Ingatlah untuk menukar e-mel dan kata laluan admin anda selepas log masuk. Terima kasih kerana menggunakan perkhidmatan kami.
Langkah 2 - Log masuk ke akaun Wordpress anda untuk kali pertama
Selepas anda log masuk ke akaun Wordpress anda, jangan jangan jangan lupa ubah e-mel dan kata laluan dengan serta-merta!
Gerak kursor tetikus anda ke bahagaian kanan atas sudut avatar anda (Anda akan melihat "Howdy, nama anda"), pilih "Edit Profil Saya" dan klik.
Kemudian, tatal ke bawah "Maklumat Hubungan" dan tukar E-mel anda terlebih dahulu. Sebaik sahaja anda telah menukar e-mel kamu, jangan lupa untuk menyemak peti mel anda. Mereka akan menghantar e-mel pengesahan kepada kamu. Klik pada pautan yang panjang dan mengesahkannya.
Selepas itu, jangan lupa untuk menukar kata laluan anda. Kamu boleh menggunakan kata laluan yang dihasilkan oleh Wordpress atau menggunakan kata laluan anda sendiri.
Apabila sudah selesai, klik butang "Kemas kini Profil" untuk meneruskan ke Langkah 3.
Langkah 3 - Pilih penampilan atau tema yang anda mahu.
Wordpress menggunakan tema "Twenty Seventeen" sebagai default. Sekiranya anda okay dengan tema default – kamu boleh terus pergi ke Langkah 4. Selain itu, anda boleh mengklik "Tambah Tema Baru" dan pilih salah satu daripa ribuan tema yang sesuai dengan karisma anda.
(Nota: Ingat untuk memilih tab "Terkini", jika anda mahu melihat semua enam ribu tema yang terkini)
Langkah 4 - Sudah tiba masanya untuk menghubungkan Vornix Wordpress dengan akaun Steemit anda
Jika anda tidak melaksanakan langkah ini - artikel yang anda paparkan di Wordpress tidak akan muncul dalam akaun Steemit anda!
Untuk melakukan langkah ini, anda perlu memuat turun plugin untuk menghubungkan Vornix Wordpress dan Steemit.
Hanya pilih "Plugins> Add New" untuk meneruskannya.
Langkah 5 - Cari plugin "Steempress" dan memasangkannya ke Vornix Wordpress anda.
Cuba cari perkataan "Steempress" dalam kotak carian, plugin Steempress akan muncul.
Klik butang "Pasang Sekarang" Steepress dan aktifkannya serta merta!
Sebaik sahaja anda selesai dengan proses ini, pergi ke “Plugins> Installed Plugins” untuk melihat sama ada plugin Steempress telah berjaya dipasang dan diaktifkan.
Langkah 6 - Isikan nama pengguna Steemit anda dan Kata Kunci Persendirian
Jangan lupa pula klik pada "Settings> Steempress", isikan nama pengguna Steemit anda dan Kata Kunci Persendirian.
Gempaklah ini. Tahniah dan hooray! Anda telah melaksanakan salah satu tugas yang paling sukar dipercayai di Vornix Wordpress dan Steemit.
Masa untuk memulakan dan mempaparkan karya anda kepada semua orang di seluruh dunia!
中文版本
坦白说,自上个月起,我就已经开始了解Vornix和Steempress的存在。然而,由于我需要花一些时间为2018年世界杯的每场比赛写下所有的解说和重点回顾 - 我没有闲暇亲自探索Vornix和Steempress。
大约在前天,我看到了一位cn-Malaysia成员 - @auleo发布了一篇关于Vornix和Steempress的文章(有关更多信息,请查看此链接)我问过他,他告诉我使用它们来发帖是非常简易的。
因此,我昨天正式加入了Vornix和Steempress大家庭!
如果您之前没有使用过Wordpress博客发微博,请查看以下分步教程:
第1步 - 您需要先付款!
嗯,当你看到上面的陈述时,不要先埋怨。相比于每年域名和虚拟主机成本 – 这一次性3SBD付款绝对是物超所值。
您所要做的就是将3SBD转移给@vornix并在备忘录上填写“Wordpress”这个字眼。在24小时内,他们将为您创建一个新帐户,都是由xxxxxx.vornix.blog开始。
您将看到“从vornix收到0.001SBD”的注释。
为了能够获取您的Wordpress帐户信息,请退出您的Steemit帐户并使用您的主密码重新登录。
请转到您的钱包页面,您将看到以下详细信息:
‘#您的wordpress博客已创建。这是其细节。’
管理域名:http://xxxxxx.vornix.blog/wp-admin
用户名:您自己的Steemit用户名
密码:xxxxxxxxxx
请记得在登录后更改管理员电子邮件和密码。感谢您使用我们的服务。
第2步 - 首次登录您的Wordpress帐户
在您登录Wordpress帐户后,记得记得记得(重要的事要说三次)立即更改您的电子邮件和密码!
只需将鼠标光标悬停在头像的右上角(您将看到“Howdy,你的名字”),选择“编辑我的个人资料”并点击它。
然后,向下滚动到“联系信息”并优先更改您的电子邮件。更改电子邮件后,请记得检查您的邮箱。他们会向您发送确认电子邮件,请单击那个长链接并确认。
之后,不要忘记更改密码。您可以使用Wordpress生成的密码或使用自己的密码。
完成后,单击“更新配置文件”按钮以继续执行步骤3。
第3步 - 选择您想要的外观或主题。
Wordpress使用默认的“Twenty Seventeen”主题。如果你觉得它没问题 - 那就直接跳到第4步骤。否则,你可以点击“添加新主题”并从你喜欢的上千个主题中选择一个您钟意的。
(注意:如果您想查看所有最新的六千多个主题,请记得选择“最新”选项卡)
第4步 – 该是时候将您的Vornix Wordpress与您的Steemit帐户连接起来了
如果您没有执行此步骤 - 您在Wordpress上发布的文章将不会出现在您的Steemit帐户中!
基于这个原因,您需要下载一个插件来链接Vornix Wordpress和Steemit。
您只需选择“插件>添加新”即可继续。
步骤5 - 找到“Steempress”插件并将其安装到Vornix Wordpress上。
您只需在搜索框中输入单词“Steempress”,即可显示Steempress插件。
单击Steepress“立即安装”按钮并立即激活它!
当任务完成后,迅速转到插件>已安装的插件,查看是否已成功安装和激活Steempress插件。
第6步 - 填写您的Steemit用户名和私人发布密钥
请不要忘记点击“设置> Steempress”,填写您的Steemit用户名和私人发布密钥。
好样的,哥们姐们。祝贺您和万岁!您已经完美地将Vornix Wordpress和Steemit链接上,同时完成这项最令人难以置信的任务。
现在,该是时候发布的你的文章,向世界各地的所有人展示您的伟大杰作!
PS: 谢谢Vornix团队的核心管理员们 - @fre3ze @jrvacation @seandeanayao
PSS: 我也在此再次感激 @fre3ze 他在vornix discord群里解答了我对syntac markdown的疑惑。同时,他也给了我一个很好的建议。
Posted from my blog with SteemPress : http://wilhb81.vornix.blog/2018/07/09/my-experience-sharing-how-to-post-on-wordpress-to-steemit-via-vornix-and-steempress-tutorialsperkongsian-pengalaman-saya-tutorial-bagaimana-mengepos-di-wordpress-ke-steemit-melalu-2/
nice, upvoted
Thanks bro :D
@wilhb81, 有品位!
谢谢淘气包的赞赏 "D
超级详细!
不如小兔也来一起玩WP :D
待我认真研究一下~~~~
嗯,期待你的参与 :)
哦,你也有别名小兔?
小兔是我给她的昵称,比较亲切 :P
我想说,没试过啊,发帖后到底是一个什么情况,为什么还要付款。
那个一次性的3SBD是为了防止那些垃圾邮件发送者 (Spammers)前来搞破坏 (话说,很多spammers都应该没有3SBD)
关于那个发帖的状况,我过后还会继续写一些相关的文章~
好的!了解。
你那里天气如何?新人吗?《steemit指南》拿一份吧,以免迷路; 另外一定要去 @team-cn 的新手村看看,超级热闹的大家庭。如果不想再收到我的留言,请回复“取消”。
Wow the translation - must of taken you forever lol
You're so right lol Also, the syntax markdown also given me some headaches too. Luckily, @fre3ze helped me to overcome the problem :)
You've been upvoted by TeamMalaysia Community :-
To support the growth of TeamMalaysia Follow our upvotes by using steemauto.com and follow trail of @myach
Vote TeamMalaysia witness bitrocker2020 using this link vote for witness
哇 何其荣幸被你中英马版本提及了三回,太有幸了。好啦,加入了就一起研究WordPress 多一些。
哈哈哈,应该的,没有你的介绍 - 我还蒙查查 :P
三回有三个notification ?
看steemworld 是三个咯。呵呵
好帖!会帮助到好多人!加油!
你也来试试吧,这个WP发帖还蛮不赖~
惊人的毅力!
如果困山洞的是你,一定没有什么难度...
38主席过奖了!
说到那个泰国FIFA少年困山洞的事件,可怜那位英勇的潜水员壮烈牺牲了 T_T
对啊无辜牺牲了……不值