Linux gentoo U盘安装指南
再一次捣鼓gentoo,还是遇到了相当多的麻烦,这里把安装的方法重新在blog里整理一下,跟着官方安装步骤一点点来。
1、 准备安装之前
1.1、下载gentoo所需的引导镜像和系统文件压缩包
下载地址:
https://www.gentoo.org/downloads/
主要文件:
- install-amd64-minimal-20160303.iso
- portage-latest.tar.bz2
- stage3-amd64-20160303.tar.bz2
$ mkdir gentoo/  && cd gentoo/
$ wget -c  # http://mirrors.163.com/gentoo/releases/amd64/autobuilds/20160303/install-amd64-minimal-20160303.iso
$ wget -c http://mirrors.163.com/gentoo/snapshots/portage-latest.tar.bz2
$ wget -c http://mirrors.163.com/gentoo/releases/amd64/autobuilds/20160303/stage3-amd64-20160303.tar.bz2
1.2、U盘准备
插入U盘,查看U盘设备名,不需求挂载
$ lsblk
$ sudo dd if=install-amd64-minimal-20160303.iso of=/dev/sdb
这样,就制作好了U盘启动了,把U盘插入要安装的机子,配置BIOS通过U盘启动,就可以进入光盘引导的临时系统。
2、开始安装
2.1、配置临时系统
安装gentoo最主要是先把网络配置好,这里我安装的时候遇到了个非常郁闷的问题,就是,公司的个别网段限制下载,导致我在配置网络的时候浪费了不少时间,所以最好先确认一下,你所在的网段是否可以使用wget下载文件。
2.1.1、配置IP
通常启动U盘临时系统应该可以dhcp分配到一个ip,但是我因为是公司的网络,所以最好手动配置一下
# ip addr add 192.168.3.155/24 dev enp0s25
# ip route add default via 192.168.3.1 dev enp0s25
# echo "192.168.1.1" > /etc/resolv.conf
2.1.2、配置ssh链接
为了方便,最好远程链接到临时系统下,那么就得配置sshd服务。
== Tip: 最新的sshd服务器默认限制root登陆,需要修改一下/etc/ssh/sshd_config
配置PermitRootLogin 为 yes ==
# /etc/init.d/sshd start
# passwd root               ####配置root用户密码
以上,我们就可以到本机,使用ssh远程登陆这个U盘挂启的临时系统了
2.2、安装到硬盘上
2.2.1、系统分区fdisk
# fdisk -l
Device     Boot     Start       End   Sectors  Size Id Type
/dev/sda1            2048      6143      4096    2M ef EFI (FAT-12/16/32)
/dev/sda2            6144    268287    262144  128M 83 Linux
/dev/sda3          268288  17045503  16777216    8G 82 Linux swap / Solaris
/dev/sda4        17045504 937703087 920657584  439G  5 Extended
/dev/sda5        17047552 226762751 209715200  100G 83 Linux
/dev/sda6       226764800 937703087 710938288  339G 83 Linux
# fdisk /dev/sda
使用fdisk分区以前有详细的说明过,在这里就不再说了。不懂的,请写看一下这个
树莓派安装Gentoo Linux 1.1.3 节
也可以参照 官方分区方案
2.2.2、重新读取sda分区表:
# partx -a /dev/sda
2.2.3、格式化分区为文件系统
# mkfs.ext2 /dev/sda2
# mkfs.ext4 /dev/sda5
# mkfs.ext4 /dev/sda6
2.2.4、格式化swap分区并激活
# mkswap /dev/sda3
# swapon /dev/sda3
2.2.5、创建系统临时挂载点
# mount /dev/sda5 /mnt/gentoo
# mkdir -p /mnt/gentoo/{boot,home,}
# mount /dev/sda2 /mnt/gentoo/boot
# mount /dev/sda6 /mnt/gentoo/home
2.3、设定日期和时间
安装Gentoo之前,请确保日期和时间是否正确设置。错误配置的时钟可能会产生各种奇怪的错误!==主要==!!!
要验证当前日期和时间,运行日期:
# date
Sat Mar  5 16:26:08 UTC 2016
如果时间不对,请使用 MMDDhhmmYYYY 这样的格式配置一下日期和时间
date 030516262016
2.4、下载和解压相关包
2.4.1、使用临时系统自带的links下载stage3和portage
==Tip: 如果前面已经在本机下载过了可以跳过这一步==
# links https://www.gentoo.org/downloads/mirrors/
或者配置代理下载:
# links -http-proxy proxy.server.com:8080 https://www.gentoo.org/downloads/mirrors/
2.4.2、效验下载的文件
效验下载的文件是否完整,打开 .DIGESTS(.asc) 相关文件对比sha512加密的是否一至。
# openssl dgst -r -sha512 stage3-amd64-20160303.tar.bz2
2.4.3、解压stage3和portage
把下载好的stage3和portage放到/mnt/gentoo目录下,进入目录解压:
# cd /mnt/gentoo/
# tar xvjpf stage3-*.tar.bz2 --xattrs
==注: stage3解压的文件是Gentoo的目录结构,所以要解压到临时的系统目录下,即/mnt/gentoo,方便后面进行chroot==
下面解压portage,这个解压需要一点时间。
# tar jxvf portage-latest.tar.bz2 -C /mnt/gentoo/usr
==注: portage-latest.tar.bz2解压的文件为系统软件目录结构,需要解压到/mnt/gentoo/usr目录下==
2.5、安装基本gentoo系统
2.5.1、配置portage make 参数
- 配置了MAKEOPTS为cpu核心数+1
- 配置就近的镜像地址 GETOO_MIRRORS 为厦门大学的镜像源
# cat /etc/mnt/gentoo/etc/portage/make.conf

==Tip: 参数配置文件/mnt/gentoo/usr/share/portage/config/make.conf.example ==
2.5.2、配置主要Gentoo的存储库
# mkdir /mnt/gentoo/etc/portage/repos.conf
# cp /mnt/gentoo/usr/share/portage/config/repos.conf /mnt/gentoo/etc/portage/repos.conf/gentoo.conf

2.5.3、配置chroot环境的dns
只需要把livecd临时环境的resolv.conf复制到要chroot的目录里就好了,如下:
cp -L /etc/resolv.conf /mnt/gentoo/etc/
2.5.4、挂载必要的文件系统
# mount -t proc proc /mnt/gentoo/proc
# mount --rbind /sys /mnt/gentoo/sys
# mount --make-rslave /mnt/gentoo/sys
# mount --rbind /dev /mnt/gentoo/dev
# mount --make-rslave /mnt/gentoo/dev
2.5.5、Chroot 到新的环境
# chroot /mnt/gentoo /bin/bash
# source /etc/profile
# export PS1="(chroot) $PS1"
2.5.6、设置主机名
这不是必要的步骤
# sed -i -e 's/hostname.*/hostname="hcj.com"/' /etc/conf.d/hostname
# echo "127.0.0.1 hcj.com localhost" > /etc/hosts
2.5.7、配置Portage
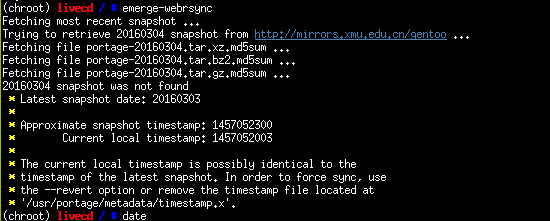
# emerge-webrsync

我在配置这个的时候报错了,按照提示删除tmestamp.x文件即可。
更新portage树
# emerge --sync
小内存的情况使用静默模式
# emerge --sync --quiet
2.5.8、配置系统环境
查看更新的通知
# eselect news list
# eselect news read
选择适合的配置
# eselect profile list
# eselect profile set 3    ### 我选择的是桌面环境系统
更新timezone
# ls /usr/share/zoneinfo
# echo "Asia/Shanghai" > /etc/timezone
# emerge --config sys-libs/timezone-data
配置语言编码
# nano -w /etc/locale.gen
# locale-gen
# eselect locale list
Available targets for the LANG variable:
  [1]   C
  [2]   POSIX
  [3]   en_US
  [4]   en_US.iso88591
  [5]   en_US.utf8
  [6]   zh_CN.utf8 *
  [ ]   (free form)

# eselect locale set 6
更新一下环境
# env-update && source /etc/profile && export PS1="(chroot) $PS1"
2.6、内核配置
######2.6.1、安装内核源码
# emerge --ask sys-kernel/gentoo-sources
# genkernel --install initramfs
######2.6.2、配置fstab
cat /etc/fstab

######2.6.3、编译内核文件
genkernel all
完成以上就可以在/boot目录下看到内核文件
# ls /boot/kernel* /boot/initramfs*
==注: genkernel编译出的内核支持几乎所有硬件,编译需要一段很长的时间,一旦genkernel运行完成,一个包括全部模块和initrd的内核将被建立。在后面配置引导程序时我们将会用到这个内核和initrd。请记下内核和initrd的名字,因为您将在配置引导程序的时候用到他们。initrd将会在启动真正的系统前自动识别硬件(如同安装光盘一样)==
2.7、安装其他软件
# emerge vim                ### 安装vim 方便后面的配置
# emerge syslog-ng          ### 安装系统日志管理
# rc-update add sysklogd default
# emerge logrotate          ### 日志格式化工具
# emerge --ask sys-process/cronie    ### 计划任务系统
# rc-update add cronie default
# emerge --ask net-misc/dhcpcd
# emerge --ask sys-apps/mlocate       ### 快速索引
2.7.2、配置网络
# cat /etc/conf.d/net
config_enp0s25="192.168.3.155 netmask 255.255.255.0 brd 192.168.3.255"
routes_enp0s25="default via 192.168.3.1"
# ln -s /etc/init.d/net.lo /etc/init.d/net.enp0s25
# rc-update add net.enp0s25 default
# rc-update add sshd default
2.7.3、配置root用户密码
这是必要的,为了从新系统能进入
# passwd
2.8、配置GRUB引导程序
# emerge --ask sys-boot/grub:2
# grub2-install /dev/sda
# grub2-mkconfig -o /boot/grub/grub.cfg
2.9、最后重启一下系统
# exit
# cd
# umount -l /mnt/gentoo/dev{/shm,/pts,}
# umount /mnt/gentoo{/boot,/sys,/proc,}
# reboot
Congratulations @graz! You have completed some achievement on Steemit and have been rewarded with new badge(s) :
Click on any badge to view your own Board of Honor on SteemitBoard.
For more information about SteemitBoard, click here
If you no longer want to receive notifications, reply to this comment with the word
STOPCongratulations @graz! You have completed some achievement on Steemit and have been rewarded with new badge(s) :
Click on any badge to view your own Board of Honor on SteemitBoard.
For more information about SteemitBoard, click here
If you no longer want to receive notifications, reply to this comment with the word
STOPIn latest https://wiki.gentoo.org/wiki/Handbook:AMD64/Installation/Base ( Sep/07/2020), need below command to do "Updating the @world set" after eselect profile:
emerge --ask --verbose --update --deep --newuse @world