EI-redux Production diary #001 : From concept to 3D model
This is the first in a series of posts that will be the production diary for a personal project mentioned in a previous post.
I am currently still knee deep in pre-production for the project, that means I have been busy storyboarding and making concept artwork. Before this I haven't done much serious production design for any of my work, be it for clients or personal work. Most of the time I already have the designs in my head and I am used to jump right in into modeling the assets. That doesn't always work out as some designs that sound good in abstract, doesn't translate well into visuals. I'd sometimes do some quick sketches to get the shape down, but more often than not I get impatient because I prefer to work in 3D.
Since I am determined to make myself learn new things, and there is no time limit for this project, I decided to put in more effort in pre-production work, particularly concept design for assets and scenes.
Below is the SECAM satellite 3D model from concept design to final asset. In the narrative it is a minor prop that only appears for a few seconds, a sort of mobile security camera platform orbiting a planet - a very simple model.
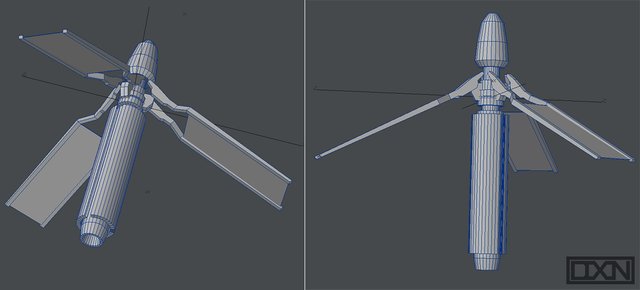
There are many ways to start a design, I find it easier to start blocking in 3D to get the proportions, form and shape down before painting over it in 2D. Another advantage is that once the conceptual design is done, I can re-use this rough model as a base to build the full resolution model.
Of course many concept artists start and end entirely in 2D or 3D. There is nothing wrong with either way, as long as it visually gets the idea across. I don't have a good eye for sketching depth in 2D, so this 3D->2D->3D method works well for me.

After I am satisfied with the rough 3D model, I either screenshot or render it out to be used as the template for the sketch. Sketching is when it is the easiest to further develop the design and details, so it's important not to restrict myself too much to the 3D template.

Colouring and shading comes last. I explored a few colour schemes before settling on this one.
Once the concept art is done (and approved), what concept artists usually do is to produce the orthogonal (front/side/rear etc. etc.) drawings for the modeling team, such as below.

(image credit : 343 Industries)
Since the SECAM Satellite is a very simple asset, and the concept art ended up to be very similar in shape with the rough 3D model, I skipped the ortho drawing and went straight into 3D modeling.

The final 3D model has some minor departures from the concept art with a bit more detail added, but otherwise the overall shape is the mostly there. Here is the mandatory AO (ambient occlusion) render:

And finally, a beauty render of the model with heavy-handed lens effects :P

To find all posts regarding the project, click on the "eiredux" tag.
Thanks for reading!
Great post, well done 👍 Cool to see your process. I like to have sketches first, but it doesn’t always go that way.
I must post some video, maybe a time lapse of a model.
Sketches are great for the design stage because I can make changes very rapidly compared to doing it completely in 3D. But there are no hard and fast rules, just that I personally find the hybrid approach more intuitive.
Would love to see your time lapse video, looking forward to it!
@originalworks
The @OriginalWorks bot has determined this post by @dxn to be original material and upvoted it!
To call @OriginalWorks, simply reply to any post with @originalworks or !originalworks in your message!
That's some good work right there - neat topology mate. Upvoted!
Hi @crypto3d thanks!
what software do you use?
Lightwave3D and an assortment of other production softwares.
This design is great and creative impression is so real. @dxn
Hi @voltranrex thanks!