photography tutorial use photoshop
One part of the image is an important part of Photoshop selected. Many people say that they can choose the precise parts, they are very efficient in Photoshop. This is quite true. If a person climbing in the house wants to get standing in the garden, then select the background (background) to be excluded. There are other options of choice that can be used.

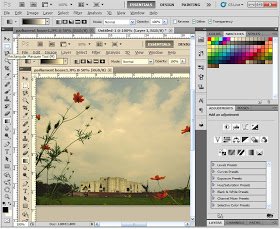
Photoshop has many tools for selection. It is convenient for each kind of image. Let's take a look at this one. Open Photoshop and open an image file. Here a picture of the national parliament building of Bangladesh has been shown. Rectangular Selection Suppose you want to skip some parts of the picture. That is why the part Note that needs to be selected. In Selecussion it is the easiest. . Select Rectangle Marquee Tool from toolbox. . Select the place where you want to drag the mouse to the right corner of the top and drag it to the bottom right corner. This practice is easy for Protees. Actually, sometimes the work can be difficult. More precisely this toolUse of keyboard for use has been made. These are; . When selecting the Alt key while selecting it, select from the center. . Holding the Shift key will select the square squares all around. . The selection will be removed by pressing Spacebar while selecting. . After selecting, the selection will be removed by dragging the selected area.Round selection Typically the Rectangular Selection Tool can be seen in Toolbox. To select Elliptical selection for circle selection, hold down the mouse on the tool. There are a total of 4 tools there. Select the round tool. Then select the part of the image in the same way. You can also use the same keyboard during the round selection.Inverse Selection Sometimes it is easy to select which one is to choose from which selection is out of the selection. After selecting it, it can be easily changed using the selection inverse command. If you want to work in the middle, instead of selecting the middle part, then enter the command from the menu, select - Inverse Selection
Use of feather Thus, the selected portion will be separated from the rest of the segment. Default is 0 pixels in this value. Changing the selection of the selection by changing the special option in the name of feder. It can be changed before selection or after selecting it, the feather options can be changed from the menu.
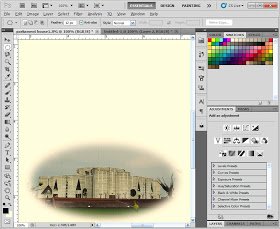
Selection, Invert Selection and Real Use of Feder Let's take a look at the actual selection of round selection and feathers. . In the option bar (right below the menubar), type 12 in pixels of the text area. . Select the main part of the Parliament House. Or try to do this in any of your films. . Invert selection with the Select - Invert Selection command from the menu. . Give commands to the menu, Edit - Fill . Select from dropdown list, color . Select the desired color and click on the button.
Effect like image can be found. Add or remove new sections with selection There will always be a chance to select the side as well, or it will not be possible to select the required part. Sometimes it may be necessary to select a little more part in one place, along with another area in another place. The selection tool is to use the keyboard. . Select a part. Hold down the Shift key on the keyboard. A plus sign is displayed with the pointer. thisSelect another place in the situation. Two parts will be selected. . On the contrary, after selecting the part, holding down the Alt key will give the minus (-) sign in the pointer and drag it on a section of the selection, then the next section will be removed from the previous selection. De-select Maybe in the meantime, after the selection, click on it outside The selection goes away. Sometimes it is necessary to de-select. For this, use the Choose - Deselect command from the menu, or use the keyboard shortcut Ctrl - D. Save selection Maybe you work hard to select specific parts from any image. Due to the slightest mistake, it was de-selected. Or you've closed the file at your disposal. The selection will not be available if it needs to be done later. There are options to save selection to avoid this problem.
There are options to save selection. . After selecting, use the Select - Save Selection command from the menu. . Give a name for the selection. Now saving the image file will also save the selection. It can be used whenever you work with the image file. Multiple selections can be saved with multiple names in the same document.Use Save Selection To select a saved selection in a document that has been saved, select the "Load Selection" command from the menu, select the selection from the selection list and click on the OK button. There are other tools and methods of selection that are needed for more complex work. Those are the other tutorials.

Congratulations @saharia! You have completed some achievement on Steemit and have been rewarded with new badge(s) :
Click on any badge to view your own Board of Honor on SteemitBoard.
To support your work, I also upvoted your post!
For more information about SteemitBoard, click here
If you no longer want to receive notifications, reply to this comment with the word
STOP