photography tutorial Photoshop interface contacts and general tasks
If you have not used Adobe Photoshop before, the software might look somewhat different. When you start the software like Microsoft Word does not open the new document itself, the toolbutton also looks like another. Get acquainted with these issues.

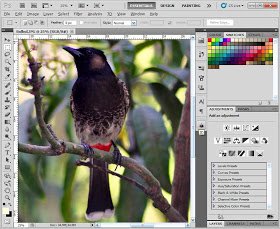
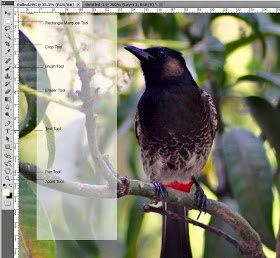
Here the CS-5 has been used as a screenshot. Using other frames can be seen somewhat differently, but the main thing is the same. To know which tool you can see its name by bringing the mouse pointer over it. Here is an image file named bulbul.jpg opened. Like all other programs in Windows Menubar and other common issues are also in Photoshop. Out of the way Photoshop has its own, Toolbox: Toolbox with a number of tools arranged in the long left of the screen. To do any work, at least one tool has to be selected from here. For example, using brushes will need to select the brass tool to paint. Text tool should be selected for writing.Having a small triangular mark in the bottom right of any tool means that there is more than one tool in the same button. The left mouse button can be found by pressing the mouse. Brush Tool, Pencil Tool and Color Replacement Tool, such as Brass Tool. Panel: One or more column panels are on the right side of the screen. Click to use to expend them (Can be seen differently from the picture in other versions). Together they can change the tool. After selecting brass tool, color is available. From here you can select the color of choice, or you can change the size of the brush. Menubar: At the top of the window are just a few other programs like Menubar Option bar: one just below the menubar Or multiple) times can be found. Its name is the options bar. From the name, you can change the options of any Toolbux tool from here. Image window: The image will be seen in the middle of the screen in the image window in the main window. The titles will display the name of the image (if saved), zoom value and color mode. Image of the image is named Bulbul, jpg, zoom 25%, image mode RGB and 8 bit / channel.You can zoom in / down by zooming in the image window below. Apart from this, the size of the saved photo can also be known. Use of Keyboard: For Photoshop, many things can be done with the help of a keyboard with MySa. Color picking can be used when holding the ALT key in a brass selection. Or add multiple parts using Shilt or ALT during selection Can be omitted. Skilled users have learned the necessary keyboard shortcuts. It can be done quickly. Let's do some work. Open the image file, remove unnecessary parts, fix the size, fix the brightness / control, save, etc. from this tutorial;

Open the file Open Photoshop and select File> Open command from the menu. Select the folder that contains the images in your computer's folder. The names of the formats that can be used in Photoshop can be seen. Select the image file that you want to open and open.
Use zoom
The size of the resolution of the camera is more than the size of the camera. Everything is not well seen when viewing the entire image on the computer screen. While working on a specific part, it is necessary to see that section bigger. Again, zooming to see a part of the whole image can not be seen. It is necessary to bring the parts that are not seen to be removed. Zoom and pan tool for these tasks.
When you open the photo in Photoshop, the whole picture is seen. The example of this example is 25% after the image is opened. Zoom to maximize it. There are several ways to zoom. . Select the zoom tool (Magnifying glass photo) from the left hand toolbox and click on the image. Pictures will be bigger on every click. . Please enter the required zoom (50 or 100) in the 25% text section at the bottom left of the image. . Keyboard shortcut Ctrl-num + Use (pressing the control key to add the numeric keypad plus (+) sign. To zoom out, use plus minus (-) sign instead. . To shrink the zoom tool selected, click and hold the Alt key on the keyboard. If the image is larger than the screen and is not visible to all, then the pan tool To use. . Select the pan tool (hand photo, just above the zoom tool). . Move the image left-right-up-down by dragging the mouse over the image. . With any tool selected, press Spacebar to temporarily use the pan tool. Exclude unnecessary parts with specific parts . Select the Rectangular Marquee Tool from toolbox (second from toolbox) and select the part of the image by dragging the mouse. . From the menu, select Image> Crop. The selected part will remain and the remaining part will be dropped. Or, by clicking on the Crop tool in the toolbox Select the location of the image by dragging on the image. Later it can be bigger. After selecting the preferred place, press Enter. Use undo After giving commands like all other software in Windows, it can be canceled with an undo command. For this, select Edit - Undo from the menu, or use the keyboard shortcut Ctrl - Z.Make a mistake if you have any mistake, because Photoshop can not use Multilevel Un-Doo. Of course, there is one thing to say about this. Fix the image size To specify the size of the picture, select from the menu> Image> Image Size Fix the unit used for the photo. Pixels are used for printing inches / cm and displays. Decide what type of unit you use.Check the constrain proportions to keep the length and width proportion correct. Type a specific size. Save Using the saved command directly to the file will delete the previous file, instead the new file will be there. To save the file to a new name or to another format, use File> Save as command. Photoshop documents by Photoshop itself Save the file as The picture quality is the best. The file size is very large in this format and it can not be used directly on all the software. To use all the space, select File> Save as command and select JPG format. There are more types of formats available for different types of work. There is a special system called Save for Web & devices for use on web pages.You can change image quality while saving. The larger the size of the image the larger the size of the file. The best value for print is to use. Again, it is important to keep filesystem short for internet access. Keep in mind the useful settings.
Good
মামা upvote দিয়েন তাইলে upvote পাবেন
I will try my level best.and thanks for your comment
Congratulations @saharia! You have completed some achievement on Steemit and have been rewarded with new badge(s) :
Click on any badge to view your own Board of Honor on SteemitBoard.
For more information about SteemitBoard, click here
If you no longer want to receive notifications, reply to this comment with the word
STOPyes iam agree for receive notifications
This post has received a 0.39 % upvote from @drotto thanks to: @saharia.
Congratulations! This post has been upvoted from the communal account, @minnowsupport, by saharia from the Minnow Support Project. It's a witness project run by aggroed, ausbitbank, teamsteem, theprophet0, someguy123, neoxian, followbtcnews, and netuoso. The goal is to help Steemit grow by supporting Minnows. Please find us at the Peace, Abundance, and Liberty Network (PALnet) Discord Channel. It's a completely public and open space to all members of the Steemit community who voluntarily choose to be there.
If you would like to delegate to the Minnow Support Project you can do so by clicking on the following links: 50SP, 100SP, 250SP, 500SP, 1000SP, 5000SP.
Be sure to leave at least 50SP undelegated on your account.