Learn Python with Steem #10 #11 笔记
Learn Python with Steem #10 #11 笔记
[toc]
划重点
- 获取用户的文章列表
通过 steem.Steem.get_account_history 获取用户的动态,从中筛选出文章的 permlink。
再用 steem.Steem.get_content 方法获取每篇文章的详细信息。
其实也可以用 steem.blog.Blog 获取用户所有的文章信息。
编程练习
导入需要的Python包
import csv
import pymongo
from datetime import datetime, timezone, timedelta
from steem.blog import Blog
from pprint import pprint
import math
定义一个日期转换函数
def date_2_local_date(_utcdate, _timedelta):
    utc_date = _utcdate.replace(tzinfo=timezone.utc)
    return utc_date.astimezone(timezone(timedelta(hours=_timedelta)))
定义计算声望的函数
def parse_reputation(raw_reputation):
    return (math.log10(int(raw_reputation)) - 9) * 9 + 25
定义获取文章详情的函数,返回字典类型的数据
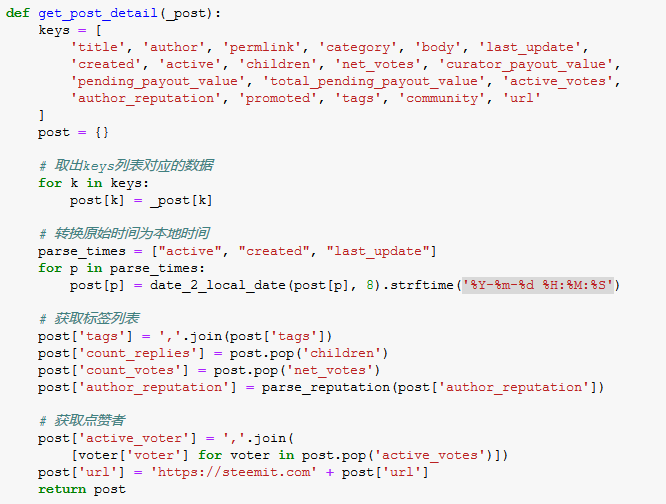
定义获取用户所有文章的函数,返回字典
def get_user_posts(account_name='yjcps'):
    blog = Blog(account_name)
    all_data = blog.all()
    posts = [get_post_detail(post) for post in all_data]
    return {
        'account_name':account_name,
        'count_posts':len(posts),
        'posts':posts
    }
保存所有文章数据为CSV文件
def save_to_csv(data: list, file_path, encoding):
    keys = data[0].keys()
    with open(
            file_path, 'w', newline='', encoding=encoding,
            errors='ignore') as f:
        writer = csv.DictWriter(f, fieldnames=keys)
        writer.writeheader()
        writer.writerows(data)
将数据导入到 MongoDB 数据库
# 配置数据库连接信息

MONGO_HOST = 'localhost'
MONGO_COLLECTION = 'steem'

mongo_client = pymongo.MongoClient(MONGO_HOST)
mongo_collection = mongo_client[MONGO_COLLECTION]
def save_to_mongodb(data, tablename):
    if data is not None:
        if isinstance(data, list):
            result = mongo_collection[tablename].insert_many(data)
            if result.acknowledged:
                print('已导入%d条数据' % len(result.inserted_ids))
                return result.inserted_ids
        if isinstance(data, dict):
            if mongo_collection[tablename].update_one({
                    'account_name': data.get('account_name')}, {
                    '$set': data}, upsert=True):
                print('已导入%s的数据' % data.get('account_name'))
                return True
    else:
        return None
yjcps = get_user_posts('yjcps')
# 查看返回的数据
pprint(yjcps)
{'account_name': 'yjcps',
 'count_posts': 35,
 'posts': [{'active': '2018-08-23 11:32:18',
            'active_voter': 'steempress,justyy,happyukgo,doraemon,superbing,dailystats,cryptocurrencyhk,jianan,steemtaker,cnbuddy,anxin,foodielifestyle,woolfe19861008,dailychina,yjcps,dongfengman,serenazz,shentrading,ethanlee,fanso,lilypang22,steempress-io,sweet-jenny8,shine.wong,turtlegraphics,regretfulwooden,witnesstools,happyfamily,ilovecoding',
            'author': 'yjcps',
            'author_reputation': 51.616714372034224,
            'body': '# Learn Python with Steem #09 笔记\n'
                    '\n'
                    '---\n'
                    '\n'
                    '[toc]\n'
                    '\n'
                    '## 划重点\n'
                    '\n'
                    '- 遍历字典\n'
                    '\n'
                    ' 利用dict.items()方法,用一个循环语句遍历整个字典的所有元素。\n'
                ...
                ...
                    "     'last_post_date': '2018-08-16-Thu 20:57:21',\n"
                    "     'post_count': 5926,\n"
                    "     'reputation': 67.26589131476406,\n"
                    "     'sbd_balance': '30.081 SBD',\n"
                    "     'sp': 5186.613554620994,\n"
                    "     'vesting_shares': 10501691.705077,\n"
                    "     'vot
limit_output extension: Maximum message size of 9996 exceeded with 57914 characters
file_path = '{}_all_posts_{}.csv'.format(yjcps['account_name'], yjcps['count_posts'])
# 保存数据为CSV文件,方便在Windows的Excel软件打开,选择编码为gbk,这样会丢弃不能编码的字符
# 可以选择utf-8编码,但需要从Excel中手动导入数据
# 如果日后编程需要取用,建议使用utf-8编码

save_to_csv(yjcps['posts'], file_path, 'gbk')
哈哈,我的所有文章数据,放到Excel里打开
#保存到数据库
save_to_mongodb(yjcps, 'steem_posts')
已导入yjcps的数据


True
成功保存到数据库
取大鹏的数据看看
dapeng = get_user_posts('dapeng')
file_path = '{}_all_posts_{}.csv'.format(dapeng['account_name'], dapeng['count_posts'])
save_to_csv(dapeng['posts'], file_path, 'gbk')
save_to_mongodb(dapeng, 'steem_posts')
已导入dapeng的数据


True
花了5分钟来获取大鹏的所有文章数据,一共497篇文章,难怪要等那么久,以后从数据库获取数据会快一点。
再看看刘美女的文章
deanliu = get_user_posts('deanliu')
WARNING:root:Retry in 1s -- RPCErrorRecoverable: non-200 response: 502 from api.steemit.com
WARNING:root:Retry in 1s -- RPCErrorRecoverable: non-200 response: 502 from api.steemit.com
file_path = '{}_all_posts_{}.csv'.format(deanliu['account_name'], deanliu['count_posts'])
save_to_csv(deanliu['posts'], file_path, 'gbk')
save_to_mongodb(deanliu, 'steem_posts')
已导入deanliu的数据


True
获取刘美女的所有文章花了11分钟,一共878篇文章,高产作家!
也成功保存了CSV文件。
补充
为所有文章生成词云图片
导入需要的Python包
import numpy as np
import jieba.analyse
import PIL.Image as Image
import re
from matplotlib import pyplot as plt
from collections import Counter
from wordcloud import WordCloud, ImageColorGenerator
定义一个清理文章的函数,只保留中文
# 去除所有半角全角符号,只留字母、数字、中文。
def clean_text(text):
    # rule = re.compile(r"[^a-zA-Z0-9\u4e00-\u9fa5]")
    rule = re.compile(u"[^\u4e00-\u9fa5]")
    text = rule.sub(' ', text)
    return text
为文章分词,并统计每个关键词的频率
def get_tag(text, cnt):
    re_text = clean_text(text)
    tag_list = jieba.analyse.extract_tags(re_text)
    for tag in tag_list:
        cnt[tag] += 1
# 取出所有文章,放到一个列表里面
yjcps_all_post = [post['body'] for post in yjcps['posts']]
# 获取词频
yjcps_post_counter = Counter()
for post in yjcps_all_post:
    get_tag(post, yjcps_post_counter)
# 画词云图

# 指定中文字体
font = 'DroidSansFallbackFull.ttf'

wc = WordCloud(
    font_path=font,
    background_color="white",
    max_words=2000,
    max_font_size=100,
    width=800,
    height=800,
)

wc.generate_from_frequencies(yjcps_post_counter)

plt.figure(figsize=(8, 8))
plt.imshow(wc, interpolation="none")
plt.axis("off")
plt.show()
再来看看大鹏的文章关键词
dapeng_all_post = [post['body'] for post in dapeng['posts']]
# 获取词频
dapeng_post_counter = Counter()
for post in dapeng_all_post:
    get_tag(post, dapeng_post_counter)

# 画词云图

# 指定中文字体
font = 'DroidSansFallbackFull.ttf'
# 指定背景图片
bg_image = np.array(Image.open("steemit.png"))

wc = WordCloud(
    font_path=font,
    background_color="white",
    max_words=2000,
    max_font_size=100,
    mask=bg_image)

wc.generate_from_frequencies(dapeng_post_counter)

plt.figure(figsize=(8, 8))
plt.imshow(wc, interpolation="none")
plt.axis("off")
plt.show()
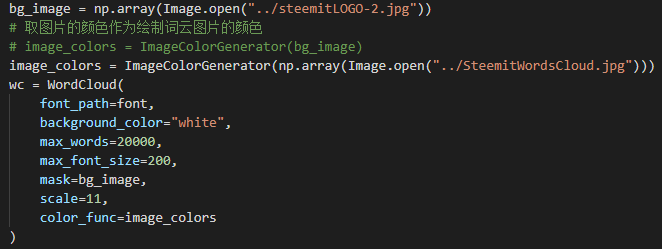
同样的,再看看刘美女的关键词
deanliu_all_post = [post['body'] for post in deanliu['posts']]
# 获取词频
deanliu_post_counter = Counter()
for post in deanliu_all_post:
    get_tag(post, deanliu_post_counter)

# 画词云图

# 指定中文字体
font = 'DroidSansFallbackFull.ttf'
# 指定背景图片
bg_image = np.array(Image.open("steemit2.png"))
# 取图片的颜色作为绘制词云图片的颜色
image_colors = ImageColorGenerator(bg_image)

wc = WordCloud(
    font_path=font,
    background_color="white",
    max_words=2000,
    max_font_size=20,
    mask=bg_image)

wc.generate_from_frequencies(deanliu_post_counter)

plt.figure(figsize=(8, 8))
plt.imshow(wc.recolor(color_func=image_colors), interpolation="none")
plt.axis("off")
plt.show()
绘制发帖时间图
导入Python包
from windrose import WindroseAxes
import numpy as np
from matplotlib import pyplot as plt
# 获取发帖时间,返回小时,获取的时间已处理为北京时间

def get_post_time(account:dict, _type:str='created')->list:
    posts = account['posts']
    time_format = '%Y-%m-%d %H:%M:%S'
    posts_time = [datetime.strptime(post[_type], time_format)  for post in posts]
    hours = [time.hour for time in posts_time]
    return hours
yjcps_post_time = get_post_time(yjcps)
dapeng_post_time = get_post_time(dapeng)
deanliu_post_time = get_post_time(deanliu)
# 我所有的发帖时间
print(yjcps_post_time)
[15, 6, 7, 6, 6, 6, 14, 7, 22, 7, 10, 0, 12, 20, 20, 19, 13, 0, 21, 18, 11, 11, 12, 1, 18, 15, 13, 12, 14, 11, 0, 0, 23, 18, 21, 15]
绘制我的发帖时间图
def make_time_image(time, colors=None, edgecolor='white', **kwargs):
    ws = np.array(time)
    wd = np.array(time) / 24 * 360

    # 统计各时间次数
    count, _ = np.histogram(time, bins=24)

    if colors:
        pass
    else:
        colors = [(94/255, 79/255, 162/255)]

    # 画图
    ax = WindroseAxes.from_ax()
    ax.bar(wd, ws, nsector=24, normed=True, colors=colors,
           bins=1, edgecolor=edgecolor, **kwargs)

    xticklabels = ['6:00', '3:00', '0:00',
                   '21:00', '18:00', '15:00', '12:00', '9:00']

    # 获取最大极径
    rmax = ax.get_rmax()
    fmt = "%.1f "
    yticklabels = np.linspace(0, rmax, 6) / rmax * max(count)
    yticklabels = [fmt % r for r in yticklabels[1:]]

    # 设置标签
    ax.set_yticklabels(yticklabels)
    ax.set_xticklabels(xticklabels)

    # 显示
    plt.show()
make_time_image(yjcps_post_time)
绘制大鹏的发帖时间图
make_time_image(dapeng_post_time)
最后绘制刘美女的发帖时间图
make_time_image(deanliu_post_time)
看到词云图和发帖时间图,大家是否想起了大鹏举办的 “猜猜 TA 是谁” 活动?
猴年马月终于到了, @dapeng @angelina6688 山寨版的用Python画这两个图的方法就在这里了。
期待下个猴年马月, @dapeng 写个正宗的用R画词云图和发帖时间图。
[DA series - Learn Python with Steem]
[DA series - Learn Python with Steem #01] 安裝Python、文字編輯器與哈囉!
[DA series - Learn Python with Steem #08] 函式庫(Modules)的安裝與使用,準備好玩Steem!
[DA series - Learn Python with Steem #09] Steem 小工具DIY #1 - 我的Steem小偵探
[DA series - Learn Python with Steem #10] Steem 小工具DIY #2 - 我的文章列表(一)
[DA series - Learn Python with Steem #11] Steem 小工具DIY #3 - 我的文章列表(二)
感觉看完自己弄还要倒腾很久,瞬间觉得助教好厉害!我才把按照你的内容把云词弄出来!明天再研究图~
最后那种时间的windrose图弄不出来呀,报错报错,求救呀~
这个color要怎么用?? T T
这里是个警告,错误信息可能在其他地方。
我看你貼出來也有相關警告,但是你最後能出結果?
Posted using Partiko Android
结果有的,你的图是空白的?
我把文件发给你
https://send.firefox.com/download/408c44db3a/#8tY1yN1GbMdR0bfaEmLiIg
多謝,明天我還搞不定就拿來看看😆
Posted using Partiko Android
还没看,但是根据你之前告诉我的修改,总算改对了,为什么说总算,因为新手的我看代码只能一知半解~
改完后能正常运行了,也没错误提示,就是不见图,虽然知道plt是能预览,但是我不知道具体要怎么做(感觉ax并没有和plt有关联起来),对于这个的参数也不熟悉,跑去github看别人的,确定少了句
哈哈哈,愉快的显示出来了,我表示我要稍微去了解下这两货!
文件我存了,非常感谢!图虽然画出来了,但是我怎么觉得和数据不对呐?
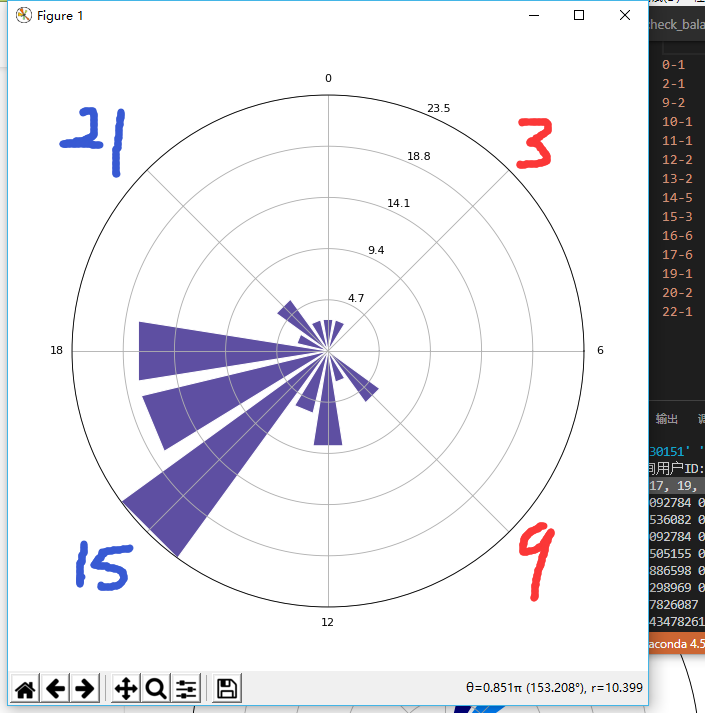
右边文字显示的是“时间”-“次数”
每一圈的数字(4.7、9.4、14.1、18.8、23.5)好像是半径,但是我没理解怎么算出来的,代表什么? T T~
确实不对!感谢提出来。
它默认划分为16个扇形,时间和角度没有对应,360/16=22.5°,扇形的位置有重合和偏差。
需要设置参数sector为:nsector=24
每一圈的数字(4.7、9.4、14.1、18.8、23.5)是半径(极坐标中的极径)。计算方法是:
在0到最大极径之间划分6等分,去掉其中的0,取其中5个数作为极径的标签。
在set_radii_angle(self, **kwargs)这个函数中是这么写的:
可以参照这个函数的计算方法,自己修改其标签为次数。
我得在文章中做些修正。非常感谢!
请教个问题“**kwargs”是什么变量或者参数?
这句话我有点不理解‘,_’是什么?“count = np.histogram(time, bins=24)”这样的我可以理解,两种有什么区别?
"**kwargs"是个字典,接收长度可变的关键字参数。python可变参数的用法可以参考文章
np.histogram()这个函数的功能是计算直方图,它的返回值是个元组:
所以用两个变量来接收这个函数的返回值。count, _ = np.histogram(time, bins=24)的意思相当于:将n赋值给count,bin_edges赋值给_,由于不需要用到bin_edges这个结果,就没给这个变量起有意义的名字,写了个下划线。
如果写成count = np.histogram(time, bins=24)的话,count会作为一个元组,包含两个数据:count = (n,bin_edges)
说下n,bin_edges的含义,n是一个列表,里面的值是各个直方的高度,也是频次;
bin_edges 也是一个列表,里面的数据表示每组数据的组距,每个直方的宽度,范围是左闭右开的,如上图:在[0,0.95833333)的范围内的数有1个,在[0.95833333,1.91666667)的范围内的数有1个......
但最后一组数据的范围是闭区间:在[22.04166667,23]的范围内的数有1个。
设置color 这个参数的目的是为了自定义每块三角形图像的颜色,也就是facecolor ,参数值是一个包含RGBA颜色值的元组,其中RGB的值表示颜色,A表示透明度,而(94, 79, 162)正好是这个颜色 ,这里没有设置透明度。
(94, 79, 162)是0~255范围的RGB值,但参数要求的RGB的值范围是0~1之间的,所以要将(94, 79, 162)每个数都除以255,这好像叫“归一化”吧。
查看帮助 可以看到 bar(direction, var, **kwargs) 并没有color这个参数,但是有colors这个参数,其中原因是我粗心漏写了个s,但又歪打正着达到了更改facecolor 的目的。
windrose 的功能实现用到了matplotlib这个库,除了windrose 文档里写的参数,还可以传递
matplotlib.pyplot.plot支持的任何参数。color是其中一个,如果设置了color这个参数,会把facecolor ,edgecolor (边缘颜色)都设置为color的值,所以它给了条警告信息:“Setting the 'color' property will overridethe edgecolor or facecolor properties.”facecolor 也是其中一个参数,如果直接设置facecolor 的值是不会生效的,因为windrose 在初始化时故意丢掉了这个参数,而把colors的参数值赋值给了facecolor。
也就是说要改变facecolor,正确的方法是设置colors这个参数。比如把原来的程序改成这样:
或者:
注意:如果colors的值是一个列表的话,设置colors的值时要符合bins的值,bins划分了多少个级别,colors里面就要多少个与之对应的颜色。
謝謝,看完了,明天繼續試,你一個帖子我看三天😂!另外今天碰到的坑主要在各種路徑上~有做出詞雲好開森,謝謝!
Posted using Partiko Android
这个得怪我写的不够详细😂
Posted using Partiko Android
应该是我不太熟悉脚本程序示范方式吧,找了下WordCloud参数资料,发现取图片的颜色作为绘制词云图片的颜色,直接在声明的时候用这个color_func参数就好了,不需要recolor了耶!