How to Launch a New Website When You Have Zero Experience
Good news: You do not need a degree in coding to build your first Dream website
Does it seem to be as though every brand, adorable Instagram pup, and neighborhood plumber have their websites these full times?
They do.
So you are scratching your mind and thinking why you do not probably.
Brands produce an almost unlimited pool of prospective customers in the vast online expense.
Already convinced? Bounce forward to Step one 1.
On the fence still? Keep reading.
Current stats reveal:
- Near 50% of the world connects to the internet (that is 3.6 billion users)
- 10x as many folks do an online search now than during 1999-2013
The trick is meeting everyone!
Most brands find sociable media the simplest way to seed their digital roots.
Moreover, it is nearly a bad destination to connect.
In the end:
- Facebook reviews 1.13 billion daily active users
- Each day Instagram showcases 500 mil users
- Monthly Twitter wrangles in 313 million users
- Snapchat rolls in around 150 million regular users
- And LinkedIn’s customers top 450 million
Your beautiful brand might build up likes, comments, and followers, but what goes on whenever your social media tribe wants to find out about your brand than your fave Instagram filter?
Where can they find reliable information about who you are?
In case your answer is something such as I have my contact number, email, and business address listed in my profile, you are performing a major disservice to your audience.
Not forgetting completely shortchanging your brand.
See, while building your brand on the friendly press is important, you cannot count on those channels to help you utilize your web audience alone.
The truth is, a few of your followers are not prepared to buy yet.
They like your supply; they get your look. However, they do not know enough about you at hand over their hard-earned cash.
Your website must part of where your friendly content cannot reach.
When done effectively, your killer website becomes:
- Your very best salesperson, spending so much time when you are not
- A genuine way to help you build authority and trust with your audience
- A much cheaper option than beginning a brick-and-mortar store so that as profitable just
- The best resource for learning more about your brand, quest, and audience
Your site also needs the pressure off prospective customers who are not in the ready-to-buy area. You will have the ability to guide these site visitors further down your sales funnel on time.
This makes your likelihood of converting later a lot more likely.
So a site is needed by you. Established.
However, what goes on when you understand significantly less than a six-year-old about building websites?
Alternatively, you cannot afford to employ you to create a site for you right now definitely?
I will let you know: You are heading to kick off your first website by yourself.
You will have today’s guide showing you exactly the way to get this done although you may have zero specialized experience with digital, code-y stuff.
I will take you on a single quest I have used to develop many websites.
Moreover, I will be genuine with you, not absolutely all my websites were sparkling gems. However, my early on mistakes do not need to be your failures.
By the finish of the guide, you will have all you need to look from concept to posting your first site. Moreover, you will breeze through it such as a total pro.
Step #1: Focus on the finish Goal at Mind and heart
That is going to sound counterintuitive. Nevertheless, you need to go along with it.
Start this amazing site task of yours by brainstorming about your real from the outset.
What would you like your website to do actually?
- Undertake it is sought by one to attract new readers to your ebook?
- Would it need to show your stock portfolio so higher paying clients golf swing your way?
- Searching to create a business lead generator that works when you sleep?
- Alternatively, are you building an e-commerce store to market your products online?
Whatever the full case, you may need to take into account your objective first.
That one step means that every component you build and increase your site aligns with getting you nearer to your goal.
Skipping this task may cause significant head pain, an eager beaver.
You will conclude spending much extra time hashing away our next steps because you never created a good game plan.
So let’s must a look at a few types of how goals differ between websites.
Looking at NY Times Bestselling Publisher Elizabeth Gilbert’s homepage, we get her website’s concentrate immediately:

She is promoting her latest publication middle and front. Besides a brief information of the complete history, Gilbert also shows store logos for where viewers can purchase her booklet.
Her #1 goal: Sell more Big Magic book literature.
Now if we compare this for an e-commerce site like Herschel Source Co., we find multiple products viewed all at one time:

Their goal is to market products also, but they are not pushing one over another.
Pat Flynn, the brains behind Smart Passive Income, on the other palm, uses his website more for to generate leads and to grow his audience.
You get an entirely different feel from the first two examples once you land on his site:

Flynn has a bright green “FIND OUT MORE” button for any his new tourists.
Plus, he grabs tourists looking to do something by prompting them to become listed on his email list immediately.
Neither Gilbert’s nor Herschel Source Co.’s websites mentioned anything about learning more about their brands or getting started with their mailing lists above the fold.
They may have goals to market more products; Flynn’s goal is to inspire more enthusiasts.
That is why having a casino game plan outlining the goals of your website is so essential.
It becomes the guiding support for your site’s beef and potatoes (or products and content).
What to Use in Your IDEA here’s
Choose only one goal for your website.
Any other thing more and you are bound to make a random, chaotic, challenging mess.
Here’s an over-all guideline:
- If you are getting started and you are content-based just, focus on building your email list/growing your audience like Pat Flynn.
- For e-commerce, feature your products in the simplest way possible; use descriptive product headings and high-quality images.
- Moreover, when you are an expert/freelancer, prominently showcasing your collection and past testimonials should be considered a top priority along with tough telephone calls to action.
Once you have nailed down your goal, it is time to create milestone dates.
Sure, you can build and start a site in a few days if you are over a level of caffeine bender and don’t value looking at sunlight, but be forewarned that it is beside much to tackle all at one time.
I do not recommend this plan. Therefore I prefer to create milestone times to keep myself on the right track.
Depending on how enough time you are devoting to space out and arranged deadlines for when certain areas of your website should be completed.
This keeps assembling your project on schedule and provides you accountability for utilizing.
Choose a concentrate on a night out to complete each part of this guide to start out.
Remember, some steps shall and really should take you longer than others, which means that your signs should not be evenly plotted on your calendar.
You might be in a position to tackle a few simultaneously even.
Before you get schedule happy, make sure you read through another few tips, so you will have an improved notion of how much work will be engaged to mix each step off your list.
Step #2: Choose an Unforgettable URL
Your URL is the net address someone types directly into finding your site.
So Yahoo.com, bing.com, and Google.com are types of a URL.

Good URLs are:
- Sweet and short
- Memorable
- Pronounceable
Bonus offer factors for to adding keywords.
The theory behind your URL is to make it a breeze for your audience to keep in mind and discover your brand’s website.
You do not want them guessing how to spell something weird here.
Your site will not get picked away up by she's right, so if these potential customers cannot get the URL right, they may never find your site and your hard work finishing this guide will be wasted.
You intend to think about what your audience will be looking for also.
Site visitors searching for consultants, infopreneurs, and creative types advertising under their name might only perform looks for actual numbers.
Making use of your real name as your URL, even as we saw with this Elizabeth Gilbert example, helps guests fast find your site.

Another example is popular of mine because it is clever in a lovely way.
Michael Epstein, a web marketer, and business strategy specialist, titled his site GetOnlineWithME.com.
It is brief, easy to keep in mind, and also contains his initials extremely subtly on the finish (Me personally). #genius

It is the perfect exemplary case of a dynamite URL.
Unfortunately, you might not exactly be able to come up with something so smart off the bat quite.
Moreover, that is fine.
You may easily on changing your URL later.
However, also, for now, you should look at a minimum of look for a Link that matches your brand to get started.
Plus, if you amount this eventually away, you will not have a huge amount of re-branding work in your future.
So brainstorm as many names linked to your brand as possible, but aim for at the least 10.
This works for just two reasons:
- It helps ensure you get your creative juices flowing
- You receive because of it backup choices
With up 1 billion active websites, your first few names of the domain (or URLs) may be studied, so getting a few backups gives you somewhat of wiggle room.
If brainstorming enables you to and freezes up itchy, use one of the free tools to do the thought for you:
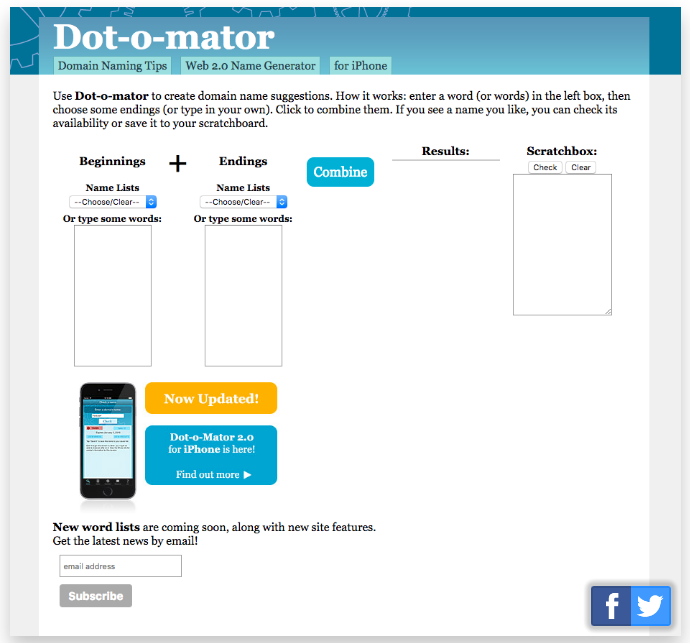
1. Dot-o-mator
With Dot-o-mator, just pop in some keywords and the generator will find a true way to incorporate them.
There is also a Scratchbox feature that enables you to keep your opinions useful or determine if they are available.
2. Name Mesh
Name Mesh generates Link ideas for many different categories.
You could create SEO-focused URLs, short ones comparable to acronyms for your brand, or fun things to inspire brand affinity.

3. NameStation
NameStation uses an unconventional method of locating the best website name.
With this tool, you enter keywords similar to the first two still, but NameStation carries a “Crowdsourced Name Contests” feature.
This helpful feature uses their community of domain researchers to help you uncover the right URL for your brand.

All three of these tools enable you to verify if your potential URLs can also be found.
To find the option of a URL linked to your business name, you can also use popular sites like:
- Bluehost
- GoDaddy
- HostGator
You find the appropriate Link once, make certain to:
- Check if matching community media handles can be found.
- Double check an existing brand does not live online under an identical name. You do not want users puzzling both of you.
- Snatch in the Link as-as you can soon. These sell out faster than made donuts newly, if you see one you prefer, do it now.
- Consider buying similar brands.
For instance: You would need it both TheMillennialDifference.commillennialDifference.com without “the.”
This guarantees you are the only person under that brand.
Reward: Sometimes adding another Link to your plan comes at a drastic discount which means this coverage should not set you back much.
Now that you understand where to find the right URL, it is time get started.
But…
That is where many people have a tendency to get stuck.
Since deciding on the best URL is hard, let’s talk about how precisely to overcome this hump without crashing.
How to prevent Getting Stuck at this time
Before you get bogged down looking for the complete URL, recognize that it is correctly acceptable to stay on one merely to maintain your website kick off project rolling. The idea here is, to begin with.
Choose the one that works. One which you would be proud to talk about.
If you discover an improved name down the road, no sweating -- change it out on up.
Use this solution to find your first ten probable URLs:
First, brain dumps a set of keywords linked to your brand.
- Add any thoughts or short search phrases that you would prefer to include this list.
- Placed a timer for 15-30 minutes and think of a few ideas making use of your list.
- Your timer buzzes once, group your favorites and either move to find out if they are available or established another timer for 15-30 minutes to duplicate the process.
You may follow this technique until a URL is available by you that sticks.
When you find the one which you are not embarrassed to call your own totally, have a breather for a couple of hours or get back to building your shed the very next day to measure if you are still up to speed with the theory.
You should not contest through this task. Nevertheless, you do not need to get caught also.
It is a delicate balance, grasshopper, in support of you should understand when you have succeeded.
Weekly give yourself about, at most, to select the right URL and just choose one which proposes you can proceed to the next phase: choosing a hosting plan.
Step #3: Choose Your Hosting Plan
Once you have secured your URL (congrats!), the next hurdle is hosting.
To distinguish between your two, think of your URL as your block address in the digital world.
Similar to a home address someone can visit IRL, it is what folks type to their browser to find your website.
Hosting, on the other side, is the area you hire for your address, or URL, to be parked on.
It is not visible on leading end to these potential customers like your Link, but it is what’s powering the area where your website lives.
While you do not view it actually, it is essential that you select the right hosting to intend to fit the bill.
Choosing the incorrect you can cause your website to look unprofessional, or worse, crash during high traffic spikes.
Both full cases will ruin the knowledge for your prospective customers, and you will risk losing them.
With regards to hosting, there are many different routes for taking, so let’s dissect each one.
#1: A FREE OF CHARGE Hosting Plan
Free hosting strategies enable you to host your site without requesting to pay a dime.
Before you throw that fist pump in the air and elope to open a new tab for your free hosting plan, this is one particular good to be real situations too.
Often, your URL becomes a digital billboard following the hosting provider adds their website name to the finish of yours.
That appears like:
- YourSite.wordpress.com
- yourbrand.wix.com
At these times, you automatically lose a little bit of credibility together with creating an enormous pain for your prospective customers to enter.
Most will most likely forget what’s in-between your Web address and .com, which won’t help them find your site.
More bad news?
Free hosting strategies are not made to support high traffic bursts.
If you anticipate growing your site -- that you should --, you would need to upgrade before an enormous traffic surge crashes your site.
Free hosting programs weight slower and cause lags for your visitors, both of which is often a distracting pain for these potential customers.
All this increases the question: Will there be ever a very good time to work with free hosting packages?
Eh… maybe.
WHILE I graduated University, DevanCiccarelli.WordPress.com was a terrific way to showcase my stock portfolio as an entry-level marketing consultancy. Here, it made sense.
However, from then on, it made me appear to be a beginner just.
Moreover, it shall do the same for your site too.
In a nutshell, avoid hopping on a free of charge hosting plan right away, and you will maintain a far more professional place continue.
#2: SHARED web hosting Plans
Another logical option for those seeking to keep things shoestring affordable is registering for a shared program.
Here, the net hosting specialist parks multiple websites on a single, solo web server although names of domain and sites are unique even.
Again, there are cons and pros to the route as well.
To begin with, it is slightly less costly than it might be to acquire dedicated hosting because the costs are disseminated amidst several websites.
Plus, you do not start to see the annoying add-ons as if you do with free hosting strategies (i.e., YourSite.WordPress.com), which means you give off a specialist vibe immediately.
Here are better still reports: When server issues appear, as they will inevitably, they are not your trouble.
Exactly like you would decide on your landlord to repair your sink as a renter, all you would want to do is record the challenge to your web hosting specialist and let them take care of the rest.
However, that leaves you at their mercy also.
When you have an enormous kick off scheduled while their server falls accidentally, little or nothing you can certainly do but hang on there’s.
Until they fix things, you are SOL.
Munch on these other cons:
Since you are writing your auto parking space with other sites, you are small on the quantity of bandwidth your site can have.
This causes an issue in two ways:
- Massive traffic surges on other sites may become a problem for yours if the shared bandwidth gets maxed away. At these times, your site too falls.
- If you are the main one triggering the surge, the effect is the same: your site can decrease, or your users will experience painfully slow legs in launching times.
While it is nice never to have to be concerned about dealing with server issues, you are small using what you can download to the server also.
Your service provider must approve certain modifications and scripts, and if indeed they pose a concern or threat to the shared environment altogether, you will not have the ability to run them.
Shared hosting, like with a free of charge hosting plan just, may appear as an appealing path to take, but down the road whenever your traffic develops later, it is heading to cause problems and headaches for both you as well as your customers.
Of course, if your shared host neighbor has huge spikes in traffic already, your website will be affected, no relevant questions asked. Regrettably, you will not know at these times until it is too late.
Knowing Murphy’s Laws, it could probably happen throughout your biggest kick off that took weeks to get ready for.
In the ending, you are better off with another hosting option (when you can spend the money for price increase).
#3: Dedicated Hosting Plans
Dedicated hosting packages will be the crème de la crème of hosting.
These plans enable you to rent the complete server instead of showing it on other websites.
Thus giving you full control over the server, any software being utilized, and the entire security of the site, according to Technopedia.
These strategies are also more reliable because you can predict and arrange for large surf in traffic.
You will not have to suffer if your neighbor’s site gets noticed by she is suddenly since it will not affect yours.
Moreover, since you are not writing your resources, your site performance and insert times will be SO considerably faster.
You can even add extra layers of security and protection, and a fortified firewall to keep you free and free from cyber attacks (whenever you can, at least).
So while this road is more costly just a little, it is certainly worthy of the excess investment.
Technically, you may always begin on a shared environment plan and upgrade, but it is better to just start on the right plan from the get-go.
You do not want your users to have a bad experience truly rather than keep coming back, do you?
Steer clear of the free designs when you can just.
You may have your hosting locked down once; it is time and energy to drop a CMS onto it.
Step #4: Drop a CMS on your Website
Since you are beginning with damage, and you do not have much experience with coding, it is in your very best interest to choose a content management system, or CMS, to utilize to make your daily life easy.
This is merely a fancy term for the tool which makes your website more active.
Inside your CMS dashboard, you be capable of:
- Change the front-end look of your website
- Create pages, portfolios, and blog articles
- Manage images, videos, and other digital media
Moreover, you may do all this and never have to touch any code. This is one way you will run your website as an actual pro.
Now, most CMS’s these full days are made to be intuitive and a breeze to utilize. When you can use Facebook, you ought to be in a position to use a CMS with zero hiccups.
However, before you reach this aspect, you have to find the right CMS for your requirements.
This is somewhat trickier.
First, take into account the goal of your site, or what you specified in Step one 1.
Are you seeking to promote something or build your email list?
Are you considering blogging or adding videos regularly?
The answers to these questions shall help you know what kind of CMS you should search for.
To assist you, I will clarify 3 of the very most popular CMSs next.
1. WordPress
Think about this:
- 15 roughly,886,000 websites developer use WordPress
- WordPress dominates 50-60% of the global CMS market
so that it is typically the most popular CMS
So why accomplish that many sites trust WordPress as their go-to CMS?
It is simple.
WordPress is simple to operate and manage, for beginners especially. Equally simple as learning your Facebook dashboard it is.

You will find every one of the essential items down the kept hand side as the leftovers of your features branch away from there.
WordPress is also free as you currently have your website name and hosting purchased long, so you will not pay a monthly or yearly payment for access to the platform.
Because of its popularity, you will find loads of topics and plugins designed for your website.
This helps it be stupid simple for non-tech savvy visitors to develop a professional-looking website that has all the features hand-coded pros would use -- at a fraction of the price.
Plus, with SEO plugins like Yoast, and a dashboard that's already created for optimization, you can quickly build a site that turns into noticed by she's in case you don’t have too much experience here either (having said that, if you’re no SEO get good at yet, you can examine away this guide to improve that).

By filling in essential items you create a full page or post anytime, you will be set up for success in minutes.
WordPress brings protection to the desk as well.
The developers behind the displays are always creating improvements and adding layers of security to the incredible number of users trusting their expertise.
You can also include your layers of protection by using security plugins that further fit the bill.
WordPress is so versatile it is adequate for designing the following types of sites:
- Ecommerce store
- Membership site
- Portfolio/Gallery
- Agency/business
- Blog
WordPress is my top choice for anybody launching a site for the very first time.
It requires all the guesswork out of your website’s look, and it is relatively safe and reliable.
Although, another CMS on my list is gathering popularity -- specifically for newbies quickly.
2. Squarespace
Despite the fact that it only needs to be seen, Squarespace launched the same yr WordPress did (2003).
Moreover, things quickly are escalating.

Its beginner-friendly aspect is one reason it is learning to be a fan favorite.
You can easily create pages, add images, and position things in simple utilizing their drop and move visual editor.
This is a great option for folks just starting out and looking to get up and running right away.
The quantity of choices on WordPress, on the other palm, can be frustrating your first few encounters downright.
Remember, the tiny bit of overall flexibility that Squarespace offers far only goes so, which is why most brands, in the end, fare better by using WordPress.
You also may need to bounce over a few additional hurdles with Squarespace you would not face growing your site on WordPress.
Just like WordPress yet, Squarespace is sufficient for creating some sites also.
You could launch:
- An individual site just like a blog or collection
- An ongoing business site for consulting so that as the official company list
- An e-commerce store
One of the fundamental dissimilarities between Squarespace and WordPress is in its pricing structure.
While WordPress is absolved to use always, Squarespace is not.
Personal sites can run you about $12 bucks monthly with a contract; business and e-commerce ideas start at $18 and can go approximately $26-$40 monthly.
These prices include your website name, usage of the program, and cloud-based hosting (among a great many other features).
With WordPress, these things separately have to be purchased.
IMO, WordPress is the better option for the long term still, even if it is slightly more overwhelming initially.
The final and then CMS on my list is intended for e-commerce sites, so if your goal does not are categorized as this umbrella, you can skip to Step #5 in advance.
3. Shopify
Technically speaking, you may build an e-commerce site on either Squarespace or WordPress.
Why consider Shopify?
Because they only give attention to e-commerce.

You know all you need in a single place and never have to find e-commerce-specific themes or to add plugins to aid your web store from alternative party vendors.
Shopify is your one-stop CMS shop.
You may manage sales, marketing, as well as your website itself applying this simple platform that’s made to meet one major goal: selling your products online.
That we know the benefits associated with using Shopify now, let’s consider the other area of the coin.
First, the business is rather new.
They are over a decade old plus they have only about 400 just,000 work sites.
This figure pales compared to the millions using WordPress and Squarespace drastically.
That is not a bad thing necessarily; it is just price noting.
Like Squarespace just, Shopify charges a regular fee. Theirs amounts from $29-$299 monthly with regards to the size of your team and whether going for added features such as marked down shipping and transfer rates.
Another similarity with Squarespace is that your hosting and website name can be bought directly through Shopify.
If you opt to carry more than a URL from a former hosting specialist, you can certainly do that, too. However, usually, you can knock out all you need in a single place.
Together with your better knowledge of typically the most popular CMSs, you are prepared to understand how to download them to your internet site.
How exactly to Download a CMS
This step is simpler than choosing a platform to go with actually.
With Shopify and Squarespace, just head to their sites to set-up a merchant account and begin.
From there, choose your design and URL, and you are all set.
For WordPress, a bit more involved there’s, but I guarantee it is still relatively easy.
Often, you can log directly into your web hosting provider.
Following that, you should visit a set of a few one-button CMS installs.
This is correctly what you will see on the backend with Bluehost:

Once you find the program you want to work with, struck the button and it shall automatically create your site and connect it to the URL you were given.
When that is all done, you are ready for the look Phase.
You do not desire a level from art institution to make a professionally designed website if you merely use the tips and secrets we will review next.
Step #5: Customize the appearance to suit your Brand
Before you collapse the rabbit hole of website themes deep, there’s homework to be achieved.
As you search your chosen sites, start watching elements and features you prefer or are attracted to.
Notice activities like - what goes on when you scroll?
Where does the menu work as you move listed below?
Just how do your challengers’ sites or retailers look?
Compare sites that will be the closest in goal-type to yours.
While you might not be able to include all the features you want initially, it can help you dig through the incredible number of designs out there when you understand which features are on top of your priority list.
Speaking of themes or templates…
IS IT POSSIBLE TO Afford to employ a Designer?
Top quality sites do not come cheap.
If indeed they did, bad websites would not exist… nonetheless, they do.
An excellent way to combat this: hire a specialist.
You will find a local image creator or outsource one overseas focus on the sort of website you are seeking to create.
Yes, anyone can design an overall internet site, nevertheless, you want someone with experience to help you optimize your design and help you reach your goal.
These experts will provide you with advice for inserting (and changing the color of) elements like buttons and calls to action, so you will always capture your visitor’s attention and increase conversions without looking such as a hot mess.
Intend to bring both your targets and websites and features you are seeking to include in your first meetings with your site creator.
By having an open plan, you can communicate what you are looking for accurately, which can help you get nearer to your eyesight.
Additionally, you want to create realistic milestone schedules with your artist to keep assembling your project on the right track and continue.
Website tasks can spiral weeks past their target start dates quickly, so it is an important area that shouldn’t be forgotten.
Anticipate to fork out extra capital because of this investment; high-quality designers feature a higher price.
The old’ you get what you purchase mentality is real here.
If now could be win time to construct the money for the right custom, get out your notebook because this next section is designed for you.
If Not, DO THAT Instead
Don’t sweat it if you cannot afford to employ a specialist designer.
Nowadays, there are an incredible number of high-quality topics that are a breeze to create and look equally professional as you designed by the side.

Just please don’t waste materials hours of your energy searching for THE MAIN ONE.
Browsing each one of these options only makes for you to decide harder.
To save lots of you from indecision, check away these next two tips first.
#1: Get Your Goal and Keep it Handy
The idea here's to get started on weeding out the themes that don’t work which means that your ideal theme shines as the clear choice.
To get this done, set in place your filters by the sort of site you intend to create.
If you are not building an e-commerce store, there’s no point in settling for an eye-catching e-commerce theme you will need to invest much time trying to control and crack.
Adhere to your intended site categories or find an all-in-one theme instead (more upon this shortly).
Get your end goals from Step #1 to see if each theme helps what you are seeking to create.
As hard as it might be to toss out your fave design, wild ones shall only distract you from your goal and consume your time.
Your website should look good and become functional.
You have a small number of options to dig through once, let’s find the one which best fits.
#2: Consider JUST HOW MUCH Versatility You Need/Want
An often overlooked area as it pertains to using themes is how much overall flexibility you will get.
In some full cases, what the thing is that is exactly what you get. This sort of theme is a template where you merely reach plug in your run and info.
It is ideal for brands that don’t have time to invest getting their site started.
The downside?
These designs can be so hard that you lose the capability to make your website as unique and exciting as your brand.
On the other end of the fully customizable themes can help you create and customize just about anything.
Beginners will discover these customization options a time-drain, but they are excellent for those with a little bit more experience and room to play with.
Consider how much overall flexibility you are looking for before making a decision over a template.
If you like to plug and chug, find web templates that look good as-is.
In case you are about on-point branding, choose a style that offers complete control.
Now, if you opt to go the theme do not and route hire an artist, you should set milestone schedules still. Otherwise, you will wrap up stalling anytime a conclusion becomes hard to make.
This is what happens when it comes to logos exactly.
HOW ABOUT a Logo?
Logos are one of the unique areas to get right as it pertains to branding your business. Moreover, there’s no chance I could supply the matter justice in this guide about starting your first website here.
So, instead, here are some ground rules to check out:
- If you cannot get a specialist logo done, stick to using the name of your site in a font that complements the colors of your brand which is easily readable.
- Sites like Fiverr can be strike or miss. I have seen some logos come out great while some are completely unusable. For that price, maybe it is worth a go. However, I would not use the one which you do not enjoy because you paid for it. The sunk cost of $5 isn’t worthwhile compromising.
- Consider skipping it altogether. In case the custom logo is gradual you, and you do not know what things to create down, omit this task for the present time and later get back to it.
The real point is never to get hung through to this stage of the procedure. Get something and exercise up. You may rework it always.
Employ a naked header or the one which only includes the navigation menu until you select an improved someone to use.
A significant factor that will begin to outdate your site, even if it is newly shared, is a full navigation menu. Uncover what to do instead inside our next section.
Map Out Your Navigation
Before you begin adding pages to your first header, map out your site’s navigation.
You intend to approach this just like you were a whole new visitor to your website.
What would a completely new visitor be looking for?
Include the main pages in advance and only a little couple of items in your first header.
It could down be tricky narrowing things, but it is essential.
Simple selections pique your reader’s interest; full ones paralyze them with indecision.
Organize the others of your group and web pages similar things together. You should use drop down selections to branch out your additional internet pages from the key header pages.
Help your brand-new visitors move around in the right direction with the addition of a “Start Here” header item that appears more like an agreeable button someone cannot hang on to click.

This is a relatively easy way to steer new visitors through your funnel naturally.
If you do not take this section to center, your brand-new reader could easily get overwhelmed with the quantity of options staring back at them, or they will get lost in a disorganized chaos.
When each one of the happen, your brand-new visitor will not stay long to see what you have to give you enough. Which means you can kiss email signups goodbye.
To determine which menu what to keep, start Heat Maps and see which links your guest's value and those can be dropped or moved.
Your navigation is a minimalistic once, functional dream, at once over to the next phase: adding testimonials.
Build Trust with Testimonials
Se is never trusted new sites.
Sure, after enough commitment, this will change eventually, but at the start, no person knows your website prevails. No one is likely to be referring your site nevertheless, you.
It is essential that tourists who do find your site -- through your social advertising and killer articles -- stay long good enough to verify that you are trusted.
One way to get this done is to show testimonials and middle leading.
They do not have to be the essential thing readers see nevertheless they should be fairly high up there.
Within this example, you will notice that after scrolling less than 25 % of the true way significantly down, two testimonials greet you before the next proactive approach.

Observe this and consider weaving testimonials between your calling to action showing that you are a dependable source.
You can also add your email signup box just underneath that to fully capture email addresses from new visitors who are impressed by your glowing customer reviews.
That wraps up the look stage of your brand-new website launch. Do not spend much time or you will never achieve your focus on unveiling schedule here.
Now it is time to start out adding content.
Step #6: Create Goal-Driven Content & Follow THESE POINTERS
Creating web pages of content takes a thoughtful method of your targets and purposes.
Searching to make clear more about your brand? Your services? Your competence?
Give every site you write one goal and let your articles indicate that goal.
When you find a focus for each page, stay on record by following these guidelines:
#1: Keep it Brief and Simple
Don’t bore your viewers or lose them in a seemingly-neverending movement of words.
Map out each site with a loose put together and some bullet points.
Whenever your write your articles, trim system.drawing.bitmap, as Sarah says, and toss out words you do not actually need. This retains your writing fluff-free and active.
#2: YOUR ARTICLES SHOULDN'T BE ABOUT You
Please don’t babble on about how precisely great you are.
Your testimonials must do this heavy lifting for you.
Your articles should strike a wholesome balance between explaining how your brand can help tourists and giving your market what they are looking for: a remedy for their problems.
So though this is your site even, stop boasting about your concentrate and achievements more on portion your audience.
#3: Brainstorm Your Calls to Action
Every little bit of content you increase your site should be well-thought-out.
However, this holds true for your telephone calls to action especially.
If you would like visitors to do something, you will need to inform them to take action explicitly. That is where well-crafted telephone calls to action end up being the heroes of your website. When done right, they guide and motivate people to take action.
In the same way that you have a goal for each page, your cell phone calls to action should have an objective. What would you like your visitor to do?
This same concept applies to your button text as well.
Asking visitors to Send to your newsletter is not heading to lower it. Instead, use a word like:
- Turn into a Driver (in Uber’s circumstance)
- Grab Your Copy
- Try it Now
By paying more focus on these specific cell phone calls to action, you will create your brand-new website for conversions immediately.
#4: BUILD UP YOUR WEBSITE with a Few Articles
Put in a few articles to your site’s blog before you start. Utilize this as another area showing your experience and build power.
Translation: Don’t dash those blogs simply for the sake of completing them.
Remember, you are aiming to build trust with your brand-new visitors. That is a terrific way to provide them with the information they are looking for without rendering it about you or your brand.
Take into account the biggest problems your probable readers face and make those your first articles to overcome.
Choose anywhere from 3-5 issues that you know well so you can knock them out right away.
Not that you should measure velocity through these articles; they will need your full attention if they are heading to help as another first impression of your brand on your site.
If this proves to be too time-consuming -- or you hate writing entirely -- don’t think about outsourcing this task. Just make certain the writing and build utilized by your selected writer echo your brand and the information you are trying to mention.
#5: Generate a Teaser Web page WHEN YOU Build
Since this section adds a couple of days to your current website unveiling timeline definitely, you should produce a teaser webpage to create on your site for the time being.
This is as easy as using Welcome Mat and adding one proactive approach with a contact signup button.
A countdown to unveiling can stir up enjoyment.
Just don’t chaos your web page with too much as people are less inclined to take action a lot more choices you overflow their brain with.
HubSpot discovered that getting web pages without navigation links found higher conversions, which range from 4-28%!
The idea here's that the navigation links can distract your brand-new visitor and lead them to wander off before taking any action.
To avoid this, keep your first menu off your teaser or getting pages. Therefore, the focus is clear.
Knowing these seemingly small details means your brand-new site will discover more success in a couple of weeks than most websites see in months.
The primary element is creating excellent content which has a goal and purpose at heart always. Otherwise, you are just squandering everyone’s time -- yours as well as your guests’.
Don’t dare to go to that publish button until you browse the next section.
Step #7: Add These Tools Before Launching
Together with adding Welcome Mat to your website, it is also advisable to include the pursuing tools pre-launch:
#1: Google Analytics
You will need to set up Google Analytics tracking for your site.
To get this done, click on their site after you are finished with this guide, create a merchant account, and add their script to every web page of your site.
Don’t worry; they will demonstrate how to do all this.
The reason why you are taking this task is to keep tallies on:
- The quantity of traffic going to your site
- Where in fact the traffic is via (referral source)
- Just how long people stick to your site (and the particular jump rate is)
- Plenty of other activities!
Google Analytics can help you gauge how effective your internet pages are if your write-ups are resonating with visitors.
Another useful tool that can help you trail the performance of your articles is Content Analytics.
#2: Content Analytics
While Google Analytics songs your website data altogether, Content Analytics dives more deeply into the actual content -- your site posts specifically.
This can help you:
- Understand how far off listed below these potential customers reading your articles get
- Uncover the best places to include your proactive approach buttons
- See stats in real-time, and that means you can make alterations as needed
#3: Heat Maps
Heat Maps is another tool that you need to use to comprehend how your site is performing.
With Heat Maps, you will see where these potential customers are gravitating and clicking to which means you can position features better.
In case your buttons are not seeing any action, you will know instantly because of the real-time responses that come standard with Heat Maps.
#4: List Builder
The very last must-have tool relating to your pre-launch toolkit is List Builder.
No real matter what kind of site you are building, growing your email list should be considered the main priority. We discussed why this is so important here, so we earned spend some time upon this today.
What you need to understand is the fact List Builder makes this important task easier for both you as well as your new viewers.
Plus, you can make use of it in many ways:
- Time your publication signup pop-ups showing only following a particular time. This catches the most employed visitors.
- Unveiling them before someone leaves just. If your brand-new reader has not registered yet, you can set a popup showing before they leave just. Thus giving them another chance to do this.
- Use click causes. Rather than a popup nowhere demonstrating out of, you can establish click triggers showing only once single clicks a web link such as “Sign up for Now."
In every four cases, these tools will not take you more than 5-10 minutes to produce; this means it is one of the fastest steps to tackle in this whole website-building process.
Which means you have not any excuses for not doing this also.
Establishing these tools in early stages gives you the various tools to screen and track your time and efforts.
You will have the ability to diagnose and solve problems instantly, and that means you do not misuse months racking your brains on why your site and email list are not growing.
When these tools are functioning on your website, you will be just one step nearer to launching.
Talking about that.
Step #8: Select a Launch Particular date, Fine-Tune, and Publish that Bad Boy
When everything starts coming jointly, you ought to be prepared to set the official launch date.
Setting a precise date is crucial.
If you do not do that, you will end up stuck on the level of I simply need to tweak a couple of things before starting -- which is a fancy way of aphorism you will procrastinate and take forever to launch actually.
That is because things are perfect never; if you wait for perfection, you will go live.
Rather than succumbing to perfectionism, vow to launch with a specified date and think about your website a work happening. As as you get something out that appears professional long, you are who is fit. The others can be updated on later.
If you have arranged to get this far, a 30-day aim for launch day should be doable.
Thus giving you plenty of time to fine tune your projects before actually going live, but it keeps the pressure to take action ASAP also.
You select a day once, start the advertising train to receive the ball rolling.
Talk about your site on public media or in personal mail messages to your closest friends, family, or colleagues (with regards to the particular niche market of your site). Let them know what you are up to with this new job.
They must be directed to the Welcome Mat/Landing Page that you created in Step #6 (right here point #5).
Make sure to include the night out of when you are heading live as a way of possessing yourself accountable. Once you drum up exhilaration for a particular day, there’s more pressure to take action by then.
Fine-Tune Before Publishing
Now it is time to execute your final website audit before going live.
Here, you will meticulously comb through every site just like you were a new visitor with a menacing, digital red pen.
Focus on every little information and make sure they with your goal for your site align.
If something does not work, toss it out and add it to a set of items to focus on post-launch.
You complete this audit once, you ought to have a decent-sized list to utilize.
Rather than getting bogged down here, yank out the things that must be tackled pre-launch now. Add the others to your post-launch to-do list.
Focus on the past items completely up to your release to make certain your site is all set live because of your focus on time. Only stall if there are significant conditions that could crash your site.
Otherwise, introduction as is and focus on the latter items later on.
While this may seem to be like the time to bask in your post-launch bliss, there’s more work to be achieved still. So before you get your piña colada and relax to celebrate, there’s one last portion of this guide you will have to have under your belt.
Step #9: Post-Launch Bliss and How to proceed Next
As fantastic as a set-it-and-forget-it approaches sounds, you are not yet there, friend.
New sites garner more action, attention, and traffic.
No better time and energy to capitalize on this momentum there’s.
You can certainly do this by:
- Submitting new content regularly or bi-weekly (ideally). If this is much too, blast for a fresh article at least one time a month.
- Generating your social media followers to your brand-new site.
- Mentioning your brand-new website in content, but for a far more subtle promotion, add your brand-new URL to every of your public profiles and your email signature.We review some more ideas in this tool.
- Regularly reviewing your site’s performance using the various tools you installed in Step #7.
These insights can help you see whether your site’s content is resonating with these potential customers or must be tweaked, including buttons, calls to action, and the rest in-between.
You do that once; the formula becomes a straightforward rinse-and-repeat: create new content, record your site’s performance, make the required tweaks, revisit your analytics, duplicate.
SO Today LUNCH YOUR BRAND-NEW Website
Given that you have all you need to get started on building your first website, it is a period to enter the driver’s seat.
- Begin by environment an objective for your site and locating the best Link and hosting plan to fit the bill.
- From there, install a CMS, pick a design that reflects your brand, and create killer content that helps your brand-new audience solve their biggest difficulties.
- From then on, it is all about tracking your performance with a few helpful tools, fine-tuning your efforts, and publishing at a steady rate.
Launching a new site is not as hard or complicated as it appears to be. With today’s guide on your side, you can fake your coding experience and stand behind a fresh website you can be proud to call your own (especially when it begins converting well).
I hope you enjoy my posts, and please feel free to follow/comment/esteem so we can grow this amazing platform together!