Wanna Blog? How To Set Up Your Own WordPress Blog On Google Cloud Platform
tl;dr. Last weekend, I choose to document the massive amount of media I'm consuming and contributing some synthesized content on my own. I decided to create my own WorldPress Blog on Google Cloud Platform in addition to see what steemit is all about. Want to do the same? Follow the step-by-step guide below.
While reading articles and watching YouTube videos about crypto, machine learning and other web dev stuff I had this idea: Instead of just consuming the media, why not really testing if I understood it and starting to write simple articles to structure my thoughts and learnings in a small blog?
So here we are, with you reading my ranting about why this blog exists. But getting here wasn't as easy as I imagined: There are tons of options to create a blog, but somehow many I didn't like (wasn't for free, limited in customization, not techy enough to configure, too nerdy to set up, you get the gist).
I considered many options:
- Blogger: Easy to setup, integrates well with Google Analytics (which I'm a great fan off). But not enough out of the box themes that are easy to configure.
- Ghost: Lightweight CMS but couldn't find a free version.
- Wordpress.com: Out of the box hosting on the Wordpress CMS, but bothered me with limited customization (have to upgrade to paid for using plug-ins).
- Hosting WordPress on a different provider: You guessed it, this is what I went for. I really like the Google Cloud Platform and decided to go with this option.
For setting up a WordPress site, you have three options, although I would only recommend the first one:
- Google Compute Engine with the Cloud Launcher
- Google Container Engine with Kubernetes
- Google App Engine Instance with install script & MySQL instance
All have pros and cons, but the easiest is definitely the first one, especially if you don't expect your blog to scale to massive traffic loads (which I'm not... ). You can read more about it here.
Okay, so what are the steps? Here's a quick overview, details follow below.
- Setting up your blog
- Create a new Cloud Project
- Use the Cloud Launcher to install the WordPress Package
- Using your own domain name
- Convert the external IP address of your Compute Engine from 'ephemeral' to static
- Set up a Cloud DNS zone and configure A & CNAME records to point to your Compute Engine instance IP
- Change the DNS records at your domain registrar to point your custom domain to the domain server of Google
- Switch the WordPress site address to your domain
1 Setting Up Your Blog
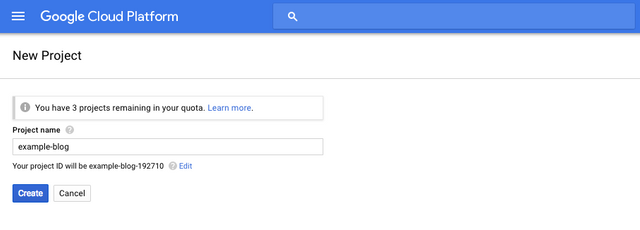
Log into the Google Cloud Plattform (https://console.cloud.google.com)
Add a new project, give it a name and change its ID if you like. It will take a little bit until it's set-up.
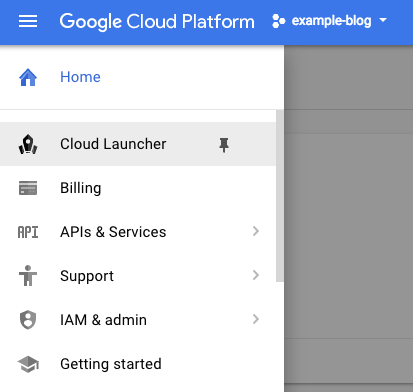
Next, we're using the Cloud Launcher to install the WordPress Package
Choose the hamburger menu on the top left side, to bring up the Google Cloud Plattform menu
Click on Cloud Launcher
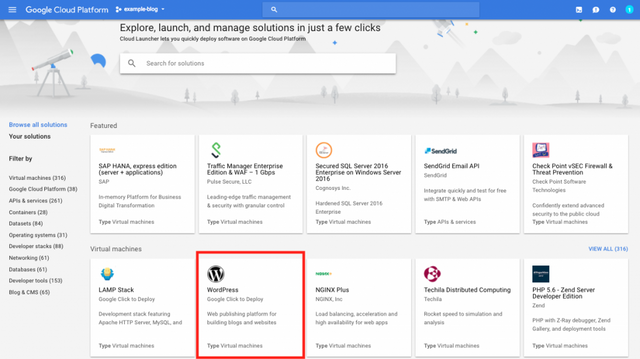
Choose WordPress package
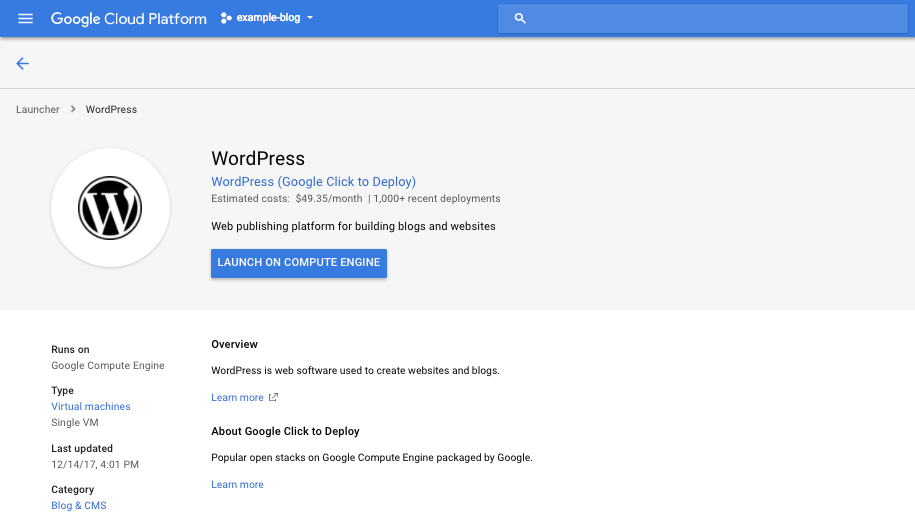
Ignore the cost, we adjust this in a minute and click on Launch on compute engine
Next, we can make some configurations:
- Give your compute engine instance a name
- Choose the geographic area, where the instance will be physically located
- The machine type per default ist set to standard, but this is usually way overpowered for a starting blog. The Google Cloud Platform has a free tier for the Compute Engine, which is the micro instance. Choosing this, won't incur you any cost.
- Enter an admin email address for critical system information updates
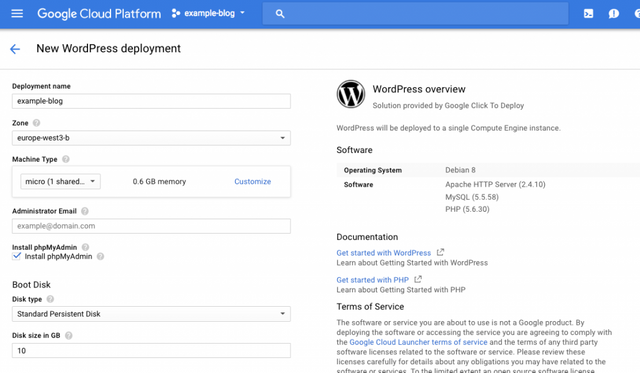
Make sure you tick the box install phpMyAdmin. If something goes wrong in the configuration, you can then access the database directly and correct the setting. This is extremely helpful when you lock yourself out of the WordPress admin panel (happened to me a few times...).
Lastly we want to accept HTTP traffic and if you're using an SSL certificate, we also activate HTTPS we won't cover SSL certification in this tutorial though.
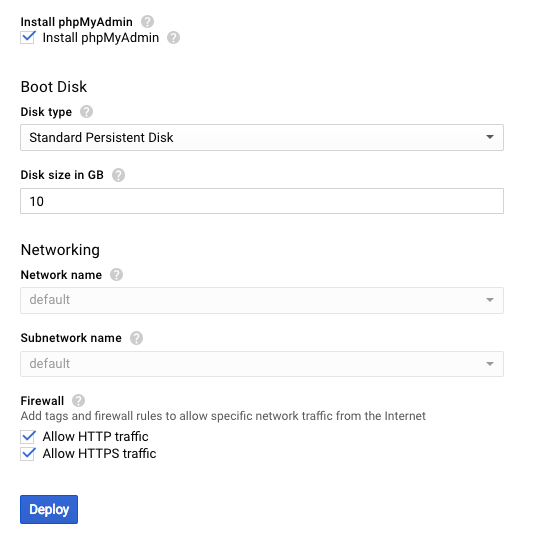
Finally, click on Deploy
After the machine is provisioned and the WordPress Package is setup, you can see all the access information for the WordPress administration and the underlying MySQL database. Now you're able to access your site with Visit WordPress Site
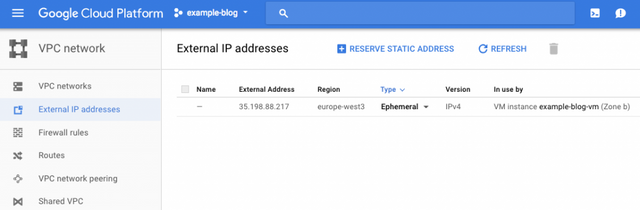
You can access the admin panel at the location of the external IP address of your server and adding wp-admin. Example: http://35.198.88.217/wp-admin (highly recommended to change to a different path later)
And you're ready to configure your personal blog on the Google Cloud Platform!


2 Using Your Own Domain Name
Now that we have the instance set-up, of course we want to make it accessible to the world over our own unique domain name
This requires a few more steps to setup. What you need is your own domain name from a domain name registrar such as namecheap.com or godaddy.com
Back in the Google Cloud Platform, we go via the hamburger menu to the VPC Network and choose the External IP addresses menu. There we see our Compute Engine and can switch the IP address from an Emphemeral (that can change) to a Static one. This ensures, we pinpoint to the right IP without changes.
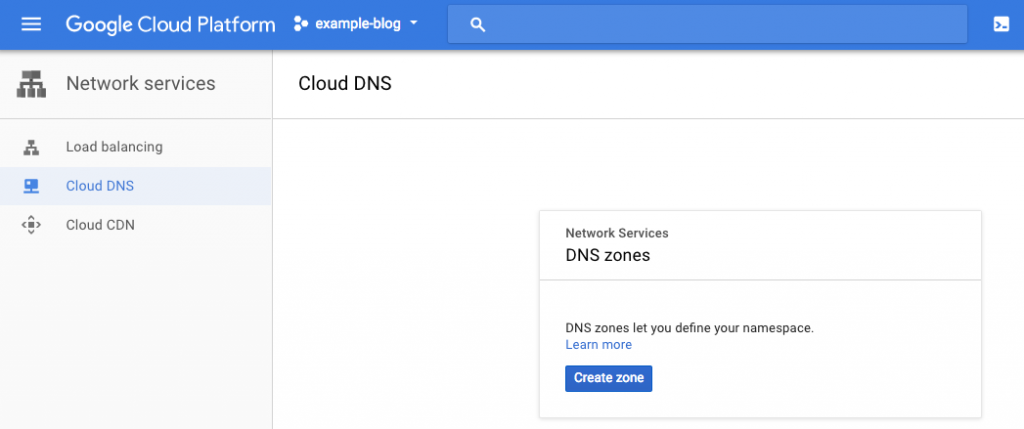
Once this is done we go back to the Networking menu and choose Cloud DNS. Once the API is enabled, we create a new zone and give it a name (e.g. yourdomain-blog).

In the DNS name field, you can type in your custom domain and then hit create
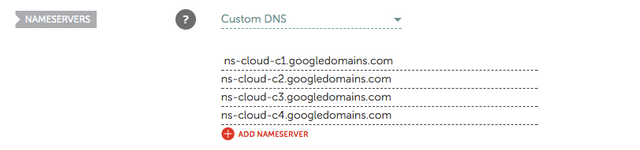
Once created, you have to entries, NS & SOA. The data in the NS field, is what you have to register with your domain registrar. So head over to your domain registrar and enter the domain server addresses as This is the server address of the name server your custom domain points towards.Here an example for namecheap: Once logged into namecheap, go to Domain List, choose your domain and then go to the name server setting further down the page, here paste in the information you got from the Google Cloud DNS:
WARNING: This setting can take up to 48 hours to take effect. Don't pinpoint WordPress to your custom domain or you won't be able to access your WordPress admin panel anymore.
Back on the Google Cloud Plattform we're still in the Networking > Cloud DNS section. We have to add two new entries to correctly configure our DNS setting: The A record and the CNAME record. To do so, click Add record set. If you have a short IPv4 address (e.g. x.x.x.x), choose A under Resource Record Type if you have a long IPv6 address (e.g. x:x:x:x:x:x:x:x) choose AAAA under Resource Record Type and enter your IP address into the IPvX field. Then hit Create.
Almost done! Now we create the last record in case someone types in www.yourdomain.com to redirect to yourdomain.com. We hit Add record set and then enter www into the DNS Field. Afterwards we choose CNAME under Resource Record Type and hit Create.
Finally, we're done configuring the Google Cloud Platform. Now we go back to the WordPress admin panel (x.x.x.x/wp-admin) and choose Settings > General in the menu. By changing WordPress Address (URL) and Site Address (URL) to your new domain name (e.g. http://yourdomain.com), we finished the configuration!


Let me know if it was helpful. If you struggled with something of found it unclear: Let me know! If something is wrong, please point it out so I can update it.
Happy Blogging!
Congratulations @aetherwings, you have decided to take the next big step with your first post! The Steem Network Team wishes you a great time among this awesome community.
The proven road to boost your personal success in this amazing Steem Network
Do you already know that awesome content will get great profits by following these simple steps, that have been worked out by experts?
Hi aetherwings, follow me please and engage with my content! I am starting my blog where I'll post cool articles and information I find on all things crypto related. I believe the only way to thrive in crypto is to stay informed! Join my followers and stay updated! Hopefully, you find my content as a cool way to stay informed on crypto! Let me know what you think about my postings. Upvoted and Followed!