Installation Guide for gnuradio, Blockstream & bitcoinfibre into Raspberry Pi 3 model B
2018/02/12 Ver.0.01
2018/02/18 Ver.0.02
ChirimenJako@Luqina
Auriga@aurigajp
MIT license
CAUTION!!!
This document explains how to install gnuradio, Blockstream, bitcoin-fibre, and all Raspbian Linux into empty USB-HDD. I confirmed it works with only this clean-install method. If you want to install them into your existing Raspbian environment, please study and understand what to do inside patches well and try it on your own risk.
Anyway, ABSOLUTELY NO WARRANTY
NOTE
If you want to know detailed information, you can clone git repository from the following address.
https://github.com/Chirimen-Jako/RasPiBlockstream/
Preparations:
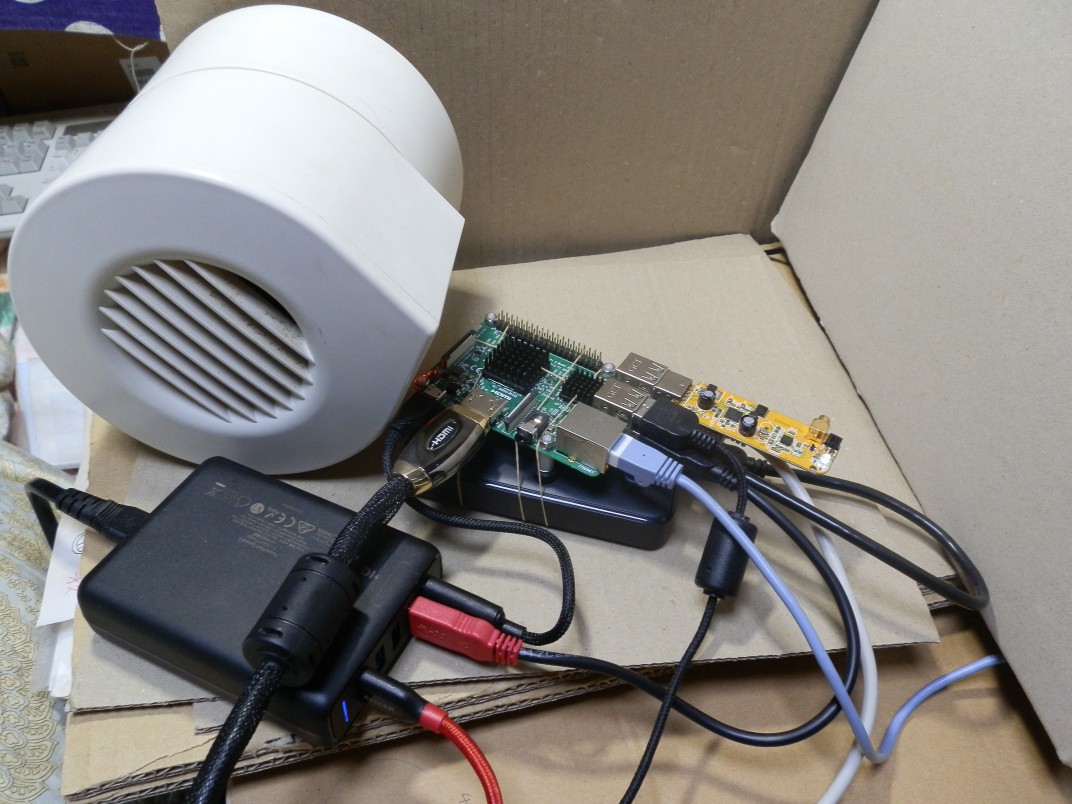
- Raspberry Pi 3 model B
- 8GB reasonable price & speed microSD card
- USB-HDD (500GB~2GB)
- Reliable 5V USB Power Source
- RTL-SDR
Download and write boot image into microSD
Make Raspbian stretch image into microSD with Win32DiskImager
RASPBIAN STRETCH WITH DESKTOP
Image with desktop based on Debian Stretch
Version:November 2017
Release date:2017-11-29
Kernel version:4.9
Release notes:Link
SHA-256:64c4103316efe2a85fd2814f2af16313abac7d4ad68e3d95ae6709e2e894cc1b
This is very common procedure, so, please refer to the other technical sources.
Install Raspbian stretch into Raspberry Pi 3 model B
Power off Raspberry Pi.
Connect USB-HDD to Raspberry Pi.
Insert microSD into Raspberry Pi.
Turn on Power.
Setup Preferences (Mouse / Keyboard / Region / Time-zone / Resolution / Bluetooth, etc...)
Enable VNC server (optional)
DON'T set super user password until finish the installation.
We checked out this installation using user 'pi' account only.
NOTE(for Japanese): Don't set Menu Language "Japanese" for now.
pi@raspberrypi$:~ $ reboot
Setup bootable USB HDD
Firmware upgrade (It has done once already, no need to do it again.)
pi@raspberrypi$:~ $ sudo apt update
pi@raspberrypi$:~ $ sudo apt -y install rpi-update
pi@raspberrypi$:~ $ sudo rpi-update
Modify config.txt
pi@raspberrypi$:~ $ echo "program_usb_boot_mode=1" | sudo tee -a /boot/config.txt
pi@raspberrypi$:~ $ echo "program_usb_boot_timeout=1" | sudo tee -a /boot/config.txt
pi@raspberrypi$:~ $ reboot
Check firmware version
pi@raspberrypi$:~ $ vcgencmd otp_dump | grep 17:
Check if it's 17:3020000a
Initialize connected USB-HDD
pi@raspberrypi$:~ $ sudo umount /dev/sda2 (if necessary)
pi@raspberrypi$:~ $ sudo umount /dev/sda1 (if necessary)
pi@raspberrypi$:~ $ sudo parted /dev/sda
(parted) mktable msdos [Yes]
(parted) mkpart primary fat32 0% 100M
(parted) mkpart primary ext4 100M 100%
(parted) quit
Format USB-HDD
pi@raspberrypi$:~ $ sudo mkfs -t vfat -n BOOT -F 32 /dev/sda1
pi@raspberrypi$:~ $ sudo mkfs -t ext4 /dev/sda2 [Yes]
Mount USB-HDD on microSD file-system
pi@raspberrypi$:~ $ sudo mount /dev/sda2 /mnt
pi@raspberrypi$:~ $ sudo mkdir /mnt/boot
pi@raspberrypi$:~ $ sudo mount /dev/sda1 /mnt/boot
Copy boot image from microSD to USB-HDD
pi@raspberrypi$:~ $ sudo rsync -ax --progress / /boot /mnt
Modify USB-HDD /boot/cmdline.txt
pi@raspberrypi$:~ $ ls -al /dev/disk/by-partuuid
pi@raspberrypi$:~ $ sudo vi /mnt/boot/cmdline.txt (leafpad is much easier)
Modify PARTUUID from that of microSD to USB-HDD.
Insert rootdelay=10 (after 'rootwait')
Modify USB-HDD /etc/fstab
pi@raspberrypi$:~ $ sudo vi /mnt/etc/fstab (leafpad is much easier)
Update SSH Host Key
pi@raspberrypi$:~ $ cd /mnt
pi@raspberrypi$:/mnt $ sudo mount --bind /dev dev
pi@raspberrypi$:/mnt $ sudo mount --bind /sys sys
pi@raspberrypi$:/mnt $ sudo mount --bind /proc proc
pi@raspberrypi$:/mnt $ sudo chroot /mnt
root@raspberrypi:/# rm /etc/ssh/ssh_host
root@raspberrypi:/# dpkg-reconfigure openssh-server
root@raspberrypi:/# exit
pi@raspberrypi$:/mnt $ sudo umount dev
pi@raspberrypi$:/mnt $ sudo umount sys
pi@raspberrypi$:/mnt $ sudo umount proc
pi@raspberrypi$:/mnt $ cd
pi@raspberrypi$:~ $ sudo umount /mnt/boot
pi@raspberrypi$:~ $ sudo umount /mnt
Power off
pi@raspberrypi$:~ $ poweroff
Disconnect Power Source (physically!)
Remove microSD,
Connect Power Source again.
Make swap partition on microSD to expand I/O bandwidth (STRONGLY RECOMMENDED)
Insert microSD
Click [Cancel] on GUI
pi@raspberrypi$:~ $ sudo umount /dev/mmcblk0p1
pi@raspberrypi$:~ $ sudo umount /dev/mmcblk0p2
pi@raspberrypi$:~ $ sudo parted /dev/mmcblk0
(parted) mktable msdos [Yes]
(parted) quit
pi@raspberrypi$:~ $ reboot
pi@raspberrypi$:~ $ sudo mkswap -f /dev/mmcblk0
pi@raspberrypi$:~ $ sudo swapon --fixpgsz --discard=once /dev/mmcblk0
pi@raspberrypi$:~ $ sudo swapoff /var/swap (down HDD swap priority)
pi@raspberrypi$:~ $ sudo swapon /var/swap (resume HDD swap area)
Check swap environment
pi@raspberrypi$:~ $ swapon
| NAME | TYPE | SIZE | USED | PRIO |
|---|---|---|---|---|
| /var/swap | file | 100M | 0B | -2 |
| /dev/mmcblk0 | partition | 7.3G | 0B | -1 |
Upgrade overall Raspberry Pi modules
pi@raspberrypi$:~ $ sudo apt update && sudo apt -y upgrade && reboot
NOTE: Raspberry Pi may have been restored to the default environment by upgrading automatically. Please check the Preferences and swap file settings.

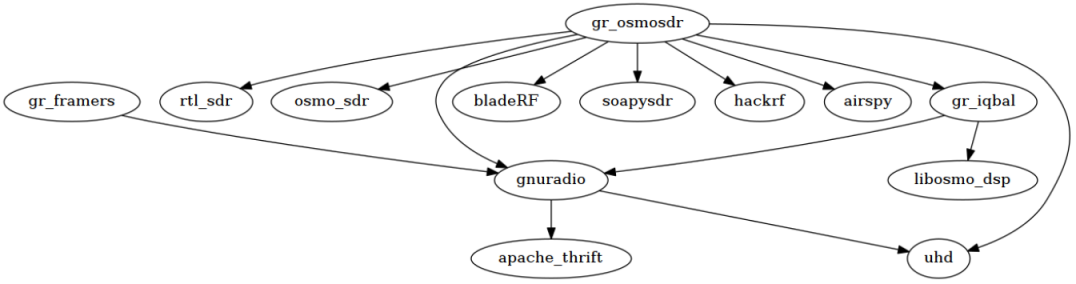
NOTE: gnuradio dependency chart
Build overall modules
copy build_Blockstream_RasPi3B-2018-02-18_1.tar.gz into your home directory.
pi@raspberrypi$:~ $ tar -zxvf build_Blockstream_RaspPi3B-2018-02-18_1.tar.gz
pi@raspberrypi$:~ $ script buildall.log
Script started, file is buildall.log
pi@raspberrypi$:~ $ ./build_BlockStream_RasPi3B.sh
Approximately, it will take around 15 hours building pilgrimage.
Wait for finish by Sleep, Gaming, Trading, Read any Books, and clean up the other tasks. That's up to you!
Test after build finish
pi@raspberrypi$:~ $ exit
exit
Script done, file is buildall.log
pi@raspberrypi$:~ $ source ~/.profile (Just in case)
pi@raspberrypi$:~ $ sudo ldconfig (Just in case)
pi@raspberrypi$:~ $ cd ~/satellite/grc
Insert RTL-SDR into USB port.
pi@raspberrypi$:~/satellite/grc $ ./rx.py --freq (your frequency) --gain 40
e.g.: ./rx.py --freq 1083250000 --gain 40
Put temporary value into frequency parameter just for checking software is enough for now. Ku-Band LNB output frequency is over 1GHz = 1000^3 = 1000000000. You have to calculate exact frequency from your home region satellite frequency and your LNB L.O. frequency when you connect RTL-SDR with satellite antenna and try receiving Blockstream satellite radio wave.
If everything is OK, you can see the following result.
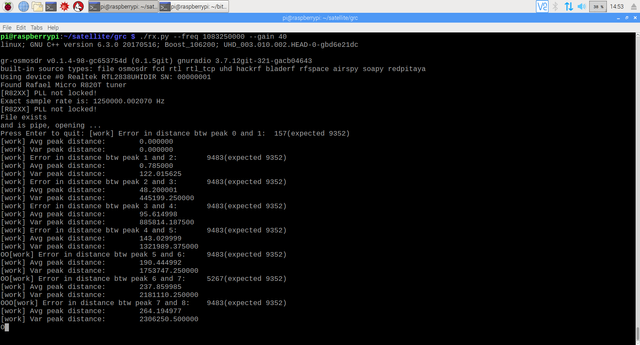
CONGRATULATIONS!!!
Troubleshooting
If you got any error and working failed, you can compare your buildall.log with an example of succeeded one. You can download from the following.
success-example-buildall.tar.gz
If this document helps you, you can tip a pinch of BTC to the following address.
We can progress to the next step by your donations!
 |  |
153w1iUUzMdFu8ckWrXsJiDSk81rk8r7K1 | 38jcX8eZQkX7npyZuMEV8wqbj76Wq2oouX |
Special Thanks
I'm inspired and received a lot of information from grubles and the following links.
If you want to construct normal Blockstream station (not using Raspberry Pi, but also with enough powerful PC), you should refer to the following links.
Building Your Own Bitcoin Satellite Node: Part 1 — Hardware Assembly
Building Your Own Bitcoin Satellite Node: Part 2 — Software Installation
Building Your Own Bitcoin Satellite Node: Part 3 — Dish Alignment
End of Document.