Developing an Ethereum Cryptocurrency on Windows
You can develop your very own cryptocurrency using your laptop that runs Windows operating system. This article a step by step guide for newbies to easily developing and deploying a token using the sample code provided by the Truffle framework. Truflle is a world-class development environment, testing framework and asset pipeline for blockchains using the Ethereum Virtual Machine (EVM).
This is a step-by-step guide for developing an Ethereum-based cryptocurrency on Windows.
To start the project, we need to set up a development environment with the following requirements:
- A code editor
- Source control
- Unit tests
- Debugging
For code editor, we use Visual Studio code for the following reasons:
- VS Code integrates very well with Git for source control. Git is currently the best choice for source control.
- VS Code works well with Truffle framework that manages unit tests.
- VS Code works well with Truffle for debugging
Besides that, Visual Studio code is a great tool for editing Solidity smart contracts and is available on Windows, Mac & Linux.
I. Installation of the Packages
Step1: Install Chocolatey
Launch PowerShell as administrator. In PowerShell, enter the following command:
Set-ExecutionPolicy Bypass
*The Set-ExecutionPolicy changes the user preference for the Windows PowerShell execution policy.*Bypass-Nothing is blocked and there are no warnings or prompts. This execution policy is designed for configurations in which a Windows PowerShell script is built in to a a larger application or for configurations in which Windows PowerShell is the foundation for a program that has its own security model.
* Why Chocolatey-"You've never deployed software faster than you will with Chocolatey." -Rob Reynolds. Chocolatey is a software management automation.
Install Chocolatey by entering the following code:
iex ((New-Object System.Net.WebClient).DownloadString('https://chocolatey.org/install.ps1'))
*https://chocolatey.org/docs/installation
*iex-invoke expression-The Invoke-Expression cmdlet evaluates or runs a specified string as a command and returns the results of the expression or command. Without Invoke-Expression, a string submitted at the command line would be returned (echoed) unchanged.
*A cmdlet (pronounced "command-let") is a lightweight Windows PowerShell script that performs a single function.
* https://chocolatey.org/install.ps1 downloads the Chocolatey installation zip file, unzips it and continues the installation by running a scripts in the tools section of the package.
After installation completed, close and reopen PowerShell as administrator again.
Step 2 Install Visual Studio Code, Git and Node.js
Enter the following code in PowerShell:
choco install visualstudiocode -y
choco install git -y
choco install nodejs -y
*Git (/ɡɪt/[7]) is a version control system for tracking changes in computer files and coordinating work on those files among multiple people. It is primarily used for source code management in software development,[8] but it can be used to keep track of changes in any set of files. As a distributed revision control system, it is aimed at speed, data integrity] and support for distributed, non-linear workflows.
*Node.js is a JavaScript runtime built on Chrome's V8 JavaScript engine.
*As an asynchronous event driven JavaScript runtime, Node is designed to build scalable network applications. In programming, asynchronous events are those occurring independently of the main program flow. Asynchronous actions are actions executed in a non-blocking scheme, allowing the main program flow to continue processing
Close and reopen PowerShell before proceeding to the next step
Step 3 Install Truffle Framework
Truffle is a world class development environment, testing framework and asset pipeline for Ethereum, aiming to make life as an Ethereum developer easier
(https://truffleframework.com/docs). We use npm (Node Package Manager) to install Truffle Framework. Enter the following code:
npm install -g truffle
You can check the version of installed packages with the following code:
node -v
npm -v
truffle --version
The output is as shown in Figure 1.
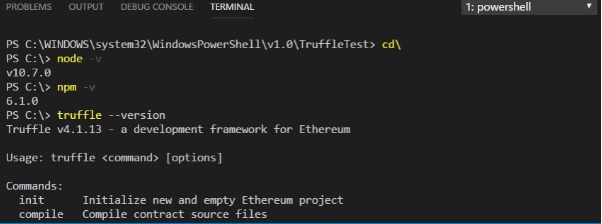
Figure 1
II. Configuring VS Code for Ethereum Blockchain Development
Step 1 Choose the folder for your project
Choose a folder you prefer for your project and enter the following code:
mkdir TruffleTest; cd TruffleTest; code .
The final command in the chain is “Code .”, which opens an instance of Visual Studio Code in the folder from which the command is executed.
Step 2 Install Solidity in the VS Code IDE
In the VS Code IDE, search for Solidity and install it
Step 3 Install Material Icon Theme
In the VS Code , install Material Icon Theme
Now you have the VS integrated with PowerShell IDE for Ethereum Blockchain development.
III. Creating a Blockchain Application
We will create a sample cryptocurrency and a smart contract using the built-in sample MetaCoin in Truffle. Now, download the files that can be compiled and deployed to a simulated blockchain using Truffle.
The code is
truffle unbox metacoin
The output should looks as shown in Figure 2.
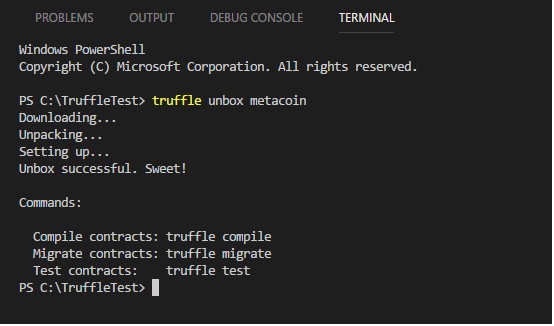
Figure 2
After downloading Truffle metacoin, we should be able to view two important application files written in Solidity, MetaCoin.sol and ConvertLib.sol, in Figure 3.
* Solidity is a contract-oriented, high-level language for implementing smart contracts. It was influenced by C++, Python and JavaScript and is designed to target the Ethereum Virtual Machine (EVM).
*the Ethereum Virtual Machine is designed to serve as a runtime environment for smart contracts based on Ethereum.
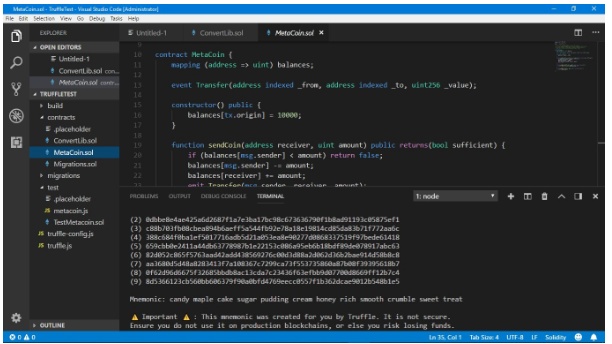
Figure 3
These two files can be compiled and deployed to a simulated blockchain using Truffle.
To compile the smart contract, using the following command
truffle compile
*Or use truffle.cmd compile if there is error as shown in Figure 4.
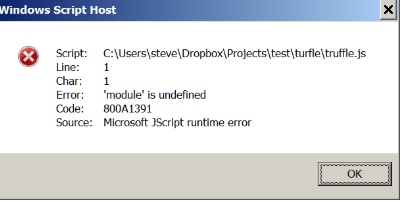
Figure 4
*Source: https://ethereum.stackexchange.com/questions/21017/truffle-microsoft-jscript-runtime-error
After compilation completed, You will notice that a ‘build’ folder has been added to the list of files, which contains the compiled json files ConvertLib.json, MetaCoin.json, and Migrations.json, as shown in Figure 5.
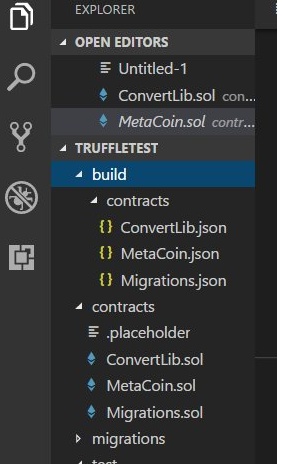
Figure 5
IV Deploying the Contract
To deploy the contract, we shall migrate the contract to a test network in truffle development environment.
The ‘develop’ command appears in the Truffle development console environment. This will set up a kind of dummy blockchain, that operates similarly to the real Ethereum blockchain, and allows us to test deployment and execution of the code without needing to interface with an actual blockchain.
To compile the contract, key in the following command
truffle develop
This command will launch the truffle development environment, automatically configured with 10 accounts and keys. The output is as shown in Figure 6.
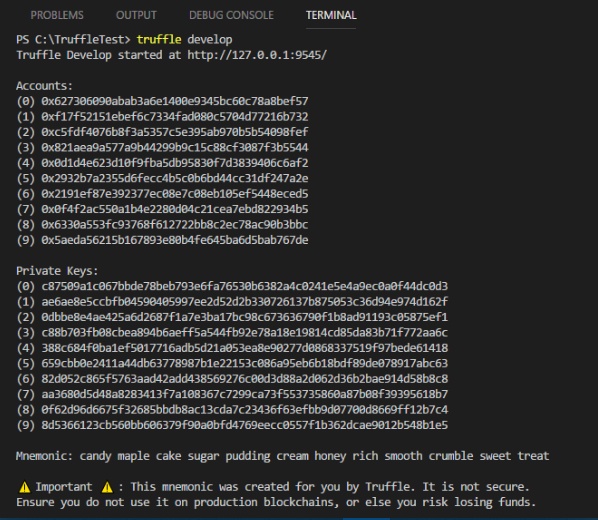
Figure 6
To deploy the compiled contract to the Truffle environment, enter the following command:
migrate
This will deploy the contracts to the test environment. The output is as shown in Figure 7.
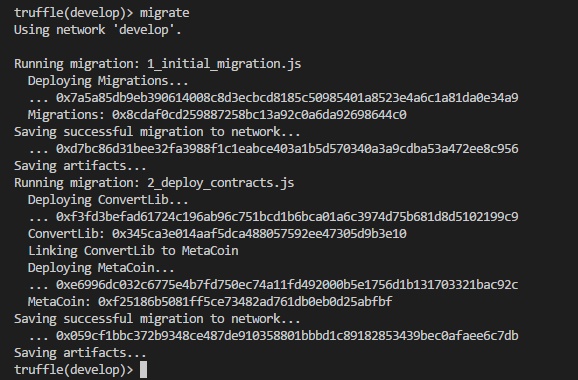
Figure 7
To test the contract, enter the following command
test
You will see the output as shown in Figure 8.

Figure 8
To exit the Truffle console, type ctrl+D
To reenter the Truffle console, enter the following code
truffle develop
migrate --reset
test
V Interacting with the contract with Web3
We have deployed and test the contract, now let’s do something with the contract. We will need to use the Web3 framework to interact with the smart contract on the Ethereum blockchain. Web3 is a JavaScript library which is bundled into the Truffle development console.
When the Truffle development console is started, it automatically configures 10 addresses, and assigns each of the addresses 100 Eth. You can check the ten available addresses by entering the following code:
web3.eth.accounts
The output is as shown in Figure 9.
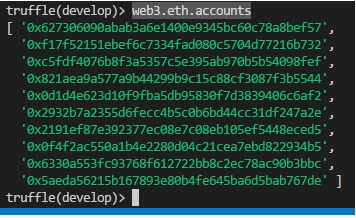
Figure 9
You can display individual account using the following syntax
web3.eth.accounts[n]
For example, enter the following code to see the output
web3.eth.accounts[2]
The output is as shown in Figure 10.
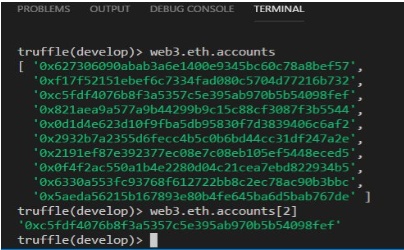
Figure 10
Functions in the MetaCoin.sol file
There are four functions in the MetaCoin.sol file, as follows:
- MetaCoin, the constructor. It is called when the contract is deployed.
- sendCoin, for transferring coins between addresses.
- getBalanceInEth, to convert between MetaCoins, and Ethereum.
- getBalance, to show the balance in the requested address.
* A constructor is a special method of a class or structure in object-oriented programming that initializes an object of that type. A constructor is an instance method that usually has the same name as the class, and can be used to set the values of the members of an object, either to default or to user-defined values.
The constructor MetaCoin comprises only one line
balances[tx.origin] = 10000;
*You can change this to any amount
This code initialises the transaction to 10000 MetaCoin(Not Eth)
The initial address is
Web3.eth.accounts[0]
Checking Balance using the getBalance() method
You can check the balance of any account using the following code
web3.eth.getBalance(web3.eth.accounts[n]).toNumber()
Will display the balance in wei. To convert it to ether, you need to divide it by 10^18
You can use
web3.eth.getBalance(web3.eth.accounts[n]).toNumber()/1000000000000000000
Or
web3.fromWei(web3.eth.getBalance(web3.eth.accounts[n]),'ether').toNumber();
For example, to check the balance of account 0, enter the following code
web3.eth.getBalance(web3.eth.accounts[0]).toNumber()
**The cryptocurrency generated by the getBalance function is Wei
1 Ether = 1,000,000,000,000,000,000 Wei (1018) or 1 Wei=10^-18 Ether
The output is as shown in Figure 11.
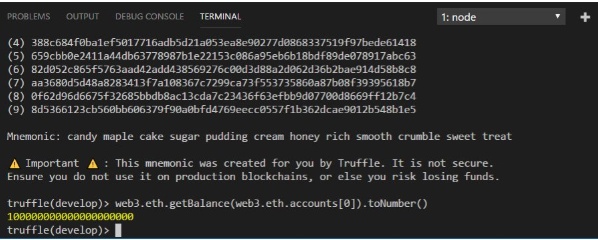
Figure 11
To check the balance in Ether for account 0, enter the following command:
web3.fromWei(web3.eth.getBalance(web3.eth.accounts[0]),'ether').toNumber();
The output is as shown in Figure 12.

Figure 12
To check the balance of Web3.eth.accounts[0] in MetaCoin(not ether), use the following command:
MetaCoin.deployed().then(function(instance){return instance.getBalance.call(web3.eth.accounts[0]);}).then(function(value){return value.toNumber()});
The output is as shown in Figure 13.

Figure 13
The sendCoin Function
To send metacoin from account[0] to account[1], use the following command
MetaCoin.deployed().then(function(instance){return instance.sendCoin(web3.eth.accounts[1], 100);});
To send metacoin from account[m] to account[n], use the following command
MetaCoin.deployed().then(function(instance) { return instance.sendCoin(web3.eth.accounts[n], 10, {from:web3.eth.accounts[m]});})
Example
MetaCoin.deployed().then(function(instance) { return instance.sendCoin(web3.eth.accounts[1], 1000, {from: web3.eth.accounts[0]});})
The output is as shown in Figure 14.
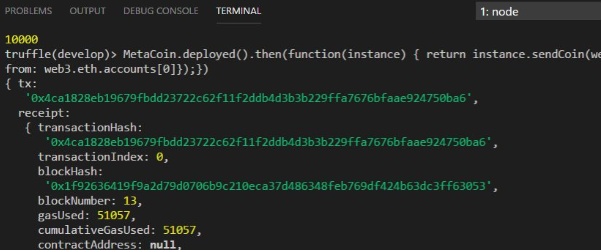
Figure 14
The check whether the transaction is successful , we can check the balance of both accounts. (Note that this is the MetaCoin balance, NOT the Eth balance)
MetaCoin.deployed().then(function(instance){return instance.getBalance.call(web3.eth.accounts[0]);}).then(function(value){return value.toNumber()});
The output is as shown in Figure 15.

Figure 15
To convert MetaCoin to Ether, use the following code
MetaCoin.deployed().then(function(instance){return instance.getBalanceInEth.call(web3.eth.accounts[n]);}).then(function(value){return value.toNumber()});
Example
MetaCoin.deployed().then(function(instance){return instance.getBalanceInEth.call(web3.eth.accounts[0]);}).then(function(value){return value.toNumber()});
The output is as shown in Figure 16.

Figure 16
Debugging the Transaction
In the sendCoin() example, a transaction has occurred on the blockchain. This transaction can be stepped through line by line, using the Truffle debugger. To do this , the Truffle debug command is used, passing in the transaction hash. This hash can be found in the console output following the sendCoin function call.
The command is
truffle(develop)> debug '0x4ca1828eb19679fbdd23722c62f11f2ddb4d3b3b229ffa7676bfaae924750ba6'
This will start the Truffle debugger. The instructions for interacting with the debugger are printed to the console, as shown in Figure 17.
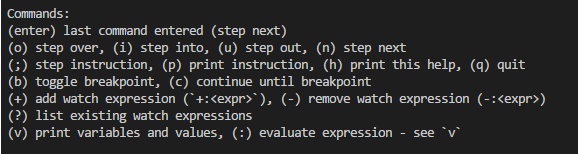
Figure 17
You should start by adding a watch to the passed variables. do this by entering the following command:
+: receiver
+: amount
As you step through the code, the values passed into the function will be shown. Note, these are ‘undefined’ at the start of the function call.
You can press the enter key a few times to step through the code that was executed in this transaction. The output is as shown in Figure 18.
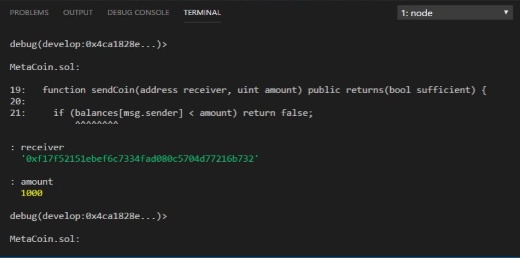
Figure 18
The debug commands can be used to inspect the variables, and add watched variables, as shown in Figure 19.
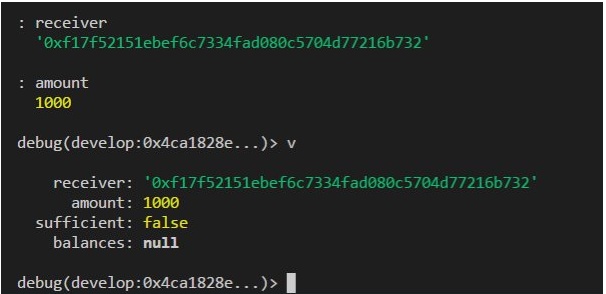
Figure 19
You can try to enter other commands.
Lastly, type quit to quit debugger
Deploying Your MetaCoin Contract with Truffle
Deploy to Ganache
Ganache is your personal Ethereum blockchain which is convenient for testing and interacting with your contracts during development. It ships with a helpful GUI that allows you to see available test accounts quickly, explore transactions, read logs, and see how much gas was consumed. Configure your truffle.js and truffle.config.js for the Ganache network:
module.exports = {
  networks: {
    ganache: {
      host: "127.0.0.1",
      port: 7545,
      network_id: "*" // matching any id
    }
  }
};
Launch Ganache
In the Truffle console, enter the following command:
truffle migrate --network ganache
The output is as shown in Figure 20.

Figure 20
Ganache output is as shown in Figure 21.
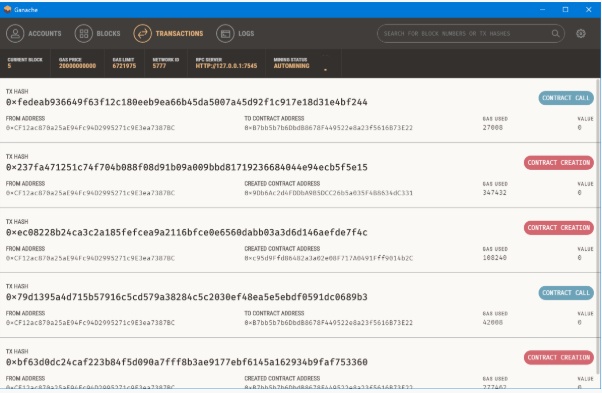
Figure 21
Click transaction and compare the transaction hash. They are the same.
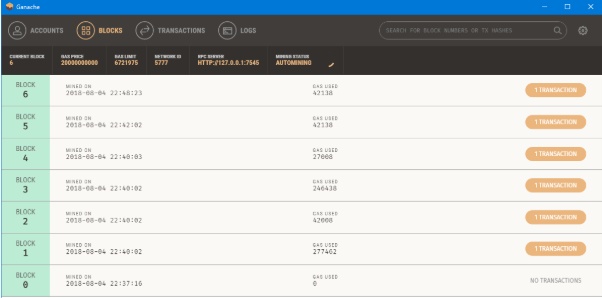
Figure 22
Deploy to Ropsten
Run a node connected to Ropsten and specify the address of the default (first) account to unlock. You will be prompted for a passphrase.
geth --unlock <account> --testnet --rpc --rpcapi eth,net,web3
Configuration for the Ropsten network:
module.exports = {
  networks: {
    ropsten: {
      host: "127.0.0.1",
      port: 8545,
      network_id: 3,
      gas: 4700000
    },
  }
};
Deploy to the Ropsten network:
truffle migrate --network ropsten
Deploy to Rinkeby
Rinkeby network is available only using geth client.
geth --unlock <account> --rinkeby --rpc --rpcapi eth,net,web3
Configuration for the Rinkeby network:
module.exports = {
  networks: {
    rinkeby: {
      host: "127.0.0.1",
      port: 8545,
      network_id: 4
    },
  }
};
Deploy to the Rinkeby network:
truffle migrate --network rinkeby
Posted from my blog with SteemPress : http://www.blockchainguide.biz/developing-an-ethereum-cryptocurrency-on-windows/