Building a production-ready Ethereum DApp from idea to final product — The smart-contract (Part 2)

In the previous post, I discussed the idea behind the survey DApp, the primary focus of this series. By now you should have a fair understanding of how the interaction between the DApp, the survey taker and survey owner is going to look like — roughly — and now it is time to get started.
But before we dig into the smart contract code we need to understand the tools that we are going to use to set up our development environment.
Table of content
This series is separated into 3 sections:
- The smart-contract — Create the Survey smart-contract (You’re here)
1.1. From Idea to a business plan
1.2. Setting up development environment with Truffle — You’re here
1.3. Creating the smart-contract the TDD way
1.4. Testing Solidity Code on TestRPC, Local Ethereum chain and Testnet - The Backend — Server side Ethereum development
- The Frontend — Client side user interface and wallet integration
The smart-contract role of the DApp
We need first to understand how we are going to develop our DApp, the application design is a significant step, as we need to architect application stages properly to avoid code smells in the long run.
The smart-contract is the core module of our DApp, but if we’re part of a team, then the design of the DApp should allow all modules to be loosely coupled, to enable rapid development.
While other parts of the DApp are essential, the smart-contract serves as our business logic, the main point of truth (don’t like to say it is a database!). While validations will exist on both the backend and the frontend, we still want to ensure our data is not corrupted, especially that anyone with the smart-contract address can call its functionality straight away, and that’s why the security of the smart-contract is a keystone to a successful DApp.
Truffle and Web3
Since DApps are literally in their infancy, there are not a lot of frameworks to work with in here, not to mention that the community is currently pushing one specific structure to use, that becomes the defacto nowadays, that is Truffle.
Truffle eases up the development tasks from compiling, testing, migrating/deploying and provide a quick and handy Command Line Interface (CLI) to do all these stuff with ease.
It also provides Truffle Boxes, a prepackaged folder structure that eases up development work with other frameworks like react, uPort and more.
Some of these boxes don’t use the latest versions, so be careful and read your
package.jsonfile for dependencies
Unfortunately, Truffle is not a one-size-fits-all framework and therefore is not sufficient. We would still need to work with accounts, BigNumbers, transactions, providers — such as Metamask and Mist — and more, and this is where Web3 comes into the picture.
Web3 simplifies working with all that is Ethereum such as accounts, transactions, different providers, Blockchain blocks, gas and much more.
Setting up the environment
Enough talk, lets get coding…
1. We need to have the latest version of Node (if you have a non-upgraded Node, you can upgrade it by following this guide).
2. Download geth(Go Ethereum) as we will need to use in Part 4 (instructions here)
3. Create the application’s folder structure by below commands (assuming Unix-based platforms)
# Create DApp Directory
mkdir survey-reward-dapp

# Open DApp Directory
cd survey-reward-dapp

# Initialize the application using NPM (Follow through, or if you're happy with default just go with npm init -y
npm init

# Start by downloading Truffle (You can also install it globally by npm install -g truffle
npm install --save truffle

# Install Web3 as well
npm install --save web3

# Always a good practice to install zeppelin solidity contracts
npm install --save zeppelin-solidity

# Install .env for environment variable management
npm install --save dotenv

# Also our trustee ganache-cli (You can also install it globally as it can come handy)
npm install --save-dev ganache-cli

# Install a great linter and style enforcer for solidity (You can also use that globally)
npm install --save-dev solium

# Install the following for test coverage
npm install --save-dev solidity-coverage


# Initialize Truffle App (use truffle.cmd for window)
./node_modules/.bin/truffle init

# Initialize Solium
./node_modules/.bin/solium init

# We also need to create a sample .env file that inject environment variables would use (This file will be added to .gitignore and will remain local)
touch .env
Notice that I installed everything locally (not globally), it is a good practice if you want to distribute your project without having to worry about individual modules availability. However, you might find it useful to install some of these npm modules globally.
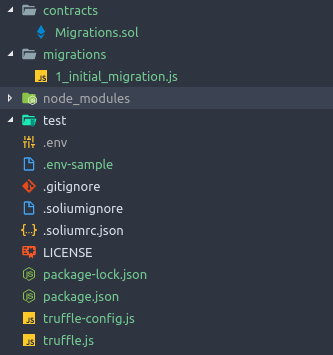
After you finish, you should end up with the below structure (Minus the LICENSE, .env-sample and .gitignore files)
Folder structure in Visual Studio Code
Now time to configure some of these modules to be ready.
Additional npm modules configuration
Now that we sat up the application folder structure, it is good to go through some of these modules to understand their role in the DApp and add its specific configurations.
zeppelin-solidity
zeppelin-solidity is a fantastic npm module that helps with common solidity patterns, not to mention that these contracts have been audited for security so you can safely depend on them. We are going to see how to use these contracts in the next part.
solium
solium is another excellent npm module as it provides lint and preliminary security for solidity code and can also — sometimes — fix these problems, it also helps if you’re working with teams and want to force particular style format.
One thing we don’t want it to analyse is the Migrations.sol contract that comes with Truffle. To ignore it, we need to add the solium ignore list. We can do that by easily open .soliumignore file and add the following line at the end.
contracts/Migrations.sol
We also need to be able to run Solium a lot; it is a good practice to add a script to it inside package.json file like so
"lint": "./node_modules/.bin/solium -d contracts --fix"
solidity-coverage
solidity-coverage is yet another excellent npm module that works in tandem with truffle test command; it generates test coverage report which can be useful, especially if you’re following TDD practices.
First, we need to create the configuration file for solidity-coverage, namely .solcover.js and add the following inside of it
module.exports = {

//Make sure that all open zeppelin contracts are included as a dependency

copyPackages: ['zeppelin-solidity'],

//If we want to skip files

skipFiles: []

};
It is also useful to add solidity-coverage as a script into package.json like so:
"coverage": "./node_modules/.bin/solidity-coverage"
dotenv
dotenv is simply a .env file that load all the properties inside of it into an environment variables, which can be handy especially when we develop server-side code.
ganache-cli
ganache-cli is part of the Truffle suite; it is JavaScript-based Ethereum Blockchain simulator that runs locally which is useful to run different tests and make sure that everything is working as intended.
It is also essential to add ganache-cli as a script into package.json like so:
"testrpc": "./node_modules/.bin/ganache-cli --accounts 30"
In the above command, I’ve changed the default number of generated accounts from 10 to 30.
Truffle
Truffle is the main framework to compile, migrate and test different solidity contracts, we are going to depend on a lot of its functionality throughout this series, but first, we must prepare its configuration.
First, we need to add our the development configuration into truffle.js configuration file.
For windows user, if you have problems with configuration, it would be better to use
truffle-config.jsfile and deletetruffle.jsfile.
module.exports = {

  networks: {

    // Test RPC environment
    development: {
      host: "localhost",
      port: 8545,
      gas: 0xfffffffffff, //Maximum Gas
      gasPrice: 0x01, //Minimal Gas Price
      network_id: "*" //Listen to all networks
    }
  }
};
The above file is going to grow as we utilise dotenv and test other networks as we move on.
And again it is good to add different truffle commands as a script into package.json like so:
"compile": "./node_modules/.bin/truffle compile",

"test": "./node_modules/.bin/truffle test",

"migrate": "./node_modules/.bin/truffle migrate"
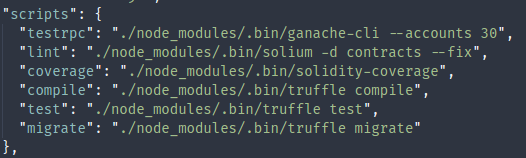
You should finally end up with something similar to the below screen in your package.json file.
In the next part
With what we’ve covered in this post, we are ready to start working on the DApp solidity code; if you found the above too long to follow, you can grab the code from the GitHub repository
If you like this article, please consider following me for more.
Also follow me on Twitter!