A Guide for Margin Trading on BitMEX

I decided to create this guide as I found the whole BitMEX and margin trading process to be daunting and very confusing when I first started. I hope that this post can help people successfully trade and make profits on the BitMEX exchange, but more importantly I wrote it to stop people getting REKT by margin trading.
First and foremost — I am no way near a professional on Margin Trading, Technical Analysis or Financial Advice! This guide is purely something I worked on to help me get a greater understanding of the features, functions and options the BitMEX exchange offers.
If you found this guide to be helpful and you would like to sign up to BitMEX, please consider using my referral link listed below. If you feel you would like to give something back to the author, use my referral link.
You should definitely use this link, as you will get a discount on BitMEX fees for the first 6 months of trading!
This guide is available for download at BitMEX Survival Guide
Foreword:
Before I get into the options BitMEX has to offer, I highly suggest you enable the FOMO Indicator on your TradingView charts. You can find all the information needed for FOMO Indicator here.
Other indicators I use on my charts are RSI, Stoch RSI, EMA’s and most importantly trend lines from previous support/resistance zones. There are multiple YouTube videos explaining the concepts behind all of these, so I won’t clog up this guide with explanations.
I predominantly trade the XBT Perpetual Contract. So this guide will base itself around this contract type.
If you are new to cryptocurrency, or are not confident with the features of how to trade cryptocurrency successfully, then I advise that Margin Trading is not suitable for you. It requires particular attention, caution and advanced elements of risk management. Anyone using the information offered in this guide does so at his or her own risk.
Margin Trading Theory
The theory behind margin trading is pretty simple. You acquire a certain amount of contracts for a certain price, watch them go up or down and sell them back at the new price. You keep the difference between your buy/sell price. It works in both directions; you can make money when the price is falling, just as you can when it is increasing.
An example:
You buy (go LONG with) 10 XBT at a price of USD6000.
Your position is LONG 10 XBT x USD6000 = 60,000 Contracts.The price of XBT increases to USD7000.
Your profit is: 60,000 x 1 x (1/6000–1/7000) = 1.4286 XBTSay the price dropped to USD5000 instead:
Your loss would have been: 60,000 x 1 x (1/6000–1/5000) = -2.0 XBT.Notice how your loss is greater? This is due to the inverse and non-linear nature of the contract. So the opposite applies if you went SHORT instead. Your profit would be greater if the price moved down than the loss if it moved up.
In the example above the 1 refers to your Leverage. So if you had 10x Leverage you would have made 14.286 XBT on the LONG, and lost 20 XBT on the SHORT.
Terminology:
So let me explain some terminology that was foreign to me when I began margin trading.
Contracts - Contracts are what we trade. Think of it as the actual amount of a stock you’d like to trade. On the XBT Perpetual Contract: 1 XBT = USD1
Leverage - A multiplier for your trades. BitMEX offers up to 100x leverage.
Limit - An order type where you set the price at which you desire to Buy/Sell. Placing this type of order will attract a Maker Rebate (See below).
Liquidation - A price point determined by your margin, leverage and current contract price whereas, if reached, your entire position will be closed automatically. AKA. Getting REKT!
Long - Going LONG on a trade means that you believe that the price of the stock will increase.
Maker - A term used to describe those users who place their orders through the Limit option. A rebate is paid to Makers. To qualify for a Maker Rebate, your order must actually appear on the orderbook.
Margin - The total equity you hold within the exchange or within a position.
Market - An order type where the price you Buy/Sell at is given by BitMEX based on the current orderbook. Placing this type of order will attract a Taker fee (See below).
Orderbook - Where all the current orders are waiting to be filled. Having an order sit on the Orderbook will mean you qualify as a Maker and are paid a Maker Rebate.
Position - When you’ve entered a trade (Short or Long) your position details the amount of contracts you are trading, the entry price, your liquidation price, and your margin.
Short - Going SHORT on a trade means that you believe that the price of the stock will fall.
Stop Loss - An order you can set to close a portion of, or your entire position, should a certain price be reached. Usually used to set a price point that you are willing to absorb a loss. A golden rule of margin trading is to set a Stop Loss to avoid Liquidation. Also known as SL or Stops.
Taker - A term used to describe those users who place their orders through the Market option. A fee is charge to Takers.
My BitMEX Process
When I first look into margin trading for the day - I go straight to TradingView and open up the Daily chart and look at:
The last few FOMO Indicator signals to see whether there has been movement one way or another.
The RSI. If it is above 70 or below 30 I know that it’s oversold/overbought.
The Stoch RSI. It’s a great indicator to show you when the trend will slow down and possibly reverse.
The EMA’s. If the candles are using the EMA’s as support/resistance this helps.
Any trend lines I have on my chart.
I then do the same for 4 hour, 2 hour, 1 hour, 15 min & 5 min. You’ll be able to see trends if they all have really low RSI or something in common. Then if the stars align you’re in business. 90% of the time they wont all say the same thing.
So, then I put it down to different timeframes. If I am planning to be trading a for a longer period of my day, say 5–8 hours, I go solely off the 1 hour chart. If I want my trade closed in under half an hour I’ll use the 5 minute. This one isn’t great for showing trends though and can be quite risky.
Limit vs. Market
Throughout this guide you will hear me refer to a Limit Price and a Market Price. I much prefer using Limit Prices as that way BitMEX pays me to place my entry and exit orders thought their Maker Rebate (explained later). Market Price is a quick way to enter and exit the market but will attract a Taker Fee (also explained later).
To have an order qualify as a Limit Order it needs to sit on the Orderbook and not be filled instantly. Any orders that are instantly filled are classified as Market Orders. This can become confusing and frustrating sometimes when you place a Limit Order too close to the current price and it fills as a Market Order thus attracting Taker Fees.

The Yellow text shows me that my Limit Order is on the Orderbook.
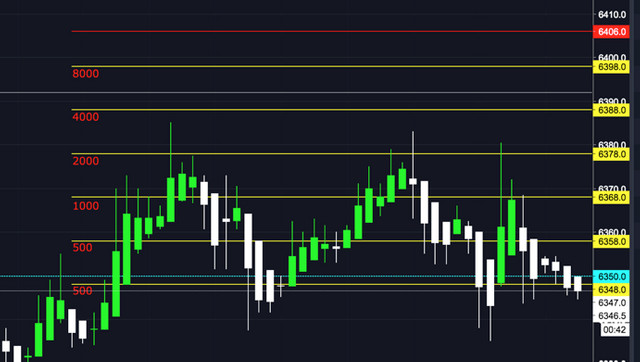
The image below shows you the zones you need to be placing orders to make sure they enter onto the Orderbook. Make sure they are a few dollars between your entry and the current price. A little trick I use is to look at the other orders on the Orderbook and try to set my entries a slight bit before the larger orders. In the image below if I wanted to set a Short, I would set it at 6358.5, so I can beat that larger order of 636,000 contracts, as it may halt the price movement.
For a SHORT order you want to enter a price ABOVE current price.
For a LONG order you want to enter a price BELOW current price.
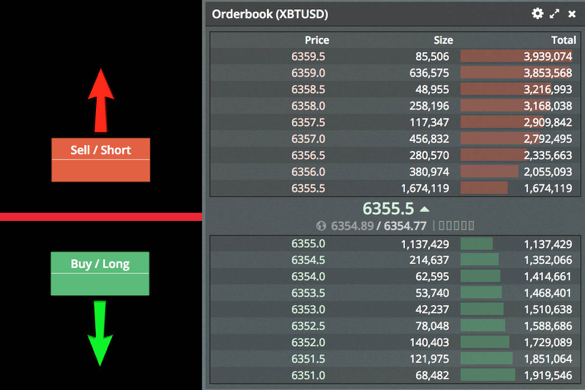
Where to place your Limit order to ensure it enters Orderbook.
Think of it in the terms of your trade:
LONG: “I believe the price will Increase. Therefore to make the most amount of profit, I want an entry price as LOW as possible to begin my trade”
Or
SHORT: “I believe the price will Decrease. Therefore to make the most amount of profit, I want an entry price as HIGH as possible to begin my trade”
Stop Losses
Before I even look at putting my money into a trade, I will set up my Stop Losses. This is a crucial part of margin trading, especially so with leverage in play. A Stop Loss will save your position from ever approaching huge losses or worse, LIQUIDATION!
This is one section where BitMEX has us all tied up in an unpleasant situation. Now, I absolutely hate paying Taker Fees (I’ll explain these in detail later in the guide), but the Stop Loss process makes it almost unavoidable.
Here is an example that we can follow along with:
I am Shorting 1000 XBT contracts with an Entry Price of USD6100. I would want to set some Stop Losses at a price above 6100 just in case the market moves upwards.
Let’s say I set a Stop Limit order at a Stop Price of 6230 and a Limit Price of 6235. The theory behind this being that: If XBT reaches my Stop Price; it’ll place an order for me to Buy (Close my position) at 6235. However, as this order is above the current price of XBT, it’ll just cancel the order.
So my only hope for the Stop Limit order to make it to the Orderbook is to have the Limit Price below the Stop Price (for a Short, obviously above for a Long). Example: Stop Price 6230, Limit Price 6225. I then have to hope that XBT falls down slightly after hitting my Stop Price. Only then would I achieve an order on the Orderbook assuring myself a Maker Rebate.
This would only work if the price of XBT were crawling upwards slowly. As it goes upwards, it slowly retraces and comes back down a few dollars, just enough to hit my Limit price.
As this type of market movement is unlikely when XBT goes on a pump upwards — I would have a Stop Market order set up at 6235 to be used as a safety stop. That way if XBT shoots straight past my 6230/6225 Stop Limit, my 6235 Stop Market would close the trade for me (unfortunately attracting Taker Fees, but I’d be safely out).
I have demonstrated the placement of the Stop Losses below

Stop Limit/Market placement attempting Maker Rebate upon exiting failed trade.
The reason for the Stop Market is just in case the price of XBT is pumping upwards massively. Imagine that my Stop Limit order gets placed at 6230, but because the market was moving so fast the price of XBT is now 6300. So it has skipped over my order and I’m stuck in a position I do not want to be in. This is where the Market order will come in handy as a last resort safety measure. It will sell no matter what the price of the market is and release me from my position.
Setting a Stop Limit or Stop Market won't cost you anything. You can set 100 of them and they’ll just cancel themselves out if they hit. I highly recommend making sure the Close on Trigger box is checked. If not, when your Stop hits it will open up an opposite position for you.
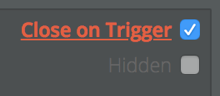
Ticked if I want Stops to close positions only.
When you set a Stop Limit before you have an active position you will get this warning dialogue box asking you if you are sure that you want to place this Stop order.
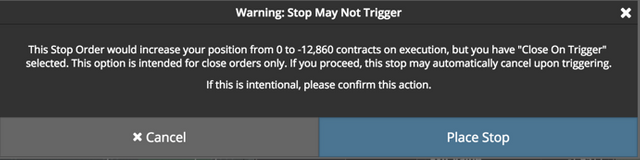
To make sure you don’t open another position.
Once you have a Stop in place, you’ll find it appears on the Open Orders pane. You can manually adjust this Stop at any time by clicking on the numbers and moving them up or down, then accepting your changes. This becomes very handy when you have a Stop set and the price is getting close to activating it, but you can see the activity is dropping off. So you want to adjust your Stop by a few dollars to remain in the position.

Adjusting your Stops is simple using the up/down arrows and Enter key.
I found that the best way to understand the mechanics of Stop Limits was just to set a few and play around. Practice with 1 contract and absolutely nothing can go wrong then.
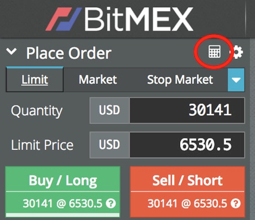
How to set Limit Orders
Opening a position with the Limit tab is far more beneficial than using the Market tab. You will get charged a Taker fee using Market orders, whereas you will get paid to set Limit orders (known as a Maker rebate, more about this later).
I really don’t understand why anyone would be using the Market option. Sure, it is quick and it’ll get you into the trade instantaneously, but if you are doing BitMEX correctly, you should have planned your entry with solid TA and not need to jump in hastily. This is where FOMO (the horrible mentality, not the awesome indicator!) will get the better of you.
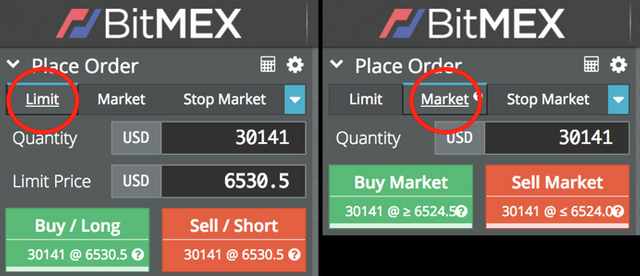
The different order tabs — Limit and Market.
To set a Limit Order you need to first select your desired Leverage. I highly recommend nothing over 10x when you are first starting! Yes, the higher leverages can seem tempting, but the losses from them are increased greatly, as is the fee you may pay. You use the Leverage slider to choose a Leverage point. Once you have set your Leverage don’t touch the slider again, as it will apply any changes you make to your open position! I have learnt this one the hard way.
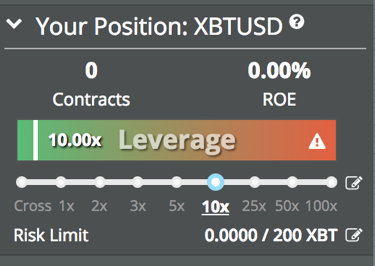
Leverage slider. Anything above 25x is not recommended for new traders.
One of the most important things with Limit Orders you need to be aware of is that your order needs to hit the Orderbook before it’ll be recognised as a Maker Order and give you the rebate. If you set the order value too close to the current price BitMEX perceives this as a Market order type and you will absorb the Taker fee. The Taker fee is quite substantial and can eat into any gains you make on the position. So set your price at least a dollar or two away from the current position to ensure it reaches the orderbook.
You will know that your order is on the order book in two ways. The first way is on the Orderbook pane itself, signified by yellow text. It shows me that my order is in the group of orders at 6522.0.
The second way is by looking at the Depth Chart. See the little green dot? That is my order waiting on the Orderbook ready to fill. Say this order filled, I would obtain my Maker Rebate and BitMEX would pay me to place this order. As a side note, exiting positions also works the exact same way. Make sure to exit at a set Limit price to obtain another Maker rebate and assist your profits as opposed to eating into them with Maker Fees.

Orderbook showing my order. Depth Chart showing my order.
A neat little trick to make sure you ALWAYS get a Maker Rebate is to have the Post Only box ticked. That way, when you place your Limit Order, if it was going to fill against resting orders (at Market level) it will cancel your order instead. This tick box is a safe guard against slipping into an order at Market price even when using the Limit Order function.

Keep this box checked to always ensure Maker Rebates.
How to Exit a Position
There are a few ways you can exit your trades and secure those gains. One of the easiest is to look in the Positions pane and find the box at the very end that says Close Position. You can input a specific value in this box, click Close and a Limit Order will be placed for you to close your position.
Again, there is the option to exit at Market price, but as we are smart traders, we don’t want to use Market entry and exits. Make sure that your Close Order makes it to the Orderbook so you can get the Maker Rebate again, as opposed to paying the Taker Fee to exit.
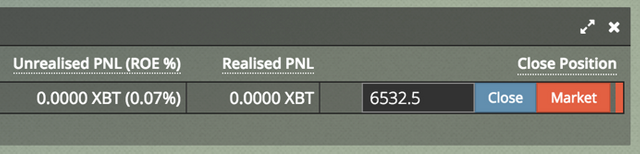
Exiting a trade using the Close Position box.
How to Chase Profits
In my opinion, one of the trickiest things is picking an Exit from your trades when they are in profit and when you’ve made a mistake and they are in loss. TA can help you decide on an area where you think a price movement will slow, or turn around completely. So you should definitely base your Exit off predetermined price points.
However, there are times when the price goes beyond your expectations and anything from there on are just further profits for you. So you will want to chase these profits with an Exit Strategy just in case the price reverses and starts climbing back to previous levels, which would eat into your profits.
A tactic I use for this is to keep adjusting my Close Position order by increments as the price is moving in my favour. Once I am happy with my profit I will place a Close Position order just a bit above/below the current price level (depending if I’m Short or Long). That way, if there was a reversal, my position would close on my Limit Order and I’d be in profit.
It is also handy for times when the price stays on track and keeps falling/rising past the point I was already happy with. I can make further gains from the level I was already willing to accept. So I will keep adjusting the Close Position order every time the price drops another 2–5%. Keep in mind that this market moves in waves and after the up there will be a down. Pick your targets by looking at the way the market is moving and adjust accordingly.
Take Profits Option
BitMEX also offers a Take Profit option. This works just the same as a Stop Limit order, but is used when the price is moving in the direction favourable to you. Set it the same way you’d set a Stop Limit Order, but just remember that you are going towards those numbers.
Take Profit Orders are great for when you want to exit a portion of your position. A good way to lock in those profits, but still keep a foot in the game just in case the price moves even further from your entry point.
In my example below I am setting a Take Profit Order to close a Short position that is already in profit. When the price reaches 6524 a Limit Order will be placed for me to close my position at 6520. Remember to leave a bit of breathing room here so when your order is placed it hits the Orderbook, to lock in that Maker Rebate and avoid that horrible Taker Fee.
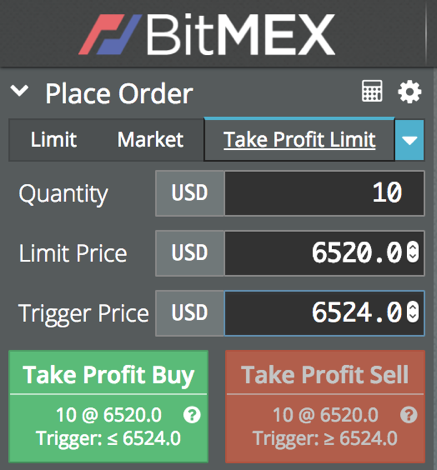
Setting Take Profit Orders.
Staggered Order Strategy
By now you have the basics of how to place Stop Losses, Limit Orders and methods to exit trades in profit. I want to introduce a more advanced strategy that gives a great Risk to Reward ratio. It involves staggering your entries with a stop loss above/below your highest Limit Order. This strategy is perfect for when you believe XBT is rising/falling to a point and will then fall/rise once it hits this point. Such as in a Bull/Bear flag situation.
To ascertain the amounts of contracts I will set for each Limit purchase I would input my maximum order price and check how many contracts I could purchase. For example, let’s say it was 8000. I then start to place orders at half the value of the order above it, starting with the first order at half the total I could potentially do (4000, 2000, 1000, 500, 250, 250). I could keep halving, but I’ll eventually get to tiny numbers and I am happy with having 6 staggered levels. Add those numbers up and I’ll get a total of 8000.
I would definitely want to set a Stop Loss somewhere above/below the largest order on my staggered list just in case. Thanks to the weighted staggering, by the time all of my entries have been filled I would have an average entry price pretty close to the current price. So my Stop Loss would be able to remain quite close to my last entry price and only have a small percentage of loss for my entire trade.
Let me explain this with an example:
Current price of XBT is 6250 and I believe that I have identified a Bear Flag after which XBT will fall; however at the current moment XBT is slowly rising. My TA displays a point of resistance at around 6350 before it’ll start to rapidly fall.
The image below illustrates exactly how I would stagger my Limit Orders and position my Stop Losses.
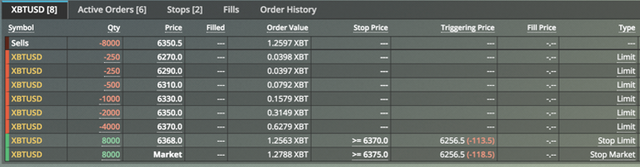
Orders staggered every 20 points at half the amount of the order below. At the top line you can see what my Average Entry Price is (6350.5).
This method represents a very safe trade. I accumulate on the way up, and then if XBT turns downwards I have a position with an average entry close to the turn price. I also safeguard my position with a Stop Loss close to the final Entry price due to the staggered nature of my entry points. This strategy coupled with a staggered Take Profits exit plan is very robust and has a low risk to reward ratio.
A neat little trick I use when I stagger my entries is to plot them on my 15 min Trading View chart as highlighted in the image below. As a very visual person, I find that this method gives me a very good representation of which orders have hit and which ones are still waiting. The numbers to the left represent the amount of contracts in each order.
TradingView 15 min chart showing staggered entry positions of orders.
I set the visibility of the lines and number text to 15 min only. That way they do not clog up my 1, 2, 4 hour & Daily charts when I am searching for trend reversals. Setting the objects to show on 15 min only is easy (shown in the image below). Either double click them, or right click and use the visibility tab to choose your range. A time saver I use here is to save my visibility parameters as a Staggering Entries Template in the Visibility tab. That way I don’t have to adjust the slider each time.

Visibility tab lets you select which timeframe objects appear.
Calculator
BitMEX offers a great little tool to help you trade in the form of a Calculator. This handy tool should not be overlooked and can be found next to the Place Order pane.
BitMEX Calculator.
Before I enter any positions I input some numbers to realise the definitive areas of each trade. The Calculator can show your current Profit/Loss (PnL), Target prices at set percentage levels, and your Liquidation price. The slider button in the top right is used to tell the Calculator if you are in a Long or Short position. Then just enter some digits and the Calculator will update the values on the right.
Profit/Loss is great for working out Stop Limit levels. Say you want to risk falling 2.5% before a Stop Limit comes into play. You can use this tab to find the level to place your Stop Orders.
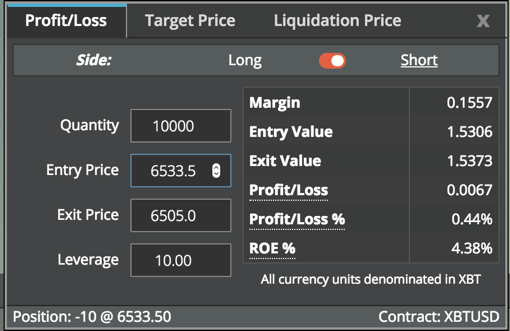
BitMEX Profit/Loss calculator.
As we are intelligent traders, we will understand that small gains can make a huge difference when a lot of them are added together. The Target Price tab lets you work out the Exit price needed to achieve a certain percentage level. I use 5% as my standard, then once I reach this level start chasing with Take Profit Limit Orders or manually adjust my Close Position as the market continues to move in my direction.
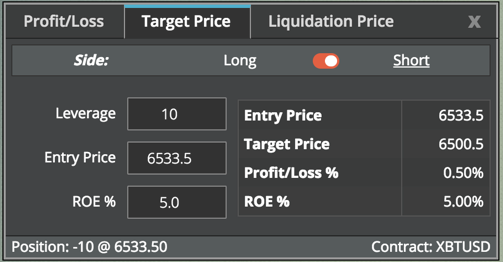
BitMEX Target Price calculator.
Nobody ever wants to get liquidated — It is a dagger through the heart! Fortunately BitMEX helps you avoid liquidation by showing you the price point at which they will take over and sell 100% of your order and you will lose everything (AKA. Liquidation!). The Margin slider here refers to trading with Isolated and Cross Margining. Isolated just means that you can only lose whatever is in the margin of the current position. Cross Margin allow BitMEX to draw more balance from your wallet to avoid liquidation.
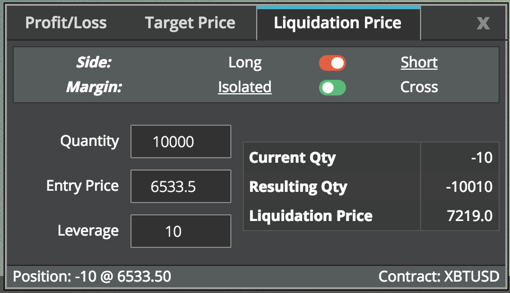
BitMEX Liquidation Price calculator.
Liquidation
In the event that your trade doesn’t go the way you have predicted and in-fact gets incredibly far from your projected price points, BitMEX has formulated a solution to assist your position from reaching total bankruptcy - Liquidation.
Say you are in a Long position. You have your Entry point; anything above this is Profit for you. Below this Entry point BitMEX calculates a Liquidation zone that sits slightly above total Bankruptcy
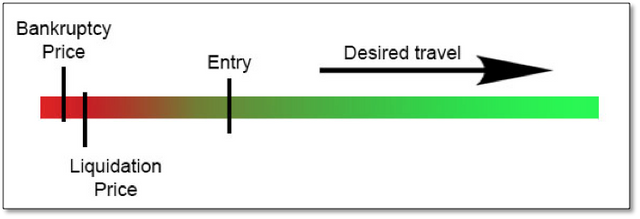
Liquidation point for a Long trade, set just before Bankruptcy.
There are a load of processes that are enabled when a position is being liquidated. Liquidations usually occur when the market makes sudden pumps or dumps and people haven’t set Stop Orders to protect themselves. You will notice in the Orderbook that Red text will appear on the orders. These are positions that have been taken over by BitMEX and are currently being liquidated.
For much more information on the liquidation procedure I suggest you check out BitMEX Liquidation Process and familiarise yourself with the processes behind it.
Fee structure
BitMEX is a business and they exist to make a profit for themselves. They do not charge for Deposits or Withdrawals, so they make their money in the form of Fees applied to every trade. However, the BitMEX fee system can be utilised in your favour, as there are two types of fees charged: Maker and Taker fees.
A Maker fee is actually a negative fee (a rebate) paid to those users who place their orders through the Limit option. A Taker fee is charged to those users who place their orders using the Market option. This is the same for both Opening and Closing positions.
Taker fee is 0.075% of your total position at Open AND Close.
Maker fee (rebate) is -0.025% of total position at Open AND Close.
I have highlighted this, as there really is no reason for you to be paying a Taker fee if you are trading in a smart way.
An example:
The price of XBT is currently USD6000.
You want to go Long as you believe that the price will increase.
You enter a Limit Order at a level a little BELOW 6000.
That way your order will be placed on the Orderbook waiting to be filled.
If you have had put an order within a few dollars of 6000, chances are it would be filled at Market Price and you’ve just cost yourself 0.075%.
So you are -0.075% before your trade has even started!
The fees I have listed above are current for XBT at the time of writing this guide. However, the Alt Coins available to trade on BitMEX use a slightly different fee structure: Maker Fee (rebate) is 0.05% of your position, Taker Fee is 0.25% of your position!
The image below is a small-scale test I completed to describe the Maker rebate. You can see I was paid for both my entry and exit. The other rebate I received was from the funding BitMEX applies on a regular basis. I won’t explore this Funding in this guide, but you may notice ‘Funding’ on your Trade History. Basically if the funding rate is negative, Traders in Short positions will pay a small fee to Traders in Long positions.

Trade History details all trades and fees paid. Notice the Maker rebate for Limit Orders.
You can view your fees and transactions by going to your Trade History on the BitMEX site at Trading History
Trading Advice for Newcomers
I found the best way for me to determine whether I was grasping the concept was to Paper Trade. The way I achieved this was to determine the price point I wanted to enter either a Long or Short trade. I would enter all of the details into the BitMEX Place Order section, but just not press the Buy/Sell button. BitMEX would tell you the details of the trade and I’d write them on a spreadsheet (you could literally use a piece of paper too).
Once the trade developed I would see where my position had taken me. I found I was getting my Entries pretty close to the turn point and by following the FOMO Indicator I was making some very profitable trades. I did this for a while (well, I still do this when I am feeling hesitant!) and noticed how much better my trading was becoming.
Sign up to BitMEX’s TestNet site to have a try of Margin Trading with fake money. Just be aware that the site is very laggy and using TA may not give you the same experience as using TA on BitMEX’s main site. It is a great way to understand the functionality of BitMEX though.
The Twitter account @BitmexREKT is interesting to watch when the market is moving rapidly. It always seems to drum into my head the importance of Stop Losses and how quickly a ‘sure thing’ can change.
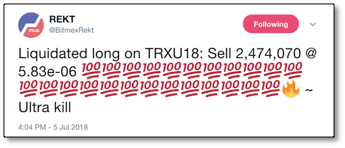
Ouch...
Summary of Steps
- Check TA to determine whether a profitable trade looks likely
- Revise all timeframes
- Look at FOMO Indicator for Trend Reversal or Buy/Sell Signals
- Determine an Entry point and decide upon risk level
- Higher Leverage = Higher Risk
- Potentially decide upon an Exit point before going into trade if TA suggests an obvious trend reversal
- Use Calculator to determine target areas for Exit and Stop Loss
- Fully understand all target areas of your trade and make an Exit Strategy should the trade not go in your favour
- Set up Stop Loss system
- Set Stop Limit, then a Stop Market as a safety backup
Enter Limit order at least a few dollars away from current value to ensure your order goes onto the Orderbook
Once in the trade, Monitor the current trends and market movement as the trade evolves
Once the trade starts to reach profitable points consider Taking Profits
- Either manually adjust Close Order or set a Take Profit Limit
- Exit trade in profit once your target is reached or the market trend starts to reverse
- If the Exit is due to a Stop Loss trigger — determine what went wrong and use it to benefit your future trades
- Appreciate your newfound profits by spending time with your loved ones and friends (Not a part of the Margin Trading Process, but why make all these gains if you can’t enjoy life?)
Enjoy BitMEX and Margin Trading!
The most important element is to make educated and smart trading decisions. Always choose the safer option of lower leverage and taking profits. BitMEX has severely REKT a multitude of people who have traded stupidly!
This guide was compiled specifically as an educational tool for people interested in the BitMEX margin trading exchange. It is my absolute pleasure seeing margin traders making well-educated calls, sharing knowledge and subsequently benefiting themselves and the community with some nice gains.
Should you desire to provide some form of a thankyou, a donation to my BitMEX BTC address would be great! Minimum deposit on BitMEX is 0.0001 XBT.
My XBT Wallet address is: 3BMEX4cmwDoEHEoqQfU1ecGw6i1g3MDbkU
very nice article and seems like you put some work into it
wishing you luck trading :-)
Thanks mate.
Yeah, it's been a work in progress for me for a long time.
Glad to share it with people. I'm hoping it helps some understand BitMEX more, and hopefully make some nice gains like I am.
well, I wish you a nice steem career as well as good bitmex profits
Congratulations @crocketdile! You have completed the following achievement on Steemit and have been rewarded with new badge(s) :
Click on the badge to view your Board of Honor.
If you no longer want to receive notifications, reply to this comment with the word
STOPCongratulations @crocketdile! You have completed the following achievement on Steemit and have been rewarded with new badge(s) :
Click on the badge to view your Board of Honor.
If you no longer want to receive notifications, reply to this comment with the word
STOPCongratulations @crocketdile! You received a personal award!
You can view your badges on your Steem Board and compare to others on the Steem Ranking
Vote for @Steemitboard as a witness to get one more award and increased upvotes!