Burstcoin Mining Step 2: Plotting the Harddrive
Burstcoin Mining Blog(Step 2)
How you plot your drives really depends how what kind of equipment you have available, and how much you’d like to monitor your plotting.
I will go ahead and explain the most hands free way of plotting for the average user using an SSD as an internal(startup disk) with about 30-60 gig of free space, then moving it to the external hdd in 30-60 gig plots. This decreases plot time, as well as allows you to start mining as soon as your first plot of 30-60 gigabytes has moved to your hdd. First however, I will explain some important vocabulary used in this process:
Vocabulary used:
plot: a dedicated space of hardrive that has nonces written to it which the miner searches for deadlines on
plots: plots can be any size, but have to go in numerical order, example --- if one plot ends with 10, the next plot starts with 11, etc
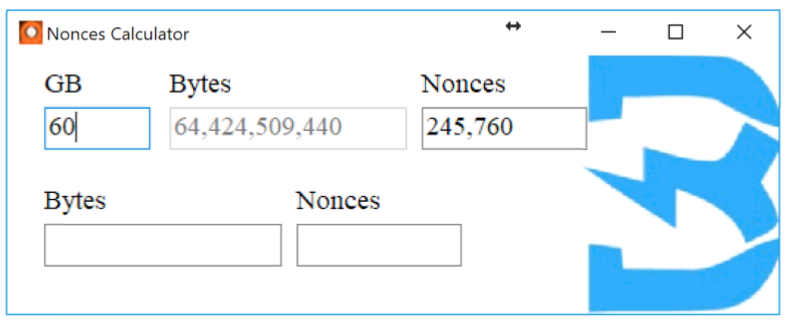
Nonce: how plots are calculated, nonces are translated from bytes an you can use this calculator to calculate how many nonces needed for the amount of free space you have:
https://www.burstnation.com/index.php?tagged/265-calculator/&objectType=com.woltlab.filebase.file
Optimization: as a general rule of thumb it is way better to run a miner that automatically optimizes the plot for you, it is a little bit slower, but drastically increases the search speed for theplot.
Step 1) Getting a burst wallet
The easiest way to get a burst address without downloading (what is now) the 10 GB block chain is to first open a wallet through a 3rd party. Use burstnation---
https://wallet1.burstnation.com:8125/index.html
and follow the account creation
- Create account--- get passphrase
- Copy passphrase into safe location
- Open wallet
- On the green account balance icon in the middle of the page, press on “more info”, it will then display important information such as your “account ID” and “numeric account ID”. Copy down both of these as we will use them later.
Step 2) Plotting Drives:
By far, my favorite plotter is S Plotter also known as Splotter.
Splotter allows you to plot on a faster drive, then move that plot to a larger drive in stages, while optimizing. This allows for faster plotting speed as well as being able to start mining within an hour.
Mining with Splotter:
- Download Splotter:
https://github.com/SamuelNZ/SPlotter/releases/
Notes: individual plot sized DOES NOT MATTER, total plot size DOES MATTER, and if you are missing
- Use the nonce calculator to determine the size of plots you want to use, since my ssd only has 40 gb of free space we will use 40 gb as an example:

- Once you have the amount of nonces you want to create, you will edit the “Runthisasadmin” file by right clicking on it and opening it with notepad.
My file:

(screenshot)
@setlocal
@cd /d %~dp0
SPlotter_avx2.exe -id YOURNUMERICALACCOUNTID -sn 0 -n 245760 -t 4 -path C:\templots -move H:\plots -mem 5G -repeat 240
(if you want to copy paste, be sure to change your numericalaccount ID and path)
Explanation of “runthisasadmin” bat file commands:
-id :numeric account ID located in your wallet(see previous step)
-sn: starting nonce, if this is your first plot, put it as zero, if it's a new plot start it at your last plot
-n: how many nonces, we chose 245760 because we only had 60 gigs of free space on the SSD
-t: number of threads, find out how many threads your cpu has and choose how many you want to use. I recommend total threads -1 for stability. If your going to browse the internet while plotting -2.
-path: path to where you will plot the nonces. I recommend plotting to an SSD then moving to a hdd for better speeds
-move: use this to your larger hdd path
-mem: how much memory you want to use
-repeat: how many times you want to repeat the process(you can leave it blank and it will go until the target hdd is full)
Make sure to run the “runthisasadmin” BAT file as admin to use the full potential
Notes: If you're tech saavy you can create another bat file and do the move process with two different hdd at once. So you can plot with one while the other is moving the file, alternating CPU usage for maximum results! It’s a little complicated and you get bottlenecked with your hdd write speeds, but by using this method you will be mining within an hour!
Good luck plotting everyone! Please stay tuned for my next tutorial explaining how to mine with the CPU miner after you have started your plots its time to make some revenue!
If you enjoyed this post and would like to continue learning about burst coin, please restreem subscribe to my steemit @maninjapan1989.
Lets get bursting!
