DIY: Bitcoin and Litecoin Cold Storage Wallet with Raspberry Pi and Electrum
If you are fed up with all the waiting time nonsense for a hardware wallet - because of the massive volume as of late, to get a Ledger Nano S you have to wait till September, to get a Trezor you have to wait till August OR go for a premium price – and you also like to take matters into your own hands, then it is time to think outside of the box and try out a good alternative: build a cold storage wallet for Bitcoin and Litecoin by YOURSELF!
Rest assured! You don’t need to be a tech expert – I for one am definitely NOT – creating a cold storage is as easy as 1, 2, 3. You only need to read the rest of the way and you’ll be fine.
First things first! In my case, I went for the affordable mini-PC Raspberry Pi. Check the official website https://www.raspberrypi.org/ to see how you can buy one. I bought a kit that had a Raspberry Pi 3 Model B, a case, and a Power Supply.
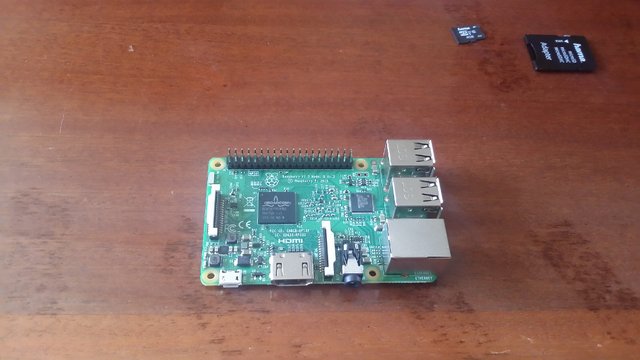
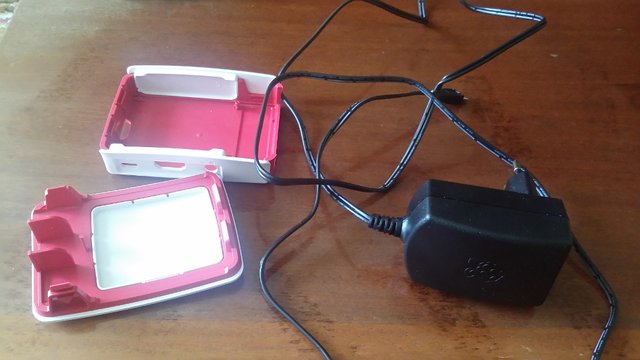
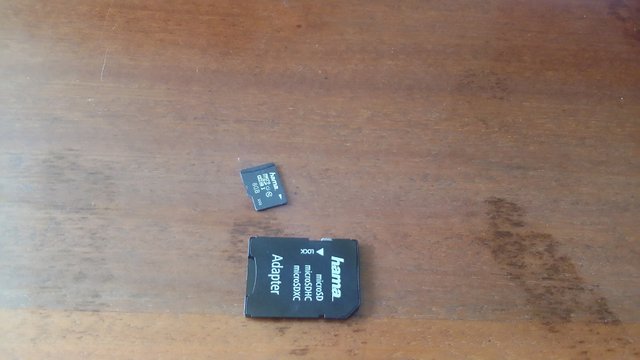
PRICE? Around $68 in my case! I also separately bought a micro-SD card with an adapter for around $8 (8GB, class 10) (you can go for the full starter's kit that also gives you a pre-installed NOOBs - an easy operating system installation wizard for beginners - micro-SD card alongside the Raspberry Pi, case and power supply.)
The shipping was FREE by the way and my order was delivered in 2 days (I ordered on Monday evening last week and received the kit on Wednesday morning). So much for waiting till September…
STEP 1: Prepare the micro-SD card
Next I went ahead and installed the Raspbian OS on the micro-SD card – it’ s fairly straight forward; you can go to the Raspberry Pi website, click Downloads and there you have all you’ll ever need to get started including an easy installation guide. If you bought the full starter’s kit the better: you will have NOOBs on your micro-SD with the possibility to install the Raspbian OS offline out of the box using your Raspberry Pi.
Since I bought the micro-SD separately, I had to connect the SD adapter to my laptop and follow the installation guide I mentioned before. After all was set and done, I inserted the micro-SD in my Raspberry Pi – basically the micro-SD will act as a genuine hard-drive (you can see where to put the micro-SD in the image below, no need to second guess, it will only fit in one way and one way only.)


If you have the NOOBs micro-SD card you can go ahead and connect your Raspberry Pi to your display using a HDMI cable, select Raspbian OS and click Install without touching any other computer.
If you installed Raspbian OS like me on a laptop using the installation guide linked above, the system will be ready to operate, no extra steps involved when you first run your Raspberry Pi.
STEP 2: Install Electrum Wallet
NOTE: Unfortunately, I couldn’t manage to install Electrum Wallet offline, thus making a pure air-gapped offline wallet. Electrum is dependent on other programs and libraries and I found it impossible to install those programs offline without using the good ol’ Debian command apt-get that downloads and installs those programs from several official servers. I tried two guides: https://bitcoin.stackexchange.com/questions/49609/how-to-install-electrum-wallet-in-an-offline-linux-computer and https://gist.github.com/jacoblyles/80898d6388880334f3e5a78785702ccc plus I tried to improvise myself but none of the attempts worked. I solved one error and another, more menacing one appeared. You can try the options above for full security, maybe they will work for you or maybe you will find a solution to those errors. As I mentioned I am not a tech guy and still learning how Linux works.
Since you are logged in and ready to go, it’s time to plug in your Ethernet cable into your Raspberry (if possible don’t use Wi-Fi, just use an old Ethernet cable and turn off both the Wi-Fi and the Bluetooth from the top bar right corner).
NOTE: I strongly recommend to check Electrum Bitcoin Wallet official website → Download section (look for linux) and see if the below commands are correct. DO NOT TRUST ANYBODY AND GO STRAIGHT TO THE SOURCE. Yes, that includes what I am writing here!!! If you happen to come across such guidelines and if you are a newbie, ALWAYS and I mean ALWAYS check the source to see if everything is in order and the commands written in the guidelines are EXACTLY as on the source website. Also the 2.8.3 is bound to change as it is the current version of the wallet at the time of this post.
If you want to install the Electrum Bitcoin Wallet, open the terminal (the prompt icon in the top bar) and go ahead and write:
sudo apt-get install python-qt4 python-pip
and press Enter. Depending on your Internet connection, you will wait some time before installing all the programs necessary for the Electrum Wallet to run properly. Don’t attempt to close the terminal, wait until it finishes downloading and installing. When all it’s set and done, you will see something like
pi@raspberrypi: ~ $
In case you wonder what this lines means, pi is your user and raspberrypi is the name of your mini-PC. When you see the $ sign, it means the computer is ready to accept new commands. If you are completely new to Linux and wonder what in the world did you write before, it’s actually quite simple:
- sudo (short for super user do) means you have administrator rights and command the computer to do something (by default you don’t have administrator rights with Linux as with Windows for example)
- apt-get install means you command the Raspberry to find specific programs on the Internet and install them immediately. In our case we need something called python-qt4 and python-pip required for Electrum to run properly.
After pi@raspberrypi: ~ $ pops us, go ahead and write:
sudo pip2 install https://download.electrum.org/2.8.3/Electrum-2.8.3.tar.gz
and hit Enter. WAIT FOR THE INSTALLATION TO BE COMPLETED! You would be able to read something like the installation was a success if everything went smoothly followed obviously by the pi@raspberrypi: ~ $ line.
If you want to install Electrum Litecoin Wallet, go to their website, click Download and follow the steps in the Linux box one line at a time:
sudo apt-get install python-qt4 python-pip python-dev
and hit ENTER. After the installation is completed and you can see the pi@raspberrypi: ~ $ line write:
sudo apt-get install python-slowaes
and hit ENTER. The # followed by on Ubuntu 13.10 and higher signals a comment that is irrelevant to Raspberry and only relevant to us, humans. Finally write:
sudo pip2 install https://electrum-ltc.org/download/Electrum-LTC-2.6.4.tar.gz
and hit ENTER. Wait for the entire installation to be completed.
STEP 3: Using Electrum Wallet
Now after you successfully installed Electrum, unplug your Ethernet cable and DON’T USE IT EVER AGAIN ON YOUR RASPBERRY WALLET! The point is for your wallet to never touch an Internet connection ever again – that’s why it is called cold storage (not connected to the Internet). Make sure you are completely offline, all possible connections are cut off (Turn OFF the Wi-Fi and Bluetooth) and only then, in the terminal, write:
electrum -o
and hit ENTER. Why -o? Well by default Electrum Bitcoin Wallet looks for a connection to the Internet and to the Bitcoin network and -o means we command electrum to open in the offline mode.
A window will open signaling the creation of a new wallet. Encrypt the wallet with a strong password, write down the seed and NEVER use a text doc to just copy and paste the seed. Your seed is your key to your wallet basically – If the wallet happens to get corrupted or you lose your password, you can restore your wallet with this SEED. Wait for Electrum to generate the wallet and after the process is completed you will have a view of your empty wallet.
Now go to the menu → Wallet → Master Public Keys and copy that key in a text file (empty file in Raspbian) and move that file on a USB stick. Go to your day-to-day computer connected to the Internet, install Electrum Bitcoin Wallet on that computer, and open the program afterwards.
Choose the following options in the wizard Standard Wallet (What kind of wallet do you want to create?) → Use public or private keys (Do you want to create a new seed, or to restore a wallet using an existing seed?) and paste the Master Public Key copied from your Raspberry Wallet (starts with xpub). Click next and wait for this pop-up to appear:
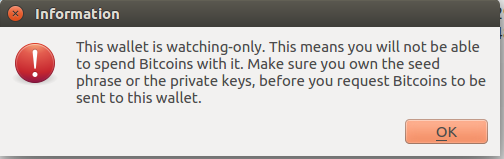
Since it’s a watch-only wallet, you can only see your balance, history and receive funds using the public address in the receive tab. That’s the whole point to secure your Bitcoin wallet right? Take a peek from time to time in case your forgot the balance and receive bitcoins; you can ONLY send funds if you decide to use your Raspberry Offline Wallet. But how do you send funds since the Raspberry Wallet will forever remain offline, you wonder? Well it’s not that complicated, all you have to do is read carefully and follow the steps presented in the Electrum documentation → Cold Storage section. There you will see how you can create an offline and watch-only wallet (as presented above) and how you send bitcoins by creating unsigned transactions and signing them using your Raspberry Pi wallet. It’s fairly easy once you get the hang of it.
If you also installed the Electrum Litecoin Wallet, in the Raspbian terminal on your Raspberry Pi write:
electrum-ltc
hit ENTER, and follow the steps provided in the Electrum Bitcoin Wallet guidelines. It’s as simple as that!
Wait till September, they said… HOW ABOUT NOT!
THINGS TO TAKE INTO CONSIDERATION!
- I must repeat that this is not actually a pure air-gapped offline wallet since you have to connect to the Internet, download and install Electrum and its dependencies. That means the system can be compromised. If you found a way to download and install Electrum offline on the Raspberry Pi, thus creating a pure air-gapped wallet, please leave a comment below explaining how you did it. I myself couldn’t and tried different solutions for a couple of days. That being said, the chances of compromising the wallet just by downloading and installing Electrum are very slim. As long as you stick to the terminal, give the right instructions and afterwards, never connect the Raspberry wallet to the Internet ever again, you should be fine.
- There is also a chance the wallet can be comprised if you used a compromised USB stick to moves things around between the offline and the watch-only wallet (master public keys, transactions). You can also buy a camera for the Raspberry and use it to read QR codes, that definitely ads extra security. I myself haven’t tried that and use a USB stick that has only one purpose: communicate between the offline and watch-only address. I never copy any files other than public keys and transaction files. I recommend you to do the same if you want to use a USB stick.
- ALWAYS AND I MEAN ALWAYS check the source. Don’t trust anybody when it comes to handling your bitcoins. Double check the links to see if they are correct when you plan to download a hardware wallet software like Electrum and don’t install unofficial third-party software by any means. Just use what official sites like bitcoin.org recommend. Since there is a good chance Bitcoin will continue rising, the number of malicious attempts will increase exponentially. Just remember: it’s better to be safe than sorry.
Florian G. OUT!