How to build BP like a boss - Build BP Docker Image
Introduction
Nowadays EOS becomes the most popular blockchain platform in the world. More and more people are joining the community and would like to build up their own node to do more experiment on this new generation blockchain.
Some people would say that the EOSIO source code compiling and the building is not complicated and could be quickly deployed to the server. Hmmm, that's true from some point of view. However, if EOS9CAT Team is going to run our EOS node as the active production blocker producer node, that is not good enough.
For us, our EOS nodes must be capable of
Scalability
In terms of the volume of the incoming traffic, not only the API call and but also the IPFS, EOS9CAT is able to simply and quickly scale-up and scale-down the replication of our nodes.High-availability
Single node failure should not stop the service. All the nodes are bond with each other as the cluster and running in an active-active mode.Self-healing
With the time going, the blocks on the main net will be more and more. When some node is crashed because of some reason, it is able to restore to normal running status through our pre-designed mechanism.Load Balance
The nodes clusters improve the distribution of workloads across multiple active working nodes and are able to optimize resource use, maximize throughput, minimize response time, and avoid overload of any single resource
Thus, we EOS9CAT team decided to use Docker + Kubernetes as our infrastructure design.
Today we would like to share the experience of how to build the EOS docker. This will be prerequisite of our Kubernetes infrastructure we are going to cover in the next coming article.
Please follow us and stay tuned.
Here are the steps we are going to follow:
- Step 1: Building/Compiling EOSIO Source code
- Step 2: Creating
Dockerfile - Step 3: Building Docker Image
- Step 4: Validation and Trouble-shooting
Below is our dev environment:
- OS: Ubuntu 16.04 LTS
- Docker: CE 17.03.x (compatible with Kubernetes 1.10.x)
Step 1: Building EOSIO
EOSIO has very detail instruction about how to build the local environment from the source code as well as how to build the EOSIO image.
Reference: EOSIO Wiki - Local Environment
In terms of the Dockerfile (GitHub) from EOSIO, the docker will compile all the code during the image building from the master branch (hardcoded). This is not what we want. By our design, we want to keep the image size as small as possible.
System Requirements (all platforms)
- 8GB RAM free required
- 20GB Disk free required
Here is the example to compile the code from the tag v1.0.7
$ cd ~
$ git clone https://github.com/EOSIO/eos.git --recursive
$ cd eos
$ git checkout v1.0.7
$ git submodule update --init --recursive
$ ./eosio_build.sh

Once the build is completed successfully, we could find a new folder - build under the folder and this is the folder we will use to build our docker image.
Step2: Creating Dockerfile
Here are some key configurations we inherited from the EOSIO official Dockerfile.
- Expose the ports for the
httpandp2p(andbnet, if necessary) - Mount the volume for the
data-dir - entry point is the command -
nodeosd.sh -e arg1 arg2
Let's prepare our building folder accordingly.
$ cd ~ && mkdir -p docker_build/eos_source
$ mv ./eos/build ./docker_build/eos_source/
$ cd docker_build && touch Dockerfile
Copy the content below into the file Dockerfile
FROM ubuntu
RUN mkdir -p /opt/eos_node/data_dir \
    && cd /opt/eos_node
WORKDIR /opt/eos_node
COPY ./eos_source/ /opt/eos_node/eos_source/
EXPOSE 8888/tcp
EXPOSE 9876/tcp
EXPOSE 9875/tcp
VOLUME /opt/eos_node/data_dir
ENTRYPOINT ["/opt/eos_node/eos_source/build/programs/nodeos/nodeos", "--data-dir", "/opt/eos_node/data_dir", "--config-dir", "/opt/eos_node/data_dir", "--genesis-json", "/opt/eos_node/data_dir/genesis.json"]
/opt/eos_node/eos_source/buildis the working folder for the EOSIO program./opt/eos_node/data_diris the folder which will be mounted from external to persistently keep theconfig.ini,genesis.jsonand other data files.- Expose
8888/tcpfor http endpoint,9876/tcpfor p2p and9875/tcpfor bnet. - The
nodeoscommand will be executed once after the docker container is brought up.
Caveat
It's very important to make the nodeos command as the entry point. Otherwise, when the container is shutdown or stop, the nodeos won't get the SIGNTERM from the docker, and if the nodeos is NOT shut down gracefully, block database can NOT be used again and the node has to spend time to resync with the other nodes.
Regarding the node start-up, shutdown, resume, etc, this part will be explained in the coming article, please stay tuned.
In the end, the structure of our docker build folder will be like the picture below.

Step3: Building Docker Image
Run the command below to build the image.
$ docker build -t eos9cat/eosio-node:v1.0.7 .
Step4: Validation and Trouble-shooting
Before going into production, it is crucial to test the build against jungle testnet. here is the procedure to test and validate against jungle test net.
First of all, we must get the data-dir working folder ready, before we run the docker image we built just now.
When we Create Account and Register on the Jungle3 EOS Network Monitor (CryptoLions.io), the website will help you create the bash script according to the information you fill into the form (e.g. p2p listen endpoint, p2p server address, http server address, etc).
After we went through the script, we found that it created the start.sh for the nodeosd and the keosd, and the script for the wallet and the cleos. Another important thing was that the script created the config.ini and the genesis.json.
Something looks like below.

Below is the config.ini (GitHub) for the reference:
#EOS Jungle Testnet Config file. Autogenerated by Jungle monitor.

    get-transactions-time-limit = 3
    blocks-dir = "/opt/eos_node/data_dir/blocks"

    http-server-address = 0.0.0.0:8888
    p2p-listen-endpoint = 0.0.0.0:9876
    p2p-server-address = !!!NODE_IP_ADDRESS!!!!:9876

    chain-state-db-size-mb = 8192

    p2p-max-nodes-per-host = 100

    access-control-allow-origin = *
    # access-control-allow-headers =
    # access-control-max-age =
    # access-control-allow-credentials = false

    # actor-whitelist =
    # actor-blacklist =
    # contract-whitelist =
    # contract-blacklist =
    # filter-on =

    # SSL
    # Filename with https private key in PEM format. Required for https (eosio::http_plugin)
    # https-server-address =
    # Filename with the certificate chain to present on https connections. PEM format. Required for https. (eosio::http_plugin)
    # https-certificate-chain-file =
    # Filename with https private key in PEM format. Required for https (eosio::http_plugin)
    # https-private-key-file =

    allowed-connection = any

    log-level-net-plugin = info
    max-clients = 150
    connection-cleanup-period = 30
    network-version-match = 1
    sync-fetch-span = 2000
    enable-stale-production = false

    max-implicit-request = 1500
    pause-on-startup = false
    max-transaction-time = 60
    max-irreversible-block-age = -1
    txn-reference-block-lag = 0
    unlock-timeout = 90000

    mongodb-queue-size = 256
    # mongodb-uri =

    # peer-key =
    # peer-private-key =

    plugin = eosio::producer_plugin
    plugin = eosio::chain_plugin
    plugin = eosio::chain_api_plugin
    plugin = eosio::history_plugin
    plugin = eosio::history_api_plugin

    #plugin = net_plugin
    #plugin = net_api_plugin

    #BNET
    #plugin = eosio::bnet_plugin
    #bnet-endpoint = 0.0.0.0:<!!BNET_PORT!!>
    #bnet_threads = 4
    #bnet-connect = bnet.cryptolions.io:19875
    #bnet-connect = bnet.cryptolions.io:39875
    #bnet-connect = 193.93.219.219:9875
    #bnet-connect  = 94.154.212.15:9877

    plugin = eosio::producer_plugin # for BP node
    signature-provider = YOUR_PUB_KEY_HERE=KEY:YOUR_PRIV_KEY_HERE # for BP node
    producer-name = !!_YOUR_PRODUCER_NAME_!!! # for BP node

#EXAMPLE peers please chek last one on http://dev.cryptolions.io/#p2p
p2p-peer-address = dev.cryptolions.io:19876
p2p-peer-address = dev.cryptolions.io:39876
Note: In terms of different role of the nodes, full node and BP node have different config.ini file. {{TODO}}We will have another article talking about it.
genesis.json (GitHub) for Junglenet
{
  "initial_timestamp": "2018-06-09T00:00:00.000",
  "initial_key": "EOS6CttW6XFfeRXaiqbD1Hoc9xPfVJrJ9RVZqA8tNTDLriNEyamFY",
  "initial_configuration": {
    "max_block_net_usage": 1048576,
    "target_block_net_usage_pct": 1000,
    "max_transaction_net_usage": 524288,
    "base_per_transaction_net_usage": 12,
    "net_usage_leeway": 500,
    "context_free_discount_net_usage_num": 20,
    "context_free_discount_net_usage_den": 100,
    "max_block_cpu_usage": 200000,
    "target_block_cpu_usage_pct": 1000,
    "max_transaction_cpu_usage": 150000,
    "min_transaction_cpu_usage": 100,
    "max_transaction_lifetime": 3600,
    "deferred_trx_expiration_window": 600,
    "max_transaction_delay": 3888000,
    "max_inline_action_size": 4096,
    "max_inline_action_depth": 4,
    "max_authority_depth": 6
  }
}
Finally, we could start up our docker image.
Start the Docker
docker run -d --name nodeos -v /opt/eos_node/your-account:/opt/eos_node/data_dir -p 8888:8888 -p 9876:9876 -p 9875:9875 eos9cat/eosio-node:v1.0.7
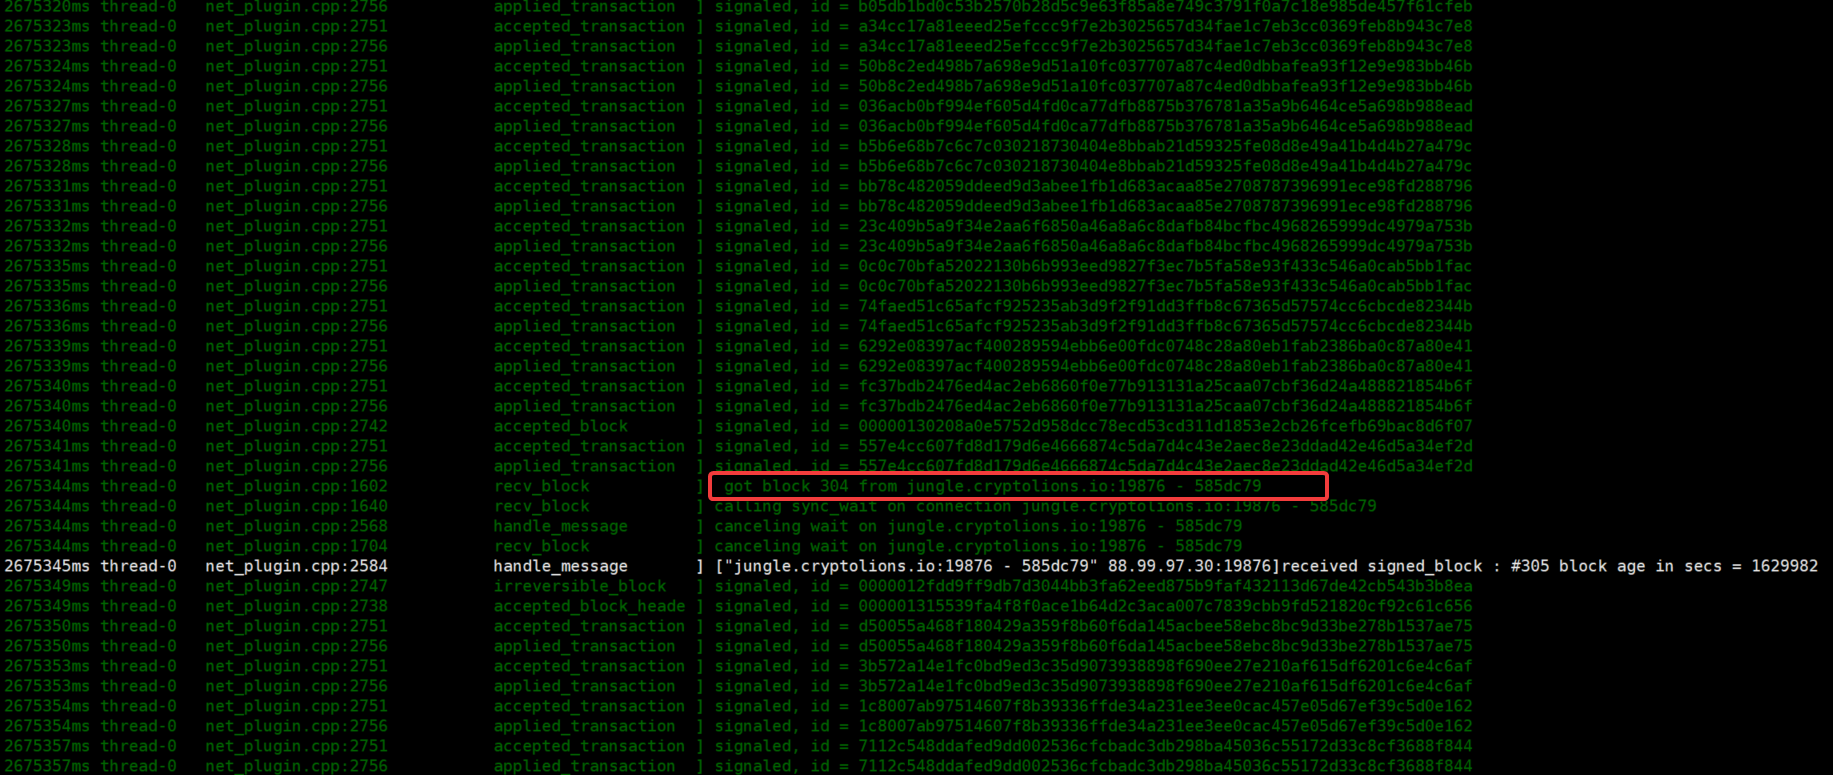
Validate the Docker
docker logs nodeos
Get chain info
curl http://127.0.0.1:8888/v1/chain/get_info
{
  "server_version":"90fefdd1",
  ...
}
Trouble-shooting
From the chain info, we could have the
server_version, and thechain_id.server_versionis the hash of the commit of the EOSIO, for this demo, it's commit hash of thetag v1.0.7.
The node got the error message -
Bad file descriptororgo_away_message.

Start the `nodeos` with `--delete-all-blocks` to clear chain state database and block log, and also please check whether the `genesis.json` is correct for the chain.
The node is crashed and unable to synchronize with the other nodes.
Start the
nodeoswith the--hard-replayto clear chain state database, recover as many blocks as possible from the block log, and then replay those blocks.In case
--hard-replayfails, please remove blocks/reversible folder and try--hard-replayagain
Now our docker of the EOS node is up and synchronizing with the other EOS nodes!!! Hooray, happy block producing!!!!
Next time, we are going to talk about how to take the docker image config and operationt.
Contact
If you have any questions or anything you would like us to do, please feel free to leave the comment or email us.
If you are interested in running and maintaining a BP node, EOS9CAT are more than happy to help you.
If you think our content helps you, don't forget to vote for EOS9CAT- eosninecatbp. Thank you for your support!
- Facebook - https://www.facebook.com/eos9cat/?modal=admin_todo_tour
- Telegram - https://t.me/joinchat/IOwgBRJj-6JdxOerWYLOkg
- Medium - https://medium.com/@master_32654
- SteemIt - https://steemit.com/@eos9cat/feed
- Github - https://github.com/EOS9Cat
- Meetup - 9cat https://www.meetup.com/Vancouver-Internet-Technology-Talents-Networking-9CAT-NET/
- Reddit - https://www.reddit.com/user/EOS9Cat/
- Twitter - https://twitter.com/Eos9C