How to Set Up a UASF BIP 148 Node with Pictures(Windows)

Most of you have probably heard that there is an upcoming User Activated Soft Fork(UASF) in Bitcoin. This WILL happen on August 1st. It means that after the August 1st Flag Day, nodes running BIP148(UASF) will ignore non-Segwit blocks. This is an attempt to convince miners to signal Segwit, an attempt to end this years long stalemate on upgrading the Bitcoin protocol. I won't get into the politics of it on this post, but users should upgrade their nodes to BIP148 nodes to achieve consensus. This post is a step- by- step for those who have not run a full node before and would like to. You can also use many of the steps in this guide to run a full node of the implementation you prefer.
Running a full node is basically running a Bitcoin wallet, but by default the Bitcoin wallet doesn't allow others to connect to your computer, so you don't actively verify transactions if you just install a wallet and stop there. You are just running a copy. You have to take a few more steps so others can broadcast transactions to your node and you can participate in verifying the transactions on the network(and signalling BIP148 in this case). Let's get started.
Step 1.The first thing you need to do is give the computer you want to run your node on a Static IP address. This is so your router will know which computer to route transactions to. To do this begin by opening Control Panel. Click on the Windows button on the lower left of your Taskbar. Then type 'con' and Windows should bring up the Control Panel icon.

Then click on 'View network status and tasks' under Network and Internet.

Once the Networks are shown, click on 'Change Adapter Settings' on the left side of the screen.

This will bring up your computer's network adapter(Ethernet) settings.

Under the Networking tab scroll down to 'Internet Protocol Version 4(TCP/IPv4). Click it to highlight it, then click the 'Properties' button below. This will open up your computer's IP settings. It will probably be set to 'Obtain IP address automatically'.
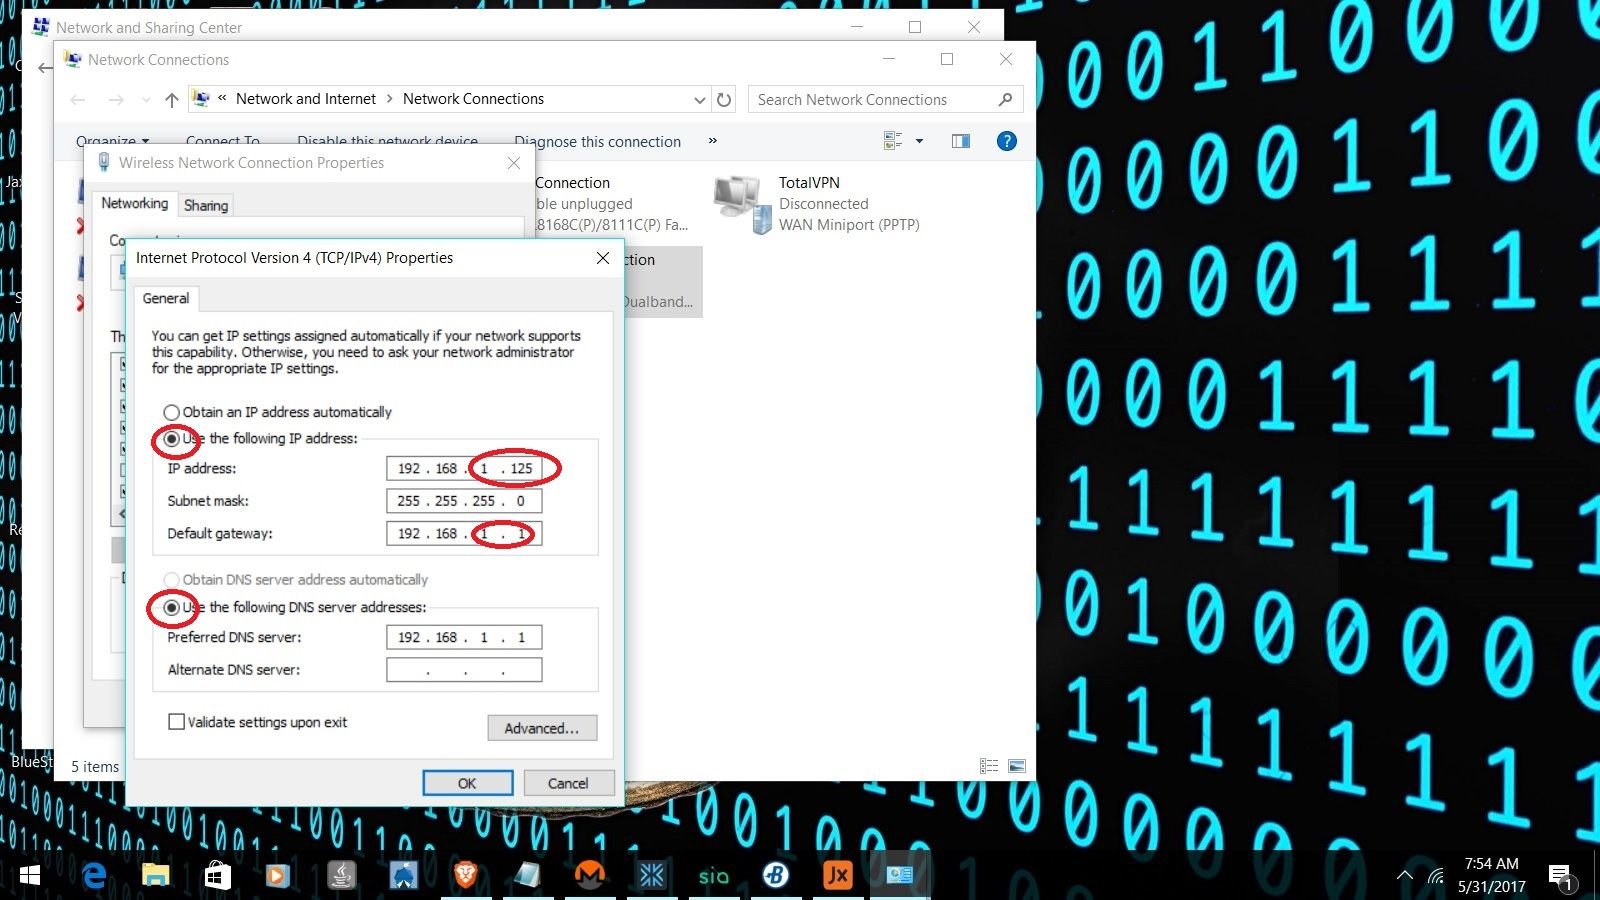
Tick the circle below that says 'Use the following IP address' and set it to 192.168.x.y where x is what your router normally assigns. It's 1 for most brands, but check your router to be sure. change y to any number that is higher than the addresses your router's DCHP usually assigns to connected devices, but is still within it's range. Most brands have a range of 1 to 254. I set mine to 135 to make sure it was high enough(check your router's DHCP - some don't go to 254).
Subnet Mask is almost always 255.255.255.0.
Default Gateway is the IP address of your router(what you have to put in the address bar of your browser to access it). It is 192.168.1.1 for most Linksys and Netgear routers, but check your router's documentation to be sure.
You'll also notice that 'Use the following DNS server address' ticked itself when you changed the IP.
Preferred DNS Server is also your router's IP address, 192.168.1.1 in this case. Some router's also have an Alternate DNS Server. Mine does not, but yours might, so put that in the next field if you have it. If you're unsure what any of these are, you can find them by clicking the Windows button in the bottom left again and typing 'cmd'. This will open a Command Prompt.

Type 'ipconfig/all' and press enter.

This will give you your router's IP, your DNS server, and Subnet Mask if you're unsure what they are. Once you have all the settings configured, click OK and that part is done. You now have a Static IP on your PC.
Step 2.The next thing we need to do is forward the ports that Bitcoin uses, so that we can signal BIP148(once we install our node) and verify transactions on the blockchain.
Open your web browser and type your router's IP address in the Address bar. For most routers this will be 192.168.1.1 and login to your router. If you've never changed any settings on your router, you may have to look at the back or bottom of the router to get the login info. Once you've logged in, now would be a good time to change that password too.
Click on the 'Advanced' tab(for most routers) and look for 'Port Fowarding/Port Triggering'.

Choose 'Port Forwarding' if it asks, then click on 'Add a Service'(yours may just have empty fields already, I have to add them on mine). You need to put in the Static IP you just gave your computer, put 8333 in all the fields that ask for a port number, choose 'Both' for the Type, give it a name(Bitcoin) and click Save.
Note - Some routers don't give 'Both' as an option on the Type of service. If yours doesn't, you'll have to add one service for TCP/IP, save it, then add another service for UDP that is identical except for the Type.
Now that we have our computer ready, let's install our Node!
Step 3.In your web browser, go to http://uasf.bitcoinreminder.com. All that's left to do is choose the link that's appropriate for your Operating System, download it, and install it. The folks at BitcoinReminder have made this incredibly easy.

Step 4.Once you have your node installed and running, go to http://bitnodes.21.co and scroll down to check your node and make sure it is reachable.

When you click 'Check Node' it should return a green bar with your IP address and the type of node you are running. In this case, a BIP 148 UASF Segwit node!
Did you find this article useful? Please upvote and Resteem if you wish!
Special thanks to those who have donated! It is very much appreciated!
BTC: 13vkcSViikMSmhokiHxgRqWnFz2ErgApyw
LTC: La3rT258PJ8kX2WiWLfX5MrmurSEuRHX1W
Dogecoin: DNHjTrBssQx6v5u8W6hSrej9ocAX5ShGDb
Monero: 47PwackL2h6H7myZVjMAKfGEViXEHsYgHUup28BeKtEEasYg9MxB5RtaUktb5AUK69YbQ28EYCEe1LTnYcz5AkmFRU1rPWk
Dash: XavE5B9FicDbeTeemGoYi1dnx8s1U5vsDR
ZEC: t1ZGnFx54UDW66d2rfSvcHMNYqpm8iraCMf
Ethereum: 0xca036585ccb3732188adc69c62f3c3c0f0177e1d
ETC: 0x2f185ff241b543d6452455d4b73376b7958b5209
PIVX: DSBKpyUY6epRQmpaFesFFV3H93QTPmJmQQ
Burstcoin: BURST-XFYD-YU7K-9MC5-3GYMT
Golem: 0xca036585ccb3732188adc69c62f3c3c0f0177e1d
Augur: 0xca036585ccb3732188adc69c62f3c3c0f0177e1d
Thinking about cryptocurrency mining? Please consider using one of the following:
3% off at Genesis Mining with code: mAWnvI (let me know in the comments if you use this code so I can return the favor when I upgrade)


Holy buckets is this a need to know and appears to be well put together...this affects a lot of steemit users as far as i can see...only 7 votes? This needs to get out there. I mean there is a risk of loss for btc holders.
I want to resteemify this so i can find it later again and more people see it but i dont see the resteem arrow. Strange. Is this post being repressed?
Ahh, nope. It's 9 days old. I guess you only get 7 days to resteem.
Gotcha. Stay in touch!
I think it's important as well. You can resteem it and your followers will see it.
Its strange, but on some posts i cant see the resteem icon
Congratulations @ancapwarren! You have completed some achievement on Steemit and have been rewarded with new badge(s) :
Click on any badge to view your own Board of Honnor on SteemitBoard.
For more information about SteemitBoard, click here
If you no longer want to receive notifications, reply to this comment with the word
STOPIf you want to support the SteemitBoard project, your upvote for this notification is welcome!
Awesome info, thanks man. Upvoted and following.