AWS API Gateway와 Lambda를 이용하여 serverless api를 구성해보자
특정 시스템에서 날씨데이터를 가져와야할 상황이 생겼다.
하지만 폐쇄된 네트워크 환경에서 특정 Host로만 접속이 가능한 상황이였고 날씨 뿐만 아니라 같은 Host에서 다른 정보도 함께 가져와야하는 경우이다.
중간에 Proxy를 두어 경유하여 데이터를 가져와서 처리하기로 했는데 Proxy 서버는 안정성이 중요했고 관리를 위한 비용을 최소화 하기를 원했다.
이럴때 AWS의 API Gateway 와 Lambda는 좋은 답이 될 것이다.
필요한 부분만 주로 CLI로 설명할 것이고 CLI로 해결하지 못한 부분이 남아있어 그 부분은 AWS Console로 설명하겠다.

위의 구성에서 AWS에 Lambda와 API Gateway를 구현해보자.
환경구성
AWS CLI를 설치하고 Lambda Code를 테스트 하기 위해서 Python 2.7이 설치 되어야 한다.
필자는 Mac을 기준으로 설명할 것이고 윈도우나 리눅스의 경우에는 python, awscli를 설치하는 방법이 조금 다를 뿐 awscli를 이용하는 방법은 동일하다.
http://docs.python-guide.org/en/latest/starting/installation/ 을 참고하자.
$ brew install python
$ pip install --upgrade pip
$ python --version
Python 2.7.12
brew는 macOS용 패키지관리자다. 매우 유용한 유틸이니 꼭 설치하자. 설치하려면 다음과 같은 명령어로 설치할 수 있다.
$ /usr/bin/ruby -e "$(curl -fsSL https://raw.githubusercontent.com/Homebrew/install/master/install)"
python 설치가 끝났으면 awscli 설치하고 설정한다.
$ pip install awscli
$ aws configure
AWS Access Key ID []: ****************QYAA
AWS Secret Access Key []: ****************JtSn
Default region name [ap-northeast-2]: ap-northeast-2
Default output format [json]: json
virtualenv 는 python의 환경을 독립적으로 분리하여서 별도의 환경을 가능하게 한다.
$ pip install virtualenv

$ mkdir lambda_weather && cd $_
[lambda_weather]$ virtualenv -p python2.7 env
[lambda_weather]$ . env/bin/activate
(env) [lambda_weather]$
virtualenv 는 각 프로젝트 디렉토리에 설정을 하는데 매번 귀찮을 수도 있다.
virtualenvwrapper(https://virtualenvwrapper.readthedocs.io)를 이용하면 좀 더 편리하게 사용할 수 있다.
virtualenv 로 설정된 환경은 deactivate 명령으로 해제할 수 있다.
$ deactivate
IAM Role 생성
개인적으로는 AWS의 사용을 어렵게 하는 부분이 권한의 부분이다.
서비스가 여러개로 나뉘어져 있고 편리하게 사용이 가능한 만큼 각 서비스들을 액세스 할 수 있는 권한은 더 어려워지기도 한다.
지금까지 구현을 하면서 문제가 되는 경우는 대부분이 권한 문제였다. 권한 문제를 해결하기 위해서 가장 좋은 방법은 서비스들을 정확하게 이해하는 것이다.
권한문제가 해결되지 않는다면 어떤 부분을 이해하지 못하고 있는 것인지를 찾는 것이 가장 현명한 방법이기도 하다.
Lambda를 실행할 수 있는 Role이 필요하다. 그리고 Role에 policy를 부여할 것이다.
Role 생성
$ aws iam create-role --role-name weather-role \
  --assume-role-policy-document '{
    "Version": "2012-10-17",
    "Statement": [{
        "Effect": "Allow",
        "Principal": { "Service": "lambda.amazonaws.com" },
        "Action": "sts:AssumeRole"
    }]
  }'
# output
{
    "Role": {
        "AssumeRolePolicyDocument": {
            "Version": "2012-10-17",
            "Statement": [
                {
                    "Action": "sts:AssumeRole",
                    "Effect": "Allow",
                    "Principal": {
                        "Service": "lambda.amazonaws.com"
                    }
                }
            ]
        },
        "RoleId": "AROAJ5EOP7LX3EQY3TTCM",
        "CreateDate": "2017-02-16T11:47:54.089Z",
        "RoleName": "weather-role",
        "Path": "/",
        "Arn": "arn:aws:iam::550931752661:role/weather-role"
    }
}
weather-role 라는 Role이 생성되었다. 생성된 Arn 를 기억하자.
arn:aws:iam::550931752661:role/weather-role
여기서 550931752661 은 Account ID이다. 이 또한 눈여겨 볼 필요가 있다.
Role이 생성되었으면 AWS에서 제공하고 있는 Policy 중 하나를 부여하자.
$ aws iam attach-role-policy \
  --policy-arn arn:aws:iam::aws:policy/service-role/AWSLambdaBasicExecutionRole \
  --role-name weather-role
AWS에서 제공하는 policy중에서 AWSLambdaBasicExecutionRole 이라는 policy를 새로 생성한 weather-role 에 부여하였다.
이제 weather-role 은 Lambda Function을 실행할 수 있는 권한을 갖게 되었다.
Lambda 코드 작성
Lambda 코드는 여러가지 언어로 작성이 가능하지만 여기서는 python 으로 작성한다. 현재 Lambda는 python 2.7 버전만 지원하고 있다.
weather.py
from __future__ import print_function
from urllib import urlencode
from urllib2 import urlopen
import json
import logging
logger = logging.getLogger()
logger.setLevel(logging.INFO)
def lambda_handler(event=None, context=None):
    weather_url = 'https://query.yahooapis.com/v1/public/yql?'
    yql_query = 'select * from weather.forecast where woeid ' \
                'in (select woeid from geo.places(1) where '\
                'text="{}") and u="c"'.format(event['params']['area'])
    yql_url = '{}{}&format=json'.format(weather_url,
                                        urlencode({'q': yql_query}))
    result = urlopen(yql_url).read().decode('utf-8')
    return json.loads(result)
lambda code를 작성했으면 AWS에 올리기 전에 Local 환경에서 테스트를 한다.
emulambda (https://github.com/fugue/emulambda) 를 이용하면 편리하다. 다음과 같이 설치하자.
$ git clone https://github.com/fugue/emulambda.git
$ pip install -e emulambda
emulambda 설치가 완료되었으면 Lambda Function으로 보낼 이벤트를 작성해야한다.
event.json
{
"params": {
"area": "seoul"
}
}
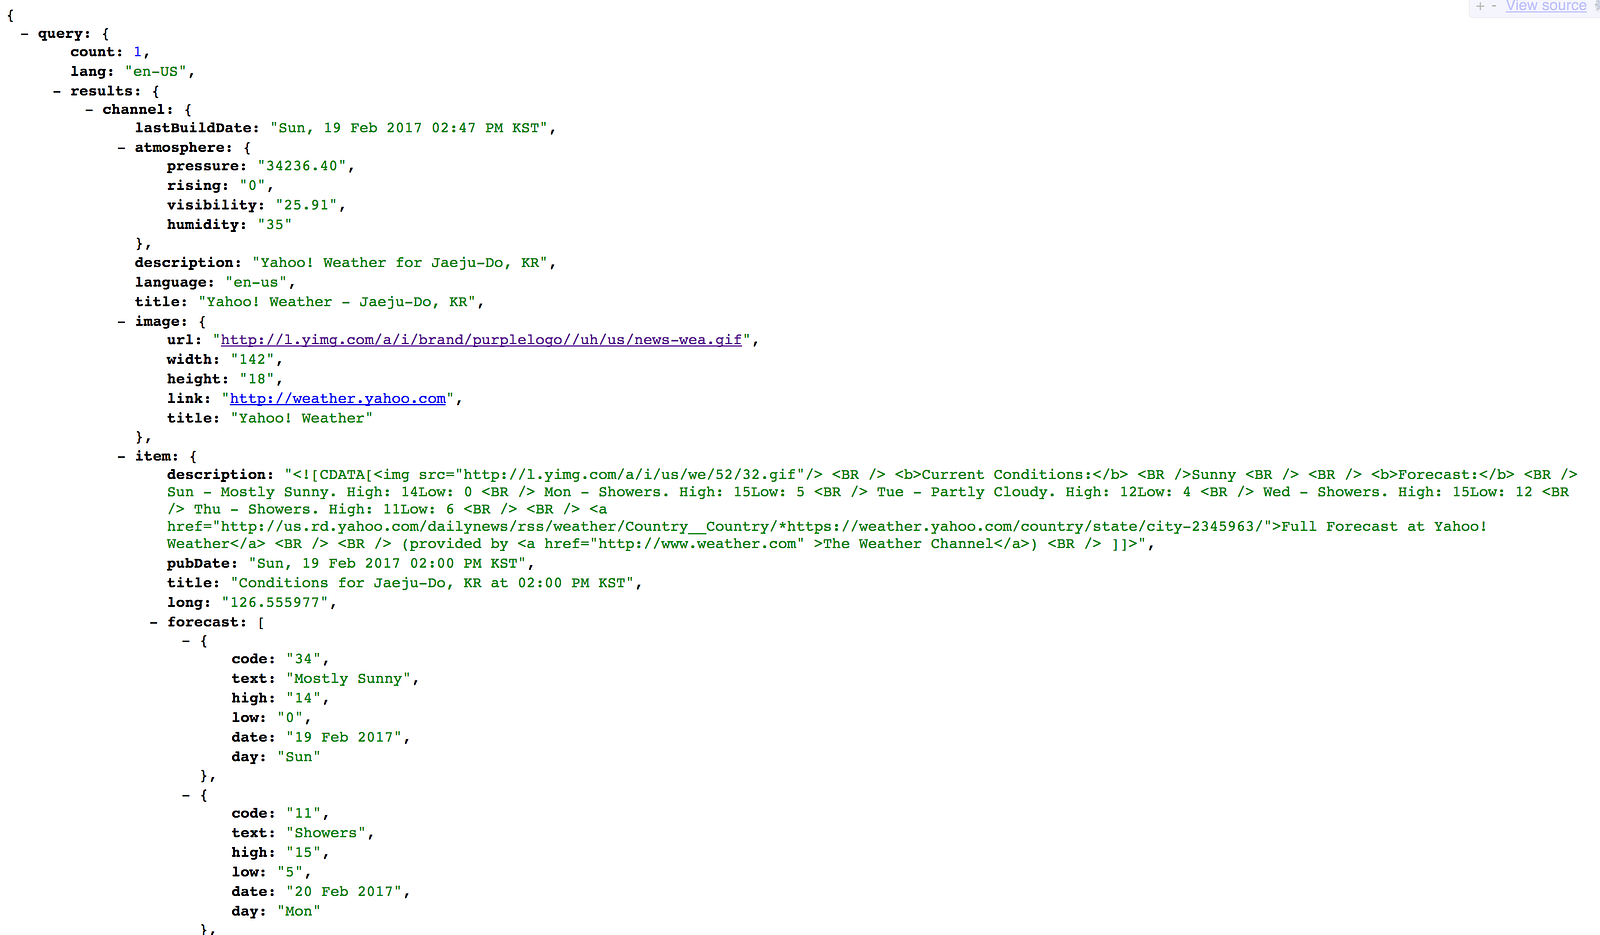
이제 emulambda 를 이용하여 Local에서 실행해본다.
$ emulambda -v weather.lambda_handler event.json
Executed weather.lambda_handler
Estimated...
...execution clock time:   703ms (800ms billing bucket)
...execution peak RSS memory:   2M (2658304 bytes)
----------------------RESULT----------------------
{u'query': {
    u'count': 1,
    u'lang': u'en-US',
    u'results': {
        u'channel': {
            u'lastBuildDate': u'Sun, 19 Feb 2017 01:15 PM KST',
            u'atmosphere': {
                u'pressure': u'34100.95',
                u'rising': u'0',
                u'visibility': u'25.91',
                u'humidity': u'39'},
                u'description': u'Yahoo! Weather for Seoul, Seoul, KR',
                u'language': u'en-us',
                u'title': u'Yahoo! Weather - Seoul, Seoul, KR',
...
실행이 잘 되었으면 압축하여 AWS에 업로드 할 수 있도록 준비한다.
$ zip packages.zip weather.py
  adding: weather.py (deflated 47%)

$ ls -lh packages.zip
-rw-r--r--  1 harry  staff   541B Feb 19 13:18 packages.zip
이번 예제에서는 소스파일이 단 하나지만 모듈단위로 여러개의 소스파일이 생성될 수도 있고 외부라이브러리들을 포함해야하는 경우도 있으니 가급적 압축하여 업로드 할 수 있도록 하는 습관을 갖는게 좋다.
Lambda Function 생성
위에서 작성한 코드를 AWS에 올리도록 한다.
앞서 생성한 IAM Role의 Arn을 알아야한다.
arn:aws:iam::550931752661:role/weather-role 이 내가 생성한 Role의 Arn인데 다음중 --role 옵션에 넣는다.
$ aws lambda create-function \
  --region ap-northeast-2 \
  --runtime python2.7 \
  --role arn:aws:iam::550931752661:role/weather-role \
  --descript 'get weather' \
  --timeout 10 \
  --memory-size 128 \
  --handler weather.lambda_handler \
  --zip-file fileb://weather_lambda.zip  \
  --function-name GetWeatherOfArea
# output
{
    "CodeSha256": "0bJINrzi1CtBQvHXaSi6wIfuz+Fh+kVlPGK6TA7fTVY=",
    "FunctionName": "GetWeatherOfArea",
    "CodeSize": 516,
    "MemorySize": 128,
    "FunctionArn": "arn:aws:lambda:ap-northeast-2:550931752661:function:GetWeatherOfArea",
    "Version": "$LATEST",
    "Role": "arn:aws:iam::550931752661:role/weather-role",
    "Timeout": 10,
    "LastModified": "2017-02-16T13:46:30.781+0000",
    "Handler": "weather.lambda_handler",
    "Runtime": "python2.7",
    "Description": "get weather"
}
Role의 Arn과 마찬가지로 생성된 Lambda Function의 Arn 역시 생성된다.
이 또한 잘 기억하고 있자.
arn:aws:lambda:ap-northeast-2:550931752661:function:GetWeatherOfArea
- Lambda Function을 서울리전에 생성했고 ( — region ap-northeast-2)
- Lambda 실행언어는 python2.7로 했으며 ( — runtime python2.7)
- 실행할 Role을 지정했고 ( — role arn:aws:iam::55…)
- 기타 다른 설정들을 함께 했다.
이제 정상적으로 lambda가 생성되었으므로 잘 동작하는지 테스트해보자.
$ aws lambda invoke --function-name GetWeatherOfArea --payload '{"params":{"area":"seoul"}}' test.json
{
    "StatusCode": 200
}
$ cat test.json
{u'query': {
    u'count': 1,
    u'lang': u'en-US',
    u'results': {
        u'channel': {
            u'lastBuildDate': u'Sun, 19 Feb 2017 01:15 PM KST',
            u'atmosphere': {
                u'pressure': u'34100.95',
                u'rising': u'0',
                u'visibility': u'25.91',
                u'humidity': u'39'},
            u'description': u'Yahoo! Weather for Seoul, Seoul, KR',
            u'language': u'en-us',
            u'title': u'Yahoo! Weather - Seoul, Seoul, KR',
...
AWS에 생성된 Lambda Function이 정상적으로 실행되는 것을 확인 할 수가 있다.
Lambda Function의 코드를 다시 업로드 하기 위해서는 다음과 같이 한다.
$ aws lambda update-function-code \
  --function-name GetWeatherOfArea \
  --zip-file fileb://weather_lambda.zip
# output
{
    "CodeSha256": "0bJINrzi1CtBQvHXaSi6wIfuz+Fh+kVlPGK6TA7fTVY=",
    "FunctionName": "GetWeatherOfArea",
    "CodeSize": 516,
    "MemorySize": 128,
    "FunctionArn": "arn:aws:lambda:ap-northeast-2:550931752661:function:GetWeatherOfArea",
    "Version": "$LATEST",
    "Role": "arn:aws:iam::550931752661:role/weather-role",
    "Timeout": 10,
    "LastModified": "2017-02-16T13:48:07.148+0000",
    "Handler": "weather.lambda_handler",
    "Runtime": "python2.7",
    "Description": "get weather"
}
API Gateway 생성
이제 외부에서 Lambda Function을 실행된 결과값을 가져갈 수 있도록 API를 생성한다.
$ aws apigateway create-rest-api  \
  --region ap-northeast-2 \
  --name 'Weather API' \
  --description 'Show weather of requested area'
# output
{
    "id": "6eh7qm8u44",
    "name": "Weather API",
    "description": "Show weather of requested area",
    "createdDate": 1487352113
}
결과값 중에서 id 값을 기억해야한다.(6eh7qm8u44)
API를 생성했으면 resource 와 method, stage 를 생성할 것이다. 이때 rest-api-id 는 계속 사용된다.
이제 resource 를 생성하자.
여기서 생성할 API 주소는 다음과 같다.
/api/v1/weather/{area}
각 path는 resource로 생성하고 마지막 {area} 에는 method 도 생성할 것이다.
각 resource 를 생성하기 위해서는 parent id 를 알아야한다. 최초에 API를 생성하면 기본적으로 / resource가 생성되는데 해당 ID를 알아내야한다.
$ aws apigateway get-resources  \
  --region ap-northeast-2 \
  --rest-api-id 6eh7qm8u44
# output
{
    "items": [
        {
            "path": "/",
            "id": "mdcteg2fd0"
        }
    ]
}
출력물 중에서 "id": "mdcteg2fd0" 를 확인한다. 앞으로 생성할 /api resource의 parent id 가 된다.
출력물 중에서 일일이 복사하지 않아도 option중 query를 이용하면 원하는 출력물만 얻어낼 수도 있다. 하지만 그럴 경우에 전체적인 출력 포맷을 알지 못해 이해하기 어려우므로 출력물을 보고 직접 원하는 값을 가져오도록 하겠다.
/api resource를 만든다.
$ aws apigateway create-resource  \
  --region ap-northeast-2 \
  --rest-api-id 6eh7qm8u44 \
  --parent-id mdcteg2fd0 \
  --path-part api
# output
{
    "path": "/api",
    "pathPart": "api",
    "id": "2khdrl",
    "parentId": "mdcteg2fd0"
}
/api 를 생성할 때에 option 중에서 --rest-api-id 와 --parent-id 는 위에서 출력된 값을 다시 입력한 것이다.
앞으로 생성할 resource 들도 같은 방법으로 계속 생성한다.
/api/v1
$ aws apigateway create-resource  \
  --region ap-northeast-2 \
  --rest-api-id 6eh7qm8u44 \
  --parent-id 2khdrl \
  --path-part v1
# output
{
    "path": "/api/v1",
    "pathPart": "v1",
    "id": "y4dl65",
    "parentId": "2khdrl"
}
/api/v1/weather
$ aws apigateway create-resource \
  --region ap-northeast-2 \
  --rest-api-id 6eh7qm8u44 \
  --parent-id y4dl65 \
  --path-part weather
# output
{
    "path": "/api/v1/weather",
    "pathPart": "weather",
    "id": "6oc3qu",
    "parentId": "y4dl65"
}
/api/v1/weather/{area}
$ aws apigateway create-resource \
  --region ap-northeast-2 \
  --rest-api-id 6eh7qm8u44 \
  --parent-id 6oc3qu \
  --path-part {area}
# output
{
    "path": "/api/v1/weather/{area}",
    "pathPart": "{area}",
    "id": "r5p13j",
    "parentId": "6oc3qu"
}
이제 resource가 모두 만들어졌으면 {area} resource에 GET method를 추가한다.
$ aws apigateway put-method  \
  --rest-api-id 6eh7qm8u44 \
  --resource-id r5p13j \
  --http-method GET \
  --authorization-type NONE
# output
{
    "apiKeyRequired": false,
    "httpMethod": "GET",
    "authorizationType": "NONE"
}
이제 API 생성을 종료되었다. 마지막으로 만들어진 method에 Lambda Function을 연결하는 작업을 한다.
$ aws apigateway put-integration \
  --rest-api-id 6eh7qm8u44 \
  --resource-id r5p13j \
  --http-method GET \
  --type AWS \
  --integration-http-method GET \
  --uri 'arn:aws:apigateway:ap-northeast-2:lambda:path/2015-03-31/functions/arn:aws:lambda:ap-northeast-2:550931752661:function:GetWeatherOfArea/invocations'
# output
{
    "httpMethod": "GET",
    "passthroughBehavior": "WHEN_NO_MATCH",
    "cacheKeyParameters": [],
    "type": "AWS",
    "uri": "arn:aws:apigateway:ap-northeast-2:lambda:path/2015-03-31/functions/arn:aws:lambda:ap-northeast-2:550931752661:function:GetWeatherOfArea/invocations",
    "cacheNamespace": "r5p13j"
}
주의해서 봐야할 점은 --uri 이다.
uri 는 형식에 맞게 직접 입력해야한다.
arn:aws:apigateway:<region>:lambda:path/2015-03-31/functions/<lambda function arn>/invocations
<> 로 되어있는 곳은 자신의 환경에 맞춰 입력하자.
이제 응답을 설정하자.
$ aws apigateway put-method-response \
  --region ap-northeast-2 \
  --rest-api-id 6eh7qm8u44 \
  --resource-id r5p13j \
  --http-method GET \
  --status-code 200 \
  --response-models "{\"application/json\": \"Empty\"}"
# output
{
    "responseModels": {
        "application/json": "Empty"
    },
    "statusCode": "200"
}
$ aws apigateway put-integration-response \
  --region ap-northeast-2 \
  --rest-api-id 6eh7qm8u44 \
  --resource-id r5p13j \
  --http-method GET \
  --status-code 200 \
  --response-templates "{\"application/json\": \"\"}"
# output
{
    "statusCode": "200",
    "responseTemplates": {
        "application/json": null
    }
}
응답까지 완료되었으면 만들어진 Gateway를 배포하자
$ aws apigateway create-deployment \
  --rest-api-id 6eh7qm8u44 \
  --stage-name prod
# output
{
    "id": "ccfzbg",
    "createdDate": 1487358560
}
prod stage에 지금까지 만든 API를 배포하였다.
권한 설정 및 테스트
배포된 API가 Lambda Function을 실행할 수 있도록 permission을 부여한다.
$ aws lambda add-permission \
  --function-name GetWeatherOfArea \
  --statement-id weather-prod-api-1 \
  --action lambda:InvokeFunction \
  --principal apigateway.amazonaws.com \
  --source-arn "arn:aws:execute-api:ap-northeast-2:550931752661:8ma5wc7ye9/prod/GET/api/v1/weather/*"
# output
{
    "Statement": "{
        \"Sid\":\"weather-prod-api-1\",
        \"Resource\":\"arn:aws:lambda:ap-northeast-2:550931752661:function:GetWeatherOfArea\",
        \"Effect\":\"Allow\",
        \"Principal\":{ \"Service\":\"apigateway.amazonaws.com\" },
        \"Action\":[ \"lambda:InvokeFunction\" ],
        \"Condition\":{
            \"ArnLike\":{
                \"AWS:SourceArn\":\"arn:aws:execute-api:ap-northeast-2:550931752661:8ma5wc7ye9/prod/GET/api/v1/weather/*\"}
        }
    }"
}
--source-arn 의 값도 직접 만들어야한다. 형식은 다음과 같다.
arn:aws:execute-api:<region>:<account id>:<rest-api-arn>:<stage>/GET/api/v1/weather/*
설정도 모두 완료 되었으면 테스트를 해보자
$ aws apigateway test-invoke-method \
  --rest-api-id 6eh7qm8u44 \
  --resource-id r5p13j \
  --http-method GET
이제 테스트도 모두 완료되었다.
마지막으로 생성된 최종 API의 URL은 다음의 형식을 따른다.
https://$api_id.execute-api.$region.amazonaws.com/$stage_name$resource_path"
예제에서 만든 URL은 다음과 같다.
https://6eh7qm8u44.execute-api.ap-northeast-2.amazonaws.com/prod/api/v1/weather/{area} 이다.
WebBrowser에서 호출해본다.
https://6eh7qm8u44.execute-api.ap-northeast-2.amazonaws.com/prod/api/v1/weather/jaeju
이제 만들어진 API를 자신의 도메인을 부여하거나 Cloud Front로 연결하여 사용하면 더 완성시킬 수가 있다.
문제 보안
Permission 관련해서 계속해서 문제가 생기는 경우가 발생했다. ㅜㅜ

아직 정확한 원인을 알아내지 못했다.
차선으로 AWS Console에 접속하여 GET method를 삭제하고 다시 추가하면 해결된다.
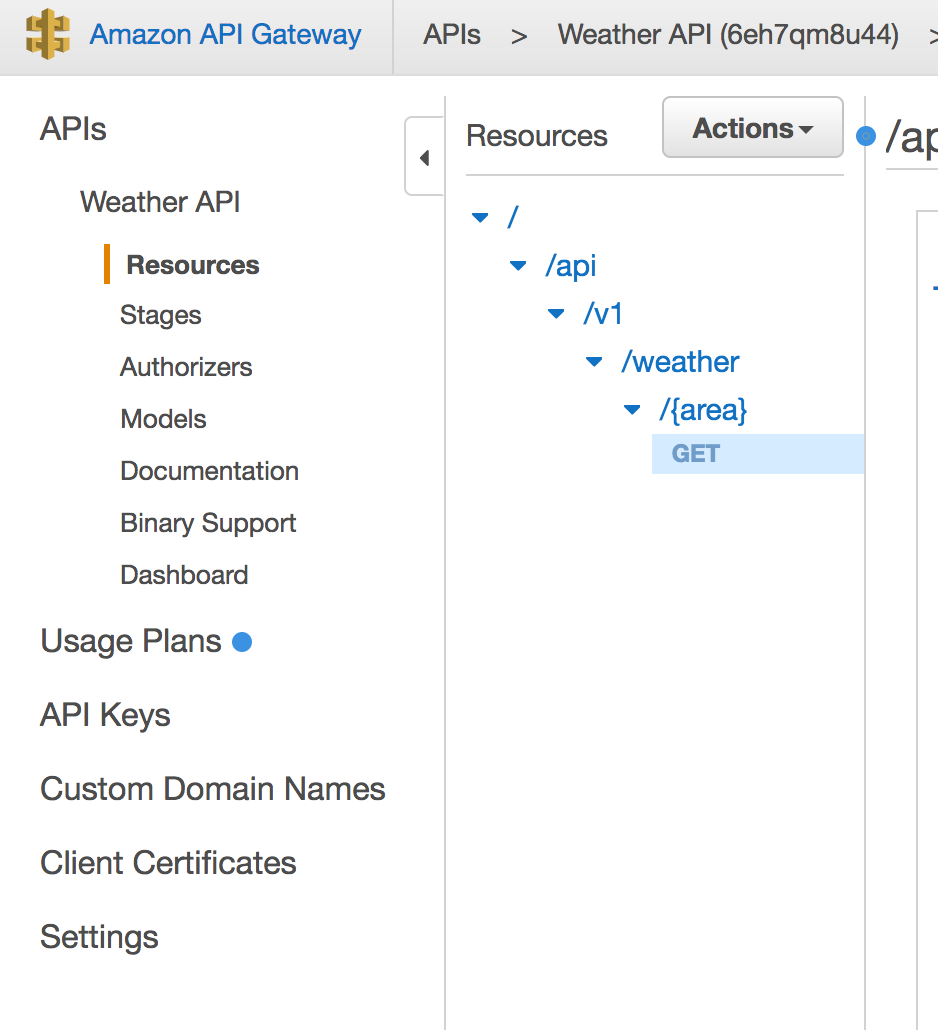
Amazon API Gateway 서비스에서 새로 생성된 API의 Resources를 보면 {area} 아래에 GET Method를 찾을 수 있다.

GET Method를 선택후 Action 을 클릭하면 Delete Method 를 볼 수 있다. 이를 통해서 삭제한다.
그리고 {area} resource를 선택하고 Create Method 를 한다.
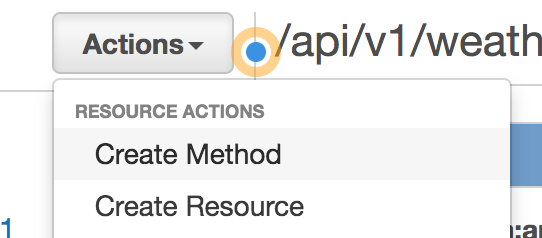
{area} 아래에 생긴 select box에서 GET을 선택하고 체크박스 아이콘을 클릭한다.

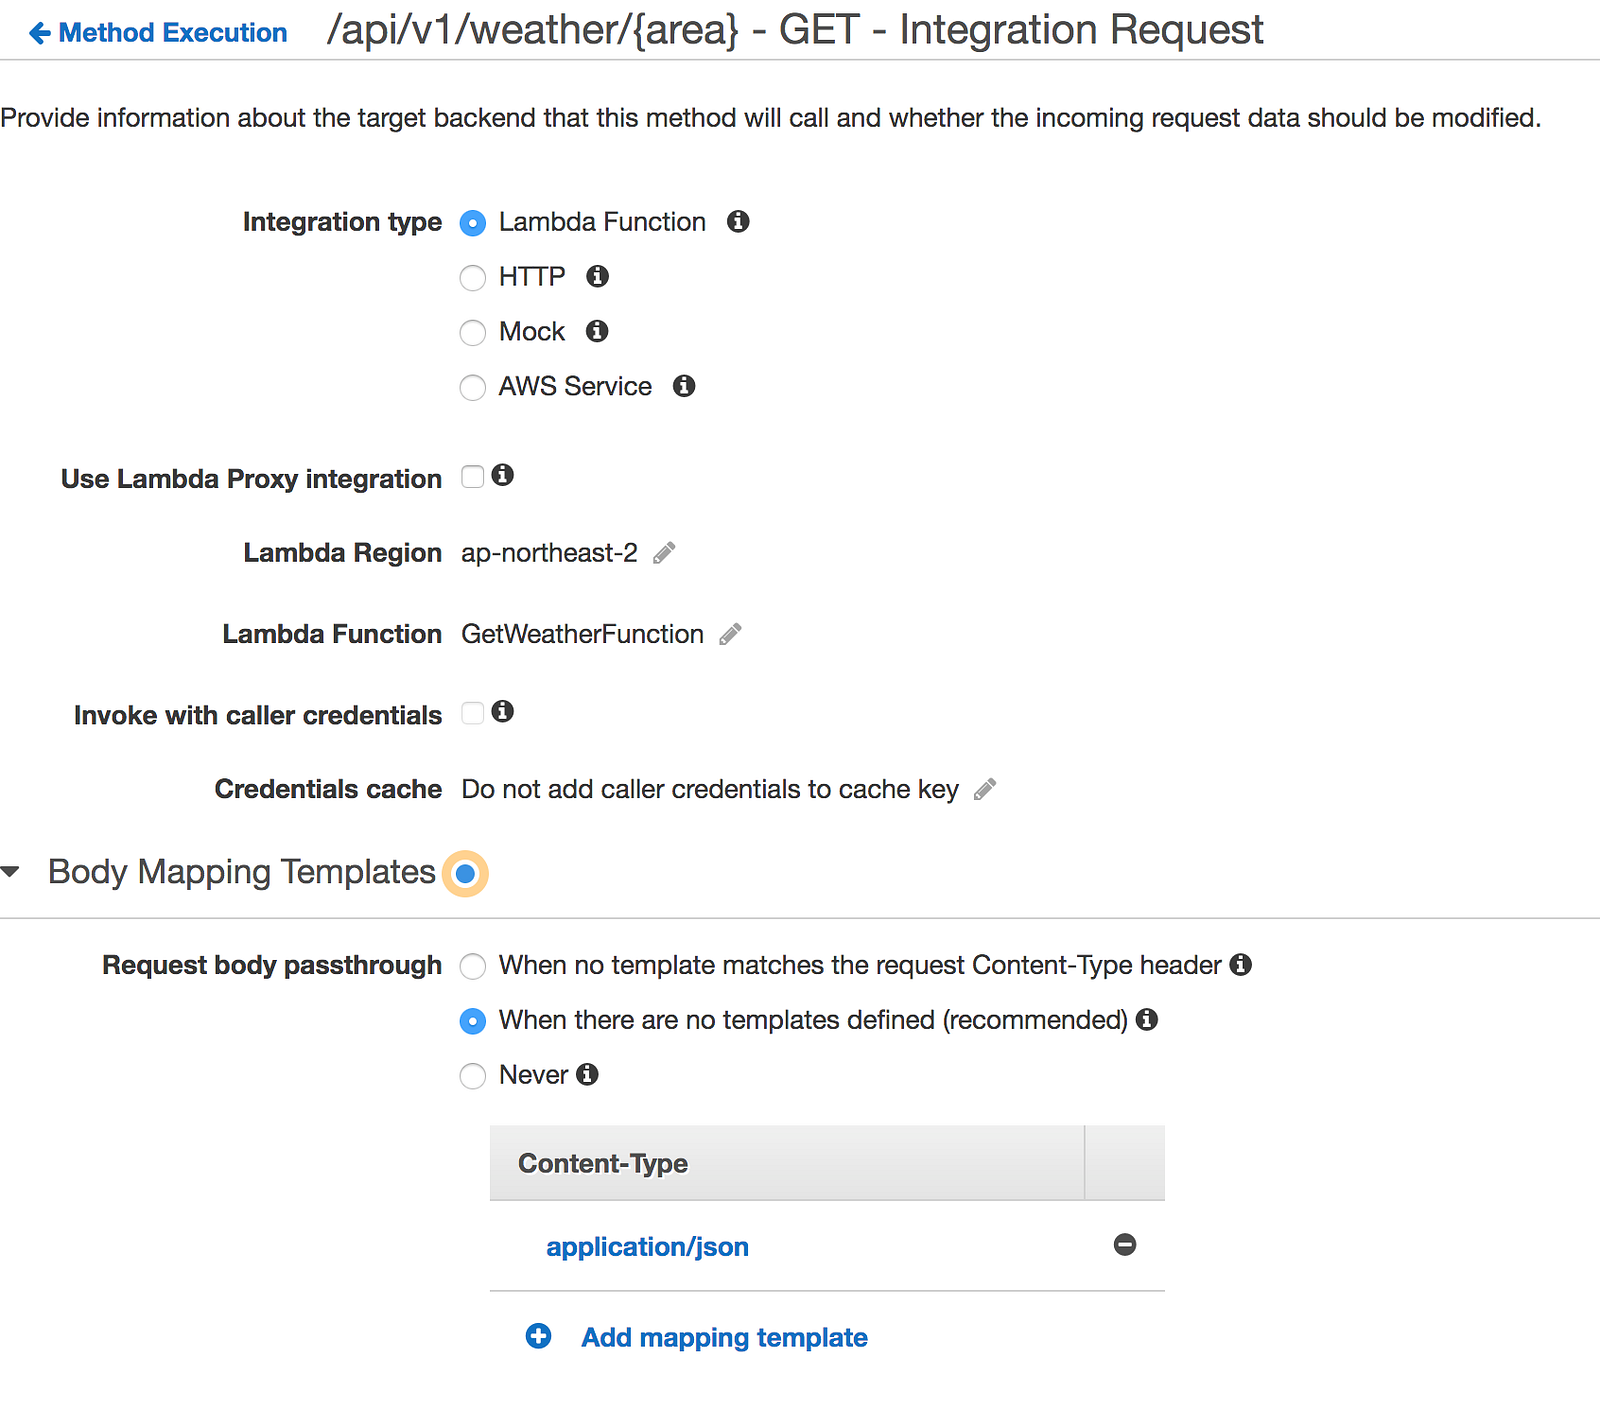
그리고 나타나는 화면에 다음과 같이 설정한다.

Save 버튼을 누르면 새롭게 Method가 생성되는데 다시 URL을 호출하면 정상적으로 표시된다.
Body Mapping
우리는 {area} 를 통해서 URL을 통해서 값을 전달받는다. Lambda에서 그 값을 쉽게 가져올 수 있도록 Body Mapping이 필요하다.
이것은 좀 더 쉽게 AWS Console에서 작업하도록 하자.
AWS API Gateway에서 {area} 에 만든 GET Method로 간다.

위의 화면에서 Integration Request를 클릭하면 세부 정보를 볼 수가 있는데 Body Mapping Templates 를 클릭하면 다음과 같은 화면을 볼 수가 있다.
Add mapping template 를 클릭하고 application/json 을 입력하면 다음의 폼을 볼 수가 있다.
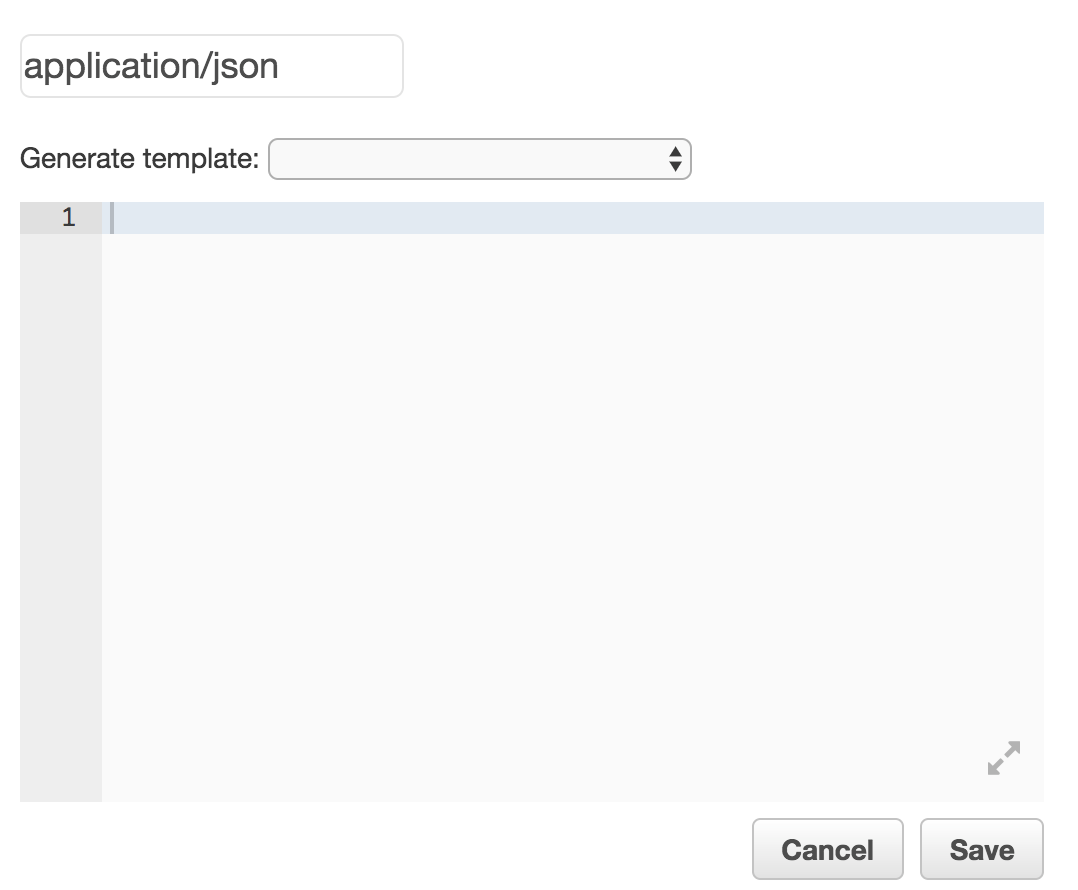
이곳에 다음의 코드를 입력하자.
{
  "body" : $input.json('$'),
  "headers": {
    #foreach($header in $input.params().header.keySet())
    "$header": "$util.escapeJavaScript($input.params().header.get($header))" #if($foreach.hasNext),#end
#end
  },
  "method": "$context.httpMethod",
  "params": {
    #foreach($param in $input.params().path.keySet())
    "$param": "$util.escapeJavaScript($input.params().path.get($param))" #if($foreach.hasNext),#end
#end
  },
  "query": {
    #foreach($queryParam in $input.params().querystring.keySet())
    "$queryParam": "$util.escapeJavaScript($input.params().querystring.get($queryParam))" #if($foreach.hasNext),#end
#end
  }
}
URL의 값을 Body 값으로 mapping 하게 된다.
이제 URL의 마지막값 {area} 부분에 원하는 지역을 입력하면 해당지역에 맞추어 값을 보내주게 된다.
{area} 부분에 seoul , jaeju 등을 입력하면 각 지역의 날씨정보를 받아올 수가 있다.
마무리
API Gateway와 Lambda를 이용하여 Proxy API를 구성하는 방법을 살펴보았다.
위에서 봤듯이 아직 문제도 좀 있고 CLI와 Console을 함께 만져야하는 번거로움도 있지만 차차 해결하여 보완하도록 하겠다.
API Gateway 와 Lambda의 조합은 서버를 관리하는 리스크를 없애고 쉽고 안정적으로 만들 수가 있다.
API 를 호출할 때에 인증부분은 생략했지만 관련된 문서가 많이 있으므로 꼭 해결하고 실제 서비스에 이용하길 바란다.
혹시 잘못된 정보나 부족한 부분은 지적해주시면 반영하겠다.(반말 죄송합니다..)
python이라면 저는 lambda를 사용할때는 zappa라는 라이브러리를 사용해서 개발합니다. zappa는 wsgi 방식으로 개발되면 api gateway 설정를 하지 않아도 작동이 되고 wsgi 방식인 flask, django와 같은 라이브러리의 어플리케이션도 외부의존성이 크지 않으면 손쉽게 포팅할 수 있습니다.
좋은 의견 감사합니다.
zappa 꼭 한번 보겠습니다.
우왕! Lambda도 상당히 관심을 가지고 있는 서비스인데 연속으로 제가 좋아하는 내용을 이렇게 양질로 써주시다니 넘 감사합니다. 하루에 한분의 글을 연속으로 리스팀 하는 경험은 이번이 처음인거 같습니다 ㅋㅋ
감사합니다.
AWS IAM 때문에 머리가 아픈 1인입니다. Lambda를 이렇게 쓸 수 있군요. 좋은 포스트 잘 보고 갑니다. 팔로우 합니다.
감사합니다.